How much does it cost to plow 1 hectare of land with a walk-behind tractor?
Prices for plowing land in the Moscow region
| Plowing services | Unit change | Price per hundred square meters |
| Plowing the land with a walk-behind tractor (large fraction) | weave | 1800 rub. |
| Plowing land with a tractor (large fraction) | weave | 4000 rub. |
| Plowing virgin soil with a walk-behind tractor | weave | 2500 rub. |
| Plowing virgin soil with a tractor | weave | 5500 rub. |
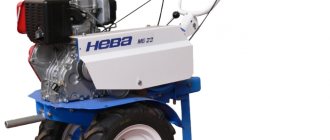
Do-it-yourself cultivation of a plot with a walk-behind tractor: detailed photo instructions
Beginning farmers often encounter problems caused by improper use of the cultivator.
Often the motor cultivator is buried in the ground and cannot be manipulated by the operator. To solve this problem, first of all, you need to understand the reasons for its occurrence. If the cultivator buries itself during plowing, this is due to several reasons.
These include:
- This is often related to the configuration of the equipment. Most often, mini-cultivators are equipped with four cutters. Provided the manufacturer uses high-quality metal for their manufacture, they will have a lot of weight. Because of this, the working elements will pull the cultivator into the soil;
- sharp knives of cutters - if the cutting elements are sharpened, the cultivator will not move forward, but, on the contrary, will bury itself in the ground;
- heavy load on the engine - in this case, the engine will create strong vibrations, which will upset the balance. Because of this, the cultivator will go deeper into the soil on the spot, instead of moving around the garden;
- the second common reason is untimely switching of the cultivator to second speed. This cannot be done when plowing loose soil and in conditions of high humidity;
- The cultivator is often buried due to improperly installed cutters. If you select an angle for attaching them to the coupling mechanism that is greater than that required by the instructions for use, this will also cause the equipment to bury.
Very often, equipment burrows into the ground due to overzealous pushing on the part of the operator. The owner must remember that he only needs to push the equipment slightly in the right direction. If you apply too much force, it will upset the balance of the cultivator, and it will bury itself in the soil all the time.
If the cultivator is buried in the soil, the operator should take a number of measures.
The farmer will need:
- Remove the outer cutting knives from the cutters - this will reduce the weight of the equipment. Another way is to improve the balance of the equipment by installing any small weight at its rear. It is very important to secure the counterweight firmly, otherwise it will fall under the influence of engine vibration;
- To quickly pull the equipment out of the soil, you should switch the cultivator to reverse mode. If it is not provided for in the design, then the equipment will have to be pulled out of the ground yourself;
- During operation, the operator must correctly adjust the position of the cutters. Their cutting knives should always be directed directly in the direction of movement of the equipment.
To prevent the cultivator from getting buried, you need to carefully inspect the transmission before work. This mechanism must be fully operational. The cultivator must not be used if it switches speeds randomly.
If the farmer notices this breakdown, then the transmission gears will need to be inspected. Self-switching of speeds indicates that the gears are touching other equipment components. To fix the breakdown, you will need to adjust the distance between the channels and transmission gears.
To eliminate the risk of the cultivator burying itself in the ground, the farmer must adhere to a list of certain rules.
These include:
- do not rush to cultivate the soil immediately after precipitation. The equipment will quickly sink into too soft, wet soil. In addition, high soil moisture will lead to the formation of rust on cutters and other metal elements of the cultivator;
- adjust the coulter correctly before each use of the cultivator;
- set the equipment gas regulator to the maximum permissible value and always check the gear shift mechanism;
- Cultivate the soil at least twice. When first processing, the opener should be set to the minimum depth position. The second treatment should be done with the opener set to the farmer's desired depth.
When using a cultivator, you must remember that careful checking and adjustment of the equipment are the main ways to help prevent the equipment from being buried.
In order to prevent the cultivator from getting buried and a number of other common problems, the owner of the equipment needs to perform a number of steps to prepare and configure it.
These include:
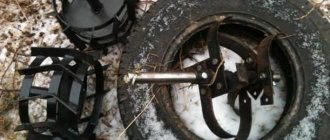
- First, the cultivator must be installed on a thick board and the factory wheels removed from it. Instead, you need to attach one set of cutters on the left and right sides. One set of cutters includes 8 cutting knives - this number of elements gives the best result when processing soil;
- When installing cutters, you need to pay attention to the position of the knives. They should only point forward. The working part of each knife should not be sharp. Otherwise, the cultivator will not move forward, but will begin to bury itself in the ground. In addition, sharp cutters will cut weed stems rather than winding and pulling them along with the roots;
- Next, you will need to install an earring on the equipment, which is necessary for mounting the opener;
- The opener is a bar with holes made in it. It is necessary for precise adjustment of the position of the cutters when cultivating an area;
- To fix the opener, it must be installed in the shackle and secured with cotter pins and a bushing. To do this, select a second hole. The count is taken from the bottom of the opener. Thus, the cultivation depth will be 20 cm. This is quite enough for high-quality soil cultivation and the elimination of large weeds;
- To increase the depth of cultivation, the coulter must be lowered down and attached to the shackle through the upper hole of the element;
- To reduce the plowing depth, the coulter should be raised up and fixed to the shackle through its lower hole.
Having installed and configured the working equipment, you can begin operating the cultivator. To accurately determine the plowing depth, you should make a control run of the equipment across the site.
At this time, you need to pay attention to the operation of the cultivator. If its engine vibrates strongly and smokes, it means that the equipment is subject to excessive loads.
READ MORE: What is better than an electric or chainsaw - which is more reliable, which saw to choose - gas or electric - reviews
In this case, you will need to set the coulter to a shallower depth and check the operation of the cultivator again.
After the first tillage has been completed, the opener should be switched to deeper plowing mode. This arrangement will allow you to properly process the area without harming the working mechanisms of the cultivator.
Cultivation is the cultivation of a plot of land using the no-moldboard method. If, when plowing a plot with a walk-behind tractor, the earth is turned over in layers, then in the case of cultivation, only its loosening occurs to a certain depth, thereby the fertile layer of soil remains in place, which ensures a rich harvest from the land plot.
Preserving the formed fertile layer is one of the main advantages of tilling the soil with cutters, but there is also one drawback. If the cultivation of the land plot in preparation for the winter period is carried out with cutters, and not with a plow, then in the spring after the snow melts, the earth will be compacted again, and you will have to start the walk-behind tractor again and cultivate your land plot.
Cultivation with a walk-behind tractor after the winter period seems to be a complex process, especially if the site was not plowed beforehand. The earth is compacted, and the load on the walk-behind tractor increases several times.
It is worth noting the fact that during cultivation, the cutters may have different depths of penetration, so the quality of soil cultivation may be unsatisfactory.
To achieve the maximum effect from cultivating a plot of land, the following soil cultivation method is used.
If, after the winter period, you first plow the area to a depth of at least 10 cm, thereby loosening the top compacted layer of soil, then you can achieve the most positive result from subsequent cultivation with the cutters deepening by 15-25 cm.
Photo 1
Let's move on to a step-by-step study of how to use a walk-behind tractor to complete the work of cultivating your plot of land.
Step one Photo 8
To obtain high quality tillage with milling cutters, it is necessary to select the correct speed mode. Typically, there are two gears to move the walk-behind tractor forward:
- Low is first gear.
- Overdrive is the second gear.
Unlike plowing, when cultivating the soil, the walk-behind tractor must operate at increased speed, so in this case it is necessary to select a higher gear to increase the rotation speed of the cutters.
Selecting a higher gear reduces the load on the walk-behind tractor engine, and with an increase in the rotation speed of the cutters, the quality of loosening the soil significantly improves.
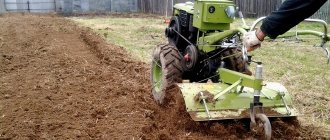
Step two Photo 9
After passing the first strip, we check the depth of tillage. If the depth is satisfactory, then you can continue cultivating the land. The passage of the second strip must be done so that the cutters follow the line left by the coulter, since an untreated area of soil remains between the cutters of the walk-behind tractor.
When performing work on cultivating a vegetable garden, you do not need to press the steering wheel down, you should not push the walk-behind tractor forward - all this can lead to the walk-behind tractor starting to bury itself in the ground.
Photo 10
In photo 10 you can see that the walk-behind tractor has stopped moving forward, the cutters have gone very deep into the layer of earth. To put it simply, the walk-behind tractor is buried in the ground! Why might this happen? Below are the main reasons why a walk-behind tractor breaks down, as well as ways to eliminate them.
1. The soil on the site is very moist and clogs the knives; you need to wait until the soil dries.
2. The coulter is deeply buried in the soil; it is necessary to adjust the coulter.
3. Insufficient speed, it is necessary to set the gas regulator to the maximum value and check the speed mode (select a higher gear for the walk-behind tractor).
4. The soil in the area is highly compacted, so it is necessary to cultivate the area in two times:
- Primary tillage with minimal coulter depth.
- Final tillage is carried out when the coulter is buried to the required depth.
5. The cutters of the walk-behind tractor are installed incorrectly; check that the cutters are installed correctly.
These are the most common reasons why the tillers of a walk-behind tractor go very deep into the ground and the walk-behind tractor stands still.
How to properly set up a cultivator?
The process of adjusting the cultivator
When using the stroke of the working parts, it is necessary to install the frame parallel to the platform. In this case, the pressure rods will rest against the liners so that each paw touches the entire length of the blade. Adjustment should be made if one of the paws does not lie on the platform.
Interesting materials:
How to paint hammer paint on wood? Moment sanitary silicone sealant, how long does it take to dry? How to remove mealybug? How long should you keep duck mullards? What year does wisteria bloom? What year do irises bloom? What year does wisteria bloom after planting? What glue should I use to glue decorative PVC panels? What glue should I use to glue fillets? What glue should I use to glue drywall to the wall?
Speed mode selection
When cultivating a plot of land using a walk-behind tractor
, for high-quality tillage it is necessary to select the optimal speed mode.
From my practical experience, I recommend choosing second gear. This is necessary to increase the number of revolutions of the shaft on which sets of cutters are installed, which ensures high-quality loosening of the soil and uniform depth of tillage. Popular feature articles:
| Adjusting the plow of a walk-behind tractor Cultivating the soil with a walk-behind tractor Choosing a walk-behind tractor for a summer residence |
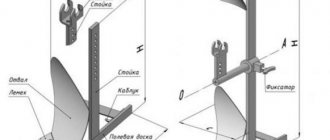
Adjusting coulter depth
Photo 4 The coulter (A) is a kind of soil tillage depth regulator. As can be seen in photo 4, there are through holes in the opener, located at different heights relative to each other. When installing the opener into the holder (B), you secure it through a specific hole using a cotter pin (B). If you need to till the soil with a minimum tillage depth, then in this case attach the coulter to the holder through the lowest hole. If there is a need for deep tillage of the soil with cutters, then attach the coulter to the holder through holes located higher in relation to the lower hole.
What else should you pay attention to when installing the opener? If you have heavy soil on your site or organic fertilizers have been applied, then if the coulter is deeply buried in the soil (attaching the coulter to the holder through the second hole or higher) during soil cultivation, the cutters will bury themselves in it, just as if they were sharpened (a description of this problem is in the section “Preparation and installation of cutters on a walk-behind tractor”).