When preparing hay for livestock, you need to make sure that it is convenient to store. There are different ways.
The simplest one is to pile a haystack of the required height and cover it with film on top (to protect it from rain and snow). However, this method is mainly suitable for storing hay outside.
To be able to store hay in a barn or other storage facility, you need to make bales of the appropriate size. This is done by pressing - using a simple device (press).
We also advise you to read: how to remove a piece of metal pipe tightly driven into the ground without much effort. Read more about this here.
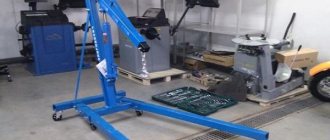
Features of a homemade loading mechanism
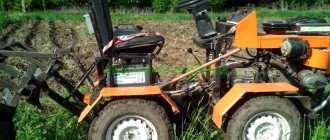
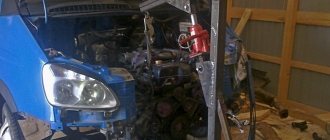
In many farms, you can often find a tractor (T-40 or MTZ), in which the mounted mechanism is driven by mechanical power take-off, a hydraulic system and suspensions (rear and front).
There is an excellent selection of photos of a homemade loader, which shows working options used in action.
If the proper tools and required materials are available, the cost of hangers can be significantly minimized. If you take into account the characteristics of the equipment, it is possible to make a homemade loader for the rear linkage. This will give you the most suitable volume and the required boom size.
Wicket device
When processing the frame with slats, you need to remember about the opening for the gate door. Therefore, experts recommend duplicating the strengthening from the inside. Along the upper perimeter it will be enough, since along the lower bottom it is rigidly fixed with an iron frame.
The simplest option for attaching a folding gate is ordinary folding or door hinges. And the side metal slats should hold it tightly during pressing. To do this, they need to be secured so that they protrude beyond the side edge and end with large notches. The length of the protrusion depends on the steel or wooden valve, or rather, on the thickness of its side edge. The valve can be made of timber, rod or rigid slats.
Basic technique and tools
Practice has shown that the best basis for a homemade loader on the rear tractor linkage is MTZ equipment (Belarus). The tractor can be found almost anywhere in Russia.
When starting work, it is worth having a complete understanding of both the positive and negative aspects of such activity. Clear benefits include:
- For each specific case, you can accurately select the appropriate dimensions, that is, height and length;
- Economic expediency. A simple preliminary assessment of the cost of the forklifts being sold will show a noticeable difference in cost.
What should be considered significant disadvantages:
- Relatively low power when compared with equipment produced in factories;
- The need for metal (in large quantities) and special tools.
For many, according to experts, the third option is beneficial. Do not create a loader yourself, but purchase a cheaper model that has already worked for some time.
As for tools, many will consider the cost of a new high-quality tool to be quite high. Then you can think about buying a used instrument.
It is very important to have experience working with metal structures. In its absence, the quality of the device that needs to be manufactured will be unimportant.
During the work process, it is necessary to join the metal elements well. If they are not adjusted to each other, the strength of the loader will be insufficient.
It is important to make the correct calculation of both balance and length. Otherwise, there is a high probability that the equipment may tip over.
Hand press from a wooden box
To make a press, you can take an ordinary wooden box. You need to put hay in it, compact it as much as possible, close the lid on top, and apply pressure. A couple of days later we take out a compact, neat briquette from the box. To get a homemade hay press with your own hands, you can use the principle of a garlic press. Hay is placed inside and pressed on top with a press. While one holds the press fixedly, the other ties the hay with twine to prevent it from falling apart.
Manufacturing stages
Having chosen MTZ, T-40 or T-25 as equipment, you can begin designing.
- Stage 1. Find drawings (or do them yourself), in which you indicate the appropriate proportions of metal parts and dimensions.
- Stage 2. To make a homemade loader for a tractor, you will need to select the following materials and equipment:
- Steel sheets;
- Profiles (metal);
- Hinged joints;
- Cylindrical elements left over from old hydraulic equipment;
- Corner grinder or cutter;
- Bolts and washers, pliers and hammer;
- Apparatus for welding work.
The base of the bucket is made of profiles and sheets. The selection of metal is carried out taking into account the thickness corresponding to the dimension of the structure being created.
Three joints on hinges, the shape of which is cylindrical. Two will allow the bucket to tilt, the third larger size will allow the boom to rise.
A grinder can be used to cut metal profiles. When choosing a welding machine, you must give preference to the most powerful equipment.
The main indicators regarding reliability, as well as strength and durability depend on the proper operation of the welding unit. All small tools, including pliers, must be available.
Do-it-yourself roll press for a walk-behind tractor
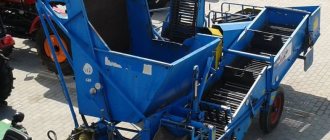
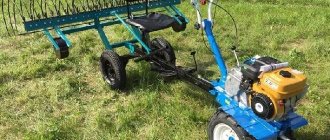
Commercially available balers are usually designed to work with a tractor - regular or mini. However, for small business owners who have only a walk-behind tractor in their arsenal, this is not always convenient - a walk-behind tractor system is often not able to pull a bulky device and provide it with sufficient energy for full operation.
INTERESTING! It is quite possible to create such a unit yourself by selecting the required dimensions and using a minimum of available tools. A homemade baler will not only be within the power of a home walk-behind tractor, but will also collect mini bales that can be easily loaded onto a transport cart and carried around the farm by hand.
Purpose
The hay-straw roll baler is used to perform the full cycle of assembling and packaging hay or straw, providing fairly high quality results:
- A selection of dried hay from windrows in the field;
- Pressing a selection of dry plant mass;
- Simultaneous twisting of the pressed fabric into a roll.
Photo of a homemade roll baler
Advantages and disadvantages
The roll hay collection unit with a press is the most popular among other similar equipment. Choosing exactly this type of picker for making it yourself will ensure:
- Initially, the ease of setup provided by the simplicity of the machine design.
- The work involves gentle baling without deformation or crumbling of the plant mass.
- The ability to create hay bales of minimal size that can be easily carried and stored by one person.
- The subsequent convenience of storing and using the resulting hay rolls.
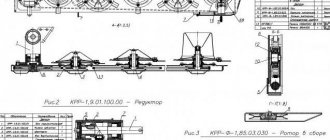
Drawing of a homemade hay baler with your own hands
1- frame; feeding conveyor; 3 - rollers; 4 - anterior chamber; 5, 6, 7 — working conveyors of the anterior chamber; 8 - pressing chamber; 9 — belt working element; 10 — tension device; 11 — pressure sensor; 12 — flashing device; 13 — supporting weights; 14 — support rollers; 15 — driving drum; 16 — press chamber body; 17 — support rollers; 18 — electric motor; 19 — safety clutch; 20 - gearbox. With homemade work, it is almost impossible to 100% replicate the complex design of factory pick-ups, which, even with a reduction in size, require a tractor power of at least 16 - 20 hp. Therefore, a binding apparatus is usually not installed in it, and the roll may not be so dense.
Build process
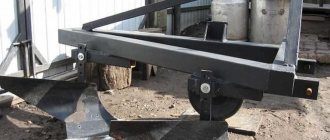
When making a homemade mini tractor loader, you need to follow certain rules.
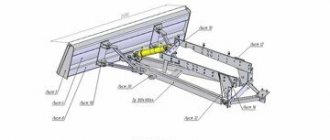
- At the first stage, a base is made in the form of a rectangle with pipes having a square cross-section. You can use metal corners for these purposes. The lower edge of the frame is intended for mounting on a canopy, so it protrudes slightly. A second rectangle (made of pipes) is strengthened in the central part. The hydraulic cylinder is installed directly on it. The upper part is intended for the manufacture of spacers, as well as hinges for the boom.
- The arrow itself is performed at the next stage. You will need metal profiles connected at a 30 degree angle. The hydraulic cylinder and the ends of the base are fixed to the structure in the upper part. The hinge (cylindrical in shape) complements the central part of the boom. This place is intended for fixing movable connecting sections. They are attached by means of cylinders, as well as crossbars for mounting the bucket.
- The next stage is making the bucket. To do this, it is enough to use four steel sheets. You can replace them with one of sufficient size. The cut metal rectangles are welded together. The front one is located at an angle.
When manufacturing a loader based on MTZ, do not forget that the length of the boom should not be more than two meters.
Such a requirement must ensure the stability of the equipment during operation, without giving any possibility of it unexpectedly overturning.
Step-by-step instruction
Sequential assembly of a homemade hay baler to a walk-behind tractor will make installation work easier and done with the highest quality. To independently create a convenient baler for your home walk-behind tractor, you will need to complete several stages of work:
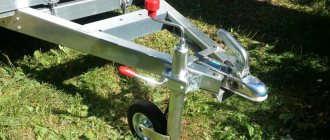
- You need to start by assembling the chassis - the base on a pair of pneumatic wheels.
- A header and a pick-up with a conveyor are installed on it.
- A press chamber is mounted separately, in the lower part of which rollers and a pressure grid are installed, and in the upper part there is a plate on a spring, which will press the compressed layers for more dense winding of the roll.
- Next, we assemble the drive that gives movement to the working parts of the machine - we connect the cardan to a 2-speed gearbox, from which a chain drive will go to the rollers and the pick-up conveyor.
- On the mechanism of the hay picking device, we install gears of a larger diameter than on the rollers in order to increase the picking speed and the force of simultaneous compacting.
If you need to obtain better results when collecting hay with a walk-behind tractor, you can use a simpler and longer-term, but effective option - dividing the work into collecting grass mass with a walk-behind rake and pressing it with a separate manual or electrical device. In the video, a homemade pick-up press made by yourself:
Photo of a homemade loader
Rake
A rake for a walk-behind tractor is an attachment that is attached to the unit using a special adapter; you can also find models that are mounted using a hitch.
In addition, this equipment has several modifications:
- belt rakes (tedders);
- cross hay rake;
- rake “Sun”.
Cross hay rake
This attachment is used for high-quality raking of hay or grass into windrows.
The attachment is used in conjunction with an adapter that turns the walk-behind tractor into a mini-tractor. The working body is raised with the help of a lever and lowered with it. Work is carried out with the rake lowered.
Installation of this canopy is possible both in the front part of the walk-behind tractor (there is a special rotating mechanism) and in the rear part. The rake is made of durable steel, protected with a special anti-corrosion coating, and has a long service life.
Review of other options for hay making devices
If the walk-behind tractor or motor-cultivator does not come with a sufficient number of attachments, the owners have to either buy various attachments or make them with their own hands, taking into account specific needs. Each owner solves these issues in his own way.
Thanks to the capabilities of modern production, consumers are offered a wide range of different equipment options for mowing cultivated and wild grasses, windrowing, mowing and chopping weeds, and transporting them to storage. Square and round balers compactly pack hay and straw, and tedders turn the hay for optimal drying.
Rakes
Depending on the method of aggregation, the nozzles can be belt, side, or transverse with tedders. Some models can be used not only for collecting hay, but also for cleaning the area and removing snow, no worse than standard rotary auger snow blowers. In a specialized network you can find attachments for walk-behind tractors in a huge assortment for the most demanding and fastidious owners.
Homemade attachments and devices for mowing, making hay and packing into bales are generally difficult to cover with any classification - folk craftsmen manage to create unique multifunctional equipment, the price of which is an order of magnitude lower than factory versions, and the quality of manufacturing and operation is not inferior to industrial designs.
In addition to the most common models of rotary (disc) and segment mowers, flail mowers are also manufactured. This is a rather rare option, since flail mowers are a very dangerous device. Flail mowers work as a grass chopper, require more power and are more often used in combination with tractors or mini-tractors.