03/04/2022 18,289 GAZ Gazelle
Author: Ivan Baranov
Many drivers, paying tribute to fashion, want to replace the old instrument panel on a Gazelle car with a new panel. The article is devoted to the “Gazelle tidy”: purpose, possible malfunctions. Instructions are given for removing and installing the torpedo.
[Hide]
Panel purpose
The main purpose of the instrument panel is to inform the driver about the current state of the car. On the Gazelle, all instruments and indicators are located on a small area of the torpedo. Drivers get used to this arrangement of instruments.
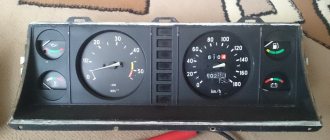
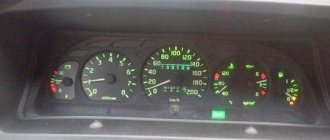
The old-style instrument panel on the Gazelle contains from 3 to 5 round dials, which are surrounded by different indicators. The largest dials are the tachometer and speedometer. The main instrument is the speedometer, so it is always located in the center.
The third largest device is the coolant temperature gauge. In addition, the dashboard contains dials for charging the battery and the amount of gasoline. Less commonly, an oil dial is present.
Old style tidy
GAZ Gazelle.
New panel instead of the old one
There was a problem with replacing the conventional instrument cluster (AP) with an electronic one (EURO3) Click to expand.
3.14. Disengaging the hood fuse
Rice. 9.50. Instrument cluster (rear view) To monitor the systems, the car is equipped with an instrument cluster in which control devices are installed: voltage indicator, tachometer, speedometer, engine temperature indicator, oil pressure indicator, fuel level indicator and signaling devices.
Updated look
Drivers are replacing their old dashboard with a business panel because of its attractive appearance. The second reason for the replacement is that the Gazelle Business dashboard has expanded functionality and more options for providing information about the operation of the car.
The Euro panel is equipped with two large dials for the speedometer and tachometer and two small ones, informing about the amount of gasoline and coolant temperature. The remaining indicators are located in the center.
The simplicity of the euro panel makes it easier for the driver to perceive information. The disadvantage of the new panel is the complexity of installation. True, the pinout is contained in the instructions. If a car enthusiast has experience in such work, then it will not be difficult for him to install a new device.
Pinout of the Gazelle instrument cluster
Functional
If the installation is done correctly, the new instrument cluster works properly. The only drawback is the weak backlight, which is almost invisible at night. It is recommended to install LED instrument lighting along the entire perimeter of the panel (the author of the video is Vodila Chelyabinsk).
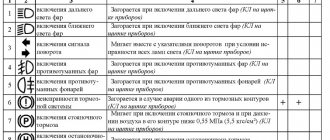
The Gazelle is equipped with 20 indicators that indicate that one of the vehicle’s components or sensors is not working.
If the “Stop” light comes on along with one of the icons, it is advisable to eliminate the problem before starting to drive.
Using indicators, the dashboard displays information about the status of the main components and assemblies of the vehicle. A detailed description of the purpose of each of them can be found in the installation and operating instructions.
Typical faults
After replacing the device, the following malfunctions are possible:
- either part of the instruments or the entire panel does not work;
- the arrows on the instruments stop;
- incorrect sensor readings.
You can solve the problem by doing the following:
- First you need to check the power: the integrity of the wires, the quality of the contacts.
- If everything is fine with the wiring, it is possible that the controller is broken. It is better to replace the entire panel than to repair the controller.
- The sensors may not work if the connection is poor or the fuse is blown.
- You can try to restore the operation of the sensors by pressing the “Mode” button.
When replacing the instrument cluster, the electronics are not affected, but problems occur with them. The problem is solved by replacing the fuses and updating the wiring.
Possible problems
Even if you change the panel to a Gazelle, you won’t be able to get rid of all the problems. Quite often problems occur after replacement. Here are the most common ones:
- individual sensors or the entire panel stops working;
- instrument readings “freeze”;
- The sensors lie, the indicators are incorrect.
Most drivers panic and then take the panel apart, which only makes things worse. Here are some solutions for most panels:
- The first thing you should always do if such devices malfunction is to check the wire contacts. A break or breakdown can cause a malfunction. You should also inspect the food.
Pinout and instrument cluster on the Gazelle panel
Since the electronic system is not improved by replacing the panel, and the devices are more demanding, problems occur with the electronics. Replacing the wiring and fuses most often solves the problem. Generally, reviews about the operation of the instrument panel are favorable, but on some older car models there are a number of problems that can only be solved by installing original instruments.
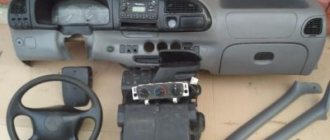
Installing and removing the torpedo
The dashboard is included in the Euro kit for Gazelle. On the latest versions it is installed at the factory. Drivers of older models also want to upgrade their dashboard. Replacing the device is not difficult: the design of the fasteners is almost identical, and the panel seat is the same in size.
Replacing a torpedo entails significant alterations, since it differs in both the shape and design of the fastenings. The car owner has to think about what changes to make himself. Sometimes, to repair the stove, you have to completely dismantle the torpedo. To do this, you need to know how to remove and install the torpedo back. For this procedure you need to prepare a set of keys and screwdrivers. An assistant may be needed.
Removing a torpedo on a Gazelle
The removal procedure consists of the following steps:
- Before starting work, for safety reasons, the vehicle should be de-energized. To do this, you need to remove the negative terminal from the battery.
- First of all, all the pads are removed. Use a Phillips screwdriver to unscrew the screws securing the upholstery.
- Then, by unscrewing two screws, remove the casing from the steering column.
- Next, remove the trim from the instrument panel, remove it by pulling the steering wheel towards you until it stops.
- We unscrew the fastenings of the instrument cluster and dismantle the tidy, disconnecting all the wires.
- Next, remove the steering column along with all connections.
- At the next stage, turn off the power supply to the lighting: rear fog lights, interior lighting. You also need to turn off the electric headlight leveler.
- Then unscrew the air damper bolt.
- Disconnect the cable from the carburetor by unscrewing the screw securing the cable sheath.
- Next, turn off the cigarette lighter and hazard warning lights.
- Using a screwdriver, unscrew the two bolts near the stove control.
- After unscrewing the 10 bolts securing the panel, carefully remove it from its mounting location.
- Now we disconnect the air ducts from the deflectors.
- Remove the carburetor damper.
- We dismantle the panel by disconnecting the hoses of the heater air ducts.
- Now you can remove the torpedo. It is better to do this with an assistant, as it is very heavy.
- Installation of the torpedo is carried out in the reverse order.
After installing a new torpedo, some indicators may not work due to incompatibility between the system and the new torpedo.
Dashboard,
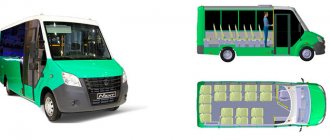
"Gazelle" is a very popular truck in Russia. A lot of vehicles for other purposes are also produced on the basis of the GAZ-3302. This includes both public transport and passenger minibuses.
What do all these models have in common? They are united not only by a common frame structure, but also by a single instrument panel. "Gazelles" of different years of production were equipped with different instrument panels.
Well, let's look at exactly what and what the features of each shield are.
Purpose
The function of any “tidy” is informational. This also applies to the Gazelle Business instrument panel. In a small area of the dashboard there are all the necessary indicators, lights and scales. Usually the shield is located behind the steering wheel, in front of the driver’s eyes. But there are also exceptions.
For example, in the UAZ Hunter the panel is located in the center. But we won’t consider the tidy of this car for now. Let's return to our Gazelles. Externally, their panels consist of three to five round dials with several alarm sensors.
In any shield, the main dials are:
They are the largest in size and located in the center. In addition, on the instrument panel (Gazelle old and new) there are a lot of auxiliary elements. These scales inform the driver about:
- The current engine temperature (namely the coolant in the engine jacket).
- Oil pressure in the system.
- Fuel level in the tank.
- Voltage in the on-board network.
If we consider more modern devices, information about the current time will also be shown here.
Note that the Gazelle instrument panel can be found on other cars. These are Sobol and Volga. The device has the same connection diagram. Externally, these shields look identical.
Types
There are several types of these panels:
- Old Euro-1 model. Installed on cars from 1994 to 2002 inclusive.
- Old Euro-2 model. These shields can be found on Gazelles with a new “face” (with teardrop-shaped headlights).
- New sample. They are still installed to this day on Next, starting with Gazelle Business.
Below we will look at the features of each Gazelle instrument panel.
Panel "Euro-1"
This tidy was installed on both “Sable” and “Gazelle” of all modifications. The reader can see what its design is in the photo below.
From a distance, this shield resembles the panel of a Zhiguli-seven. But still, this is an original development. There are no electronic signs here. Only available:
The shield was produced in this form for about eight years. No changes were made during this period.
This device is also called “Rizhskaya”. It was also installed on the Volga, in particular the 31105 series. This shield has a slightly different design and appearance. It was developed specifically for the new torpedo, with a rounded visor. There are no new sensors here, but the layout of some dials has changed.
The speedometer scale has now become larger in diameter, and the antifreeze temperature and oil pressure sensors are combined into one “well”. The changes also affected the odometer.
If previously the main odometer was designed for a mileage of up to one hundred thousand (after which it was reset), now its limit is one million kilometers.
Of course, few people have seen a Gazelle with similar mileage, but still adding one digit has made some work and maintenance much easier (no need to guess and think about when to replace the chain, or even overhaul the engine).
According to reviews from owners, the new Riga Gazelle instrument panel is much more convenient to use. Also, the tachometer and speedometer needles do not “walk” here. Since 2003, these scales are electrically operated rather than cable operated. The readings have become more accurate.
"Euro-3"
For the first time, such a tidy appeared on Gazelle Business cars. The old-style Gazelle instrument panel went out of fashion, and all Gazelle drivers began installing the updated panel in their car. The Volga owners also made the same modifications.
Indeed, the new dashboard has become much more informative, convenient and practical. What can I say, its design is much more modern. As reviews say, it makes the interior look fresher and less dull.
The reader can see what the updated tidy looks like in practice in the photo below.
But it is worth noting that this shield has slight differences in design. So, on some models the instrument scales had a darker shade. But this did not affect the information content in any way - the reviews say. Another feature of the new shield is the presence of sound indication. Now the driver can hear a characteristic signal if:
- The fuel level has dropped to the minimum level.
- The engine temperature increased to 105 degrees Celsius or more.
- The handbrake was not released. What is noteworthy is that the signal is triggered only when the car starts moving at a speed of 2 kilometers per hour or more.
The new tidy has large modern dials. Now the speedometer and tachometer scales are in opposite places (compared to the “Rizhskaya”), and their diameter has become the same. On the left is the fuel level indicator, and on the right is the coolant temperature sensor.
But where did the mains voltage and oil pressure indications go? The answer is simple - this data is in the on-board computer. It is located in the tachometer “well”. By default, only time is shown here. But if you click on the button on the right, you can switch the mode.
So, the driver can find out the data from the voltmeter and oil pressure in real time.
What’s noteworthy is that when the oil drops below 0.2 bar, a flashing window with a sensor will light up.
There is a digital odometer on the left side. The top shows the total mileage and the bottom shows the daily mileage. It is reset by pressing the key on the left. Also on the new model panel there are 20 indicators (including ABS and EBD), which light up in the event of a malfunction of one or another system.
Principle of operation
The algorithm of action for all panels is the same. Each light bulb and arrow interacts with a specific element. So, the readings of both speed and mileage come from the sensor that is screwed onto the box. Engine information comes from the crankshaft sensor. And the voltage data comes from the generator terminals.
What is noteworthy: if you do not connect the voltage contact, the car will not charge even with a working generator. This problem is accompanied by a red battery light on the panel. If it lights up, it means there has been a break and the wire does not fit into the connector of the device.
As for oil pressure and coolant temperature, this information comes through the terminals from the corresponding sensors.
Problems
Are there any problems associated with the above shields? Unfortunately, owners are faced with the problem of a malfunctioning device. This happens least often with the very first panel, the old model. It works like a clock.
The Riga panel may not accurately provide information about the oil pressure level. Also, the speedometer often malfunctions here. Along with this, the odometer refuses to work.
But most of the complaints, surprisingly, are caused by the new instrument panel of the Gazelle Next and Business.
Thus, the most common malfunction is the kilometer reset (and total) at a mileage of 60 thousand kilometers. Because of this, it is impossible to accurately control the passage of maintenance and a number of other repair operations. But that is not all. The daily mileage is also reset to zero - reviews say. This happens if the voltage in the network is less than 11.5 Volts. Also, the data is erased if the terminals are removed from the battery.
What else?
The new Gazelle instrument panel does not work even when installed in an old Gazelle. It needs to be mounted correctly - simply switching the pads with contacts will not work. For successful installation, you need a pinout of the Gazelle Business instrument panel.
Among other malfunctions, it is worth noting that the speedometer and tachometer needles are stuck in one position. Most owners begin to panic and completely disassemble the shield. But you don't need to do this. The problem lies in insufficient contact of the connectors.
Installation
To install the panel, you must remove the old shield. To do this, you need to dismantle the steering wheel using a special puller and unscrew a couple of screws of the decorative lining of the dashboard. You should also unscrew the bolts securing the tidy itself.
To do this you will need a 8" head. After this, you can remove the old panel and put a new one in its place. But as we said earlier, simply switching the connectors will not work. You need a pinout for the Gazelle Business instrument panel. There are four pads in total - XP1, 2, 3 and 4. Let's look at how to connect each:
- XP1. The first, fifth, sixth, seventh contacts are connected to ground. As for the rest, they connect to the sensor signals. The first contact is the air damper closing relay, the third is the DTOZH, the ninth and eleventh are the oil pressure and fuel level sensors in the tank, respectively. The remaining contacts are “Reserve”. We do not touch them and do not connect anything to them.
- XP2. Contacts number two, four, nine are connected to ground. The “plus” terminals are all from the fifth to the thirteenth.
- HRZ. Terminals two and thirteen are connected to the +12V positive contact. The first, eighth and twelfth terminals are connected to ground. The sixth connector is the speedometer speed sensor, the ninth is the ignition coil, the eleventh goes to the engine control unit.
- XP4. Here, almost all contacts need to be connected to ground. This applies to connectors from the first to the seventh inclusive. Only the sensor for the presence of water in the fuel filter (if there is one) and the glow plug switch are positive. These are connectors number eight and nine respectively.
By the way, if the car does not have an ABS and EBD system, the outputs to these sensors must be plugged. How? It is enough to connect them to ground.
So, we found out what the Gazelle instrument panel is, what types it comes in and how it is connected.
Source: https://FB.ru/article/370982/schitok-priborov-gazel-ustroystvo-printsip-rabotyi-i-otzyivyi