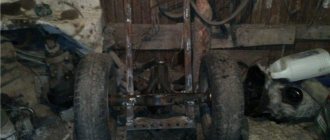
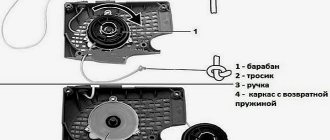
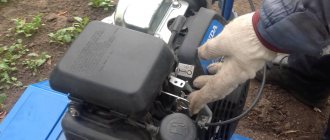
My son finished Minsk-Krokha and tried to start it, but it didn’t work out.
I took a look and the problem was in the spark. There is a spark but it is very weak. threw another candle and a coil - the same thing. I replaced the capacitor with a car one - the same thing.
There is catastrophically not enough time to study the principle of operation of a magneto. Maybe there are threads on this topic, who can tell me where to dig?
The magnet is new, the contacts also look almost new, clean, the gap is normal, there is no shortness in the anvil. Initially, he assembled it as it was assembled before us, there the wire to the light from the horseshoe went to ground. During the cold run-in (I twisted the crankshaft by the magnet bolt with a hammer drill), the magnet got hot (I think because of this connection)
Of course, an electronic one would be best, but again, I don’t have time for that at the moment, and the child can’t handle it on his own. Let us at least travel as usual for a start.
Capacitor faults:
- broken leads
- breakdown
- poor contacts of the capacitor body with ground and the insulated conductor with the breaker terminal
These malfunctions are determined on an ignition test device (IPD) or using a warning lamp. A test lamp connected in series with the capacitor and connected to a 220 V AC network does not light up when the capacitor is working, but after disconnecting the capacitor from the network, a spark appears when bypassing. If there is a break in the capacitor, the lamp does not light and the capacitor does not charge. When the capacitor breaks down, the lamp lights up. The damaged capacitor is replaced.
Why does Ant, Tula not pull and start badly?
It would seem that this is happiness: buy a new piston at the nearest dealership, quickly disassemble the engine, peel off the old scabs from the parts, put everything back together and enjoy unsurpassed drive. But no guys, it’s not that simple. If everything were so simple and easy, the masters would have already become rich long ago and would look at you with contempt, and not with lust as they do now.
The first sign that something is wrong with the engine is poor starting and poor traction. All your attempts to adjust the carburetor or ignition for the hundred-fifty-thousandth time will lead to nothing. Because poor starting and weak traction are 100% a symptom of weak compression in the crank chamber and in the combustion chamber. Today's case confirms this.
Breaker faults:
- burning or oxidation of contacts
- short circuit of an insulated contact to the body
- cam beat
- change in contact gap
- broken contact spring
Oxidation of the contacts is facilitated by a faulty capacitor. If necessary, clean the contacts with fine glass sandpaper. Worn tungsten contacts are replaced with new ones. The normal gap between the contacts should be within 0.2...0.25 mm. Defective contact reinforcement springs are replaced with new ones.
Why won't the walk-behind tractor start?
Repair of a walk-behind tractor will be successful if you correctly diagnose the walk-behind tractor.
The reasons for unit failure are very different:
- The hole in the gas tank is clogged;
- The fuel supply channels are clogged with debris;
- The air filter blocks the entry of clogged air;
- Carburetor failure.
Gasoline and diesel walk-behind tractors must be carefully prepared for seasonal work. It is important to make sure that all structural elements are in place and securely fastened.
Installed Subaru engines or engines of other brands may not start after a long period of inactivity, especially in winter. Incorrect storage conditions for equipment also have a negative impact.
The following malfunctions may occur:
- The contacts in the electrical wiring have oxidized;
- Water has entered the oil or fuel;
- The integrity of the wire insulation has been compromised;
- Debris has accumulated in the carburetor jets.
Before starting the walk-behind tractor, you need to look at all the connections in the units of the device, check the integrity and connections of the throttle, reverse and clutch cables. If clamps or kinked cables are found, this must be corrected in order to start the unit.
It is necessary to check the amount of oil in the crankcase. Lack of lubrication can negatively affect the piston group. A diesel or gasoline walk-behind tractor may not start if there is not enough oil. Some models have low-level protection installed; if it is not there, you need to constantly monitor the volume of lubricating fluid.
It is important to take into account the quality of the gasoline being poured. The walk-behind tractor must be refilled with the brand recommended by the manufacturer, then the unit will work without interruption. Two-stroke engines operate on separately prepared fuel: gasoline and oil. It is important to maintain a strict ratio of substances.
Magneto transformer malfunctions:
- insulation damage
- short circuits and breaks in the windings, leading to disruption of sparking
- nicks and rust on the core support surfaces
Breaks in the windings are checked using a test lamp. In the absence of external damage, the magneto transformer is checked for uninterrupted spark formation on the KI-968 stand.
Before testing the repaired magneto, check the correct assembly, the presence and tightening of fasteners, the smooth rotation of the rotor and sparking when rotated by hand.
In the assembled magneto, the angle of rotation of the rotor from the neutral position until the breaker contacts opens, the gap between the breaker contacts and the force transmitted by the spring to the breaker contacts are checked and adjusted. The magneto is also checked for uninterrupted spark generation, the condition of the high-voltage insulation, the correct alternation of sparks and the characteristics of the starting accelerator or ignition timing clutch.
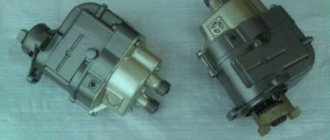
The source and distributor of current is what a magneto can be called. Appropriate types of current are used inside carburetor engines to ignite the combustible mixture. In fact, thanks to this mechanism, mechanical energy is converted into electrical energy. A tractor magneto often comes complete with an internal combustion engine.
Symptoms
The engine starts with great difficulty, there is practically no traction. The owner swears and swears that everything was installed new (you also know the symptom).
In such cases, first of all, you need to check the spark, the ignition timing, the carburetor, the rubber gaskets under the carburetor (the gaskets often burst and thickly and begin to suck air through the cracks) and, just in case, the air filter. If nothing suspicious is found in these devices, measure the compression in the combustion chamber and if it is below 8 kg/cm, feel free to open the piston
How does a magneto work?
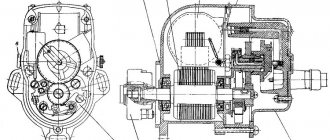
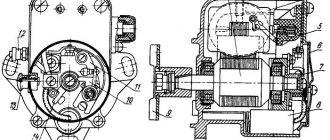
The device diagram will have the following description:
- Opposite the magnetic core shoes are the pole pieces from the rotor.
- The transformer core causes the power lines from the magnets to begin to close.
- When the magnet is in a 90-degree position during rotation, the main element becomes the gap between the tips and shoes.
- It is imperative that the lines of the magnet intersect with the turns of the windings of the transformer. Due to this, the electromotive force acquires induction. Ignition is also used in the processes.
The EMF acts on the device in such a way that when closed contacts are used, a magnetic flux appears at the transformer core. As a result of opening the circuit, the current disappears from its primary type. Because of this, the magnetic field is sharply reduced.
Induction of EMF up to 25,000 Volts occurs when using a secondary winding. Self-induction of EMF up to 300 V will appear only if you open the contacts from the primary winding. The primary type circuit produces a self-inductive tone, which causes the magnetic current to disappear more slowly. Such situations are characterized by a decrease in the EMF for the secondary circuit.
Parts often begin to burn when sparks appear at the contacts. Connecting a capacitor to the structure is carried out in order to avoid such consequences. Then there is no spark between the contacts in the magneto, which is described above.
The rotor can be easily rotated to a 90 degree position. Afterwards the primary circuit is opened with a breaker. This moment is called the magneto outline.
Device diagram
The location of the transformer part inside the magneto on the tractor is characteristic. The part is pressed onto the shaft, helping to create a high voltage current. Another important part of the design is the rotor, which constantly performs the function of a permanent magnet rotating on two bearings. The cam is attached to the front of the rotor shaft. On the back there is a so-called leash. How each part works is easy to understand.
When the magneto device is mounted on the engine, the wire is supposed to fit into the groove of the gear. The case is closed with a corresponding cover, which is used as a base for installing contacts from the breaker and terminals at the transformer windings. The breaker itself is also closed with an easily removable lid.
The first reason has been dealt with
The second reason is leaky crankshaft oil seals or a broken flange on which the dynostarter stator is installed. Indirectly, there is little evidence of a leaky oil seal on the cooling fan volute. If you see oil dripping from the cavity of the dynostarter, immediately remove it and see what’s wrong there.
The inside of the snail is covered in oil: a sure sign of a dead seal
That’s right: the cavity is full of oil, the oil seal is dead, the flange is not screwed to the crankcase. Here’s your “capital”...
The spring is either original, or it was found in a trash heap and then stuck here - it’s not clear. Another thing is clear: the spring should stand on the cuff, and not hang snot on the shaft
Behind the flange it’s the same story: a broken spring
The flange was unscrewed and something like Niagara Falls was siphoning through it... This is evidenced by the presence of oil on the gasket
Another point: a new crankshaft was installed in the engine. Naturally they took the Chinese shaft, but there were no others. How is this shaft working? The bad: the keyway on this one was broken. Most likely, the metal from which this obscenity is made is raw and the cone is machined incorrectly. If you decide to buy a new crankshaft, it’s better to buy a used Soviet one, restore it, and don’t mess with this crap
Diagnostics of technical condition
Diagnostics is carried out by performing the following procedure:
- The first stage is connecting the high-voltage cable to the voltage terminal.
- The second end of the cable is constantly held at a distance of about 0.5-0.7 centimeters from the device body.
- Maintaining position near the wire. Next comes a sharp turn of the rotor in the direction of rotation. The spark should jump as a result of this movement; if everything is in order, the magneto is adjusted correctly. If there is no spark or is too weak, there is a high probability that the installation requires a malfunction check. If necessary, adjustments are made.
Common malfunctions and their repairs
Here are just a few of the most common problems magneto owners may encounter:
- Failures during sparking. There are several reasons for this situation and ways to resolve the problem. Possible problems include: contacts burn, oxidize; the gap adjustment is violated; the lever cushion at the breaker is worn out; The capacitor element was broken. If an element fails, it is completely replaced. When the problem is in the gaps, they undergo additional adjustment. Contacts are also changed or completely cleaned. How to set up the magneto is described further.
- Complete lack of spark. This often happens because the transformer wiring has broken, there has been a short to ground, or the insulating layer that supplies the high-voltage cable has broken through. If problems arise with the transformer, the unit must be replaced. You can eliminate the short circuit itself or change the cable when an insulation breakdown occurs.
- A broken capacitor is the most likely cause of a spark that is too weak. In this case, the part must also be replaced.
Why is there no spark at the spark plugs?
There can be several reasons for the lack of spark at the spark plugs. Most often the culprits of the malfunction are:
- Accumulator battery;
- High voltage wires;
- Ignition coil;
- Distributor;
- Malfunctions in the low voltage circuit.
Also, in the absence of a spark, special attention should be paid to checking the quality of contacts and electrical connections of the ignition system elements. You can check the condition of the contacts simply by rubbing them with your hand.
Carefully inspect the wires and blocks of the ignition system - if dirt, oil or water is found on them, they must be wiped with a dry cloth. After that, try starting the engine, it may start this time.
Checking the battery
A clear sign of problems with the battery is a dull and quiet horn signal. Also, if there are problems with the battery, the indicator lights on the instrument panel usually go out while the starter is rotating. In this case, the reason for the lack of a spark may be poor contact at the terminals or a low battery charge.
- If the terminals are oxidized, they must be cleaned and tightened tightly. In addition, you can use graphite lubricant, which will reliably protect the contacts from oxidation in the future.
- If the battery is discharged, it must be charged using a charger.
For information on how to properly charge a car battery and maintain it, read our battery charging instructions.
Checking high voltage wires
Next, it’s worth inspecting the high-voltage wires: they must have a neat, not “tattered” appearance, without insulation damage, otherwise they will have to be replaced. If the wires are ok, then you can start looking for a spark.
We recommend starting your search for a spark with the spark plug wires. To do this, you need to remove the tip of the spark plug wire from the spark plug and bring it to the “ground” (the nearest unpainted metal part of the body or engine) at a distance of 5-8 mm, after which you need to turn on the starter for a few seconds.
The rotation of the starter should be accompanied by an uninterrupted bright spark of white color with a slight blue tint. If there is no spark, you need to check the ignition coil. A violet, red or yellow spark indicates a malfunction in the ignition system.
It is also worth noting that the spark plugs themselves rarely fail all at the same time. If there is a “spark” in the spark plug wires, you can check any spark plug by unscrewing it from the cylinder head and putting the spark plug wire on it. Touch the metal part of the spark plug to the “ground” of the car, and by rotating the starter, make sure that there is a spark at the electrodes of the spark plug.
It is necessary to change spark plugs within the time limits established by the maintenance regulations for your car (usually every 15-25 thousand km).
You can learn more about the markings and heat ratings of spark plugs from our material at this link.
Checking the ignition coil
To check the ignition coil, you need to pull out the central wire coming from the coil from the distributor-breaker cover.
While turning the starter, make sure there is a spark from the wire, similar to the spark plug wires.
- The appearance of a spark indicates the serviceability of the ignition coil. In this case, the fault should be sought in the distribution switch.
- If there is no spark from the wire, then the cause of the malfunction is hidden either in the ignition coil or in the low voltage circuit.
If there is a malfunction in the ignition coil, it should be replaced with a new one.
Troubleshooting yourself
A diesel walk-behind tractor is sometimes difficult to start after purchase. The reason is air getting into the fuel supply system.
The following actions are performed:
- Air plugs are released. The valve supplying diesel is opened and the connections of the fuel supply channels are unscrewed;
- The injectors are blown out.
The walk-behind tractor starts poorly even if there is no fuel in the combustion chamber. In this case, the candle is completely dry.
This type of failure can be resolved as follows:
- Old fuel is drained;
- The gas tank is thoroughly washed;
- The air filter is cleared of blockages;
- The hose that supplies fuel is purged;
- The carburetor jets are purged;
- The tank is filled with fresh fuel;
- The fuel valve is closed;
- The breathing channel in the gas tank is purged.
To restart manually, fuel is pumped up - you need to press the fuel pump primer a couple of times. After starting the engine, it takes time to warm up. After this, you can begin full operation of the walk-behind tractor.
The internal combustion engine will start after performing the following steps:
- The fuel mixture is prepared;
- Fuel is supplied to the cylinder;
- The mixture ignites;
- Exhaust gases are released.
The cause of the breakdown may be in the intake and exhaust valves. If they do not fit tightly to the saddles, they are adjusted by turning the screw clockwise.
To prevent problems with incorrect operation of the walk-behind tractor, you need to regularly clean the walls of the muffler from accumulated carbon deposits. Compressed air is used for this purpose.
anthill scooter
I'll give my two cents.
First, decide what the scooter will be used for and how often it will be used. A 2000 year old is probably fine, so leave the working system alone, but put the battery at 12V/17H, go easy and start with the key. Tens of thousands of people must travel to disable a dynastarter.
As for the cam ignition, with all its shortcomings, it seems that the timing is not entirely accurate and so on. It has one big advantage - simplicity. Three details you can see and touch. Moreover, mechanics almost never surprise, which is not the case with electronics.
When problems arise, it is best to address them when they become available. Like any equipment, ants have their problems (with the dynastarter, clutch, carburetor, etc.). However, for many, this method has worked for decades with minimal care.
Well done admin Published March 25, 2011 - 16:51
The generator and starter in the same dynastar bottle remain in place, the switch is removed from the ant. An adapter is made between the shaft and the end of the crankshaft, the front panel is placed on the dynastarter housing, and a magnet is attached to it. Since the magnet will protrude, you will need to make a cutout in the hood. Were there diagrams and pictures in motorcycle magazines for 9? of the year. It was converted into a magnet and into a Voskhod generator. I liked the version with a generator better - in 20 years of operation, I changed the switch once, and that was all the maintenance.
Emil30_30 Published January 28, 2013 - 13:46
Members, I have a question for you. but in general it is possible to restore the entire enton mechanism, today I looked at the failure genes going to the coil and since I bought it second hand I would like to know if there is a relay that can be used instead of the usual one (pp-121 / 2903.3702) , since it is impossible to find it now, if you tell me I will be grateful.
Emil30_30 Published January 28, 2013 - 19:49
Home // How to install the ignition on a film anthill | | rel = 0; control = 0; showinfo = 0; iv_load_policy = 3;" frameborder =»0″ Fullscreen>
Sleeves on scooters. How to set up a magnet.
Subscribe to the new channel. https://m.youtube.com/channel/UCMds5tPNqtfKfhl-mOmQFTw.
Installing a magnet on an Ant motor, part 2
Installing a magnet on an Ant engine (part 2)
In each case, the reason may be completely different, so you must understand it deeply. Three holes with a diameter of 7 mm are drilled in the fan cover, which are necessary for attaching the magnetic adapter.
Like most Soviet equipment, this cargo scooter is reliable and easy to use, but a little rough around the edges.
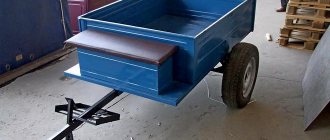
Improving the carrying capacity, or making a dump truck out of Ant
Considering all the advantages, many today prefer Ant. First of all, owners are interested in the possibility of increasing its carrying capacity, as well as the possibility of re-equipping the body into a folding one, like a dump truck.
It’s important not to overdo it here. The carrying capacity stated in the passport is 250 kg
They carry more. But at the same time, with such a load, your speed will not exceed 30-35 km/h, otherwise you risk becoming a “goat”. The controllability of the scooter also decreases.
It is possible to increase the load capacity by increasing the sides. This will make it more convenient to transport large volumes of bulk material. But here it is necessary to strengthen the frame of the scooter. Craftsmen use different options for this, for example, they strengthen the frame's pendulum with pancakes (+5-10 kg) to the weight; other available metal will also do.
Welding would be the best option, but there are also cases where an additional frame was made of wood and without a welding machine.
It is better to move the body itself forward or leave it in place, but under no circumstances move it back.
You can find and buy a separately closed booth for the Ant scooter. This is suitable for those transporting delicate goods that need protection. The price for it will be about 8 thousand rubles.
Mechanism options for a dump truck: cable winch, hydraulics with automatic drive, “manual” options with door hinges, etc. Hydraulics will also require the installation of a pump. The costs of such equipment are somewhat high compared to the price of the ant itself.
There is no spark on the walk-behind tractor: options for fixing the problem
The most common cause of walk-behind tractor malfunctions is failures in the ignition system. The problem may be related to the cap, magneto, spark plug or high-voltage equipment wire.
If the spark is lost, you need to do the following:
- Check the ignition system for blockages. Often there is no spark because water or dirt has entered;
- Check for contact between the main electrode and the spark plug cap;
- Make sure that all electrodes are intact and that there is a gap between them. You can use a special probe. The optimal gap is 0.8 millimeters;
- Carbon deposits are removed from the insulator and metal parts of the ignition unit;
- The spark plug is unscrewed and checked for oil stains. Existing oil stains and thick carbon deposits must be thoroughly cleaned and the spark plug dried. You also need to dry the cylinder of the unit by pulling out the starter cable;
- If after diagnostics the cause of the malfunction is not identified, the spark plug needs to be replaced. This part has a low price, but it is advisable to give preference to more expensive options. They are distinguished by reliability and durability.
All described troubleshooting methods are suitable for walk-behind tractors of the following brands: Krot, MB-1 and MB-2, Neva, Cascade, Agro, Zubr, Salyut.