How to make a trailer for a walk-behind tractor with your own hands
Let's look at how to make a trailer for a walk-behind tractor with your own hands.
It is important to be able to read drawings and diagrams, as well as have the skills to use some tools
A homemade trailer for a walk-behind tractor is made according to diagrams and drawings, which can now be found in large quantities on websites on the Internet. Before you get to work, you need to develop a drawing of a trailer for a walk-behind tractor. In addition, it is necessary to prepare all the small parts for fastening, tools and a welding machine.
The dimensions of the trailer for the walk-behind tractor must be clearly drawn on the diagram, each detail is marked and highlighted from different sides.
You need to assemble the trailer based on the power and dimensions of the walk-behind tractor. Equipment with insufficient traction power will not drag a heavy semi-trailer.
Having understood the diagram, you need to decide on the leading parts of the trailer. The basis is the frame and hitch for the walk-behind tractor trailer. These are followed by the frame, driver's seat and wheels (2 or 4 pieces).
They usually start with the main component of the cart - the frame, since it is on it that the entire load falls during the transportation of goods, so it must be extremely strong. The ideal option would be a ready-made axle with wheels, in which case you will not have to waste time and effort on additional settings
It is important that the materials are hard and not deformable. You can use pipes or thick channel
The simplest method is a trailer assembled from 60x30 mm pipes welded together to form a frame. A traverse (steel crossbar) is attached to them. Transverse pipes are attached from different sides, which in the future will serve as racks. For piping, pipes with a cross-section of 25 mm are welded to the posts, and at the end - corner supports.
It is preferable to weld the trolley parts together; bolted fastening is considered not very reliable and short-lived. To strengthen the cart, braces are added from below and a reinforcement is welded.
Once the supports are completed, they move on to assembling the body. Any materials are suitable for this: wood and metal, and a combined option is possible. It is advisable, of course, to make the base metal. For strength, it is preferable to make the bottom double. To make the sides attach better, corners are welded along the edges. For easy loading and unloading, the sides can be folded by placing them on a movable mount.
There is no need to choose very heavy materials, since the weight of the assembled trailer will overload the engine of the walk-behind tractor. The simplest body can withstand weight up to 500 kg, and this is enough for a small farm.
It is better to take wheels from used equipment; they already have hubs. The rods on which the wheels will be supported are prepared. It is desirable that the wheels are located directly under the sides. To attach the wheels, the rod is pre-sharpened to the size of the wheel bearing. Instead of a rod, you can use devices from a VAZ beam.
What is a trailer for a walk-behind tractor?
The towbar to the walk-behind tractor consists of:
- body;
- wheels;
- wings;
- seats;
- drawbar;
- brakes
The ability of the body to withstand a particular load depends on the quality of the assembly. The cart must be made of durable material that can withstand the weight of the load and any weather conditions. In addition, it is desirable that it have folding sides for ease of loading and unloading. The dimensions must be roomy and match the power of the walk-behind tractor.
Wheels are used on carts: car wheels, motorcycle wheels, etc. The main thing is that the cart for the walk-behind tractor can withstand heavy loads.
Wide wheels are preferable, as this increases the vehicle's maneuverability.
There are wings on cars too. Serve as protection against stones and dirt from wheels.
All modern trailers are equipped with seats. Some craftsmen build a box underneath to store necessary things.
The drawbar is a triangle-shaped mount that connects the trailer to the walk-behind tractor.
Brakes will improve the process of transporting goods.
Trailed equipment for walk-behind tractors can be purchased from manufacturers of agricultural machinery, or you can make a homemade trailer for a walk-behind tractor. Let's consider both options.
There are many ready-made models for motor cultivators on the market. They have different sizes, weight categories, carrying capacity and cost. Their advantage is that they are assembled by professional mechanics according to pre-developed schemes. You don’t waste any effort or time on this. The disadvantages are, firstly, the search for a conscientious manufacturer that sells a quality product, and secondly, a high-quality product is not cheap.
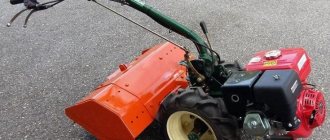
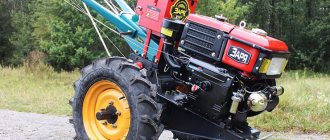
The walk-behind tractor acts as a horse cart. It acts as a drive connected by a drawbar to the trailer. The following brands of walk-behind tractors are suitable for this purpose: Patriot, Ural, Cayman 320, Forza, Crosser, Foreman, Viking, Texas.
You can make a trailer for the Neva walk-behind tractor, made of durable metal. Load capacity of the body is 500 kg. The trolley has a brake drive, which makes driving easier. On the Internet you can find a lot of drawings of trailers for the Neva walk-behind tractor. They have a successful design with minimal consumables.
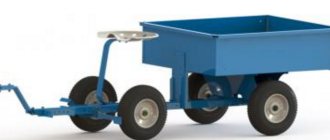
Among the ready-made models you can find a device with a dump truck function. The design is basically the same as on a conventional trolley, but with a modification that allows unloading by tilting the drawer. Although this model is more expensive, it is necessary on the farm.
The manufacture and assembly of the trolley is often carried out by the owners of walk-behind tractors themselves. There are a lot of homemade products, but they can be assembled according to one principle - a chassis on wheels, sides and an axle to connect the trailer to the walk-behind tractor.
From a VAZ-2109 beam
A trailer made from a VAZ-2109 beam is suitable for walk-behind tractors with high power - 10 hp. The structure will be quite heavy, so more traction power is needed. Such trailers have a large load capacity.
It’s easy to make a trailer from a VAZ-2109 beam with your own hands; just watch the training videos, which are available for free. You can also find drawings and dimensions of the structure; almost any one, with one or two axes, will do.
The beam will be used as an axle; a whole axle with wheels from a VAZ-2109 will be suitable for the rear axle. For the front axle, one beam will be enough; the wheels can be any. For large trailers, wide wheels are recommended to ensure maneuverability and stability.
The advantage of a trailer for a walk-behind tractor based on a beam from a VAZ 2109 is that there is no need to waste time on manufacturing additional components, especially if the entire rear axle is taken.
Photos and descriptions of interesting options
DIYers have already come up with a considerable number of original trailer options. Perhaps one of the following will suit you as a sample.
The small dump truck has small wheels, a simple frame design and no brakes. At the same time, making a tipping trailer is not at all difficult; you just need to provide turning hinges and provide for fixing the body when moving.
A two-axis option is also possible. Such a trolley is suitable for transporting heavy and bulky cargo paired with a powerful walk-behind tractor; in this case, a rotating mechanism for the front axle is required and a braking system will obviously not be superfluous.
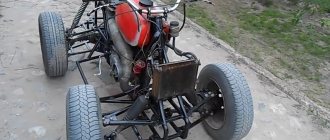
It is very smart to use part of the structure from a heavy motorcycle. In this case, a soft suspension with springs and shock absorbers is provided. The wheels of the motorcycle are light in weight and fit well with the load. A luxurious car seat increases the comfort of movement.
Seeing a wide bench, it’s hard to resist saying: “Give us a ride on your tractor, Petrusha.” If two people are going to use the walk-behind tractor, of course, you should provide appropriate seating.
If you have to transport hay, you should provide high sides. To do this, you need nests along the perimeter of the sides.
Just like a mining dump truck, not a trolley for a walk-behind tractor. However, the powerful water-cooled engine allows for the transportation of large amounts of soil.
This unsightly-looking option seemed the most practical. The loading platform is located low, which makes loading easier and increases the trailer's stability when driving. Suspension with springs and shock absorbers plus a car seat promise comfort to the driver of the motor vehicle. In general, if not a Mercedes, then it will definitely be a cool bike.
Probably, such a car is not even a “Zaporozhets”?! At least he has a trunk in front, but here, where should I put the cargo? The owner will have to sit on a pile of sand...
Composition, structure and characteristics of the trolley for the walk-behind tractor
When planning to make a trailer cart with your own hands, it is important to understand what it is. The composition and design of components and parts vary markedly depending on the need for cargo transportation and the engine power of the unit.
The maximum configuration of the walk-behind tractor trolley consists of the following elements:
- frames;
- chassis;
- body;
- coupling device;
- driver's seats;
- brake system;
- parking stop;
- lifting mechanism.
Making a trailer with your own hands
After studying all the design options, when making a homemade trailer for a walk-behind tractor, the simplest options are most often used. A dumping device is certainly more difficult to make, but its functionality is an order of magnitude higher.
Work on creating a tow hitch for a walk-behind tractor with your own hands begins with a drawing. Thanks to this, you can determine the amount of materials needed and select complex components that require the development of more accurate diagrams.
It should be remembered that the center of gravity of a properly balanced trailer should be located closer to the front side, but not exceed the level of the wheel axle.
Frame assembly
The reliability of the frame is determined by the durability and strength that the towbar will have. This should be taken into account when creating a project for a future trailer hitch. Thus, the following materials can be used in the manufacture of a trailer frame:
- Angle and rectangular pipe.
- The front and rear crossbars can be made from a corner measuring 25x25 mm.
- For spars, a 60x30 mm pipe would be an excellent choice.
- To connect all the elements, it is necessary to make five additional crossbars forming a lattice frame.
- Four vertical posts are attached to the longitudinal pipes of this lattice in the corners.
Making a one-piece trailer is quite simple. Some homestead owners decide to make more complex devices. In such a situation, all subsequent actions depend on the choice of a specific type of trailer:
- On a dump trailer, the tailgate must be hinged.
- If you plan to manufacture a trailer with folding sides, then all three sides, except the front one, must have such a design.
- The frames of the folding elements should be made separately from the general frame. For simple models they can be its common elements.
Frame covering
This is one of the easiest steps in creating a tow hitch. However, some nuances are present and must be taken into account. To carry out work on framing the frame, it is worth choosing those materials that cannot increase the cost of the tow hitch:
- Wood is the most affordable material, but not the most practical due to its low resistance to moisture. In order for the boards to last as long as possible, it is imperative to treat them with special compounds and constantly monitor the integrity of the coating.
- Plastic lacks the main drawback of wood, but at the same time has poor resistance to mechanical damage.
- Metal sheets must first be treated with anti-corrosion compounds and are the most durable, but also quite expensive material.
First you need to sheathe the bottom (floor) of the trailer, and then work on its sides.
Chassis
This design element can be taken from an old vehicle, such as a garden wheelbarrow. An additional pipe is required to attach it. The hub can be pressed, and its rear part can be bored and strengthened on the axle
At the same time, it is extremely important to ensure that there are no distortions
For mounting wheels, pins are the best option. They will provide a fairly reliable and long-lasting connection. To strengthen structures, bolted connections can be used. The final stage of work on the manufacture of the chassis will be the fastening of the caps.
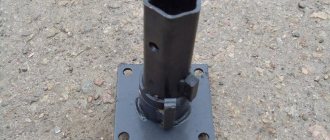
After creating the towbar, all that remains is to make the hitch. This is a separate element, which is also very responsible. The simplest way to connect a walk-behind tractor to a trailer is a “pipe-in-pipe” assembly. A short piece of pipe is attached to one end of the pre-bent pipe in a vertical position.
At the opposite end of the main element (curved pipe), a second section is welded, and a king pin must be attached to it, which will act as a connecting element. This robust design is easy to manufacture and highly reliable.
Making a trailer with your own hands
After studying all the design options, when making a homemade trailer for a walk-behind tractor, the simplest options are most often used. A dumping device is certainly more difficult to make, but its functionality is an order of magnitude higher.
Work on creating a tow hitch for a walk-behind tractor with your own hands begins with a drawing. Thanks to this, you can determine the amount of materials needed and select complex components that require the development of more accurate diagrams.
It should be remembered that the center of gravity of a properly balanced trailer should be located closer to the front side, but not exceed the level of the wheel axle.
Frame assembly
The reliability of the frame is determined by the durability and strength that the towbar will have. This should be taken into account when creating a project for a future trailer hitch. Thus, the following materials can be used in the manufacture of a trailer frame:
- Angle and rectangular pipe.
- The front and rear crossbars can be made from a corner measuring 25x25 mm.
- For spars, a 60x30 mm pipe would be an excellent choice.
- To connect all the elements, it is necessary to make five additional crossbars forming a lattice frame.
- Four vertical posts are attached to the longitudinal pipes of this lattice in the corners.
Making a one-piece trailer is quite simple. Some homestead owners decide to make more complex devices. In such a situation, all subsequent actions depend on the choice of a specific type of trailer:
- On a dump trailer, the tailgate must be hinged.
- If you plan to manufacture a trailer with folding sides, then all three sides, except the front one, must have such a design.
- The frames of the folding elements should be made separately from the general frame. For simple models they can be its common elements.
Frame covering
This is one of the easiest steps in creating a tow hitch. However, some nuances are present and must be taken into account. To carry out work on framing the frame, it is worth choosing those materials that cannot increase the cost of the tow hitch:
- Wood is the most affordable material, but not the most practical due to its low resistance to moisture. In order for the boards to last as long as possible, it is imperative to treat them with special compounds and constantly monitor the integrity of the coating.
- Plastic lacks the main drawback of wood, but at the same time has poor resistance to mechanical damage.
- Metal sheets must first be treated with anti-corrosion compounds and are the most durable, but also quite expensive material.
First you need to sheathe the bottom (floor) of the trailer, and then work on its sides.
Chassis
This design element can be taken from an old vehicle, such as a garden wheelbarrow. An additional pipe is required to attach it. The hub can be pressed, and its rear part can be bored and strengthened on the axle
At the same time, it is extremely important to ensure that there are no distortions
Pins are the best option for mounting wheels.
After creating the towbar, all that remains is to make the hitch. This is a separate element, which is also very responsible. The simplest way to connect a walk-behind tractor to a trailer is a “pipe-in-pipe” assembly. A short piece of pipe is attached to one end of the pre-bent pipe in a vertical position.
At the opposite end of the main element (curved pipe), a second section is welded, and a king pin must be attached to it, which will act as a connecting element. This robust design is easy to manufacture and highly reliable.
How to do it yourself?
Before you make a cart for a walk-behind tractor with your own hands, first of all you need to have an idea about it - to roughly understand what its appearance and dimensions of the future product should be.
DIY trolley
After this, you need to start calculating the rolled metal - the number of channels, angles and pipes and profiles from which the future trailer will be made. After careful consideration of the issue, you will not only optimize costs, but will also be able to get a clearer picture of the future product.
And at the time of purchasing materials, it will be easier for you to deal with it - you will be able to cut them to the required size right on the spot. You also definitely need to get a welding machine, if you don’t have your own - all frame connections need to be well welded.
In no case should it be connected using self-tapping screws, since they do not provide a sufficient level of reliability. In order to make a durable frame, corners with a section of 50*25 millimeters and 40*40 millimeters are ideal. Pipes, both round and rectangular, are also needed.
https://youtube.com/watch?v=7ImHJB4Rp9A
Making a simple trailer for a walk-behind tractor with your own hands
It is difficult to completely repeat an existing product design, since each of us has our own set of materials and components, homemade experience and operating conditions for the trailer. The main design elements are the suspension and frame, so we’ll start with their consideration.
Often, the rear Zhiguli beam along with hubs from front-wheel drive cars is used as the basis for the suspension. The solution is simple and reliable.
The beam is welded to the trailer frame in a vertical position. At the same time, the loading platform turns out to be quite high. The beam dictates the dimensions of the trailer, so it is heavy and of substantial size. For a weak walk-behind tractor
with an air engine this option is useless.
To reduce the dimensions of the suspension, you can cut out the central part of the beam, and instead weld a pipe with a cross-section of 50x50 mm of the required length to the hubs as an axis. The version of the stroller shown in the photo is easily rearranged by an adult with his hands. The manufacturing process of this structure can be assessed in more detail using the following video.
Theoretically, you can use the rear beam from any passenger car. In this case, it is more convenient to use the rear suspension of a front-wheel drive car with the least possible weight and size. The suspension of the Oka car is well suited for load capacity.
The photo shows two options for trailers with a rear axle from a classic VAZ as an axle. The gearbox should be removed and its place covered with a metal plate with bolts. The axle shafts must be pulled out, cut to 200 mm and inserted back. Practice has shown that they successfully stay on the bearings and do not come out. The bridge is welded to the frame with two jibs on each side.
A trailer with soft suspension is noticeably more comfortable, although more complex. The load does not bounce in the cart at every bump, and the driver’s “fifth point” does not experience unnecessary overloads. Probably, installing springs and springs at the same time is clearly overkill. At the same time, making levers on silent blocks and installing springs is not so difficult.
The trolley for transporting bulk materials must be folding. In this example, the frame is made from a 50x50 mm corner. Hinges are welded to its rear and body. The trolley axis is located exactly at the center of gravity of the load. To unload the trailer, you need to place it on a stand, disconnect it from the walk-behind tractor, and then tilt it, lifting the drawbar up. Be careful not to move the drawbar suddenly.
Brakes, hitch, hubs and other components
When assembling a trailer for a walk-behind tractor with your own hands, you will inevitably have to make a decision on the design of the brake system, coupling device, parking stop, and other things. We will evaluate possible solutions and select the appropriate ones.
For a heavy cart, a parking brake is a must. It will also fit any passenger car and should be attached to the frame next to the driver. If there are standard mechanical brake drives in the rear suspension, all that remains is to connect them to the handbrake lever with a cable of the required length. Hydraulic and mechanical brakes should be thoroughly tested before loading the trailer
.
The hitch is another important component of the trailer. In the simplest case, a pipe is welded to the drawbar, in which a hole is drilled for a finger. For motorized towing vehicles with an air-cooled engine, its diameter is usually 16 mm, with water cooling - 20 mm. In this example, the safety net is very correctly arranged in the form of a chain, which is attached to a finger in the side hole of the hitch.
Often, a cardan is used as a rotating element of the hitch. In this case, the side elements of the cross must be welded so that the drawbar of the cart does not sag.
When using a 4 wheel trailer, it is possible to use a factory hitch. In this case, you will need an adapter with a ball attached to the walk-behind tractor.
Let's consider several possible options for adapters for connecting a trailer. The first one is the same ball we mentioned and it works with a 4 wheel trailer. The other two are a sleeve welded to a rod that can rotate in the tube. The bushing is inserted into the hitch of the walk-behind tractor and secured with a finger. The tube is welded to the trailer drawbar. Thus, the cart has the ability to turn in both directions when moving, as well as freely tilt on uneven roads. The height of the bushing is 60-70 mm (depending on the version of the walk-behind tractor).
READ Do-it-yourself fret grinding on an electric guitar
When parked, the cart may need to be supported. The spring design is reminiscent of a bicycle stop and allows the bar to be fixed in two positions.
Reliable tailgate latches can be made from strip, rod and pipe. You can’t do without a grinder and welding here.
On a small trailer you can weld regular bolts. In this case, the side sides should not tilt, otherwise the connection will spontaneously fall apart.
If the sides are intended to be extended, it is necessary to provide eyelets for the vertical posts. They are conveniently made from a 40x60 mm profile pipe.
Sometimes it is enough to weld small eyes on the bottom of the body. Through them you can tie an awning or cargo in a trailer.
You can weld the hinges for the tailgate yourself from a rod and tube. However, it is easier to weld regular door hinges.
To fasten corrugated sheeting, it is convenient to use self-tapping screws with a drill. Regular ones with a press washer or roofing ones with a seal will do.
We have already seen how a car seat or an office chair is used as a seat. You can make a simple bench for sitting yourself from a piece of chipboard, foam rubber and leatherette. The covering is attached to the base using a staple gun.
Homemade trailer for motoblock from scooter
I tried to collect in this article the most useful information for those who decided to make a trailer for a walk-behind tractor
on one's own. A detailed story about the features of homemade trailers is offered by their owners in the following videos.
Trailer for walk-behind tractor: types of trailers and recommendations for making it yourself
Using a trailer for a walk-behind tractor allows you to significantly expand the functionality of this popular technical tool. However, purchasing a ready-made device is not financially feasible for all owners of personal plots. In such a situation, you can think about making a trailer yourself.
Trailers have different load capacities, and this is one of the criteria used to classify them. Most often, at home there is no need to use devices with a high load capacity. In addition, all trailers for walk-behind tractors can be divided into groups according to their design:
- Solid - have the simplest design, in which the bottom and walls are connected motionlessly.
- With folding sides - great for transporting large cargo.
- Tipper - convenient during unloading operations and allows you to increase their productivity.
When planning to purchase a trailer or make a cart for a walk-behind tractor with your own hands, it is important to take into account some design features
If everything is quite simple with solid towbars, then in the case of other types this must be done
Particular attention should be paid to the following factors:
- Two-axle dump trucks with a large load capacity are equipped with a hydraulic drive to make work easier.
- In single-axle models, tipping is most often carried out due to the special location of the center of gravity and it is quite enough to equip them with a manual device.
- Trailers with a load capacity of more than 350 kg are equipped with a mechanical braking system.
Making a trailer with your own hands
After studying all the design options, when making a homemade trailer for a walk-behind tractor, the simplest options are most often used. A dumping device is certainly more difficult to make, but its functionality is an order of magnitude higher.
Work on creating a tow hitch for a walk-behind tractor with your own hands begins with a drawing. Thanks to this, you can determine the amount of materials needed and select complex components that require the development of more accurate diagrams.
It should be remembered that the center of gravity of a properly balanced trailer should be located closer to the front side, but not exceed the level of the wheel axle.
Frame assembly
The reliability of the frame is determined by the durability and strength that the towbar will have. This should be taken into account when creating a project for a future trailer hitch. Thus, the following materials can be used in the manufacture of a trailer frame:
- Angle and rectangular pipe.
- The front and rear crossbars can be made from a corner measuring 25x25 mm.
- For spars, a 60x30 mm pipe would be an excellent choice.
- To connect all the elements, it is necessary to make five additional crossbars forming a lattice frame.
- Four vertical posts are attached to the longitudinal pipes of this lattice in the corners.
Making a one-piece trailer is quite simple. Some homestead owners decide to make more complex devices. In such a situation, all subsequent actions depend on the choice of a specific type of trailer:
- On a dump trailer, the tailgate must be hinged.
- If you plan to manufacture a trailer with folding sides, then all three sides, except the front one, must have such a design.
- The frames of the folding elements should be made separately from the general frame. For simple models they can be its common elements.
Frame covering
This is one of the easiest steps in creating a tow hitch. However, some nuances are present and must be taken into account. To carry out work on framing the frame, it is worth choosing those materials that cannot increase the cost of the tow hitch:
- Wood is the most affordable material, but not the most practical due to its low resistance to moisture. In order for the boards to last as long as possible, it is imperative to treat them with special compounds and constantly monitor the integrity of the coating.
- Plastic lacks the main drawback of wood, but at the same time has poor resistance to mechanical damage.
- Metal sheets must first be treated with anti-corrosion compounds and are the most durable, but also quite expensive material.
First you need to sheathe the bottom (floor) of the trailer, and then work on its sides.
Trailer options for walk-behind tractor
Depending on the planned volume of transportation, the method of using the trailer and the capabilities of the walk-behind tractor, several different options can be made:
- The lightest single-axle trailer
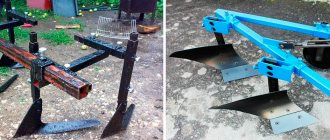
weighs 50-70 kg. load without taking into account the weight of the driver, the easiest way to make this option is from a heavy single-axle garden cart with rubber wheels. All that needs to be done is to weld to the handle a towbar for a walk-behind tractor, made from a hitch from a plow, and a small stand for sitting; - Universal small-sized trailer for small loads. Unlike the previous option, such a trailer
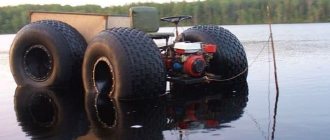
can lift up to 120 kg, is safe and stable even on uneven ground. The U-shaped frame structure is welded from an I-beam, a towbar is installed on the drawbar to the walk-behind tractor from the plow, which can be used as a stand; - A heavy rubber trailer will allow you to use the most productive capabilities of the walk-behind tractor. By spending money on metal profiles and cheap spare parts from the running vehicle, you will get a convenient trailer design for walk-behind tractors, costing several hundred dollars.
The heavy version will allow you to transfer the attachments, the plow, and the entire stock of potatoes to planting at one time. The service life of such a machine is tens of years.
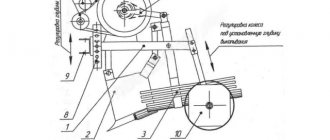
Trailer frame: 1 — brace (angle 21x21x3), 2 — seat frame (angle 21x21x3), 3 — riser (pipe 50x25x4), 4 — seat posts (angle 40x40x4), 5,14 — front struts (pipe 50x25), 6, 15 — longitudinal spars (angle 40x40x4), 7.8 — right wheel axle supports (angle 32x32x4), 9.16 — rear struts (pipe 50x25), 10 — reinforcing cross member (angle 40x40x4), 11 — longitudinal hinge housing (pipe 58x4 ), 12 — wheel axle (rod with a diameter of 30), 13.17 — transverse spars (angle 40x40x4), 18 — gussets (s4)
Operating a heavy carriage for a walk-behind tractor will require a certain skill, so the first attempts should be made exclusively in deserted areas. In addition, for this type of construction, traffic police officers may require registration and equipment of a carriage for a walk-behind tractor with dimensions, brake lights, and brakes.
Sources:
https://samodelino.ru/telezhka-svoimi-rukami/telezhka-dlya-motobloka-svoimi.htmlhttps://bouw.ru/article/pritsep-dlya-motobloka-svoimi-rukami
Ready-made options
If you start comparing factory carts for walk-behind tractors, their prices will seem sky-high, given that such a product will be used in a limited area and along a simple route.
Although their quality still attracts the attention of many owners of walk-behind tractors who, for one reason or another, do not manufacture them at home. Although there is something to look at - galvanized sides and bottoms, brakes for every taste and soft seats with footrests - almost all types of comfort
You can even get a warranty on the product. But, since they are all manufactured according to certain standards, their dimensions, load capacity and overall design convenience often do not meet the needs of buyers. Therefore, the question of choice is serious: buy or make it yourself?
TPM-350-1
- The TPM-350-1 trolley for walk-behind tractors, equipped with band brakes, with a non-galvanized dump body type, has dimensions of 1.2 meters by 1 meter. The carrying capacity of this product is 500 kilograms.
- The trolley is suitable for many models of walk-behind tractors, both foreign, made in China, and domestic, which use components supplied from China. Its total length is 2.6 meters and its width is 1.3 meters. The average price is about 18,000 rubles.
- The TP-350-1 galvanized dismountable trolley for a mini tractor, the body of which is completely assembled from galvanized steel sheets, is also equipped with reflective elements. With its own weight of 90 kilograms, its carrying capacity is about 500 kilograms.
- The body dimensions are 1.1 meters by 1 meter exactly. This cart has disc brakes and is completely dismountable. True, in the standard configuration it is only suitable for attaching to a mini tractor.
- In order to use the cart together with a walk-behind tractor, you will need to supplement it with the necessary fastening. The average price of such a product is approximately 20,000 rubles.
- Trailer –
This is a trolley that, despite the name, can be used not only with walk-behind tractors from this company, but also with their analogues. And there are plenty of them, since, like walk-behind tractors, it is made in China.
The same applies to attachments, or rather, mountings for them.
- The dimensions of the trailer body are 1.4 meters by 1 meter exactly, height is 1.13 meters. The trailer type is tipper with a load capacity of 350 kilograms. One of the available amenities that all trailers of this model are equipped with without exception is a convenient glove compartment, which is located under the seat.
- The average price of such a trailer is approximately 17,000 rubles.
Development of the walk-behind tractor into more complex homemade devices
A homemade walk-behind tractor can serve as the basis for various more complex units that can be used not only for soil cultivation. Based on homemade products from the Ant motor scooter, you can make a mini tractor, snow blower, towing vehicle or other mechanized device. Making a tractor from “Ant” is especially popular. To do this, a steel rod made of a channel or beam is attached to the walk-behind tractor frame under the engine. Then a sprung two-wheeled cart is made with a seat on top. The springs can be removed from the same scooter.
Under the trolley with the seat, the same rod is welded to the frame, which is connected to the walk-behind tractor rod with an overhead coupling with bolted connections. This allows such a tractor from “Ant” to tow quite serious loads. The metal rod will distribute the force across the entire tractor frame. There is every possibility of making a trailer for a walk-behind tractor from Ant. 4 wheels on springs are attached to a frame made of steel beams, and a rectangular platform made of boards or sheet metal with folding sides is mounted on top. On the front side, instead of a tailgate, you can install a driver's seat.
You can make quite a lot of different homemade products from “Ant”. This depends primarily on technical literacy and skills in working with metal and mechanisms. In addition to the old scooter, a variety of parts and mechanisms can be used, otherwise inevitably sent to scrap.
Their main advantage, in addition to their relatively low cost, is that they can be maximally adapted to the specific needs of the owner.
Agricultural machinery, used on personal plots, fields, vegetable gardens and cottages, at the present time is a fairly technologically advanced device. It is almost impossible to find a person who has not used a walk-behind tractor or cultivator to facilitate the work associated with working on soils.
You can choose a walk-behind tractor to suit every taste and budget, or you can make it yourself. Often the motor from the unit is used to make a full-fledged scooter, which is also indispensable for farmers, because they always need to move loads over long distances. Let's look at how to make an Ant scooter with an engine from a home walk-behind tractor.
Use the motor from a walk-behind tractor to give life to a new device
WHAT IS BETTER TO CARRY WOOD, HAY, OR GO FISHING??? | Topic author: Eduard
Victor Ishak and the chaise. My grandfather was twenty years old. The donkey also outlived his grandfather.
Stanislav the horse
Alexei
Andrey from a distance. the traction unit and wheels can be installed in all-terrain iron ones, the downside is that it eats a lot and is slow-moving.
Ilya is not the same, not that, if you have collected money for the Urals, then it’s better to save up and buy an ATV, not much more expensive, but definitely much more versatile, expensive new, buy used....
Vasily saw it live on the road at one time - a cart with hay rolling very cheerfully along the road, a very decent cart. Overtaken - instead of a horse, the Ural is “harnessed”. For driving - a motorcycle, but the block is also for earthworks.
Gennady personal car solution to all problems
An Igor Ural with a stroller costs half a million rubles, but brings hemorrhoids to all three. There is also no need to buy a walk-behind tractor in order to move around in space on it - the donkey mentioned above moves faster. I recommend purchasing an inexpensive ATV, available aftermarket. If you go fishing, please, the trailer carries the load easily, and even a shield is attached for clearing snow. Personally, this is how I solved the problem by buying an ATV 250 and using the walk-behind tractor exclusively for plowing.
Valentin Self-propelled trolley with two-cylinder diesel engine. Price from 230 thousand.
Artem Motor scooter “Ant”.
Peter I had an Ant with a factory aluminum booth. There is somewhere to hide even from the rain. Eats about 4 liters of 80 per 100 km. I couldn't be happier. Then I bought a car and sold Murka. Now I regret it with terrible force. Now there are modern tricycles. If you pull it, buy it without thinking. But “Murka” is fire! I pulled 800 kg. Stepan doesn’t skid on ice, doesn’t skid from the start on ice, and is as reliable as a three-ruler. You really have to know how to start it. One day, at the market, I saw someone unscrewing a spark plug and pouring gasoline... - What are you doing? — I ask — When it’s cold, that’s the only way it starts — he answers. — Do you know the structure of a carburetor? - I ask. — Pull the kick starter slowly as many times and, as soon as it gives into your hand, start it. By working the kick starter slowly you will pump gasoline into the cylinder. The next day he came and said, “I owe you a bottle.” I’ve been unscrewing the candle for 17 years... And I also tied a 55 battery in a metal box under the booth, near the wheel, so in general - fire! And on the other side I made a toolbox. So my body was always free.
Egor Tested over years and life experience.