When you need to lift or move something very heavy and bulky from one place to another, and even alone, you can’t do without an auxiliary device.
In certain cases, a manual mechanical or electric winch can come to the rescue. But we recommend making a mini faucet with your own hands.
It can be used for a variety of tasks: to lift a car engine or to move some large piece of driftwood to a suitable place.
The design is suitable for garages and construction sites, and is also suitable for simply lifting heavy objects. Let's consider a homemade mini crane in 3 versions, with different lifting drives.
Assembling a goose tap with your own hands is not at all difficult. All the necessary drawings with dimensions can be easily found on the Internet.
The main thing to remember is that the garage crane must be reliable (made of metal), stable and have sufficient load capacity.
Structurally, a homemade crane consists of three main elements:
- a support (usually with wheels so that you can move it freely around the garage);
- vertical stand with a drive mechanism (jack, mechanical or electric winch, etc.);
- retractable telescopic boom.
Below you can see three different lift options.
Necessary materials
The tap is made from a profile 7 m long. It is best to use a material whose wall thickness is 7 mm. The mechanism must be durable, so you should choose a profile with a cross section of 80x80 mm.
To make a lifting device, you will also need several pipes. Suitable products are 700 mm, the cross-section of which ranges from 76 to 99 mm.
To build a crane you will need a jack, you can take it from a VAZ. It is best to use a device that is designed to lift loads weighing up to 5 tons. To construct the mechanism, 4 plates with a thickness of 8 mm are required.
To assemble a crane yourself, you need to have the following set of tools:
Assembling the mechanism is not complicated, so it can be easily done on your own. A gantry crane or any other device can be painted after assembly.
Installation of lifting mechanism
The main element of the crane is the lifting mechanism, which can be manual or automatic. The tefler consists of a cable and a winch installed on the side of the rack. The cable moves due to the rotation of the rollers. Additional fixation of the elements is not required; it is enough to secure the lift to the rack.
A self-made crane can be equipped with lifting equipment that is used in elevators. Such mechanisms are highly reliable and able to withstand massive objects.
To simplify repair work, it is possible to connect an electric drive to the lifting element. To automate the design, a motor with a power of 300-500 W is suitable. The electric drive is mounted to the base of the crane beam.
The design, equipped with an electric drive, is widely used in large-scale garage repairs and car disassembly for spare parts when a complex of work is required. According to the principle of operation, manual and automated cranes do not have significant differences.
Experienced car owners say that a crane beam is rarely needed in the garage, but if it is needed, there is nothing to replace it with. It is used for removing and installing the engine, and less often for moving other loads. Purchased mechanisms are expensive and take up a lot of space, so the best solution for a private craftsman is a do-it-yourself beam crane made from scrap materials.
In order to make a garage lift with your own hands, you will need:
- For racks - pipe with a cross-section of 100x100, length 2350 mm - 2 pcs.
- For the cross rod - a round pipe with a diameter of 100 mm and a length of 4150 mm.
- For supports – round pipe with a diameter of 110 mm and a length of 600 mm – 2 pcs.
- For bases and diagonal supports - corner 100x100 mm.
- M 16 bolts for attaching supports to rods.
- Wheels (for example, from a warehouse cart) – 4 pcs.
- Manual winch with a lifting capacity of up to 1 ton.
- Cable and rollers (for example, from an elevator door drive).
A beam crane is necessary for moving various loads
Crane beam device
The mechanism is a U-shaped structure (bridge) with a lifting mechanism. In large auto repair shops, both parts may be movable. The bridge moves on rails, the lift moves on a span beam. In garages, to save space, rails are not laid, and the bridge is equipped with wheels.
The crane beam device consists of supports, a span beam and a lifting mechanism. The supports are welded from metal pipes and channel bars. A manual or, less commonly, electric winch is used as a lifting mechanism.
Girder cranes are of the "floor operated" type, as opposed to those that are handled from a cab. To make the mechanic's work easier, the garage crane can be equipped with an electric winch
. This will increase manufacturing and maintenance costs, but if it is necessary to frequently dismantle engines and other heavy units, it will pay for itself. In rural areas where there are power outages, insufficient power or voltage surges, you should give preference to a manual winch. Especially if we are talking about a personal garage and not a private workshop.
Above we looked at what a beam crane consists of: supports, a span beam and a hoist. Manufacturing takes place in several stages:
- Weld the vertical supports in the shape of an inverted T with two diagonal supports.
- Weld the span pipe to form a U-shaped structure.
- Install the wheels.
- Weld a winch to one of the side supports.
- Install the lifting mechanism: fix the rollers, stretch the cable and hang the hook.
Ready-made drawings can be found online, but it’s easier to make it yourself by adjusting the product to the size of the garage.
Important All-terrain vehicle Kamaz Arctic 6x6 for low temperature and off-road conditions
Crane drawing
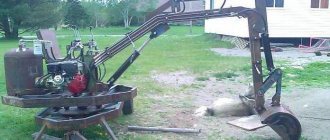
If for some reason this type of lift is not suitable, you can make a goose garage crane with your own hands - it will take even less time. The gooseneck crane has an L-shape, where the vertical stand is equipped with a jack rather than a winch. It is rolled under the car from the front and the engine is lifted by pumping a hydraulic jack. The boom moves upward and lifts the load.
Another interesting solution that will help save space is a suspended crane beam. Unlike the supporting structure described above, the span beam is attached to the ceiling by means of a rail (I-beam). This option requires sufficient ceiling height and strength of the building.
All devices must be tested with a load 20% greater than the maximum intended load.
Assembly instructions and drawings
The design was called “goose” because of its L-shaped shape. The mechanism is easy to use, because thanks to it you can bring the boom to the engine compartment. This reduces labor costs for tying the engine, which reduces the time required to complete repair work.
The design of the “goose” is simple. The mechanism consists of a collapsible support equipped with wheels. With their help, it is easy to move it from place to place and roll it under a car.
The garage device has a vertical stand, on which a jack is installed. “Goose” has a retractable boom, which is equipped with a chain and hook. When the jack is activated, the boom goes up, lifting the load.
A hydraulic crane is most often used to lift an engine. The device can be made according to ready-made drawings, but most often a hand-created crane diagram is used; even beginners can draw it with their own hands.
First, the collapsible part of the pore is made; it is a butt part. After this, the vertical stand is welded. A spacer must be installed at the bottom. After this, they proceed to installing the jack; it must be securely fastened. The boom is made to reach full reach; it is needed to remove the engine. All parts of the structure are welded. The result is a reliable yet maneuverable device.
When the product is ready, tests must be carried out.
To do this, hang a load that should be 20% heavier than the one that needs to be lifted. If the mechanism can withstand the load, it can be used for work. The goose crane is collapsible, so it will not take up much space in the garage.
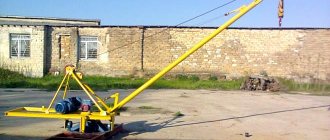
Mobile mini crane for lifting and transporting heavy loads
The design of this device is practically no different from the previous version, but there is a small addition in the form of a manual lifting mechanism.
Let's get to work. First, the base of the crane (supporting part) is made from corrugated pipe.
Swivel wheels are attached to the bottom of the base so that the structure is mobile and can be freely moved around the garage or outside it.
After this, a vertical stand along with a stop is attached to the base.
Next, a telescopic boom is manufactured and installed. We install a bottle jack between the stand and the boom.
At the last stage, all that remains is to secure the hand winch to the vertical stand. We wind a steel cable (at least 4-5 mm thick) with a crane hook at the end onto the lifting mechanism drum.
This design is quite convenient to use and can easily lift a load weighing 200 kg or more.
The step-by-step process of making the lift is shown in the author's video - we recommend watching it.
Homemade A Small Mobile Crane For Workshop
How to use
The telescopic boom of the mechanism can be installed in several positions. The goose is maneuverable and can be controlled by 1 person. The equipment lifts quite heavy loads due to the installed jack; no additional accessories or devices for moving heavy loads are needed.
In order to raise the car engine, you need to open the hood and roll up the crane. It is installed so that the “legs” are placed under the machine, and the chain with the hook hangs over the engine.
The engine has eyes, cables are hooked onto them, and a chain with a hook is connected to them. Having installed the pry bar, pump the jack. He raises the boom, and the engine goes up with it.
After the repair of the machine is completed, the motor is lowered into place and the hook is removed. The crane is rolled away from the car. If necessary, it can be disassembled.
hydraulic crane jib 2t
General information
The single-handle faucet replaced the outdated “herringbone” and other similar designs. This type of faucet is easy to use and maintain, durable and reliable.
The stylish appearance of the single-handle faucet will transform the interior of the bathroom. Even the most ordinary bathroom will take on an elegant and modern look if you install a single-lever faucet in it.
Important Technical characteristics of South Korean light trucks Hyundai Porter (Hyundai Porter)
The water temperature and flow rate in the single-jaw mixer are adjusted using 1 handle. This allows you to create pressure from very weak to very powerful, depending on the case.
Washing and cleaning single lever faucets is easy. This can be done using regular cleaning products and a soft sponge. At the same time, the faucet will always have an elegant and shiny appearance.
Single-handle mixer device
Single-grip cranes also need minor repairs. To repair such a device yourself, you need to know how to disassemble a single-lever mixer, what elements it consists of, etc.
The main components of a single-jaw mixer are:
- control handle (lever);
- spout that regulates the stream;
- frame;
- fastening element;
- ball or cartridge element;
- gaskets made of rubber or silicone;
- circular nut;
- elastic tubes (hoses) for supplying water.
The main difference between single-lever taps of different designs is the mixing chamber. It can be a hollow ball made of stainless steel or a cartridge made of especially durable ceramics.
Through 2 holes, hot and cold water is supplied to the mixing chamber. There is an additional passage for the jet to exit. Water circulation, pressure and temperature adjustment of the stream inside the chamber are carried out using the working handle.
The ball mixing chamber is subject to minor repairs, cleaning, etc. during operation. The ceramic cartridge chamber must be replaced in case of malfunction. Special filters through which water will be supplied from the water supply will help extend the service life of such faucets.
Self-disassembly of single-lever taps is carried out to eliminate such malfunctions as:
- cartridge leakage;
- weak water supply when the ball mixer is turned on at full power;
- Push-button switch malfunction;
- simultaneous supply of water to the shower head and spout.
How to make a garage goose crane with your own hands
photo of the manufacturing process
mode according to pipe sizes and angle
I used a cardan cross and a shank as the upper hinge
During the tests, I noticed that the jack was tilting and thought about making a similar hinge at the bottom of the jack, but after several removals and installations of the engine in the engine compartment, the problem disappeared because the jack's stroke was not so large and the misalignment practically disappeared
and a short video of the work
the two-ton jack is a little heavy to pull; in the future it will be replaced with a more powerful one
Review of a homemade hydraulic crane! Removing and installing the engine in a car with two hands.
Roll-away crane for removing the engine with your own hands
Posted by FACTOGEN 4 years ago Find FACTOGEN
If you liked this video, subscribe to my CHANNEL.
Subscribe to the channel and watch for updates.
Stay updated on all new events and take care of yourself.
Our client remains the author's rights belong to their legitimate owners. For which the design is intended, if you are the creator of any of the fragments provided in this collection and the distribution of this material infringes on your rights as the author, please contact me.
This video is a photo slide about Home Decor Ideas.PHOTO IS FROM INTERNET.If you are an owner of photo please contact me for tag you or if you wish to delete.
FOR DONATING AS THANK YOU: https://donatepay.ru/donation/10086
To develop and improve the channel, funds are required. If you have the opportunity, please help.
I would be grateful for financial assistance in the development of the CANAL.
AccountRapida 9021781447Qiwi 79021781447PAYEER P27059362paypal [email protected]
Sberbank 4817760012887810
Subscribe to my social accounts, share the link with your friends.
https://.com/id97628782 https://.com/club81765941 https://.com/club81655395 https://www..com/profile.php. https://.com/adgodadhttps://my.mail.ru/ro.ru/ad-god/https://ok.ru/profile/590315610156https://mirtesen.ru/people/367612980 https:// coub.com/843641d4562cbe00518e2e44c2d418b1https://ru.pinterest.com/ad999ad/https://postila.ru/id6448411https://mirtesen.ru/people/367612980
https://plus.google.com/ad999ad11
Don't share this success with your friends.
This video describes the process of producing a homemade crane for a garage, commonly known as a gander. divided into 5 parts Manufacturing and Review You can look at the review of the crane at the link:
A group on VK about my garage, where there are a lot of exciting homemade products: https://.com/snkgarage
Garage crane // Crane for removing the engine /// DIY hydraulic folding crane!!!
Friends, I found the time to assemble for myself a magical sandblasting unit, which is also very powerful, not at all difficult to assemble and not even expensive! See sandblasting work here
Don’t be embarrassed to comment, and additionally like it as a symbol that my work was useful to someone or was just interesting to look at)
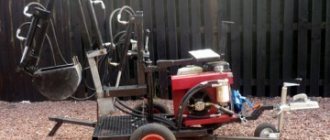
Here the video shows the process of production and assembly of a homemade motor lift. The lift is equipped with an electronic winch with a lifting capacity of up to 500 kg. and a hydraulic jack 10 tons. The following parts were used: I-beam No. 10 for the boom; channel for the frame, pipe for the support mast.
The purpose of building this lift was: universality of implementation (lifting engines not only), prefabricated design, simplicity and speed of assembly. This video shows the process of manufacturing and assembling a self-made lift for the engine. The hoist is equipped with an electric winch with a carrying capacity of up to 500 kg. And a hydraulic jack of 10 tons.
Of the parts were used: I-bar 10 for the boom; A channel for a support, a pipe for a supporting mast. The purpose of the construction of this lift was: universality of application (lifting of engines and not only), collapsible construction, simplicity and speed of assembly. There is an option to purchase a cheap tool here: https://goo.
gl/DmU62F 0:08 Introduction; 0:21 Assembly; 02:03 Platform for a jack; 03:11 Installing a jack; 05:18 Crane boom; 05:56 Installed an electronic winch; 06:13 Lifting mechanism assembly; 07:07 Test lifting of the load; 07:33 to the upbuild channel Support the project, subscribe to the channel: https://www..com/channel/UCbvlxy4eID2WGhwr46Cxe-Q?sub_confirmation=1 VK group: https://.
com/upbuild Part 5: Testing the lift: https://www..com/watch?v=a9kQxr-LopE Refinement and testing: Part 3: https://www..com/watch?v=xDQC23aDQMw Homemade motor lift part 4 End Homemade lift for the engine part 4 Final
https://www..com/watch?v=E-p70P5L-aM
video answer DIY engine crane
Continuation of the topic about engine knocking on the Gazelle Next. Here in the video we will show you how to remove the pan on a Gazelle Next with a Cummins engine, and what pitfalls there are during the removal process. Now we have a good assistant for removing engines, a hydraulic garage crane.
Continuing the theme of the engine knock at Gazelle Next. In this video we show you how to remove the tray from the NEXT Gazelle engine Cummins, what are the pitfalls when removed. Now we have a good helper for removing engines, hydraulic crane garage.
Design features and operating principle
The hydraulic valve is made of durable metal and has a stable design. The main principle of the mechanism structure: stable support with low dead weight. This helps you lift loads of up to three tons with ease, but a maximum of two meters above the ground.
Garage crane is used for:
The crane contains a hydraulic drive and operates through a system of communicating vessels. The method allows you to make the rise smooth.
Stationary
The stationary crane is installed in large car repair shops and is securely attached to a monolithic foundation. The mechanism has a boom with a rotating system and is equipped with a manual drive. Allows you to work on only one vehicle at a time.
It is important to calculate the installation location in advance, since it will not be possible to dismantle the structure without loss.
An integral advantage of a stationary crane is its large lifting capacity. It is provided by a monolithic support, which creates rigidity of the system.
Portable
The hydraulic rolling crane has wheels on its base. The support is provided by the lower metal beams, which results in loss of load capacity readings. It is better to choose a faucet with a massive triangular support. By design they are divided:
Important! Folding units need to strictly follow the instructions for lifting the permitted load. The arrow cannot withstand and, if the permitted standards are not observed, it breaks off.
Transportation
Relocation of a tower crane is carried out:
- Divided into assemblies and mechanisms. The method is typical for non-mobile lifts with a fixed tower and heavy-duty rotary cranes.
- Loading the unit onto a vehicle in one piece without disassembling. This method is used to transport mobile, quickly mounted devices.
When transporting non-mobile cranes, the installation time of which reaches up to 2 weeks, use:
- tractor units;
- 1-axle trailers.
Mobile units transport:
- tractor units;
- dolly trolleys;
- tractors with a ball pin hitch;
- trailers.
The lift is turned when moving using safe handles and a drawbar. When driving a road train along streets and highways, overall dimensions must comply with GOST 13556-76.
Standard dimensions:
- Load moment - up to 170 tm.
- The length of the module without a tractor is up to 28 m.
- Height and width - no more than 4.2 m.
- Clearance - no less than 0.35 m.
- Wheel load:
- for 4-wheeled trolleys - no more than 5 t;
- for 2 coaxial bogies - no more than 4.3 tf.
Thus, the KB-503 crane is transported folded on 4 dollies when attached to KrAZ-255V, KrAZ-214V tractors. Install separately from the tap:
- boom mechanism with trolley;
- intermediate tower sections;
- head;
- 2 wheeled trolleys;
- counterweight.
Permissible slope:
- longitudinal - 5%;
- transverse - 3%.
The route must be coordinated in advance with the traffic police. Self-erecting lifts do not require a permit. Transportation speed can reach more than 80 km/h. The driving speed of non-mobile devices when driving on a flat highway is 15 km/h.
Important Description and technical characteristics of the KamAZ-65801 truck
If it is necessary to relocate the lift over short distances, it is transported without disassembly along temporary inventory and crane tracks. When moving from the territory of the plant where the crane was produced to an industrial facility, they use the services of the railway. To facilitate loading and unloading of lifting modules, open railway platforms are used. Their dimensions must correspond to the dimensions of the rolling stock.
Main types of equipment
The average garage has a reduced square footage and requires careful selection of equipment. Before installation, it is recommended to carefully study the need for individual mechanisms, their types, pros and cons. A hydraulic valve is determined by two criteria.
By type of drive
There are also two subtypes of hydraulic drive:
A significant drawback of the first is oil cylinders. They need frequent regular replacement, so this design is considered extremely unprofitable for constant use. The combined system will last longer. However, some of the work with winches will have to be taken on by mechanics.
According to the design of the support
Hydraulic cranes are divided into mobile and stationary, they can be folding and prefabricated cast (goose). For ordinary garages, it is more rational to choose a mobile structure with folding parts.
DIY crane assembly technology
If you have certain skills, assembling the mechanism yourself will not be difficult. To do this, it is important to draw up a preliminary design drawing, choose materials wisely and strictly follow the assembly instructions.
Schemes and drawings
Below are sample drawings of a hydraulic crane. You need to make accurate calculations yourself, based on the parameters of a particular garage.
Material selection
To build a garage lift yourself, it is recommended to first purchase all the required materials:
Step-by-step construction instructions
The process of assembling and installing a homemade garage crane does not look complicated:
Installing a faucet yourself has a number of important advantages. For example, the cost of a homemade mechanism is almost two times lower than a purchased one.
Source
Homemade garage crane “Goose”
Homemade garage crane “Goose”
Good day everyone, the story of days gone by. So to speak, the product has passed the test of loads and time. This drawing was found on the Internet, although the dimensions and design had to be changed to suit my conditions and capabilities, but thanks to the author anyway.
August 2015.
A 6.5 mm channel was purchased for the bottom, but it turned out to be weak for the four supports (wheels), so the front legs had to be made a little shorter and strip 6 was welded along the bottom.
a 60*60*4 mm pipe was taken onto the post and boom
The price of wheels pushed me to make them myself)
cylinder according to the Chinese request) for 8 tons, the working stroke is somewhere around 0.
the first ascent, the engine from the Mercedes W 123 3.0 D + 4st gearbox held up perfectly, but when trying to turn around, the purchased, good and cheap rear wheels collapsed
Removing Attachments
Also, for the convenience of performing work, it is better to drive the car into an inspection hole. Immediately after this, the negative terminal from the battery is removed.
Before starting work, you need to drain the engine oil and coolant system.
To make it more convenient to remove and disconnect engine attachments, you must remove the hood from the car. This will provide better access to the upper hanging elements.
Then all pipes and wiring from the engine are disconnected - the cooling system pipes going to the engine from the radiator, the pipes going to the stove.
As for the wiring, you will need to disconnect all connections going to the sensors:
You will also need to disconnect the wires from the spark plugs, starter, and generator. In the future, the generator will have to be completely dismantled.
| 4. Removing the coolant sensor | 5. Removing the solenoid valve |
| 8. Disconnecting high voltage |
You will also need to disconnect:
In general, removal of the Oka engine should be accompanied by preliminary dismantling of the gearbox and drive, but this may not be necessary.
Since the engine will still be disassembled, the method of removing the engine without a gearbox will require removing the cylinder head before removing the engine from the car.
| 10. Removing the carburetor pipe | 11. Removing the brake vacuum hose and manifold heating | 12. Removing the air filter housing |
| 13. Removing the air damper drive | 14. Removing the throttle drive |
How to make a garage tap for engine removal
One dark autumn evening, when I was drinking coffee and sorting through photographs, my friend Dima sent me a message that he had accidentally found a very large and interesting abandoned object. We began to study satellite images, and the more I looked at the map, the more the thought grew stronger in me that this was definitely not a cowshed, not a farm, or not an MTS base, but something very interesting.
Having searched for additional information, we found out that this object is nothing more than an abandoned military unit of the missile forces, the remains of the legendary “nuclear shield”. As a rule, there is almost no information about such objects in the public domain - despite the fact that Belarus in 1993 year abandoned nuclear weapons and completely gave up all nuclear warheads; such objects are still shrouded in an atmosphere of secrecy and almost mystical fear.
Some grains of information can be gleaned from the memories of former soldiers who served in the unit - this is exactly the kind of search work we did, finding out the purpose and functions of almost all the buildings in the unit.
By the way, service in the Strategic Missile Forces was one of the most dangerous. The soldiers came into contact with radioactive materials, a caustic rocket oxidizer, as well as extremely dangerous, all-pervasive and affecting literally all body systems, heptyl, which was part of the rocket fuel.
Despite the fact that many years have passed since the facilities were decommissioned, I do not recommend anyone to go directly into abandoned missile silos.
However, there were no missile silos directly on the territory of the site of our walk today - apparently, they were located somewhere nearby. So, we start KVN forward.02. The facility is a very extensive complex of buildings and structures located on an area of approximately 300x400 meters. The first building on the right of the road is the unit headquarters. It is clear that the building has been abandoned for a very long time - the entire area around has already been overgrown with young aspen trees.03. Everything inside the headquarters was broken and stolen.
In some places there are even missing boards on the floor.04. Remains of furniture in the corridors.05. Room. Once upon a time, officers sat here, puffing out their cheeks and studying the terribly secret maps of the “probable enemy.”06. Storage room near the dining room. On the side wall there was a fresco with the inscription “The people and the army are united!” The fresco depicts a soldier, a steelworker, Ilyich, who is sick with jaundice, and for some reason the sea with a ship.07. Hundreds of sets of old quilted jackets, ear flaps, caps and other military uniforms are scattered inside the warehouse.
There is the smell of rotten fabric, some small flies are circling over the clothes.08. Shirts, bubyr.09. The building of the soldiers' canteen.10. Let's go inside. A stenciled menu from the last lunch was left in the lobby.11. Dining room with sepp and hammer.12. Some side rooms.13. Kitchen “hot shop” room.14. I wonder why such high ceilings are made here? The height of the room is six and a half.15 meters. Pantry doors. Probably, soldiers' pearl barley was stored here.16. View of the building from the back.
17. The building on the left is the officers' mess. It is slightly smaller in size than the soldier's.18. Everything is about the same inside. In the photo there is a side room, some kind of storeroom.19. Bathhouse doors.20. Steam room.21. Broken glass blocks in the locker room.22. The boiler room, which heated the entire military unit.23. Everything inside is destroyed. Local residents are slowly taking away the refractory bricks of the boilers for their own needs.24. Here is one of the dangerous places - a side room in the boiler room.
At the back of the room is what appears to be a concrete pool of unknown depth, which is filled with black bitumen.25. Go ahead. These are the garages. Most likely, there were rocket tractors here—huge vehicles on sixteen wheels that carried rocket “pencils.”26. Wheel. But not from tractors, no. The tread pattern is not what is needed for driving on concrete.27. Everything around was overgrown with dark green radioactive moss.28. Open doors.29.
Inside we found a poster with the rules for using a light khimza suit. Soldiers used this while working in missile silos - when working with heptyl and rocket oxidizer, it was simply necessary. And I also put on an instrumentation gas mask - this one with a closed breathing cycle.30. And in the next garage there is... A combine harvester! That's who the wheel belonged to. It is completely unclear what he is doing here. By the way, pay attention to the ceiling - it's all black.
At the same time, there are no signs of a serious fire on the walls or floor. I think that these are traces of the work of local “color markers” burning insulation on copper wiring.31. Garages.32. Premises of unknown purpose. It looks like a small warehouse. Since it is located not far from garages - perhaps something like a mechanic shop.33. Entrance.34. Interior premises.35. For some reason, there is a child’s sandal lying on the floor of the corridor, which vividly reminded me of Pripyat. What is she doing on the territory of a strategic nuclear facility?36. Cinema building.37.
It is quite different from the rest of the fairly well-built “military establishments” on the territory of the unit. It's like a wooden barrack filled with glass wool insulation. I think this building was built by the soldiers of the unit themselves.38. The inside looks like this.40. And this is medical point 41. Entrance.42. Interior premises.43. Inpatient rooms.44. Second floor.45. Ladder. The railings have long been cut off. I wonder when and by whom?46. View of the dining room from the side of the first aid station.47. Barracks building. We won’t go inside yet, we’ll leave it for dessert.
Then you need to move under the car
Removing engine mounting elements
First you will need to unscrew all the bolts securing the clutch housing from the power unit.
16. Removing the clutch housing
Then you should proceed to the engine mounting elements.
To do this, you will have to unscrew the bolts securing the motor mounts. First, the nut is unscrewed from the bolt on the front support. Since the power plant continues to rest on this support, in order to be able to pull out the bolt, the engine should be lifted slightly using a pry bar and the bolt removed. Next, holding the unit with a pry bar, insert a wooden block into the gap between it and the subframe. After this, it will be possible to unscrew the engine bracket mounting bolts.
| 17. Removing the front engine mount | 18. Lifting the engine with a pry bar, remove the bolt | 19. To unload the bracket, we place a block |
| 20. Using the “17” head, unscrew the 3 bolts securing the bracket | 21. Bracket mounting bolts when removed | 22. Remove the bracket with support |
In the same way, the rear right support becomes loose, followed by installing it on a wooden block and removing the bracket.
Do-it-yourself crane beam in the garage: manufacturing advice
To make a beam crane yourself, you need to have some plumbing and welding skills. Only a garage with sufficient area is suitable for the location of the finished crane. To get started, you must first purchase a pipe with a rectangular cross-section, a metal corner, a metal C-profile and sliding wheels.
When installing posts and rails, it should be taken into account that the walls of the garage most often are not even.
The frame is welded from a corner along the entire width of the building. Particular attention should be paid to ensuring that all ribs are located strictly parallel and perpendicular. To make the trolley, a pipe with a rectangular cross-section is used. The frame must be placed on wheels, which must coincide with the ribs of the frame.
Making Tips:
- It is better to attach the rollers to a strip welded overlapping where the rods are connected to the supports.
- To make the crane movable, rollers are welded to the racks, which can be taken from containers used in warehouses.
- To manufacture the lifting mechanism, a manual worm winch equipped with a steel cable is used.
If there is no winch, it can be replaced with a hoist. But in this case, for the manufacture of the rod it is necessary to use a double tee. A crane beam, manufactured taking into account all the rules, will allow you to easily remove the engine and lift the car body.
Video - How to remove the engine from the Oka
It is recommended to remove the engine and transmission together as a single power unit and then disconnect the engine from the transmission. The following work is carried out in the same way for all types of engines; additional instructions are given for cars with an automatic transmission. When lifting the power unit, it must be tilted at an angle of 45° to ensure exit from the engine compartment of the transmission. The power unit weighs more than 200 kg, so when removing, special care must be taken not to damage the body surfaces or paintwork.
Rice. Open the hood to a 90° position
Rice. Location of the coolant drain plug (1) on the left side of the cylinder block. Do not unscrew the bolts indicated by the arrows.
Rice. Location of the coolant drain plug on the right side of the cylinder block. Do not remove the bolts indicated by the arrows.
Rice. The arrows indicate the mounting bolts for the pump of the hydraulic system of the adjustable wheel suspension.
Basic maintenance of the motor is possible without dismantling it. Replacement of spark plugs, maintenance of intake and exhaust manifolds, and even replacement of the timing belt (chain) is carried out directly in the engine compartment of the car. However, work with valves, crankshaft, piston group, etc. is carried out only with the engine removed. Not to mention the overhaul procedure.
From our article you will learn how to remove the engine from a car in the garage, how you can remove the engine yourself and how to do it correctly.
The material was prepared by the site Auto-science.ru - whose specialists will help you check the mileage of your car efficiently and without errors.
how to lift the engine out of a car with your own hands
You really can't do it with your hands.
manual winch
head removed, hinge, 2 bolts, rags for wings, 2-3 meter thick pipe, 2 lift, 1 coordinate, do not put legs
You can take everything apart under the hood. I've already done this.
the cable, the crowbar, and two people can pull it out entirely. if there is one then for parts
There are special attachments sold in auto parts stores, where you can turn the handle by hand or something like that…. Well, personally, how long ago was the engine removed from a Muscovite - they drove it into the garage, the chain to the engine, then the chain was thrown over the crossbar, and then this chain was attached to the second car
depending on what car. on a six without a head, one was pulled out and installed. hard, but tolerable
at least three of us are required or a winch behind the beam
If a car has up to 2 liters, remove everything from the engine, the block will become much lighter. The engine jack is lifted, removed from the cushions and pulled out. If it’s a Jeep/SUV, then pull the waist, or take everything off again and take two or three people out. If it’s a BelAZ, then it’s easier to squeeze it out without special ones. equipment
I knew one guy - one of them pulled out pennies from the collection.
When the time comes to overhaul the engine, there is no way to do without overhauling its internal parts. To do this, you have to remove it and take it to a mechanic, who can replace all the old worn parts with new ones. But it is at this stage that most drivers make their mistakes when they try alone to quickly remove the engine, repair it and quickly drive their favorite car. First of all, you need to understand that it is impossible to remove the power unit alone, otherwise you can not only hopelessly damage the engine crankcase, but also damage your limbs. How many cases have there been when drivers, in great haste, tried to remove the engine themselves! Then we drive the car to the garage, where there is a pit and reinforced concrete floors, which allow us to more confidently carry out all these necessary repairs. You can only disconnect all the electrical cables, fuel wires and belts from the pulleys, while not forgetting to drain all the water from the radiator and the oil from the engine crankcase. These are all elementary but necessary operations that every self-respecting driver should know. Therefore, before removing the engine, you need to prepare all useful containers where all liquids from the engine will be drained, not forgetting to prepare soft rags along the way, with which you will have to collect all the spilled liquid (you can be sure that there will definitely be some). It is advisable, if the engine still has a liquid air filter (they are installed on GAS), to remove it and pour out the old oil. This will reduce the weight of the engine. Then we rent a special device - a jack-trolley and place it under the engine. With its help, we slightly lift the engine from below in order to be able to loosen the bolts on the rubber pads on which, in fact, the engine hangs. After the last nuts are unscrewed, the engine is then smoothly and gradually released to the bottom. This first option is suitable when an electric lift is available and the car can be raised completely. But in widespread cases, when you don’t have a hoist or floor lift at hand, but you really want to go, you can get by with primitive devices. You need to prepare a metal cable and pipe. Then we wrap the cable around the engine, lift the engine, loosen the nuts on the mounts and very carefully lower the engine to the bottom of the pit. It is better to do this dangerous work with three people, because two will hold the iron pipe, and the third will loosen the nuts on the engine shock-absorbing mounts. Needless to say, before removing the engine from the car, the wheels should be firmly fixed in wooden blocks in order to completely eliminate even the slightest movement of the car chassis? Install the engine in reverse order.
A winch or assistants to help.
Lower into the pit, then winch up
the simplest and cheapest option is a manual hoist. You can buy it for 3-4 rubles! https://www.mp-u.ru/shop/ruchnaya_tal
My husband also suffered and finally bought a hoist. Perhaps you should buy or maybe repair the old one. There are also spare parts for the hoist here.
touch.otvet.mail.ru
How to remove the engine from a car in the garage without resorting to the help of a car service?
In fact, this is not such a complicated procedure as it might seem at first glance. The main task is to select tools for removing the motor.
Important!
The engine weighs several hundred kilograms.
Falling it can not only cause property damage, but also cause serious injury. Before lifting the engine from the engine compartment, it is necessary to carry out the following procedures:
If you plan to remove the engine without the transmission, you need to unscrew all the tightening bolts and make sure that after removal the gearbox will not fall under the car. That is, you need to take care of temporarily securing the unit.
How to remove the engine from a car?
At home, there is usually no professional lifting equipment, so you will have to rent it or make it yourself.
Do-it-yourself goose for removing the engine
This is a simple mechanism that resembles a gooseneck. It makes it possible to move the engine away from the engine compartment. It may have a rotating design that allows you to remove the engine without moving the machine.
The heavy internal combustion engine is simply transferred to a workbench located next to the car. In fact, it is a universal garage crane. The rack rests on long “legs” located under the engine compartment to prevent it from tipping over. A cable and a winch are used for lifting.
The gander is used both in garage conditions and in small services.
DIY engine removal lift
As a rule, this is a rolling crane, the lower part of which is placed under the front bumper. A smooth platform is required; on uneven ground, removing the engine using such a device is problematic. The lift operates using hydraulics or a tensioning mechanism like a winch. The device is simple: a stand with rolling supports, and a movable boom on which the motor is suspended. You can make a lift with your own hands from a channel or a square professional. pipes.
If there are strong wheels on supporting legs, you can quickly roll out the lift with the motor and move it to the repair area.
Do-it-yourself winch for removing the engine
Applicable if the car is being repaired in a solid stone garage. The most inexpensive tool that can be used to remove an engine. A chain or cable is used to pull it out.
There are two design options:
Homemade crane for car engine
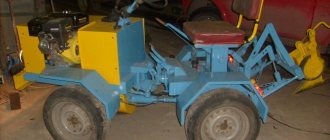
For repair work on a car engine, a lifting device was needed, a craftsman from Novosibirsk decided to make a homemade crane with his own hands.
As planned, the crane should be collapsible so that it does not take up much space in the garage. Lifting will be carried out using a hydraulic jack.
The photo shows the homemade design.
The base is welded from a 60 mm channel and a 50 mm square pipe; additional trim is used to strengthen the structure.
The channel is welded at an angle at which the vertical column tilts back.
Vertical stand and boom made of 50 mm square pipe.
The legs and reach of the boom are made from 40mm square tube. I drilled holes for the vertical stand, legs, and arrows for outreach. I welded the ear under the jack and figured out how the jack would fit on a piece of some kind of metal structure. The boom has a 30mm corner reinforcement.
Shoulder - 1/5, approximately 110 cm of the boom and 22 cm of the stop from the axis of the vertical post.
In the photo there is a rise of 130 cm to 210 cm. The boom can be moved plus depending on the load capacity. You can also unscrew the screw from the rod on the jack. The jack is designed for 3000 kg, so the weight on the boom is maximum 600 kg (arm 3000/5).
During testing, the vertical console began to bend (between the lower channels and the lower stop of the jack). Motor + gearbox, 250-260 kg. I had to strengthen it and weld 5 mm cut plates onto the 50 pipe.
A homemade crane is easy to use, 25 minutes and the motor is already on the cushions in the car.
sam-stroitel.com
DIY crane assembly technology
If you have certain skills, assembling the mechanism yourself will not be difficult. To do this, it is important to draw up a preliminary design drawing, choose materials wisely and strictly follow the assembly instructions.
Schemes and drawings
Below are sample drawings of a hydraulic crane. You need to make accurate calculations yourself, based on the parameters of a particular garage.
Material selection
To build a garage lift yourself, it is recommended to first purchase all the required materials: