In order for an engine with a 402 carburetor from a UAZ to work normally, you need to set the ignition correctly, and how to do this will be described in this article. Many novice car owners incorrectly set the marks when changing the timing belt, so our auto service often receives engines that require major repairs. This should not be allowed, since, firstly, it is costly for the owner. Secondly, such a breakdown leads to the purchase of a new engine. But this doesn't happen often.
Ignition system elements
The elements of ignition of fuel in the engine are dominant. Through it, the power unit is started. A couple of types of ignition systems have been developed for gasoline engines:
- contact;
- contactless.
The elements for igniting a combustible gasoline engine are given in the list:
- distributor or spark breaker. Installed to determine the moment in ignition when a spark appears and transfers high voltage to the engine cylinders. The device combines its work with the movement of pistons in the cylinders;
- coil;
- switch. This part extinguishes the flow of electricity to the coil winding and turns the signal from the regulator into a current signal;
- candles;
- lock;
- starter;
- resistance. Sometimes they add.
Attention! On an engine from a Gazelle or UAZ, a non-contact ignition system is used. A generator is added to it to control signals and devices to regulate advance: vacuum and centrifugal.
Experienced mechanics advise reading the characteristics given below to set the ignition correctly:
- The operation of the engine cylinders is carried out in this way: one, two, four, three;
- the rotor device always rotates counter-minutewise;
- the centrifugal part has a lead angle of eighteen degrees;
- the vacuum part has a lead angle of ten degrees;
- SZ play does not exceed 0.8 mm;
- R resistor does not exceed 8 kOhm;
- R SZ no more than 7 kOhm;
- R in the stator winding – 0.5 kOhm.
Now let's talk about how ignition of fuel in the power unit works.
Characteristics of the UAZ 469 transmission, chassis and control systems
Transmission
UAZ 469 is equipped with a 4-speed manual transmission with synchronizers in 3rd and 4th gears. The weight of the gearbox without lubrication is 33.5 kg. Oil volume – 1 l.
Gear ratios: First gear – 4.12 Second gear – 2.64 Third gear – 1.58 Fourth gear – 1.00 Rear gear – 5.22
Transfer case
UAZ 469 is equipped with a 2-speed manual transfer case. It is rigidly attached to the gearbox without an intermediate driveshaft. Its weight including the handbrake is 37.4 kg. The volume of oil to be filled is 0.7 l.
Gear ratios: Direct transmission – 1.00 Low gear – 1.94 Power take-off – up to 40%
UAZ 469B has a single-speed transfer case.
How the ignition system works
The fuel mixture is ignited as follows:
- The driver turns the key in the lock.
- Current from the battery goes to the starter.
- The crankshaft begins to rotate.
- The distributor turns on.
- Current flows to the coil.
- It passes through the switch to the distributor.
- The last device distributes the current among the spark plugs.
Similar article Engine oil for UAZ Patriot ZMZ 409
This ensures proper ignition in the engine. However, there are early and late arson. Then we can talk about malfunctions of the power unit.
Early ignition
Early ignition occurs before the cylinder piston approaches top dead center. Gasoline with air and oil is ignited while the piston is still moving. Such problems arise due to an incorrectly set ignition angle.
Experienced mechanics identify such a breakdown by the following signs:
- the power unit does not start immediately;
- unstable operation of the engine when idle at traffic lights, when the car is standing still;
- the appearance of a chattering sound that does not go away when the load increases;
- When disassembling the engine, mechanics discover carbon deposits on the spark plugs. This means that the fuel does not burn out completely;
- increased fuel consumption;
- dark smoke from the muffler pipe.
These are all signs of pre-ignition. Let's look at what happens when the ignition is slow and ignition does not occur on time.
Late ignition
If the marks are set incorrectly on 402 ZMZ engines, late ignition occurs when the piston has already passed the top point. The car owner can notice this by a drop in power with increased gasoline consumption.
Experienced mechanics notice late ignition by the following signs:
- candles turn gray or white;
- the engine begins to heat up very much, although the cooling system is in order;
- The motor may stall when the load increases.
Correct ignition adjustment and adequate placement of marks will help to cope with the problems described above.
Design features
The operating procedure for the ignition of a 4-cylinder engine
The design of the engine in question is simple and quite reliable. The 409 has a durable cast iron cylinder block (bored directly into it), with coolant passages between the cylinders.
The cylinder head is cast from aluminum and contains exhaust and intake valves - 4 per cylinder. The cylinder clearance is controlled by hydraulic pushers. In early models, hydraulic tappets were prone to failure because the tensioner shoes were made of plastic, wear debris from which contaminated the oil. Later, it was decided to abandon this practice, and the shoes were replaced with metal “stars”.
The motor pistons are also aluminum and equipped with inserts for thermoregulation. The bottom of the pistons is equipped with four special grooves, which help to avoid severe damage from the pistons hitting the valves during engine malfunctions.
There are 3 piston rings on each pistons: one oil scraper ring, two compression rings. The latter are coated with porous chromium, and a tin layer of protection is applied to the bottom.
The engine crankshaft is cast iron to increase strength. The crankshaft, in comparison with that in the 406 modification, is distinguished by a larger crank radius and, accordingly, the piston stroke has increased to 94 mm.
The valves are steel, made of a heat-resistant type of metal, and can be rotated during operation, which ensures more uniform wear.
The supply with ZMZ 409 gasoline, as mentioned earlier, is injection; the mixture is injected into the engine cylinders by an injector. The injection is controlled by an electronic microcontroller, this is how, for example, the fuel system of the UAZ “Bukhanka” with an injection 409 engine and other samples from this concern are implemented.
Gas distribution mechanism
The engine camshafts are cast iron. Their design differs slightly depending on the modification of the ZMZ 409 engine. The mechanism is driven by a chain, the tension level of which is ensured and adjusted by two hydraulic tensioners - on the front cover of the BC and on the head.
Timing chain appearance:
Procedure for adjusting the ignition system
To correctly adjust the ignition, you need not only to set the advance angles, but also to position the marks correctly. By the way, if the car owner does not understand and does not understand the design of the engine, then it is better to give this work to experienced mechanics in the service center.
Let's look at all the nuances of ignition adjustment.
Label matching
To correctly compare the marks and set the engine ignition, do the following:
- Set the first cylinder to top dead center.
- The crankshaft is turned so that the mark on its pulley aligns with the mark on the cylinder head.
To do these steps, you will need to remove the spark plug from the first cylinder and plug the hole with a rag. Rotate the crankshaft until this rag is removed by air, which creates pressure inside the cylinder.
Similar article How to properly break in an engine after a major overhaul
Such actions will help to find the end of the compression stroke, otherwise the top dead center of the cylinder.
Advance angle adjustment
To set the ignition timing of the ZMZ 402, you need to do the following:
- Slightly unscrew the octane number corrector bolt on the distributor.
- Set the advance angle on the engine to the center of the scale.
- Slightly unscrew the screw that secures the plates of the octane correction device.
- Rotate the distributor until the red mark on the rotor head is directly in front of the mark on the stator.
The car owner must then hold the engine distributor with one hand. And with his second hand he will tighten the screws. This is how the ZMZ 402 ignition is set.
Checking the correct installation of the ignition
Now the car owner will only have to check that the ignition is installed correctly. Whether he installed the ignition correctly or not can be determined as follows:
- Accelerate the vehicle to 60 kilometers per hour.
- At this speed, press the gas pedal sharply.
- Detonation will occur within three seconds.
- If it does not continue in the future, then the engine ignition was set correctly.
Attention! Experienced mechanics set the ignition in the engine using a strobe light.
Design Features
In principle, the UMZ 417 engine is copied from the ZMZ 402 engine, but differences still exist:
- seating of the sleeves in the block with rubber rings instead of copper gaskets;
- the flywheel is larger in diameter;
- no fins at the beginning of release, then 4 stiffening ribs appeared;
- removable oil filter instead of a glass one;
- the cooling system diagram is reversed - both supply and intake of coolant from the cylinder head;
- weak fiber pump seal instead of the seal from the VAZ engine;
- The diameter of the valve plates has been reduced.
And the most important reason for the decrease in power of the UMZ 417 in comparison with the ZMZ 402 is the combined, non-bifurcated exhaust manifold.
Design features are:
- in-line engine layout and its longitudinal location relative to the vehicle’s trajectory;
- combustion chamber is small in size, dome configuration;
- improved cleaning of lubricant (full-flow circuit with replaceable filter);
- high service life from 150,000 km;
- short piston stroke and overhead valve arrangement.
To carry out major repairs, you do not need to visit a service station; all operations can be carried out on your own in the garage. For this purpose, the user manual contains both a description of the parameters and step-by-step photos.
Even in the absence of hydraulic lifters, the manufacturer recommends pouring high-quality oil and antifreeze to cool the engine with a very modest finning of the cylinder block.
How to install the ignition yourself
You can install the ignition yourself. For such a procedure you will need a standard set of tools. If there is a strobe, then that's good. The tool will allow you to set the correct ignition of the mixture, so as not to endlessly crawl under the hood.
And the procedure is done as follows:
- Warm up the engine to 80 degrees. This is its operating temperature.
- The instrument is connected to the on-board computer.
- The distributor cap lock will need to be unscrewed.
- The signal sensor must be placed on the high-voltage wire of the first cylinder.
- If there is an engine vacuum corrector hose, it must be plugged.
- Light from a strobe light is directed onto the engine crankshaft pulley.
- Start the engine and leave it idling.
- Rotate the distributor body.
- Combine marks.
- Tighten the clamp.
This completes the installation procedure.
What to buy
In fact, you don’t need to buy much, and if you have a working distributor and reel, then the list of purchases will be minimal.
So, you need to buy:
- Hall Sensor;
- High-voltage wires (preferably silicone);
- Switch from VAZ 08.
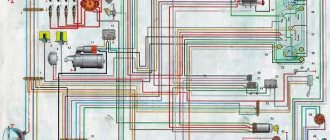
For reconfiguration and operation, you will also need a new UAZ 31514 wiring diagram, which is shown in the photo below, and which you can print for convenience. For a new ignition - a new circuit
You can also make your ignition system more powerful by upgrading it with two kits at once:
- Two switches;
- Two Hall sensors;
- Two ignition coils.
With this approach, each subsystem will be responsible for sparking 2 cylinders at once:
- First and third;
- Second and fourth.
Most often, UAZ cars that take part in competitions or are used by professional fishermen and hunters are subjected to such serious modifications. The video below shows how an engine works with such a system.
Installation of distributor with drive
Installation of the distributor with the drive is carried out as follows (all work is carried out with the power unit running):
- Turn the distributor counterclockwise.
- Be prepared for the engine speed to increase.
- If the car owner continues to crank the engine distributor, the power unit may stop working stably.
- When the engine speed drops, you need to turn the distributor clockwise.
Similar article 10,000 km after this mileage it is necessary to change the oil in the car engine
To test whether everything has been done correctly, it is recommended to sharply accelerate the car or, conversely, brake sharply and stand for a while. At the same time, the operation of the engine should be stable, and it should not stall.
UAZ-469 car - characteristics, design, repair
Possible options:
- Technical characteristics of UAZ-469, UAZ-469B Engine characteristics (41416, 414) UAZ-469, UAZ-469B Engine UAZ-469, UAZ-469B Transmission UAZ-469, UAZ-469B Chassis, suspension, control systems of UAZ-469, UAZ-469B Electrical equipment of UAZ-469, UAZ-469B Body of UAZ-469, UAZ-469B Adjustment data of UAZ-469, UAZ-469B Filling capacity of UAZ-469, UAZ-469B
- Controls of UAZ-469
- Preparing for work UAZ-469
- Engine mount UAZ-469
- Crank mechanism of the UAZ-469 engine
- Gas distribution mechanism of the UAZ-469 engine
- Lubrication system UAZ-469
- Engine crankcase ventilation system UAZ-469
- UAZ-469 engine power supply system K-129V carburetor Maintenance of the UAZ-469 engine power supply system
- Gas exhaust system of the UAZ-469 engine
- UAZ-469 engine cooling system
- Preheater for UAZ-469 engine
- UAZ-469 engine malfunctions
- UAZ-469 clutch UAZ-469 clutch control drive Possible malfunctions of the UAZ-469 clutch
- UAZ-469 gearbox Malfunctions of the UAZ-469 gearbox, shift mechanism
- Transfer case UAZ-469 Possible malfunctions of the transfer case UAZ-469
- UAZ-469 driveshaft Malfunctions of the UAZ-469 driveshaft Rear axle UAZ-469 Rear axle UAZ-469B Possible malfunctions of the rear axle UAZ-469B
- Front drive axle UAZ-469 Maintenance of the front axle UAZ-469
- UAZ-469 frame
- Suspension UAZ-469 Shock absorber UAZ-469 Wheels and tires UAZ-469 Possible malfunctions of wheels, tires and hubs UAZ-469
- Steering of UAZ-469
- UAZ-469 brakes Maintenance of UAZ-469 brakes Possible malfunctions of UAZ-469 service brakes UAZ-469 parking brake
- Electrics UAZ-469
- Generator UAZ-469
- Voltage regulator PP132
- Battery UAZ-469
- Ignition system of UAZ-469 Possible malfunctions of devices in the ignition system of UAZ-469
- Starter UAZ-469
- Lighting, light and sound alarm system UAZ-469 Sound signal UAZ-469
- Control and measuring instruments UAZ-469
- Tools and accessories UAZ-469
- UAZ-469 body UAZ-469 awning Ventilation of the UAZ-469 body Installation of sanitary stretchers in the UAZ-469 body
- Marking UAZ-469
- Maintenance of UAZ-469 First maintenance (TO-1) of UAZ-469 Lubrication of the UAZ-469 car
- Lubricants UAZ-469 and UAZ-469B
Removing the distributor assembly with the oil pump drive
To carry out repair work on the distributor on a Gazelle or UAZ engine, you will need to remove it. This is done this way:
- Remove the cover along with the wires located there.
- Remove the vacuum regulator hose.
- Dismantle the fastening of the low-voltage wire.
- Remove the octane corrector fastenings. To do this, use a key of ten. And to dismantle the low-voltage wire, use a seven key.
- Finally, remove the engine distributor itself.
This task is easy and does not require special skills to complete. However, the car owner must have an understanding of the design of the motor. Installation is carried out in reverse order. It must be remembered that the distributor can only be installed in one position.
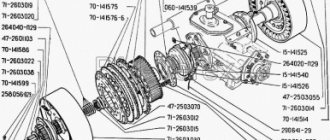
If you need to remove the oil pump with distributor, you need to do this:
- Remove the engine distributor cap. Remove high voltage wires.
- Now you need to remember how the slider is located relative to the body.
- Dismantle the vacuum hose and switch wire.
- Unscrew the two fastening nuts. The key is used for thirteen.
- Dismantle the distributor sensor and oil drive.
Remove the gasket on the engine and put in a new one if that's the problem. If the position of the engine crankshaft remains unchanged, install everything in the reverse order. If even small changes occur, then first the piston is moved to top dead center. Align the mark on the crankshaft pulley with the mark on the cylinder head. The cylinders must be closed.
Then the distributor is installed.
Spark plug gap. What should it be and what does it affect?
Although spark plugs are simple, they must be handled and used correctly. They should be properly cleaned, selected and replaced. However, even new versions can sometimes cause problems - the car may run unevenly, sometimes there are jerks during acceleration, as well as slight detonation. Many people immediately begin to look for the cause in the ignition system - of course, the spark plugs are new! However, the gap between the electrodes may be the culprit, just fix it and the engine will just start singing...
First a little definition.
The spark plug gap is the distance between the top and bottom electrodes for optimal performance and ignition of the fuel mixture. If this clearance deviates from the recommended specifications, the engine will run rough and you may experience jerking or knocking similar to your engine.
Simply put, if the gap differs from the norm set by the factory or dealer, then you can even half the engine and still not find the reason. It is especially strong in carburetor systems. But first, I suggest you start with the device and operating principle.
Common faults
As for breakdowns in the electrical wiring of the Ulyanovsk Automobile Plant product, they are as follows:
- Battery low. As we have already reported, without a battery, normal operation of the motor will be impossible, and the same applies to electrical equipment. Battery discharge can occur for various reasons. Due to evaporation of the electrolyte or its leakage as a result of damage to the battery case, damage to the plates inside the structure, or their short circuit. Typically, such problems are caused by wear and tear of the device or its improper operation.
- Failure of the safety device. Its burnout can occur as a result of wear or a power surge. Before installing a new fuse, you need to test the circuit to make sure there are no surges. If they do occur, then the cause must be determined and eliminated, otherwise the problem will recur.
- Broken wire. This problem is relevant not only for UAZ, but also for other cars. To prevent breaks, wires should be laid away from moving parts of the body.
- There is no contact with the device. This usually occurs as a result of a broken wire, but if it is intact, then the problem lies in the contact. The end of the wire could simply come off or oxidize. Oxidation is one of the main problems in domestic cars.
- Generator failure. The design of the generator unit itself is quite complex, so there can be many problems in its operation. If the generator itself works, but incorrectly, first of all it is necessary to diagnose its belt - it may be overtightened or tensioned too loosely, in which case adjusting it will solve the problem.
Technical characteristics of the UAZ 469 car
Popular to this day, the domestic jeep
The UAZ 469 all-terrain vehicle, which appeared in our country in the early 70s of the twentieth century, remained for a long time the best domestic SUV. Thanks to its high reliability, maintainability in field conditions and low price, this unpretentious hard worker still remains the standard all-wheel drive vehicle for many.
Indeed, what other car can you fill with a cloudy brownish liquid called A-72 gasoline, used motor oil and castor oil instead of brake fluid, and then drive our entire great country from end to end without ruining the engine and brake system. The technical characteristics of the UAZ 469 are unique; they allow this SUV to be used in conditions that would kill any other vehicle.
terms of Use
Experienced car enthusiasts assessed the car modification differently. In comparison with its predecessor - UAZ 469, the new “three hundred and fifteenth”:
- Became more comfortable, which was facilitated by alterations to the interior and chassis;
- It lost its off-road qualities because it received gearboxes with changed gear ratios.
In practice this was expressed as follows:
- When used in off-road conditions, the old 469 easily overcame mud thanks to its “military bridges”;
- The new UAZ could be “buried” in swampy areas due to the installation of “civilian” bridges;
- The maximum speed of “469” did not exceed 90-100 km/h on the highway;
- The new UAZ 31514 accelerates to 120-130 km/h.
Conclusions: the appearance of the “civilian” version allowed the Ulyanovsk Automobile Plant to maintain its leadership among domestic SUVs.
UAZ cars are still popular vehicles for many municipal and emergency services. How is the electrical circuit of the UAZ 31514 different? The car received a completely different ignition system from the previous one; it became contactless. At the same time, reliability remained at the highest level, just like that of the UAZ 2206. The choice of this particular achievement of the modern automotive industry is associated not only with the electrical wiring, but also with the quality of the overall assembly. All models, including UAZ 390945 and others, amaze with their reliability, durability, strength, and ease of use.
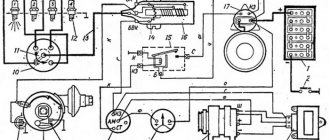
1 — front lamp; 2 - headlight; 3 — sound signal; 4 - fuse; 5 — side direction indicator; 6 — additional resistance; 7 — heater switch; 8 — heater fan electric motor; 9 — engine compartment lighting; 10 - generator; 11 — turn signal and hazard warning relay; 12 — spark plugs; 13 — heater resistance (resistor); 14 — starter relay; 15 — ignition coil; 16 — sensor-distributor; 17 - switch; 18 — battery; 19 — ground switch; 20 — electric washer; 21 — emergency vibrator; 22 — fuse block; 23 — oil pressure indicator sensor; 24 — coolant temperature sensor; 25 — coolant overheat sensor; 26 — emergency oil pressure sensor; 27 — sensor of insufficient brake fluid level; 28 — starter; 29 — headlight relay; 30 — portable lamp socket; 31 — parking brake warning switch; 32 — brake signal switch; 33 — speedometer; 34 — indicator of insufficient brake fluid level; 35 — parking brake activation indicator; 36 — turn signal indicator; 37 — indicator for turning on the main beam of headlights; 38 — carburetor microswitch; 39 — windshield wiper; 40 — block of the EPHH system; 41 — windshield wiper relay; 42 — electromagnetic valve of the EPHH system; 43 — warning lamp for emergency oil pressure; 44 - warning lamp for coolant overheating; 45 - central light switch; 46 — alarm switch; 47 — fuel level indicator; 48 — coolant temperature indicator; 49 — oil pressure indicator; 50 - voltmeter; 51 — interior lamp; 52 — interior lamp switch; 53 — right steering column switch; 54 — horn switch; 55 — fuel level sensor; 56 — left steering column switch; 57 — fuel level sensor switch; 58 — cigarette lighter*; 59 — rear fog lamp switch; 60 - thermal (bimetallic) fuse; 61 — ignition switch; 62 — ignition relay; 63 — reverse light switch; 64 — rear light; 65 — additional brake light*; 66 — reversing light; 67 — rear fog lamp; 68 — license plate light; 69 — trailer socket*. * Installed on car parts.
The presented model is more reliable, for example, 390994, the injector of which causes many problems for customers and requires close attention to temperature sensors. The electrical equipment of the UAZ 469 or UAZ 3303 had a simpler system, there were no such problems, and the later electrical circuit of the UAZ 2206 was made much simpler, which did not in any way affect reliability and quality.