Preparation
To make a go-kart you will need various materials. Karting is a means of transport that covers a long distance in a short time. Karting can participate in competitions, it can be driven on uneven roads, in rural areas, where large equipment cannot pass. The preparatory stage begins with creating a diagram of the future structure.
A drawing of the karting should be drawn up taking into account the dimensions, which should correspond to the height of the person. For teenagers, the device can be made to individual specifications. After choosing the sizes, you need to assemble the main base. To make a karting structure, you will need the following materials and tools:
- chainsaw;
- square pipes 10 m long;
- round steel pipes;
- durable steel plate;
- gearbox from an old car;
- bottom plugging equipment;
- driver's seat from a kart or passenger car.
Buggy-kart or Go-Ped TRQ with a motor from a Ural chainsaw
Moderator: User buggy
Buggy-kart or Go-Ped TRQ with a motor from a Ural chainsaw
Post by romi4 » Tue Mar 25, 2014 12:25 am
My topic (Buggy-kart or Go-Ped TRQ with a motor from a Ural chainsaw) viewtopic.php?f=45&t=11331
Re: Buggy-kart or Go-Ped TRQ with a motor from a Ural chainsaw
Post by romi4 » Tue Mar 25, 2014 12:34 am
My topic (Buggy-kart or Go-Ped TRQ with a motor from a Ural chainsaw) viewtopic.php?f=45&t=11331
Re: Buggy-kart or Go-Ped TRQ with a motor from a Ural chainsaw
Post by romi4 » Tue Mar 25, 2014 12:58 am
My topic (Buggy-kart or Go-Ped TRQ with a motor from a Ural chainsaw) viewtopic.php?f=45&t=11331
Re: Buggy-kart or Go-Ped TRQ with a motor from a Ural chainsaw
Post by egorka75 » Tue Mar 25, 2014 7:01 am
romi4 I present the scope of work! Well done !
How do I understand the one-wheel drive? :shok: I have a doubt about the frame, are there wild bending loads and the pipe is an inch? It really likes to bend. Did you make the steering ends yourself? Circuit protection?
Three-wheeled bike with a chainsaw engine
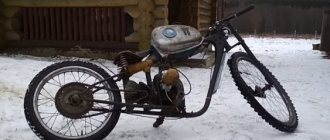
Dear visitors of the site “Visiting Samodelkin”, from the material presented by the author you will learn how you can independently make a three-wheeled mini-bike with an engine from a Ural chainsaw with a minimum of funds, so let’s go) This three-wheeled mini-bike is the brainchild of one very good man and his name is Gainetdin Bulatov from the city of Pyt-Yakh, or simply Gennady.
The author made the three-wheeler especially for his beloved grandchildren; Gennady has three of them) The heart of the mini-bike is the engine from the Ural chainsaw; according to the author, it lay abandoned in the garage because he uses modern saws. This engine is well suited for a mini-moped and has enough power to push a child around.
The frame is welded from a half-inch water pipe, the wheels are from a garden wheelbarrow, the axles are from the same, the small drive sprocket is from a D-6, the large driven sprocket is from a bicycle, the chain is also a bicycle chain. The throttle and brake cables are mounted on the bicycle handlebars. The rear axle is mounted through bearings at three points and is driven by transmitting torque from the engine through a chain drive from a small to a large sprocket.
The wings are also homemade and made of metal from an iron barrel. There is a small glove compartment under the seat where you can store and transport wrenches and a chainsaw starter.
So, let's look at what exactly the author needed to assemble a three-wheeled mini-bike?
Materials
1. engine from a Ural chainsaw 2. wheels from a garden wheelbarrow 3. bearings 3 pcs 4. sprocket from D-6 5. bicycle chain 6. half-inch pipe 7. cable 2 pcs 8. bicycle handlebar 9. rear axle for 2 wheels 10. paint 11. large bicycle sprocket 12. foam rubber 13. leatherette 14. plywood (for seat) 15. bolts, nuts, washers, engravers
Tools
1. welding machine 2. grinder (angle grinder) 3. drill 4. set of wrenches 5. screwdriver 6. tape measure 7. spray gun 8. marker 9. hammer 10. corner
Step-by-step process of assembling a mini-bike with an engine from a Ural chainsaw with your own hands.
As mentioned above, Gainetdin created this mini-bike for his grandchildren in order to instill in them a love of motorcycles from a young age. A three-wheeled moped is very convenient in terms of stability, just like a bicycle in principle, and the child quickly gets used to riding such a bike. It’s clear that children love their grandfather very much for his invention and enjoy riding in the yard of the house (under the supervision of adults, of course)
To start the assembly, the author purchased 3 wheels from a garden wheelbarrow at a reasonable price.
Then I made the rear axle and prepared the bearings.
Next is fitting and test assembly.
In order to reduce the noise of the exhaust pipe, a muffler was additionally made from a pipe with 3 partitions inside, which helped reduce noise.
The seat is made of plywood and foam rubber trimmed with substitute leather, attached to the frame on hinges, and under it there is a trunk where you can put a tool and a starter.
Installed the gas tank and connected the gas line.
Torque is carried out by chain transmission.
The rear axle is attached to the frame via bearings at three points.
The gas and brake cables are routed to the steering wheel. The bike's fork is also homemade.
Asterisk from D-6.
This is such a cool bike
We also recommend watching a video of rides on a mini-bike
The creator of the three-wheeled mini-bike is Gainetdin Bulatov from the city of Pyt-Yakh.
As you can see, in order to make your children and grandchildren happy, you don’t have to buy expensive imported toys that he will play with, break and throw away, but such a bike will give happiness and joy to a little boy and respect among his peers and not only) Well done Gainetdin. Skillful fingers
That's all
Thank you all very much for your attention! Come visit often and don't miss out on new items in the world of homemade products! Source
Source
Become the author of the site, publish your own articles, descriptions of homemade products and pay for the text. Read more here.
Communities › This is interesting to know. › Blog › Friday chainsaw crafts!
Light weight and solid power combined with compact dimensions allow this “lumberjack’s dream” to be combined with an ice auger and a bicycle, a sawmill and a winch.
Anyone who can confidently work with a welding machine, an angle grinder, and, if necessary, can even use a lathe, can make interesting homemade products from a chainsaw with their own hands.
In this case, knowledge of the basics of design and drawing will be very useful, since the accuracy of all dimensions and quality of assembly are the main conditions for the normal functioning of a unit driven by a chainsaw.
Without going into technical details, we will consider the most interesting designs using it.
Options for homemade chainsaws
The first thing that comes to mind when you think about what can be done with a chainsaw is its use as a sawmill. Many developers had to split logs onto beams with this tool.
In this case, the log lies motionless and is neatly sawn along its entire length without wobbling or oblique seams. If you equip such a mobile carriage with four lifting screws, you can accurately set the thickness of the sawn timber.
A lightweight homemade snowmobile made from a chainsaw is more complex in design than a sawmill, since here you need to move the gas and clutch to the steering wheel, and also take care of the shock-absorbing suspension of the supporting frame.
To increase traction, a “traction” gear is placed on the caterpillar drive shaft, the diameter of which is larger than the size of the chainsaw drive sprocket.
There are usually no problems with the steering mechanism, since it is taken from a regular bicycle or scooter and modified so that the central axis moves the rods that turn the skis. The snowmobile engine power must be at least 5 horsepower, so it is better to use a Ural chainsaw for this purpose.
The winter line of homemade vehicles will be complemented by snowmobiles
from chainsaws, which are structurally simpler than a snowmobile. The driving force is provided by a large diameter screw, which directly rotates the gasoline engine.
Those home inventors who would like to make a backpack-type helicopter from a chainsaw should know the same thing. Such a machine will require not one, but at least two engines operating in a coordinated mode.
This vehicle is most often made for the sake of principle rather than practical use. The main driving force of its creator is the desire to test his strength as a mechanic and prove to others the original use of this cutting tool.
The basis for the design is usually my grandfather’s old Druzhba chainsaw and an equally ancient bicycle, with which you can carry out any experiments on converting the frame for mounting the drive.
Power is transmitted here through a gear pair using a bicycle chain, and the start of such a homemade product is reminiscent of preparing for cutting firewood.
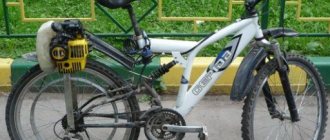
Less common are more advanced models, the basis for which is a mountain bike equipped with reliable brakes and shock absorbers. This chainsaw moped is equipped with a gearbox with a gear ratio of 18:1 and a CVT transmission, which allows you to comfortably move on it at the speed of a regular bicycle.
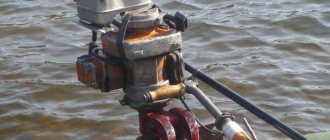
This option for using a chainsaw is quite simple, since the task here is to transfer torque from the saw motor to the propeller. A homemade outboard motor does not need to install a transmission. For it you will need to make a reliable adapter on a lathe from the saw drive gear to the propeller shaft. The propeller can be used from a standard outboard motor.
It is difficult to make a full-fledged walk-behind tractor from a chainsaw due to lack of power and traction. But many home craftsmen were able to build a lightweight motorized cultivator based on it.
The design of such a machine is very simple: the motor rotates a pair of gears and transmits increased traction force to one drive wheel.
Creation of a sawmill
A fairly simple solution is to slightly change, or rather, improve the purpose of the chainsaw by creating a sawmill. To do this, you just need to weld a frame of pipes, angles and fittings, and in it a moving carriage
Then secure the carriage to the body using bolts and nuts, being careful not to crush the plastic casing. The guide ribs must be smooth and fairly strong so that the cutting edge does not vibrate
Thus, the saw moves, but the log, due to its weight, remains motionless. The result is smooth boards (or beams) ready for further processing.
When building a house, such a micro-factory will help save a lot of money, in addition, after completion of construction it can be safely sold.
Homemade children's ATV from a chainsaw
The last homemade product that we will look at will be dedicated to ATVs. In fact, to assemble an ATV you need similar materials as for a go-kart or tricycle:
- engine from an old powerful and working chainsaw;
- gearbox – increases engine thrust and takes over its operating speed;
- ATV frame – it should be stronger and more stable;
- the driver's seat is good if you have an old moped seat: a teenager will be more comfortable in it than in a bulky car seat;
- wheels with rough tread, diameter of at least 34-35 cm each. This will improve the cross-country ability of the ATV and make it similar to an SUV.
If desired, the prefabricated structure of the ATV can be improved to perfection with shock absorbers: the maneuverability of the ATV will increase, and the operating stroke will become smoother.
Homemade vehicles are cheap, but not always reliable. They can only be used in strict compliance with all safety regulations.
Source
Chassis and steering column assembly
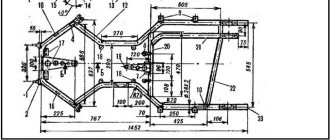
- The chassis should be assembled exactly according to the drawing, which is best made in full size on graph paper glued to some dense material. The drawing must be made in several projections. The metal pipe must be cut into pieces according to your project. Most types of go-karts have a slightly smaller camber angle on the front wheels than on the rear wheels. Thanks to this design, the wheels can turn, allowing the chassis to spin slightly. To achieve this effect, you need to secure the steering axis at the front corners, in the place where the wheels will be, so that slight rotation is possible. To make the work easier, you can make a chalk drawing of your go-kart on the floor and lay out the parts on it;
- Next, you need to weld all parts of the frame in accordance with your drawing. During welding work, press the chassis parts with a concrete slab. Check the strength of the welds. The chassis must be strong enough to support the weight of the engine and your weight. Inserting wedges at all corners will help increase strength. To make work easier, secure the chassis in a raised position using concrete blocks;
- attach the front axle plugs. The axle must be formed from a metal pipe with a diameter of 2 cm and two bushings attached to the frame. The structure is fastened with bolts and washers. The plugs should be installed before starting work on the steering column;
- installation of the rear axle. It must be installed in such a way that it is welded to the frame, but can rotate freely. This can be achieved by attaching the carrier support bracket to the rear axle. Then the steel plate must be welded to the chassis, strengthened with bolts and nuts, so that the bearing is pressed. To make your work easier, you can buy a ready-made structure called “support-bearing units.”
- Next, the seat and bottom of the go-kart are made from pre-prepared plywood or metal. You can make a driver's seat from a simple seat with a cushion. You don’t have to bother with making it yourself, but use a seat from an old go-kart or a car seat that fits the size. The seat must be made so that the driver sits tightly in it during sharp turns and does not move towards the tilt. Be sure to leave enough space for the levers, pedals, and steering wheel.
Advice: do all the difficult and important work first, add additional details at the end.
Homemade lawn mower
Lawn mowers are equipment for cleaning grass. They are used by owners of private houses and summer cottages to give their land an attractive, well-groomed appearance. Factory-produced models are easy to use, but they are not affordable for everyone. A self-made lawn mower from a chainsaw will cost much less than branded analogues. Its capabilities are quite sufficient for domestic use.
Home craftsmen assemble homemade lawn mowers of various types and capabilities. But any design requires the presence of the following elements:
- drive;
- frame;
- pens;
- wheels;
- knives;
- control systems;
- protective casing.
The manufacturing process of a lawn mower takes place in the following sequence:
- weld a frame of a suitable size, for example, from metal corners 25 by 25 mm;
- Handles made of iron tubes are attached to the frame using bolts or welding;
- wheels are mounted at the corners of the frame;
- remove the handle and tire from the gasoline saw;
- screw the remaining part of the tool to the frame using studs and nuts so that the gearbox shaft, turned 90 degrees, is directed downward;
- extend the gas cable;
- a telescopic shaft is made from two metal tubes, which is then connected to the gearbox;
- make a knife yourself (for example, from a handsaw blade) or purchase a factory product;
- it is connected to the shaft using bolts or welding.
Wheels from a baby stroller or an old car will do. If you use pipes of different diameters, you can make a telescopic handle with the ability to adjust its length - this increases ease of use.
Knives come in different designs. Their simplest version is shown in the following photograph.
Knives made of high-quality steel are not afraid of encountering small stones. They are capable of mowing even thin bushes. Some craftsmen additionally equip a homemade mower with a grass catcher, thanks to which virtually no cut grass remains on the site.
Powertrain and steering
If you could only get the motor from a chainsaw, then you can use it to make a drive with one gear. This is not very convenient because there is no way to adjust the drive/driver ratio, so the wheel torque will be the same during acceleration and during constant movement. If you were able to get a scooter’s power drive, a motor from the old Soviet “Ant” scooter or its analogues, then you can use its gearbox to increase torque during acceleration. To do this, you will have to install the clutch pedal and gear selector lever. For the scooter's power drive, these operations are not needed because it uses a variable speed drive.
To create steering, it is convenient to use the axle shafts of rear-wheel drive vehicles and the tip of the steering shaft. The tip is cut off and then welded to the axle shaft. After this, the axle shaft is cut to the required length and the steering column pendulum is welded at the other end. Steering rods are attached to the pendulum using a bolt or welding, installing one on top and the other on bottom. To prevent the steering wheel shaft from dangling, it is secured with two axle bearings. To fix the bearings, you can use standard axle bushings, which will have to be heated to a temperature of 400–500 degrees. The brake mechanisms of a sports bike or moped are easier to install, but they are difficult or expensive to obtain. The master and working cylinders of the front brakes from a Lada or Lada can be found at any disassembly site, and besides, they will cost very little. If the standard brake disc is very large, you will have to use some kind of substitute - a flat gear or a final drive flange welded to the axle shaft. Due to the low speed of rotation of the axle shaft, as well as low loads, the flange will work for a very long time.
For the front axle, the king pin assembly with the steering knuckle from GAZ 21 and GAZ 24 cars is well suited. But for them it is necessary to install car wheels, at least from Oka. If you have small wheels, you will have to cut off the bearings of the steering knuckle and king pins and use welding to make a new unit to which to attach the wheel hub.
How to make a moped from a chainsaw?
The youth dream of most of our fellow citizens was and remains a moped. It develops a higher speed and has a structure that is more advanced than the motorbike described above. Buying a ready-made moped is not a cheap pleasure. We will tell you how to make it from scrap materials.
For this you will need:
- a motor from a working, powerful saw (in our version, this is the “Friendship” model);
- 2 wheels from an old bicycle;
- pipe with a diameter of 2 cm (metal);
- cable;
- bicycle sprockets; as well as forks;
- old spare parts from a motorcycle - a ready-made fuel tank, a headlight, and, if desired, a seat, although this can also be made with your own hands;
- steering part;
- gas lever.
- we cook the frame to which we connect the wheels from the bicycle, forks, as well as a gas tank and a lantern;
- we adapt the motor - the composition of the installation will depend on the configuration of the frame;
- screw on the gas tank and battery;
- we check that the newly installed elements do not dangle;
- We make a chain drive - it will allow the wheels to receive the torque of the motor and move. You can use a belt instead of a chain pulley. But we must not forget that its wear will be noticeably higher;
- we set up the ignition system - we connect the battery and brake lever to it;
- adjust the exhaust pipe.
The assembly process is complete: you can start testing the moped.
Frame assembly
To make a kart from a chainsaw with your own hands, you need to start with the frame. To do this, pipes are cut to the required length and welded using electric welding. This is how the frame of a homemade go-kart is made. The front axle of the frame is equipped with plugs. Then the rear axle is welded to the frame so that it can turn. Then, according to the drawings, the bottom of the structure is cut out of a sheet of metal or durable wood and attached to the frame. The chair is taken ready-made from a car or buggy.
You need to take 2 steel rods, bend them at a right angle - you get a steering drive. After this, the brakes are mounted to the frame. Braking should be on 4 wheels. Install the brake pedal. Then the wheels are mounted. You can take wheels from an old kart. Then they install the ignition system, fix it with the gas handle and throttle valve.
The structure of my buggy
In general, the design is very simple. Frame made of profile steel pipes of various sections. The front wheels from the walk-behind tractor are connected to the hubs from the moped with three bolts. The bearings in the hubs were replaced, 6202 were installed under a 15 mm axle. For the front wheel axles I used the front wheel mounting bolts of the Voskhod motorcycle. The steering knuckles are homemade, made from a 40 mm angle, with an M 16 bolt as a kingpin, which rotates in a union nut, which in turn is turned and pressed into the pipe.
Castor and Ackerman angle are set by eye. The front axle beam is connected to the frame by reaction rods. Shock absorbers are attached to the frame and beam with welded corners.
The steering is from the Oka car. The steering rods and shaft were shortened.
Homemade pedals - gas, brake and clutch (will be removed when not needed) Cable drive of gas and hydraulic brakes. The rear axle is a hollow steel pipe with a diameter of 30 mm. The wheel hubs from the walk-behind tractor are attached to it. The brake disc and driven gear are attached to the hubs with M 10 bolts. Chain drive, motorcycle chain 428 pitch. The engine is equipped with a centrifugal clutch, from which a 420 chain goes to the driven sprocket located on the gearbox input shaft. Gear ratios – Engine – gearbox 3.6, gearbox – axle – 3.2, plus four gears.
Wheels 4.00-10 with developed lugs. The exhaust pipe of the muffler was lengthened, the engine became quieter.
What and how you can make from a chainsaw with your own hands
A chainsaw is a universal unit. The size of the tool is small, but the power of the motor allows it to be used for almost any purpose. The “rotary heart” will feel great when transplanted into a pump, generator, snow blower, ice ax or any other device where an autonomous drive is needed. Let's take a closer look at some know-how.
How to make a snow blower from a chainsaw
If you have a chainsaw and parts from an old car, then you can start designing a snow blower. Typically a rotary drive is used to drive the auger. This is a special shaft designed in a special way for collecting snow.
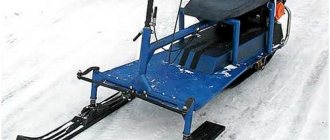
DIY snowmobile made from a chainsaw
To make a homemade snowmobile from a chainsaw, you will need some factory-made parts (for example, a gas cable to the steering wheel) and a children's snowmobile.
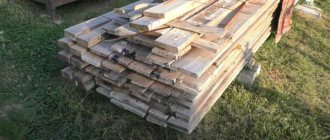
Homemade sawmill from a chainsaw
Craftsmen offer dozens of different options for how to “adapt” a chainsaw for sawing boards. Most often, such structures require welding of the frame to install a “carriage” under the saw or the so-called tire. Available tools are used as guides, for example, an ordinary ladder.
Homemade sawmill based on a chainsaw... and stairs
The most important thing is to weld the frame tightly, controlling yourself according to the level. A flat and solid base will help avoid distortions and vibration during operation
Also consider at what distance and height the chainsaw will be mounted. The longevity of its work depends on this. Fastening the carriage too close to the working area will lead to clogging of the chain mechanisms and failure of the motor.
If you do not plan to cut large logs, you can make a manual version of the sawmill. More details in this video.
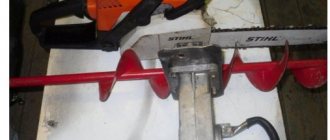
How to make an ice screw from a chainsaw with your own hands - diagrams
The drill is an indispensable thing for those who know how and love to work around the house: it is used in construction work, installing supports for the vineyard, poles and fences, as well as in winter fishing to prepare holes.
To make an ice screw from a chainsaw with your own hands, you need a diagram and the following devices:
- Chainsaw motor.
- Chainsaw gearbox for drill.
- The drill itself.
- Metal pipe.
- Bulgarian.
- Drill.
- Welding machine.
Engine Installation
Then you need to equip the unit with an engine. To do this, remove the motor from the Druzhba or Ural chainsaw. The base for the engine is made from a steel sheet and an angle. You need to remove unnecessary parts from the chainsaw engine (handle, tank, chain). Remaking a sprocket is considered labor-intensive work.
They take a chainsaw sprocket as a basis, remove the teeth, and give it an arbitrary shape. Make 2 holes in the cooling system housing for mounting to the engine frame. The speed of a go-kart with a chainsaw engine will be low.
To fix the engine, you need to mount a metal plate to the rear side of the frame by welding. It is necessary to install the power unit on the plate so that its pulley coincides with the axle pulley. Afterwards, markings are made to mark the holes for fastenings. The connection of the pulley to the axle must be done before you install the axle in the bushing. A set screw is used to secure the pulley.
An expansion tank from an old car is used as a gasoline tank.
You need to take wheels with a diameter of 30 cm, this is enough for driving on uneven surfaces.
Then all components and parts are connected using fasteners and welding. After this, the reliability of the fastenings of all parts and assemblies is checked and the finished structure is checked for strength.
Then the home-made equipment is tested when driving on the road surface and uneven ground surface, that is, in the conditions where the unit is supposed to be operated. In this way, you can make and use a go-kart with a gasoline saw engine for moving and transporting small loads.
DIY chainsaw crafts
The basis of any homemade chainsaw device is its use as a drive. These homemade gasoline saws are used:
- in cutting stone and metal materials;
- in pumping out water;
- in drilling wells;
- in snow removal;
- while driving and even flying.
What can you make from a chainsaw? A question that worries many craftsmen.
Homemade devices assembled from a gasoline saw are divided into 2 types:
- simple in design. This includes, for example, a grinder, a winch, etc.;
- more complex in design. This group includes: sawmill, snowmobile, power plant, etc.
One of the units made with your own hands can be a generator made from a chainsaw. It is especially useful for dachas and areas where there is no centralized power supply. The simplest known design is a gas generator assembled from a chainsaw and the electric motor of an old washing machine.
Using a saw motor, you can build a device similar to a grinder. A chainsaw cutter can be used for cutting metal, wood, concrete, tiles, for trimming and grinding.
From a saw you can make a cultivator, the operation of which is based on the fact that a motor, rotating a pair of gears, transmits increased traction force to the drive wheel. A chainsaw motor cultivator can cultivate small areas.
Is it possible to build a trencher using a gasoline saw? Probably yes. But it is clear that the possible technologies are complex, and the idea itself is not so rational. With all this, it is quite difficult to find a good manual for the manufacture of such a unit.
Craftsmen can independently construct a motor drill from a chainsaw - the so-called gas drill. To assemble this device, the following components are used:
- Saw engines.
- Gearboxes.
- Boers.
- Metal pipes.
This type of motor drill is used for excavation work (they create recesses with the required diameter and depth in order to strengthen the supporting structure of any structure).
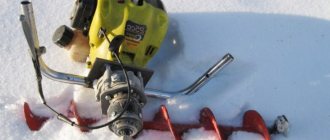
A homemade device based on a chainsaw – an ice auger – can also simplify a fisherman’s work in winter when drilling ice. To build such a unit you will need a number of tools and materials.
Using a gasoline saw you can build a compressor. To do this, you need to have good knowledge, including engineering graphics, because such a craft is quite complex.
Some craftsmen are interested in the question of how to make a snowmobile from a chainsaw. To build a snowmobile, the following basic parts and materials are required:
- frame;
- engine (with a power equal to at least 5 hp);
- caterpillars;
- steering mechanism (bicycle parts will also work);
- runners for movement.
It is also necessary to develop depreciation. You should also take into account some other nuances in the design of such a snowmobile.
A motor pump is essentially the same pump, only powered by a gasoline or diesel engine. Therefore, a motor pump can also be assembled from a chainsaw. The unit consists of a centrifugal pump that has a support that serves to secure it with a saw, and a wheel that drives the pump turbines (pulley).
How you can make your own pump from a gasoline saw and a blade pump is very clearly shown in the following video.
Other homemade inventions are described in more detail below.
Motoblock from chainsaw Friendship and Ural
Let's look at how to assemble a walk-behind tractor from a Druzhba chainsaw. Assembling a unit from a Druzhba chainsaw engine is very simple. The motor is light and compact, so the frame can be assembled from a pipe. In addition to the engine, a reverse gearbox and a fuel tank are attached to it. The pipe curved at the top serves as a holder for controlling the device. A speed knob is installed on it.
Let's figure out how to make a walk-behind tractor from a chainsaw with your own hands. Step-by-step instruction:
- A drawing is created. This is a very important stage in creating a unit, without which it will not be possible to produce reliable equipment. All spare parts with mounting points must be clearly marked and all dimensions must be indicated.
- Creating a frame. It is a cube whose corners are 32x32 mm. The motor is installed on the upper corners of the frame, and below it is the fuel tank. For intermediate support of the shaft, vertical posts are installed at the front. And in order to mount the bearings, you will need supports for the longitudinal angles.
You can create a homemade walk-behind tractor from a motorcycle. This will be a more powerful device; it uses a motorcycle engine. For example, an IZh motorcycle engine is suitable.
The easiest way is to install a fan. And to ensure that the air is directed to the cylinder, a protective coating is used. They can use an old motorcycle fuel tank. Mopeds are also suitable for making the unit.
They also make a walk-behind tractor from a Ural chainsaw. The agricultural unit can be assembled not only from the Urals, but also from Taiga, as well as any chainsaw of domestic and foreign production. The main advantage of such an engine is that the chainsaw motor has a diaphragm carburetor, which allows it to operate in any position. Carbs on all chainsaws work the same.
How to choose wheels for a walk-behind tractor? Usually you have to choose from two types of wheels:
- rubber (with deep treads), which are suitable for moving on dirt roads;
- metal (with lugs), which are designed for work in the field.
Wheels can be selected from any vehicle if they are the right size.
With an engine from a walk-behind tractor, you can assemble universal equipment needed in agriculture. Some add additional equipment to the walk-behind tractor to perform various jobs. In this case, the homemade product allows you to modify the walk-behind tractor at your discretion.
Auto mechanic, specializes in agricultural equipment
It is no secret that in our country there are many craftsmen who are capable of creating all kinds of technological wonders from scrap materials. Of considerable interest are the capabilities of the engine from a walk-behind tractor, which can be equipped with a motorcycle, swamp vehicle, snowmobile and all sorts of other devices. Why are such solutions attractive?
First of all, its accessibility, not to mention the ability of talented mechanics, while doing interesting work, to find practical and original application for their efforts, creating things needed in the household. As for a homemade motorcycle with a walk-behind tractor engine, this solution can be called not only practical, but also quite simple to implement.
You can make a motorcycle from a walk-behind tractor yourself
Homemade cars
Buggy “Barracuda” made by hand, Nikolai Zubik from Melitopol: detailed photo report on the assembly of the buggy.
An interesting project of a Barracuda buggy with an engine from a Yamaha R1 motorcycle. Below is a photo and description of the design.
The frame was made from pipes 3 mm thick, internal diameter 20 and 25 mm. Levers are made from the same metal as the frame. In total there were about 100 meters of pipes.
Making a frame for a buggy.
The suspension arms are also homemade.
I thought for a long time about which coin to take as a donor. I wanted a liter engine, after talking with motorcyclists I realized that the most problem-free engines are Honda and Yamaha. I started calling around looking for one.
A motor with an outboard, there were options for 2000 euros, as it was a bit expensive for the engine, I began to look for a motor without documents. About a month later I found a 2003 Yamaha R1 in Zaporozhye. A couple of days later I went and looked, the bike was in excellent condition, and it was picked up the same day.
To make a rear gearbox, the money is almost the same as half a buggy, a lot of turning work, you can see everything in the photo, I did everything from iron. Drive shafts were taken from BMW 34 and lengthened by 10 cm.
The radiator was installed by a VAZ from a classic, the pipes are also from a VAZ, the thermostat is from a Yamaha, everything else is also from a Yamaha, the only pipes are temporary, after painting I will make them from a metal pipe.
I installed the front calipers from Oka.
All tests have been passed, weaknesses have been identified. The shock absorbers turned out to be weak (it was foolish to hope that homemade shock absorbers would turn out great the first time). Rear sprocket 43 teeth is not enough (you need 65 to know about this). The brakes, the front disc is hitting, we need to figure it out. Gearbox, you need to start the gearbox cable differently. Now about the pros. It steers like it's on rails, and at any speed. It accelerates like a shot from a cannon, after 7000 rpm. presses into the seat and holds up to 12,000 rpm. The suspension works perfectly, in principle everything is ok, there are no more questions, now the final assembly will begin.
The first time I rode on a 43 tooth sprocket removed from a motorcycle, in fact I installed sprockets from a motorcycle and the gear ratio was the same as on a motorcycle, that is, theoretically the maximum speed is 300 km, but the weight of the buggy is twice as much as a moto, but even on this sprocket it rode very brightly. Now there is a 65 teeth star, the buggy starts off without gas at all (no different from a passenger car) and let me tell you, it crashes hard.
Video of rides on a homemade buggy:
Author of the project: Nikolay Zubik. Melitopol.
Share on social media networks
Popular homemade products on our website
- Homemade mini-buggy: photo and description of the design
- Homemade buggy
- Homemade buggy "Terminator"
- Do-it-yourself mini buggy from a brushcutter engine
- DIY all-terrain vehicle made from a walk-behind tractor (18 photos)
- Homemade Piranha buggy
- DIY buggy from VAZ
- Comfortable truck driver's cabin (20 photos)
- Homemade all-terrain vehicle on caterpillar tracks: photo, video
- DIY ATV from the Urals: drawings, photos
- Homemade buggy with Lifan engine
- DIY buggy: photo, video and description
- DIY buggy
- All-terrain vehicle Sherpa: characteristics, photos, videos
An electric bicycle is a dress rehearsal on the way to a “do-it-yourself buggy.”
The first self-propelled vehicle I assembled with my own hands was an electric bicycle.
He's on the right in the photo. Of course, buying a battery and a wheel with a motor, and then attaching it all to the bike turned out to be a simple matter. But I was pleased with the result. I will never forget my first trip through the city at night. The bike rides on its own! Silently! No need to pedal! At that time, electric bicycles were still a rarity in our city, and often overtaken by my cycling colleagues, they looked at me with bewildered glances. The lack of a garage prevented me from creating a homemade car, because even a bicycle with an electric motor took up a significant space in the corridor. And only after moving outside the city, to a private house, where there was room to spread out, I began to think in detail about how to assemble the buggy with my own hands.
So, what to build?
Assemble a buggy with your own hands from used Sovavtoindustry products?
Or build a four-wheeled velomobile by installing a motor like the Soviet D6
Or maybe assemble a Cyclecar? A small car on moped wheels with a walk-behind tractor engine?
Or will it be a trike with a streamlined aluminum body, a powerful electric motor and a bunch of lithium batteries?
I thought for a long time. All options had their pros and cons:
- I didn’t really want to find Oka and use a grinder and a sledgehammer to unscrew the stuck bolts, and then constantly tinker with the engine.
- The velomobile would have been flimsy for country roads; the cyclic car had no suspension or gearbox.
- The electric trike turned out to be too expensive and tied to an outlet.
But we had to start somewhere. You need to know in advance what the future homemade product will be intended for. This is either a walking option for traveling around the surrounding area, or a household assistant - a mini tractor, or maybe a buggy, assembled with your own hands, will be used as a sports equipment - to drive along the intersection. Despite the presence of a vegetable garden and the unequivocal hints of my wife and mother-in-law, I still needed a recreational vehicle that would not shy away from forest paths, mud and puddles. Of course, the buggy must be equipped with suspension, reliable steering and headlights.
How to assemble a snow blower with your own hands?
Having understood the design of snow blowers and familiarized yourself with the drawings from the Internet, you can build a snow blower with your own hands using a chainsaw. Even a beginner can easily master this homemade product. Having a number of necessary components, tools and spare parts on hand, you can construct a homemade snow blower.
The only difficulty you may encounter is finding a power unit. However, any motor of domestic or foreign chainsaws is suitable for these purposes. On forums and on many websites you can find various diagrams and drawings that show what components are needed and how to connect them together.
Homemade buggy for a teenager
A homemade buggy is one of the best options to teach your growing child to drive and instill a love of technology from an early age. The design of the presented buggy is simple and reliable, and also quite inexpensive. Step-by-step assembly photos are included. This buggy has a gasoline engine from a Sadko walk-behind tractor with a power of 6.5 l/s located in the rear of the car; for the internal combustion engine, a separate frame is welded from a pipe and profile, which is attached to the main frame. Torque from the engine is transmitted to the gearbox, and from it through a chain transmission to the driven sprocket of the rear axle driving the wheel.
The buggy frame is welded from a 22 x 1.5 mm pipe; a pipe bender was used to give the parts the desired shape. The suspension is made in an interesting way, namely the axle shafts sit rigidly on the frame, but the half frame with the engine has two twin shock absorbers from a scooter. The front suspension is also on shock absorbers from a scooter, the homemade steering is the same as on the go-karts. The rear wheels are from the domestic scooter "Tulitsa" and the front wheels are from a scooter.
The engine power is enough to propel a teenager around; even adults wouldn’t mind riding a buggy)
So, let's look at the design features of the machine
Materials
- Gasoline internal combustion engine from the Sadko walk-behind tractor
- gearbox
- scooter front wheels
- rear wheels of the Tulitsa scooter
- pipe 22x1.5 mm
- driven sprocket from a motorcycle
- rear axle
- housing bearings
- shock absorbers 4 pcs
Tools
- welding machine
- drill
- pipe bender
- Angle grinder (grinder)
- set of wrenches
- measuring and plumbing tools
- skillful hands and a bright head
Step-by-step photos of assembling a buggy with your own hands. The rear axle of the buggy is made from a bored axle shaft from a ZIL car, a homemade differential, brake discs, a driven star from a motorcycle and support bearings are installed, which are actually attached to the frame holding the axle in a given position
The front wheels are borrowed from a scooter, and the rear wheels are from the Domestic scooter “Tulitsa”. PLEASE ATTENTION! The engine is mounted on a separate semi-frame, which is attached to the buggy with levers, and two shock absorbers from a scooter are attached to the upper part, thus creating a pendulum suspension with a rear axle rigidly sitting on the frame (see photo below). The homemade steering is made according to the kart principle. Rear wheels scooter Front scooter ICE petrol 6.5 l/s “Sadko” is mainly installed on walk-behind tractors and other garden equipment
Pulley 3 streams Homemade muffler The gearbox transmits torque to the rear axle through a chain drive and a sprocket from the motorcycle. Once again ATTENTION! Consider how the rear suspension is designed. During the tests, the shortcomings of this suspension design were identified and it was decided to convert it to an independent one for each wheel and axle shafts. This is actually what came out of it... As you can see, A-shaped arms are installed. Front suspension. Differential and axle shafts. Disc brakes. This is the kind of buggy the author came up with; the design is quite simple, except for the fact that the frame requires a pipe passed through a pipe bender. If you have any thoughts on how to simplify the manufacture of the frame, then write a comment (constructive criticism is welcome)
Peculiarities
Buggy is a successful American invention. The technology first appeared on US roads in the 50s of the last century. The donor cars used were disabled Volkswagen cars with the famous “Beetle” prefix.
The models were made without a radiator, many body elements, and the engine was located at the rear. A modern two-seater buggy is a small car, the design of which makes it easy to overcome off-road conditions. Main design advantages:
- low center of gravity;
- high ground clearance;
- increased cross-country ability;
- independent suspension;
- reinforced chassis;
- short wheelbase;
- off-road tires.
The advantages of using a car that is unpretentious to the road surface and winding terrain are also obvious - simple controls, mobility, the opportunity to get a lot of positive emotions from the driving process.
Every craftsman and lover of modern vehicles can assemble a 2-seater buggy in a short time according to their own preferences. For example, make a recreational version of the car or make a powerful cross-country vehicle to overcome difficult obstacles. Regardless of the model, the key requirement for a two-seater buggy is the ability to perform extreme off-road driving and on public highways.
Making an angle grinder
An angle grinder is a multifunctional tool necessary for a number of jobs. Despite its availability and prevalence, craftsmen made an angle grinder from a chainsaw (a sample is shown in the photo below).
Assembling an angle grinder using a special device for a chainsaw goes like this:
- remove the chain and bar from the gasoline saw;
- install a pulley on the gearbox shaft;
- instead of a tire, they mount a special attachment, also with a pulley, after putting a belt on it;
- tension the belt drive like a chain;
- attach the protective casing;
- install the disc.
The entire process is shown in detail in the video below.
A self-assembled grinder-petrol cutter will help in performing many practical tasks. Its power is sufficient for productive work on concrete.