Seeder
Any seeder contains several basic elements:
- Tools that bury planted elements and level the soil.
- Openers. More often they are of the disk type. Designed to cut layers of soil in order to embed crops to the required depth.
- A device that feeds seeds or roots. First, a uniform selection takes place, then the material enters the seed tube.
- Containers in which material for planting is placed.
- Frame with fasteners for coupling with mini-tractors.
https://youtube.com/watch?v=9RVSzVFs7CM
There is a basic solution that is suitable for beginners in this field. It involves performing work with the following progress:
- First, disk blanks are taken. They are mounted evenly on the main working axis. 3 pieces will be enough to start with.
- Each of the discs is equipped with a rim, which is drilled with an electric drill 12 times. This is how the owners receive preparations for placing seeds inside. Chipboard, plywood are acceptable materials for the box.
- The part of the structure on top houses granaries. This is the name of the bunker into which materials for planting are poured.
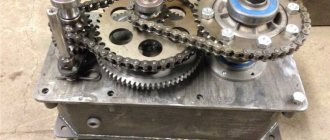
- Seeding devices are manufactured separately. It is permissible to use wooden shafts supported by two bearings.
- Any wheels can be used.
- The supporting frame is standardly U-shaped. Strip iron will be the best option.
- The hopper is secured with bolt ties.
The second manufacturing option is in many ways similar to the one described above. The main difference is the drilling of additional holes inside the hubs. The coulter is made of sheet steel. Brackets are used for mounting.
Exploitation
Before starting work, the equipment must be configured and checked. The first step is to check the presence of all parts, as well as their condition, after which it is assessed whether the bolted connections are well tensioned
It is immediately important to pay attention to adjusting the position of the hiller. If it is necessary to increase the height of the ridge, the disks are brought closer together, their installation angle increases, as well as their depth. Reducing the height of the ridge is carried out by moving the discs apart, as well as reducing the specified parameters
Reducing the height of the ridge is carried out by moving the discs apart, as well as reducing the specified parameters.
To change the space between the disks, you will have to slightly unscrew the nuts on the brackets, change the position, and then tighten them again. To adjust the installation angle, loosen the bolts. Next, the hillers are lined up in the desired position, the bolts are tightened again. In the case when a change in the depth of the depth is required, again it will be necessary to unscrew the bolts, correct the situation, that is, raise or lower the hiller itself, and then fix everything back. It is not customary to place hillers on the front hitch of a mini-tractor, so they are secured at the rear using a double hitch.
When everything has been checked and adjusted, the operation of the hiller should be checked in an empty area; if something is not in order, adjust it again
During a test run, it is important to note both the functioning of individual parts and the entire mechanism. When you start using the hiller, you should avoid making sharp turns at the end of each bed.
You need to turn smoothly in first gear of the mini-tractor. If a sharp turn still needs to be made, then at this moment the coupling with the hiller should be raised.
When a mini-tractor needs to be transported to a storage location or to a new cultivated area, this must be done exclusively in the transport position. In the case when a vehicle together with a hiller needs to be transported over a long distance along unsatisfactory routes, then this must be done using vehicles, partially disassembling the agricultural equipment and fixing its position. In general, the operation of a hiller for a mini-tractor must be carried out in accordance with the instructions supplied with the attachment, in compliance with safety requirements.
After work, the hillers must be cleaned of plant residues, soil and dirt. You should immediately inspect the equipment and assess whether everything is normal. If necessary, the fastenings are immediately tightened. The hiller should be stored for a long time in a dry room with the necessary protection from emerging moisture. Before moving the device there, it should be cleaned, wiped dry and lubricated with a thin layer of special lubricant.
In a protected room, the equipment is fixed in a stable position, after which, if necessary, it is tinted with paints and varnishes. The drums with bearings are washed separately, dried and treated with a suitable product.
Making a lancet hiller
Lancet hillers can be stationary or with an adjustment mechanism. The first type is immediately made according to the parameters of the beds. The second type of device has the ability to install wings at a certain distance between them.
The switch hiller is made in the following sequence:
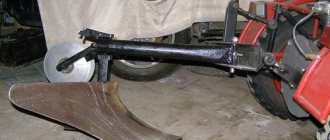
- Steel pipes are marked with a core and cut into blanks. A three-dimensional frame is welded from them to secure the ploughshare (arrows for lifting and moving soil). To achieve an additional margin of safety, it is recommended to reinforce the corners with metal plates or tubes. Mounting holes are drilled to attach the product to the mini-tractor bracket.
- Arrow halves are cut from sheet steel. They are folded together at a certain angle and welded. At least 3 passes must be made. A steel corner is welded to the seam on the bottom side. It will prevent rapid wear of the cutting part and protect the joint from pressure. In addition, the corner will act as a keel, keeping the hiller on course.
- The frame and boom are joined together and welded. During this process, it is necessary to control the geometry of the product. If it is violated, it will be led to the side, which will lead to breakage of the hiller and damage to the plantings.
- The metal is cleaned of deposits and rust. The product is treated with a special anti-corrosion primer. The moving parts are treated with lubricant and covered with plastic film. The hiller is painted with paint that is resistant to moisture and ultraviolet radiation.
The final stage of work is fine-tuning the product. If necessary, the boom blades are adjusted to fit the desired configuration. It is recommended to carry out field tests of the hiller. This activity will help identify and eliminate deficiencies before the start of major field work. It is imperative to sharpen the tip and wings of the arrow well. A sharp device penetrates the soil much better and cuts the stems and roots of weeds.
Various models of hillers
The hiller is the second most important tool after the plow and winch. With its help, you can first cut furrows for planting, and subsequently fill them with planting material.
When moving the hiller along the row-spacings of evenly planted rows of potatoes, you can observe how the wings of the tool quite quickly pour soil into the holes with tubers
On sale you can find several variants of models of this instrument.
Option #1 – lister hiller
This is the simplest type of tool that has a fixed working width. The design consists of two fixed wings connected and slightly extended. Since the wings of the tool are stationary, it is impossible to adjust the working width by adjusting the hiller to the row spacing. Therefore, when working with such a tool, the row spacing is adjusted to the capabilities of the hiller, and not vice versa. Traditionally, manufacturers produce products with a working width of 25-30 cm, which is also far from the most convenient option, because the technology for growing potatoes provides for a row spacing of 50-60 cm.
Such tools are designed to work with motor cultivators whose power does not exceed 3.5 hp, and the total weight of the unit is 25-30 kg
A design feature of lister hillers is also the presence of thin racks that prevent the motor cultivator from being overloaded when the hiller is buried in layers of dense soil.
Some models of lister hillers have a streamlined shape, which is more preferable, since when working with such a tool, the soil is less turned out and dried out.
Option #2 – products with variable working width
Such tools are more convenient to use because they are equipped with an adjustment mechanism with which you can change the position of the wings. This allows you to adjust the tool to different row spacings.
Such hillers are designed to work with more powerful walk-behind tractors with an engine of 4.0 hp or more. or more, whose weight exceeds 30 kg
A significant disadvantage of such structures is their high energy consumption. The reason for this is that during operation, the wings of the tool push the soil to the side, part of which, after its passage, still crumbles back into the furrow. As a result, your back and arms get tired faster, and part of the engine power is wasted on useless work. But despite this, they are one of the most popular models among most gardeners.
Option #3 – disk models
Disc hillers are an order of magnitude more expensive than their traditional counterparts, but the efficiency of working with such tools is many times greater
The main advantages of disc hillers are:
- A successful combination of a walk-behind tractor with the tool itself. Using a disk hiller, when the speed of the motor cultivator decreases, its power increases. This not only increases the efficiency of cultivation, but also has a positive effect on the operation of the unit itself.
- Ease of use. To work with such a tool you need to put in a minimum of effort: it propels itself forward without requiring additional pushing from behind.
- Versatility of use. Using this tool, hilling can be done both after planting tubers and during the period of active growth of the above-ground part of the crop.
When choosing among the variety of assortments, it is advisable to give preference to models made of alloy steel, equipped with rolling bearings (rather than sliding bushings), with a large diameter and thickness of discs.
Option #4 – propeller-type hillers
The principle of operation of the tool is the operation of special propellers, under the influence of which the soil is first crushed and weeds are combed out, and only then the beds are hilled with loose soil
Such hillers are designed for equipping walk-behind tractors and cultivators that have two forward gears. This is necessary so that in second gear, with the power increased to 180 rpm, using the tool you can not only loosen, but also transfer the soil into the beds from between the rows.
Recent Entries
It's time to fertilize tulips for the first time 5 flowers that cause headaches: don't plant them in large quantities 5 chamomile-like flowers that bloom all summer
Advantages and disadvantages of hillers
The use of mechanisms always allows you to increase labor productivity on farms and summer cottages.
Advantages:
- reduces labor costs and increases farmer efficiency;
- can be a multifunctional tool that can additionally be used for loosening the soil, planting potatoes, and also during harvesting;
- You can freely buy a potato hiller in a store or make it yourself.
Flaws:
- in order to use the device, you need to purchase it, which means that material costs will be required for the purchase and further maintenance;
- When working with the device, you must follow safety regulations.
Sprayer and manure spreader
The cost of such products will depend on how the owners approach production. To assemble it yourself from scrap materials you will need:
- A pump with a voltage of 12 V.
- Pipes.
- Square metal profiles.
- Tank, plastic or stainless steel. The minimum required capacity is 200 liters.
Pipes with sprayers are attached to the structure after completion of welding work involving the frame. The sprayer is connected to the hitch of a mini tractor. It is better to make the rod with the sprayer movable. To do this, the automobile structure is connected to a jack; it will operate from a hydraulic system.
Homemade sprayer for a mini tractor in the video:
Manure spreaders are equipped with wheels. Their tread must be strong enough to avoid slipping. The conveyor belt is responsible for supplying fertilizers; the drive from the trailer wheels sets this part in motion. Adjustment and shutdown are often done manually.
https://youtube.com/watch?v=CvOQJefuIMI
How to choose?
The choice of hiller depends on its purpose. For example, a three-row option is unlikely to suit the owner of six acres, but on a farm it will become an indispensable assistant when cultivating root crops or berry crops. When choosing a product, you should focus on the completeness. For example, disc types of hillers on a frame are often sold without a hitch. If you overlook the equipment, you will have to postpone work in order to buy or make a hitch yourself.
It is clear that for a household cultivator and for a MTZ it is effective to use different models of hillers.
Multifunctional Polish models have taken root in Russian fields. They are suitable for processing large areas with a slight slope. For subsidiary farms, it is worth acquiring a universal mechanism that is compatible in parameters with the existing or planned to purchase walk-behind tractor or cultivator.
For gardeners cultivating large potato plots, an active two-row type of hiller is suitable. The rotating blades will cope with three tasks at once: they will loosen the soil between the rows, chop the weeds, and form mounds above the vines.
Kinds
There are several types of tractor hillers on the modern market.
Lister equipment for a mini-tractor is considered the simplest model. Work with the ground is carried out thanks to the presence of a pair of connected and slightly spread wings. The thin stand prevents overloading when the moving device is immersed in the soil
It is important to mention that the lister hiller does not have the ability to adjust the grip, that is, the width of the rows must correspond to the equipment, and not the canopy adapt to the existing beds. The working width of the device is always fixed and ranges from twenty-five to thirty centimeters
This gap is sometimes not enough to process large areas, which, of course, is a disadvantage of this variety. A model with a variable working width is considered more convenient for use, which indicates the possibility of adjusting the space being processed.
- The disc hiller is considered a universal device, very convenient to use. Such equipment allows you to cultivate the land not only during planting, but also when the potatoes are actively developing. Models made of alloy steel and equipped with special rolling bearings instead of sliding bushings are considered to be the most reliable. The large diameter and thickness of the discs are also important.
- The next type of hillers is called propeller-type devices. As you can guess from the name, soil hilling in this case occurs with the help of propellers. These parts rotate, crush clods of earth, and then transport them from the space between the rows to the beds themselves. As a rule, propeller-type hillers are mounted on moving vehicles with two forward gears. This condition is necessary so that in second gear, the power of which reaches 180 rpm, in addition to loosening, the earth is also thrown over.
It is worth mentioning that many craftsmen make such attachments on their own from available materials, fortunately the Internet contains a large number of suitable drawings and instructions. The role of discs is usually played by lids from old pans without an enamel coating. The diameter of the circles in these cases varies from forty to fifty centimeters, and the edges of the lids must be sharpened and, if necessary, slightly bent. A circuit is assembled from pipes and bushings, onto which the discs are then attached. The frame itself also has to be equipped with wheels for movement.
Description and types
Using hillers to cultivate potato fields is a wonderful modern way to speed up and simplify hard work. You can buy a ready-made, factory-assembled hiller, or you can make it yourself - from simple materials.
According to the principle of operation, hillers are divided into:
- disk;
- plow
Disk
This type of hiller is universal: ideal if you have a large area to cultivate, but can also be used for a small garden plot. This type is considered the most convenient for use and, as a result, is the most popular.
Disc potato hiller for tractor
The disk hiller also has a disadvantage - its high price, but if you have minimal technical knowledge and skillful hands, you can make it yourself. It will also be useful to learn about how to use salt against weeds in the garden.
Pluzhkovy
And if the design of disk hillers is more advanced and modern, then the design of plow hillers most closely resembles the design of a conventional plow. This type of hiller is the simplest, but reliable and trouble-free in operation. However, there is also a drawback here - the plow hiller has to be attached to a more powerful tractor or motor cultivator.
Pluzhkovy
If you look at the structure of the working element, then from this point of view the hillers can be divided into:
- adjustable;
- fixed.
Adjustable
This type of hiller has the ability to change the working width. The latter quality allows this type of unit to be used for potato beds of any width. It also has a disadvantage - when cultivating the beds, the soil spills back into the furrow. But how to plant potatoes correctly, and how planting work is carried out, is indicated here.
Adjustable
Fixed
This type of hiller is the simplest; it does not have the ability to change the working width. Therefore, in this case, it is important when planting potatoes to make row spacing as equal in length as possible. Otherwise, the work will be very difficult.
Fixed
By type of media
Tractor
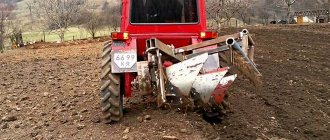
As the name implies, this type of device is used by attaching it to a tractor. Such a hiller is capable of simultaneously cultivating the beds and destroying the weeds in them, which also further increases the chances of a high yield. A tractor hiller consists of a metal frame, a canopy, wheels, paws and the dumps themselves, which directly hill the ground.
Tractor
For motor cultivator
In this case, the hiller is attached to the cultivator instead of the coulter. This device hills up in the following way: it pours soil while passing between the beds, and pours it directly onto the potato tubers.
For motor cultivator
Feasibility of the procedure
Disc hillers are used for a very important agricultural technique - hilling. Carrying out this event is a mandatory procedure when growing potatoes
It performs a number of important tasks:
- removing weeds, which is quite problematic to do manually with a hoe;
- hilling protects the tubers from exposure to direct sunlight, which, if the potatoes are close to the surface of the earth, can slow down their development and sometimes even lead to drying out;
- Correct and timely hilling leads to improved air exchange in soils and normalizes the evaporation of moisture from the surface of the earth.
If there are several rows of potatoes in a summer cottage, there is, of course, no need to purchase a hiller, but if quite large areas are occupied by potatoes, then mechanization of this process is indispensable.
Manual potato hiller
Potatoes have always been considered one of the main vegetables in the kitchen. It is used for preparing first and second courses, desserts, etc. Growing this vegetable requires a lot of labor, because to get a good harvest you need to hill up the potato bushes several times a season. Thanks to hilling, oxygen access to the roots improves, channels in the ground are destroyed, as a result of which less moisture evaporates, and the number of tubers increases.
Hilling up bushes is carried out in summer cottages mechanically using a hoe. However, this is a long and difficult process.
To help farmers and gardeners specializing in growing potatoes, a special tool called a hiller has been created.
how to plant potatoes under a hiller? | Topic author: Anatoly
Vitaly Tak is planted with a motorized cultivator, but it can also be done with a manual hiller. You make the rows of Roman with a hiller, put in the potatoes, and then go through the hiller again between the rows and fill in the potatoes. It is very convenient if the width of the hiller can be adjusted - make the grooves narrow and fill them wide.
Ruslan Just plant under the straw, without digging or hilling, but after germination, constantly cover the bush with weeded grass
Valentin is not entirely clear what a hiller is
Nikita is under the hiller, there is no other way.
Igor Make the furrows with a hiller, spread out the potatoes and ashes, and then take the shovel in your hands and cover the furrows. You still need to WATER
The principle of operation of hillers
The hiller allows you to dig a furrow of the required depth with a dump of black soil on both sides.
In terms of its importance in processing potato plantations, the hiller ranks second after the plow. The design of its working body allows you to dig a furrow of the required depth with a dump of black soil on both sides of it
When planting, the groove must be made larger, since potatoes need a thick layer of soil on top. Then the tubers are evenly laid out and the row is filled up. During hilling, it is not necessary to provide a large depth, which significantly reduces the load on the walk-behind tractor engine.
Weed control will occur both between the rows and on the potatoes themselves. The working parts of the hiller, cutting off the soil in the inter-row space, will simultaneously weed it, and the soil that the mouldboard wings will feed onto the row will completely cover the crops and weeds. If this is only good for potatoes, then for unwanted plants it is guaranteed destruction.
How to set up a hiller
Before starting work on hilling potatoes or other root crops, you need to set up the equipment.
One of the most important parameters is the working width. It is adjustable on multi-row structures. The fact is that if the working width is set incorrectly, the tubers may be damaged (if they are too close to the furrow) or an insufficient amount of soil will fall into the furrow (the working width is larger than necessary). The parameter is adjusted manually by changing the position of the working parts on the frame.
Another parameter is depth. It is adjusted depending on how the planting took place - if the root crops are close to the surface of the earth, then the depth of hilling should be greater in order to loosen a lot of soil. You can change the hilling depth in two ways: by changing the angle of the boom or by placing the working element deeper into the ground.
Important points in work
There are other types of devices, among which we should highlight the rotary hiller, double-row hiller, etc. Despite the fact that a double hiller allows you to process a large area, many people prefer conventional single-row hillers, since only they can work with light walk-behind tractors. Although the single-row hiller allows you to hill up only one bed per pass, it has the advantage that you can fine-tune the device.
Also, in theory, hilling potatoes is quite simple: you should sprinkle the base of the bush with soft and loose soil. This allows you to create favorable conditions for the development of root crops, improves aeration, and destroys weeds. During the hilling process, soil moves from the spaces between the beds to the bases of the bushes. Many people do not know when to hill up and how to properly use hillers with walk-behind tractors.
More experienced people recommend hilling about 4 times per season. This is due to the fact that a potato tuber (or other root crop) is capable of development only when it is buried at a depth of 15-20 cm. Moreover, the hilling process allows the potato to develop in different directions. Thus, the hilling process creates additional opportunities for the development of root crops, increasing the yield and quality of the fruit. In this case, it is most effective to hill up damp soil - after rain, dew, etc.
It is strictly forbidden to hill up with dry soil - this can lead to the death of the plant.
The first hilling is carried out almost immediately after the potatoes emerge.
Before starting work, you need to be extremely careful about setting up the block: it is important to set the distance between the discs or knives so as not to damage the plants, but at the same time so that the seedlings are not completely covered with soil. The height of the hill should cover the base of the stem to the leaves, which allows it not to destroy the plant and allow it to develop
The next hilling is carried out when the tops reach a height of 30 cm.
At the beginning of work, incorrect installation of hiller plows is often revealed. It either buries deep into the ground, or, conversely, walks almost along the surface. The solution to this problem is simple - you need to adjust it more precisely.
The hillers are installed on a minitractor in the same way as on a walk-behind tractor. However, it should be remembered that to work with these blocks, the width of the bed should not exceed the distance between the wheels of the tractor or walk-behind tractor.
One more detail - in some models of hillers it is impossible to adjust the angle of attack, on which the efficiency of the work depends. Therefore, you should be extremely careful about connecting the walk-behind tractor or tractor with the hilling device and carefully adjust the distance between the discs or knives.
Important Tips and Recommendations
When starting to manufacture attachments and other equipment intended for cultivating land, it is necessary to take into account some features of the production of products. If you assembled and launched a cultivator or hiller with your own hands, it will be impossible for you to guess how it will behave on the ground during operation.
Especially if a tractor equipped with a homemade product has to work on different soils. Thus, a homemade cultivator for the T 25 may turn out to be too light, since it was assembled according to the scheme for the T 16 model, which has a lower power engine.
The same applies to equipment such as a homemade cultivator on the T 40 - although this tractor has great power, it will not be advisable to install large equipment on it.
In this case, he will be able to process a larger area in a short time, with the same quality of workmanship.
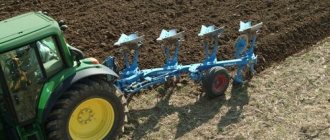
Three-body hiller for mini-tractor
The Avtovelomoto online store has all the necessary agricultural equipment for mechanizing agricultural work. Not only residents of Minsk, but also other cities of Belarus can buy a three-body hiller for a mini tractor in two clicks.
As the official representative of the manufacturer of attachments, we offer proven products at a price lower than our competitors. We offer flexible offers for all clients to make purchases in installments or on credit. Use the loan calculator to calculate your own payment schedule.
Why is hilling necessary?
Some gardeners manage to grow potatoes without hilling the beds. However, in order to grow a truly good harvest of large root crops, hilling is necessary.
This procedure allows the plant roots to have better access to air, and it also helps retain moisture. In addition, hilling causes the plant to begin to develop stolons (side shoots), resulting in more tubers.
On the video - why hilling is needed:
Of course, you can hill up potato beds using hand tools, however, this method is only suitable if the beds are small. For large areas it is necessary to use a hiller, which significantly speeds up and simplifies the work process.
It is also worth paying attention to why a potato digger for the Neva walk-behind tractor is needed, and what is its price
Advantages
If the specified condition is met, then hilling potatoes with a mini tractor acquires some advantages over manual work.
- Firstly, it greatly simplifies the process in terms of physical activity.
- Secondly, the speed of work increases, and hence labor productivity.
- Thirdly, the result obtained is many times higher than the quality of manual work.
Hiller at work
Agree, the described circumstances characterize the hiller for a mini tractor only from the best side. But this does not mean that it is necessary to buy a potato hiller for a mini tractor as soon as possible. These actions should be carefully considered, since such an acquisition is fraught with significant financial costs. Moreover, you can easily make a hiller for a mini tractor with your own hands, without asking for help from strangers. (The device is shown in the photo).
How to make a hiller for a mini tractor with your own hands?
Making a minitratcore hiller with your own hands is quite simple. The choice of design will depend on working conditions and your preferences. Having mastered the production of this equipment, you can safely make your own rototiller for a mini tractor.
Most often, homemade hillers for mini tractors are sheet and disk.
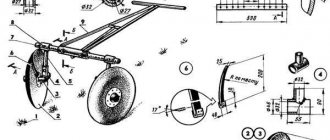
Drawings and dimensions of listing equipment are shown in the diagrams below:
The manufacturing procedure is as follows:
- a tube of smaller diameter is inserted into the pipe intended for the rack, and the height of the device is adjusted;
- in order to find the optimal angle of inclination during processing, use a tarlap to adjust the angle of inclination between the rod and the stand;
- the stand itself is made of a pipe approximately 1 m long, bent at an angle of 15 degrees;
- Hiller rods are made in the form of U-shaped forks, about 50 cm wide and about 20 cm long. The front rod handles are made a little longer. They are inserted into a vertical rack;
- The hiller itself is made of 2 metal plates about 2 mm thick. Having bent them in the necessary way, we weld the device to the rack;
- A ploughshare is welded to the wings, made of slightly thicker steel and sharpened for better cutting of the ground.
The production of a disk hiller for potatoes on a mini tractor is carried out according to the following algorithm:
- Identical, symmetrical hemispherical disks are welded from sheets of metal 1.5-2 mm thick.
- The disks are attached to the rack using bolts or welding at the required distance and at the desired angle.
- The discs are connected by adjustable adapters. The rotation of the disks around their axis is regulated by tarlaps.
- The hiller is connected to the mini-tractor with a T-shaped leash with a coupling device.
As an alternative, we invite you to watch the video, which shows the manufacture and operation of a manual lister hiller:
Varieties of manual hillers for potatoes: diagrams and step-by-step assembly
Depending on the design, there are the following types of manual hillers: lister (ploughshares with a fixed working width), disk, furrow makers (markers).
Lister mechanisms
Potato lister hiller is made as follows:
- A sheet of metal is cleaned of rust using a special attachment on a drill.
- On the cleaned surface, using a special pattern, two blanks are outlined.
- The blanks are cut out with a grinder and processed on an emery machine.
- The wide ends of the workpieces are bent in a vice so that the distance between them is equal to the row spacing.
- Two workpieces are welded with their front, non-curved edges.
- The working part of the body is reinforced with a corner.
- At one end of a thick steel strip, make 2-3 holes with an 8 mm drill.
- The second end of the steel strip is welded to the inner surface in the working part of the body.
- A small cut is made on a round pipe with a diameter of 25 mm and a length of 2-2.5 meters at a distance of 60-80 cm from one of its ends.
- At the place of the cut, a bend is made so that the angle between the pieces of pipe is 100-105.
- A fork with a wheel from a folding bicycle is attached to the end of the pipe.
- At a short distance from the fork, a long through cut is made along the pipe.
- Just above the bend, parallel to the cut, two strips with several adjustment holes are welded.
- The housing with the stand is inserted into the cut, fixed in the adjustment holes using a bolt and nut.
- A bicycle handlebar is attached to the long part of the pipe using a clamp.
- After checking the functionality of the assembled hiller, all its components are cleaned, degreased, primed and covered with 2 layers of dark oil paint.
Disc hillers
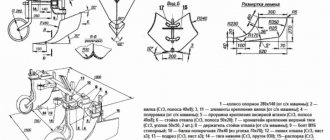
Homemade disc hillers are made as follows:
- Disks from a harrow or potato digger with bearing units are fixed on L-shaped posts.
- Two pieces are cut from the channel, and a through hole is drilled into its flanges, having the same diameter as the L-shaped disk stand.
- After this, a piece of thick-walled tube is welded between the shelves.
- A hole with a diameter of 12 mm is drilled in the middle of the tube, a nut is welded to it, into which a long bolt with a hex head is screwed.
- A hole is drilled at the base of each channel section, a nut is also welded to it, and a hex head bolt is screwed in.
- Racks with disks attached to them are inserted into brackets made of channels and tubes.
- A handle is welded to a square profile pipe (frame) on one side, and a fork for the support wheel on the other.
- A piece of square pipe is welded 20-30 cm from the fork across the frame.
- Brackets made of channels with racks with disks fixed in them are placed on the welded square pipe on both sides.
- A support wheel is installed in the fork.
- The depth is adjusted by vertically moving the stand in the bracket and fixing it with a screw screwed into the nut.
Manual potato hiller
The manufacturing process of the simplest manual hiller consists of the following operations:
- Applying the contours of two blank parts of the dump onto a sheet of rust-free metal.
- Sawing blanks with a grinder, processing them on an emery machine.
- Bending the wide ends of the workpieces at a certain angle.
- Welding workpieces, cleaning the weld seam.
- Welding between two parts of the moldboard of a reinforcement bar.
- Attaching a tube with a hole to a reinforcement rod.
- Cleaning, degreasing, priming the hiller.
- Fastening the handle in the tube, fixing it with a small self-tapping screw.
- This type of furrow maker is used for cutting planting furrows and hilling potatoes in small areas.
Hiller for tractor
A homemade hiller for tractors T-40, T-25 is a more labor-intensive and costly unit. Unlike hand tools, it is equipped with more durable and reliable factory hiller bodies with paws
Simplified, the manufacturing process consists of the following steps:
- Welding a frame from a square profile pipe 50×50×2 mm.
- Attaching support wheels to the frame with rods and adjusting screws.
- Attaching racks with hiller bodies to the frame.
After final assembly, all parts of such a home-made unit are cleaned, degreased and painted with oil paint. In this case, the racks with working parts are painted orange or yellow, and the frame itself is painted blue or dark blue.
You can clearly see the design of one of the homemade units of this type in the following video:
We manufacture a product for a walk-behind tractor
The simplest disk hiller can be made using the following video instructions:
In the form of a plow
A plow-shaped hiller is made in the same way as a lister hiller. The only difference in the design of this unit is the presence of a special adjustment of the distance between the blade wings.
With your own hands
The most important starting material for construction is old pot lids. Here we must take into account the fact that the specified raw materials must be made of metal and not have an enamel coating.
The optimal diameter of the lids is 40-50 centimeters. This is quite enough, since potatoes do not immerse their root crops very deeply - 15-20 centimeters.
The next step is to sharpen the edges of the lids. These actions are best performed using a special unit. It is worth clarifying that these elements will serve as discs for a homemade hiller for a mini tractor. (See photo).
An important point in the production of these elements is the shape of the lids. If they are straight, you need to bend their edges a little. This can be done with a hammer.
In order to make the unit for your mini tractor as convenient as possible, you should design a special trolley. It is this that optimizes the process of moving the cutter blades, which loosens the soil.
To accomplish the task, pipes and bushings are used. Next, the unit on the minitractor is equipped with wheels that are attached to the frame of the structure.
For the convenience of constructing the unit, you can first sketch out the appropriate drawings, on which all the details of the project will clearly appear. Similar drawings can be made by anyone who is at least a little familiar with this process.
It is worth noting that a homemade unit does not have to be built in accordance with any aesthetic standards. The most important thing is that your cultivator-hiller for a mini tractor functions smoothly and performs its direct duties with the highest possible quality. Then the potatoes in your garden will feel quite comfortable, which will allow you to reap a rich harvest.
Exploitation
Whether you bought a hiller for a mini tractor or created it yourself, you need to know how to operate this device correctly, and therefore safely. First of all, it must be said that the hiller is capable of performing several agricultural operations:
- hilling.
- loosening the soil.
- cultivation.
- cutting furrows.
An important advantage of the unit is that its owner has the ability to independently regulate the operation of the hiller depending on the conditions and specifics of the process. In addition, the weight of the equipment is quite small, which makes it easy to install or change special paws on it. (See photo).
Another important advantage of this device is its ease of operation. To use a hiller, a minitractor does not have to have a high power rating, since the specified equipment belongs to the traction class.
This is how we gradually got to the basic rules for working with a potato hiller.
- Before the unit is started, it is necessary to carefully inspect it to ensure that all working elements are securely fastened.
- There are a number of manipulations that should be carried out exclusively when the mini tractor is turned off. We are talking about the following actions:
adjustment of mechanism parts;
- installation of certain structural elements;
- cleaning specific parts from dirt and plant parts;
- repair and preventive manipulations;
- It is allowed to turn on the power take-off shaft only at minimum speed.
- While the hiller is moving, there should be no people in its area of effect.
Upon completion of the work process, it is necessary to thoroughly clean the unit from soil and plant matter residues. Make sure your equipment is completely clean and dry before you retire it. Ignoring this rule will lead to undesirable consequences that may interfere with further operation of the device.
In cases where long-term storage of the hiller is planned, excluding the use of the device, all its working surfaces must be treated with grease. If it is necessary to involve the device in agricultural activities, the specified lubricant must be removed.
This video provides information on how to build the described device at home, spending a minimum of time and money.
Making a disk hiller
In this type of agricultural equipment, the main working parts are discs. Their use is much more productive, since the required accuracy and shape of the bed are achieved. The configuration of the product is such that the risk of damage to the tubers and stems of the plant is almost completely eliminated.
If it is not possible to purchase disks made industrially, then you can make them yourself. For this, 2 mm thick sheet steel or wide iron pan lids are used.
If there is a discrepancy in shape, the hiller will leave the row and cut the plant stems.
The disk hiller is manufactured in the following sequence:
- Working elements are being made. Depending on the power of the mini-tractor and the type of soil, hillers are designed as single-row or multi-row. Disks are made in pairs. Their edges bend in different directions. A heavy hammer and anvil are used for this. Bushings or powerful rolling bearings are inserted into the center of the circles.
- The hiller frame is being assembled. It is better to do this by welding. It is recommended to strengthen vertical and horizontal parts with steel ties made from pipes or angles. In order to be able to adjust the grip angle, screw lanyards are attached to the frame.
- The discs are mounted on the axles. Each fragment is configured and adjusted. If a multi-row device is being manufactured, then holes are drilled in the bracket for mounting disk modules.
- The quality and correct assembly of the product is checked. After that, it is fixed to the bracket of a mini-tractor and tested in field conditions. If defects and shortcomings are identified, they are eliminated in the workshop.
Upon completion of mechanical work and debugging, the hiller is given a marketable appearance. It is completely cleaned of dirt, dust and rust. The moving parts are lubricated, and the remaining surfaces are painted with acrylic paint.
Tools and materials
Before you start work, you need to draw up drawings and diagrams. They need to display all the parts, methods of connecting them and attaching them to the tractor. Adjustment mechanisms must be provided so that the operator can adjust the hiller when working in different conditions. After checking the calculations, you need to prepare tools, materials and equipment.
In order to make a hiller yourself, you will need:
- roulette;
- welding machine;
- electric drill;
- Bulgarian;
- hammer:
- grinder;
- screwdrivers;
- spanners;
- level;
- sheet steel 2-3 mm thick;
- profile steel pipes 20x40 mm;
- iron corner 30 mm;
- sandpaper;
- paint brush;
- dye.
When making a disc hiller for a mini tractor, you need to find blanks for the discs themselves. You can use decommissioned products. Their condition is quite satisfactory for making a small hiller. Old wheels are found in abundance on farms and scrap yards.