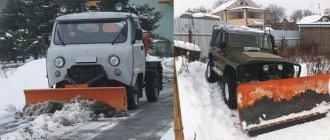
The question of how to make a blade for a walk-behind tractor with your own hands arises before almost all owners of land plots with the onset of winter. Specialized and online stores offer many devices for snow removal. However, not everyone has the opportunity to buy a walk-behind tractor with a factory-made blade. A good, high-quality factory-made snow plow has an impressive price. You can save on an expensive purchase if you show creativity and make a blade for a walk-behind tractor with your own hands. For such work there is no need to purchase special equipment. You can make a homemade blade for a walk-behind tractor from what you have on hand.
Design Features
First, let's define the design itself. A walk-behind shovel is a curved working surface that consists of the following elements:
- rigid frame;
- stiffeners;
- curved steel sheet 2 mm thick;
- heels (2 pcs.);
- knives (metal and rubber).
A metal knife is used for excavation work, when it is necessary to level the ground, etc. In cases where areas are cleared of snow, debris, etc., a rubber knife (gentle) is used, which will protect the nozzle itself from damage upon contact with solid covering, and pavement (tiles, asphalt, concrete).
Blade shovel
A standard shovel is 100 cm wide and 40 cm high.
There are two types of walk-behind blades, which have some visual differences in their design:
- Blade shovel.
- Ladle.
A shovel blade for a walk-behind tractor is intended only for clearing areas of debris, snow, and is used for leveling crushed stone, soil and sand. The bucket is closed at both ends with welded plates, so in addition to the actions already described, it can also be used for loading the same sand, earth, snow, garbage, etc.
We invite you to look at the photo, which shows how a shovel differs from a bucket:
Installation type relative to walk-behind tractor
Due to the relative simplicity of the design, relatively low weight (up to 16 kg) and great functionality of the work performed, the dumps can be attached to both medium and heavy walk-behind tractors.
Depending on the design of the walk-behind tractor itself, the canopy can be attached to:
- to the front;
- behind the motorized device, taking into account that the steering column of the latter rotates 180 degrees around its axis.
Location of the working body
There are two types of dumps:
- adjustable (rotary);
- unregulated.
Rotary blades are universal, as they allow you to set the required angle of attack:
- right tilt;
- left tilt;
- direct installation.
Non-adjustable canopies are rigidly fixed in the position required by the operator (straight, right, left) and are not subject to adjustment.
We invite you to watch a video of a walk-behind tractor using a straight and rotary blade:
Types of hitches for walk-behind tractors of famous brands
The hitch is an indispensable device that comes complete with a walk-behind tractor, which allows you to aggregate various attachments. Depending on the brand of walk-behind tractor and its design, the configuration of the hitch itself also changes. In addition, hitches are also adjustable (angle of attack, horizontal) and non-adjustable.
There are several types of fastenings:
Kit hitch equipped with front lift mechanism
Types of lifting mechanism
Lifts allow you to raise and lower the working element (blade for a walk-behind tractor), and perform loading and cleaning work. There are several types of lifts:
- manual or mechanical (lever);
- hydraulic (using a hydraulic pump).
Description
A plow blade for a walk-behind tractor is an attachment that is widely used at any time of the year by owners of personal plots. Review, application, use - we will talk about all this in this article.
Using a blade you can perform the following work:
- clear snow along roads, sidewalks, in the yard and adjacent areas;
- level soils, screenings, sand;
- rake - shovel away garbage;
- if the blade is made in the form of a bucket, perform loading operations.
Required materials and tools
Before you begin selecting materials and creating a blade for the MTZ-82 tractor shown in the photo, you should first draw up a plan and drawings that can easily be found on the Internet. To select the optimal dimensions and weight of the equipment, you should take into account what materials you decide to use, as well as the power and weight of the power unit.
To make a snow shovel for the MTZ-82 tractor with your own hands, you need a minimum set of tools, namely:
- measuring instruments;
- hand-held electric drill;
- welding machine;
- set of drills;
- bolts;
- steel beams or pipes with a diameter of more than 70 mm;
- shock absorbers;
- set of wrenches;
- hydraulic cylinders;
- metal cutter or scissors;
- Bulgarian;
- steel sheet with a thickness of at least 8 mm;
- rubber strip.
As for materials, the most basic is sheet metal, which will be used for the frame of the unit and the blade itself. Dimensions should be calculated in accordance with the likely maximum loads, or dimensions can be copied from existing factory models.
To make a half-frame, you will need two thick metal beams, six hinge-type joints and one hydraulic cylinder. You will also need two pieces of metal pipe of the appropriate size and a diameter of about 100 mm, and four more swivel joints. But, if you are planning a homemade rotary blade, then instead of metal pipes you will need two more hydraulic cylinders. This will make it possible to control the rotation of the grader and expand its functionality.
Refinement of the scraper
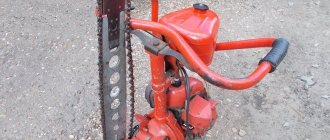
I cut a slice at 60 degrees. It turned out that the blade sector is approximately 120 degrees. That is, from one barrel you can already make 3 scrapers. I left the side edge as a sector; I didn’t cut it along the chord, because the side is so high and wide, snow won’t fall out of it.
It is advisable to take Russian-made barrels that are currently being produced. Their metal is thin. The old Soviet ones are too thick, the snow removal tool will turn out to be heavy. Birch cuttings. They are mainly used on blades because they work on bending and are stronger than pine. They are not needed on the scraper. Birch is about 1.5 times heavier than pine, so if you can get your hands on it, the master will change both the guides and the handle to pine ones. Then the scraper will be completely airy.
Although a huge amount of snow falls in the Altai Territory, this is only the 4th snow region. And somewhere there are 5, 6, where such precipitation falls 1.5 times more. So stock up on shovels and scrapers and face the winter fully armed.
Source
How to make a blade for a walk-behind tractor with your own hands
Assembling an attachment such as a snow plow is a fairly simple task. However, during the manufacturing process you should follow a few simple rules.
When choosing or drawing up a drawing of a device, it is important to compare the load on it with the power of the existing walk-behind tractor. The use of equipment whose design is designed with too much productivity can lead to overloading of the unit and premature wear of its mechanisms, which leads to its breakdown
The device to be assembled must meet a number of important criteria:
- Durability. The strength of the knife and bucket must be high enough for the equipment to serve uninterruptedly for at least 5 years. All units and components must be assembled from such materials and using such connections that they can withstand the maximum load.
- Dimensions. There are standard industrial sizes, which, if made by hand, may vary. However, you should not go too far beyond the standard limits: it makes sense to make the width of the blade from 80 to 130 cm, and the height - 30-50 cm.
- It is advisable to provide a lifting mechanism that can be easily implemented using levers or hydraulics. Thanks to this, it will be possible not only to clear snow and remove garbage, but also to remove it from the site.
- The presence of a swivel joint. If you have the ability to tilt the blades up and down and left and right, snow removal is better.
- Rubber shock-absorbing strip at the bottom of the bucket. This part is needed to protect the unit from impacts, the shovel from breakage and deformation, and the road surface from damage.
- Convenience of quick installation/disassembly of the attachment on the walk-behind tractor.
Before starting production, first of all, you should decide on the dimensions. A standard snow shovel has a width of 100 cm with a metal thickness of 2-3 mm. The material for manufacturing should be chosen of high quality.
The first step is to collect the necessary set of tools and materials. You will need:
- welding machine;
- grinder with discs;
- drill with metal drills;
- spanners;
- pliers;
- steel barrel with a volume of 200 liters or an empty gas cylinder;
- small thick steel sheet;
- a piece of square pipe 1 m long and with a cross section of 40×40 mm;
- iron strip – 850×100×3 mm;
- sheet of thick, high-strength rubber;
- bolts (M12, M10, M8), washers, nuts.
In addition, you need to take care of the drawings - find the desired design on the Internet or draw it yourself, taking into account your own wishes and operating conditions of the unit.
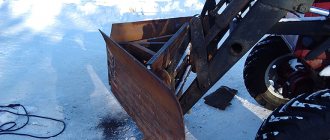
The optimal material for making a ladle is a metal 200-liter barrel, since this container initially has the required bend. If such a container cannot be found, sheet steel of the required thickness will do, but it will have to be heated and bent to the correct radius. If you have a barrel, the first step is to cut off the bottom and lid with a grinder to create a wide pipe. Next, you need to cut it from top to bottom into three equal parts. Two of them are welded around the perimeter, and the remaining third is opened with a grinder into several strips, the purpose of which is to provide the structure with the required rigidity. Two strips are attached to the bottom and top edges of the blade, and the rest are spread across it for reinforcement.
In order to provide the shovel with additional efficiency, a knife is fixed at its bottom. It is made from a metal strip. 3 holes with a diameter of 5-6 mm are drilled in the workpiece, located at a distance of 100-120 mm from each other. A rubber gasket is fixed to them, and the knife itself is bolted to the bucket.
This is interesting: a disk hiller for the Salyut walk-behind tractor.
Having made the shovel, proceed to assembling the mount. This part is made from a pipe and is attached to the center of the blade by welding. Next, a semicircle of thick sheet metal is fixed, in which several holes are made to fix the angle of rotation of the bucket.
After this, an L-shaped holder is made from a piece of pipe, which is fixed with the short side in a semicircle, and the long side is fixed in the frame of the walk-behind tractor. The height of the blade is adjusted using two bolts fixed in an additional part, also made of a pipe - it is put on the holder.
Motor cultivator Sibiryak MK-3-02: cultivator, instructions, technical specifications, repair
Instructions and user manuals for the motor cultivator Master MK 265 can be found on the Pahalka website page - Engines for walk-behind tractors
A design feature of the motor cultivator is the ability to disconnect the gearbox from the engine, which allows the engine to be used as a power unit.
Due to its low weight, size and the possibility of easy partial disassembly, the MASTER motor-cultivator is easy to transport.
Attention: transportation and storage should be carried out in a horizontal position, the permissible tilt angle of the motor-cultivator is no more than 15°. To ensure ease of use of the motor-cultivator during work, as well as for transportation, the steering wheel with controls can be adjusted in height and angle of rotation in the horizontal plane, as well as fold into transport position. Motor cultivator Master MK 265 - operating instructions download
Motor cultivator Master MK 265 - operating instructions download.
GENERAL INSTRUCTIONS The motor cultivator is intended for use in areas with a temperate climate. The reliability of your cultivator will be maximum if you strictly follow the rules of operation, maintenance and storage. Before using the motor cultivator, carefully read the operating manuals for the motor cultivator and engine. During the break-in period (5 -10 hours) of a new motor-cultivator, do not overload it. Till the soil in 2…3 steps to a depth of up to 10 cm in one pass. Use the throttle lever no more than half its travel. Carry out engine maintenance during break-in according to the engine manual. During operation, the space between the rotor blades and the gearbox housing may become clogged with grass or other foreign objects. In this case, immediately turn off the engine and remove any stuck objects.
Attachments for the motor cultivator Master MK 265 (ZiD)
Neither a cultivator nor a walk-behind tractor has value “in itself”; their scope of activity depends on mounted and trailed equipment.
Example of attachments application from the operating instructions:
The key distinguishing feature of the machine is its modular design. One of the modules is the engine, the second is the working mechanism, which can be different. Initially, of course, this is the cultivator itself - a worm gearbox with cutters and control handles. However, other mechanisms can be installed instead, and this point should be discussed in more detail.
It is known that a cultivator is, in general, a seasonal tool. Its main task is to loosen the earth; The most commonly offered additional equipment is a plow, hiller and potato digger. And they must have metal wheels with lugs. You can purchase rubber wheels for some models; they are useful for towing a trailer. On a trailer, the list of available attachments usually ends; nothing else is offered for cultivators. Everything else is the lot of walk-behind tractors, which have a power take-off shaft and the associated ability to work with an active “hitch” (that is, requiring drive from the engine).
Clamp connecting individual blocks (wheel reducer and reducer-adapter)
“Master” is another matter. The ability to replace actuators (essentially just rearranging the motor) opens up limitless scope for the designers' imagination. The result is a kind of hybrid - relatively light cultivators of not very high power, capable of performing operations typical of walk-behind tractors. For the “Master” you can purchase the MKS-1 rotary mower and the MSU-1 motorized snow blower. They come with a gearbox-adapter - it is used to take power from the engine.
Motorized snow blower MSU-1 (with gear adapter) for the Master MK 265 motorized cultivator
The motorized snow blower (MSU), complete with the Master motorized cultivator, is designed for removing snow from flat surfaces in climate zones with a temperate climate, in the temperature range from +5°C to -20°C and relative humidity up to 100%.
Making a rotary auger snow blower for a walk-behind tractor with your own hands
To independently manufacture a mounted homemade auger snow blower (auger rotor), you need to think about the placement of the main elements of the equipment, as well as link the dimensions to the existing walk-behind tractor. Therefore, first of all, a layout diagram of the device is created.
Necessary materials
To make an auger-rotary snow blower, you need to purchase:
- roofing galvanized sheet, it will be used for the manufacture of auger and rotor housings, as well as a snow ejection pipe with a deflector;
- an equal-field corner of 40 or 50 mm, it will be used to make the frame;
- a sheet of steel 2 mm thick, from which the auger and rotor blades will be cut;
- a profile pipe will be needed to make brackets;
- bearing housings and the bearings themselves for installing the shaft;
- a pipe or circle with an outer diameter of 30 millimeters or more will be used as shafts;
- pulleys, sprockets and other transmission elements;
- hardware for creating detachable connections.
Making a homemade auger-rotary snow blower
An approximate procedure for manufacturing a mounted auger rotor for snow removal:
- Parts of the auger body are cut from roofing sheet. They are bent according to a suitable cylinder. The frame of the auger body is welded from a rolled angle or profile pipe. The body and frame are connected into a single unit.
- Screw parts. To do this, segments are cut out of sheet steel, and then blades are formed from them. The auger shaft needs to be adjusted to accommodate the installation of bearings, so on a lathe the surface is machined to fit the fitting size of the supports, as well as transmission elements. The blades are welded to the shaft, forming an auger converging towards the center.
- The bearing housings and the bearings themselves are installed. The auger element of the snow blower is being assembled.
- The housing of the snow removal rotor is cut out of roofing sheet metal. Using suitable items, the final shaping of the rotor housing is carried out.
- Rotor parts. Rotor blades are cut from sheet steel. The rotor shaft is adjusted to accommodate the installation of bearings and transmission elements. The blades are welded to the rotor shaft.
- Balancing is necessary, since the rotor rotates at a fairly high speed.
- The frame of the rotor housing is welded from a corner or profile pipe. The bearing housings and the bearings themselves are installed. Assembly: the rotor assembly is assembled.
- A homemade frame is made on which the rotor and auger assembly will be placed.
- The working part of the machine is being assembled. Transmission elements are installed.
- Brackets are adjusted to connect the working tool to the walk-behind tractor.
- Bench tests are carried out, based on the results of which defects and shortcomings are determined. After eliminating the shortcomings, they begin testing the auger-rotor type snowblower under operating conditions.
All that remains is to use the manufactured rotary snow blower on the walk-behind tractor for its intended purpose.
Category: Attachments
What it is?
The walk-behind tractor is similar to a mini-tractor; its real participation in work begins with equipping it with attachments. The “symbiosis” of the engine and all kinds of attachments allows you to plow, loosen, chop wood, transport cargo, mow grass, and clear snow. All these devices can be placed on a walk-behind tractor and you will get a miniature excavator, tractor or lawn mower.
A walk-behind tractor is often confused with a cultivator, both of which carry out pre-planting work on the ground.
But it should be understood that the capabilities of the first are much wider than the second, although they completely depend on the attachments. A walk-behind tractor is more powerful than a cultivator; its traction is due to the wheels. It also has an engine, often internal combustion, a transmission that regulates the speed and gearbox, and a steering wheel (remote control). As you can see, the device is simple and can be repaired independently.
Various types of attachments are purchased for the walk-behind tractor, for example, stationary equipment is mounted on an adapter. The activator depends on the rotational power of the gearbox. On axial equipment, the nozzles rotate under the weight of the walk-behind tractor. Landing and steering accessories refer to adapter attachments.
The final stage
To prevent the device from crashing into the ground, the edge of the blade is sheathed with metal. If the dimensions of the main device, the blade, are 45*22 cm, it will look like a bucket.
Each time you use the machine, take the time to check the tension of the V-belt.
Check regularly and, if necessary, tighten all threaded connections.
Timely and constant performance of such device maintenance will allow your homemade snow blower to operate reliably and efficiently throughout many winter seasons.
Every craftsman is quite capable of making a snow blower for a walk-behind tractor on his own, and by experimenting with sizes and materials, learn how to make snow throwers for different models of walk-behind tractors.
To avoid the formation of corrosion on your unit, do not forget to frequently treat metal surfaces with special chemical solutions. Compliance with all the above recommendations will allow you to avoid costly repairs to the device or the purchase of a new unit.
Find out how to make your own electric snow blower here.
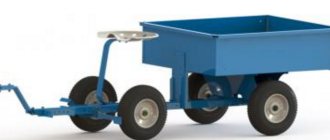
Homemade attachments
The user can make a hitch on the mini tractor with his own hands. To do this, you will need design drawings that will indicate the parameters of the equipment being manufactured.
Before you begin assembling the KUN, you need to decide on the dimensions of the attachment and prepare the tools:
- metal profile (metal thickness depends on the type of proposed work);
- 3 hydraulic cylinders;
- swivel type connections;
- welding machine and gas cutter;
- wrench and wrench.
KUN manufacturing process:
- Cut the inner frame from two metal sheets.
- Make an arrow, where 70% of the length is a support that will connect to a large cylinder.
- Using hinges, attach the middle part to the base.
- Attach a bucket to the middle part (it is made from a prepared metal profile).
Bulldozer blade
In order to make such a homemade product for a mini tractor with your own hands, prepare the following tools:
- steel barrel;
- steel corner 10-15 mm;
- steel square 30 mm;
- 2 hinges;
- 3 hydraulic cylinders;
- fitting;
- hoses;
- transport tape (thickness 20 mm);
- rivets.
- Cut the top off the barrel, then cut it into 3 parts.
- Using pliers, bend all edges 3-5 mm.
- Make reinforcements from a corner (10-15 mm) and weld the slots. There should be 2 amplifiers at the edges, and the rest should be placed at a distance of 20 cm from each other.
- Weld a square along the entire frame from the bottom and top.
- Weld the braces.
- Install hydraulics between the corner and the square.
- Using hinges, hydraulic cylinders and angles, make a lifting and turning system.
The plow is made from a surface in the form of a cylinder (it is recommended to use steel to avoid bending of the blade). The workpiece is given the desired shape: it is fed to the rollers at an angle of 20-23°, bent, and then refined with a hammer according to the template.
A hitch is used to attach the hitch to the tractor.
The plow can also be made from a steel pipe, the diameter of which is 55-66 cm and the thickness is 4-5 mm.
A template is made from cardboard, applied to the pipe and outlined with chalk. The blade is cut out using gas welding and treated with emery. If necessary, modify the shape with a hammer. For attachment to tractor equipment, a rear linkage is used.
Homemade dumps
Nowadays, many people prefer to live in their own homes, and accordingly the surrounding area occupies a large area. To work on a personal plot, motor cultivators, walk-behind tractors and mini-tractors are purchased.
In winter, snow removal turns into a competition to see who can beat whom. And owners who have motorized equipment prefer to remove snow with its help. Attachments for a walk-behind tractor are not cheap, so craftsmen prefer to make them themselves.
The domestically produced walk-behind tractor "Neva" is widely used. It has standard places for hanging devices and rubber wheels that are suitable for driving on loose snow. Most of the homemade dumps were made for the Neva.
On the Internet you can find many descriptions and drawings of a shovel for a walk-behind tractor with your own hands. But before manufacturing, you should familiarize yourself with the characteristics of the dumps. Product composition:
- executive (working) body;
- rotation mechanism;
- mounting bracket.
Rotation angles:
Turning the shovel to the side allows you to remove the snow mass while moving. By going to websites for amateur craftsmen, you can find a lot of information on how to make a blade for a walk-behind tractor with your own hands.
Blade from a cylinder
One of the available materials for making a dump is a gas cylinder. Its height is just over a meter, and the recommended shovel width is 1000 mm. Manufacturing work proceeds in the following sequence:
- Release excess pressure from the cylinder, if any.
- Trim both sides of the lid so that the width is equal to a meter.
- Cut the resulting pipe lengthwise into two halves
- Using a welding machine, connect these two halves so that the height of the blade is about 700 mm.
- The mounting bracket is made as follows. Cut a scarf from thick metal. Drill several holes in it to rotate the shovel in different directions. Weld a piece of pipe to the gusset.
- Weld the resulting device to the shovel at the height of the bracket on the walk-behind tractor.
- Installation is done using a thick finger.
The thickness of the cylinder is sufficient and no reinforcement is required. But the lower part can be equipped with dense rubber, which will remove loose snow and not spoil the compacted road. To do this, you need to take hard rubber from a rotary conveyor.
The width of the rubber sheet is 100−150 mm. Use an electric drill to drill holes in the blade to secure the rubber. To securely fasten the canvas you need a metal strip 900x100x3 mm. Drill holes in the strip and in the canvas, first marking them along the blade. Secure with bolts.
Sheet steel blade
Some craftsmen prefer to use new material rather than used elements. This way you can make a homemade dump shovel from a steel sheet 3 mm thick. To strengthen the structure, take strip steel with a thickness of at least 5 mm.
The material is cut according to the drawings. The blade of the shovel itself has four parts: frontal, lower and two side. The welded structure needs reinforcement. To do this, elements cut from the five are welded in the vertical direction.
Next, the rotating mechanism is manufactured. It is an ear with a hole for an axis. The ear is welded to a corner that is attached to the blade. The axis is fixed at one end of the pipe, and the other end is fixed to the walk-behind tractor. The required angle of rotation is fixed with a finger (dowel).
3 mm - the thickness is small, so reinforcement is required. Cut a strip of 850x100x3 from a 3 mm sheet. You can secure it with a bolted connection, but you will have to first drill or weld the strip.
As you can see, to carry out the work you will need:
- working material;
- grinder with discs;
- electric drill with drills;
- bolts with nuts;
- welding machine with electrodes;
- spanners;
- round or profile pipe.
If you have certain skills, the job is not difficult. And the resulting structure can be used not only in winter, but also in summer. Level the site after construction work, level out a place for a children's sandbox and much more. Which design to choose is up to you.
Preparing for work
You can install a snow blade on the frame of any motorized cultivator with a power of at least 4 liters. With. and weighing more than 50 kg. Also, by reviewing the drawings of a plow for a mini-tractor with your own hands, you can adjust them to your needs if you have a mini-tractor on the farm
It is important for this unit that it is not lightweight. The heavier it is, the easier it will be to rake snowdrifts
The domestically produced Neva walk-behind tractor is well suited for this type of work. The equipment has a high performance coefficient. The walk-behind tractor is adapted to harsh weather conditions at maximum loads.
In the process of making a shovel for a walk-behind tractor, you will need the following tools:
- Welding
- Roulette
- Grinder with cutting and grinding discs for metal
- Electric drill
- A set of keys
- Screwdriver
- Paint brushes and paint
Having completed the preparation of the tool, you can begin to select the material for making the device. Many metal products with a good strength rating can be suitable for this.
The shovel can be made from such materials
- Inoperative gas cylinder. The walls of the product are made of thick and durable metal, so having made such a dump, it will be possible to remove compacted snow, level the ground, rake crushed stone and sand.
- Large barrel with a capacity of 200 l. When choosing such a material, you need to remember that the steel of the product is not thick, and such material can only withstand removing snow that has recently fallen and is not compacted.
- Metal strips. For manufacturing, truck bumpers or corrugated steel for covering the floor of production facilities may be suitable.
To make a snow dump, you can also use Zykov’s plow, drawings and dimensions. As a material for the rotating mechanism, you need to choose steel with a thickness of more than 10 mm. Such material is easy to find at scrap metal collection sites. For fastening you will need a steel pipe profile of approximately 20x40 mm.
When working with loose snow and deep hillocks, the equipment can get stuck and slip. This problem is solved by installing tracks on the axle shaft of the tractor. After this, you can work with the snow blower in any conditions without losing productivity.
Read also: Should a resistor ring?
A blade from a gas cylinder - how to make it yourself?
One of the most common options is to make a dump from a 200 liter barrel or from a gas cylinder. Such a snow removal attachment will successfully cope with clearing the local area from compacted icy snow masses, and will save your time and effort. As in the first case, you will need a detailed diagram that will detail all the dimensions and installation locations of the main elements of the snow blower.
Next, to make an auger or rotary snow blower, you will need to prepare the same materials and tools as in the first case. You don’t have to buy steel sheets and stiffeners - a cylinder or barrel will be used instead.
A snow dump for a walk-behind tractor is made as follows:
- Cut an empty barrel or cylinder into 3 parts - in the end you should be left with 3 curved segments from which you need to make a shovel;
- Weld 2 segments out of the resulting three to each other along the contour. As a result, you will receive a product 3 mm thick - this is quite enough for high-quality snow removal;
- To strengthen the lower part of the blade, install a durable steel blade. Use a drill to make 3 holes in the knife with a pitch of 10 and a diameter of 6 mm. When installing the knife on the ladle, place a rubber gasket between the elements;
- In the middle part of the installed pipe, weld a semicircle in which you make 3 holes in advance - they will be used to securely fix the rotating corners of the bucket;
- Make an L-shaped holder from another piece of pipe. Insert one end of the part into one of the holes in the semicircle, and secure the other to the walk-behind tractor frame. You can see the result of the work done in the photo.
A ready-made snow shovel will help remove large amounts of freshly fallen and compacted snow. Thanks to the large width of the bucket, you can clear a significant area, saving your time and effort. For better cleaning of the local area, a sweeping brush can be installed on the manufactured dump. It should be secured directly behind the bucket using bolts. If you want to use this element, then when making a blade, you need to weld 2 pipes, at least 1 m long, to its side parts. A third pipe is welded perpendicular to the pipes, and the brush itself is welded to it.
Rotary
A snow blower of this type is represented by a mounted model, fixed to a walk-behind tractor. The technique is used only in winter, as it copes with any type of snow mass due to its design (stay and freshly fallen snow, ice, crusty drift, passage through deep snow). The main element is the rotor, made of a shaft with bearings and blade impellers.
There are up to 5 blades in the design; it is possible to manually install more or less blades based on the needs of cleaning the area.
A pulley (made from a V-belt) rotates the blades when the walk-behind tractor moves.
The bearing metal hub is fixed on the side sections of the housing. The visor pipe, located in the side wall of the upper part of the equipment, throws snow out.
Rotary snow blowers work by sucking snow using blades and air flow, which is generated by the rotation of impellers. The height of the emission of snow masses reaches 6 meters. One of the disadvantages of the cleaner is the lack of ability to remove compacted snow. The width of the finished passage of rotary equipment is half a meter.
How to create a snow dump from a barrel?
Making a shovel on your own is easy when you have a welding machine, a grinder and an electric drill in your home. Here is one simple way. You will not need to search for the required material, since you can use a simple 200-liter iron barrel.
Carefully cut it into 3 pieces and you will have 3 curved pieces for the snow plow. By welding 2 of them along the contour line, we obtain an element with an iron thickness of 3 mm, which is fully enough for the rigidity of the shovel
The lower segment of the shovel is reinforced with a knife. To do this, you will need a metal strip 5 mm thick and the same length as the blade grip. Holes with a caliber of 5-6 mm are made in the knife at intervals of 10-12 cm for mounting a protective strip of rubber.
The mechanism for attaching a shovel to a motor cultivator is quite simple and can be done at home. To the shovel, assembled from two parts of the barrel, approximately in the middle of its height, a pipe with a cross-section in the form of a square measuring 40x40 millimeters is welded for reinforcement. Then, in the middle of the pipe, a semicircle of thick iron is welded, in which 3 holes are pre-drilled, required to stabilize the angles of rotation of the blade shovel.
Next, a bracket is welded from the same tube, outwardly similar to the letter “G”, one edge of which is placed in a hole on the semicircle, and the second is connected to the chassis of the unit using bolts.
Factory models
Any company that manufactures walk-behind tractors can also offer a range of snow plows. There are popular models on sale from such manufacturers as Centaur, Neva, Zirka, etc. The only big advantage of a factory design over a home-made one is that they are made of high-quality steel and are more difficult to damage. Moreover, such models last longer than homemade ones. But, on the other hand, they cost a lot.
There are a lot of options for factory dumps, so you should check before purchasing whether this model is suitable for your existing walk-behind tractor. At the factory, snow plows are not equipped with spring mechanisms due to the low speed of movement. If the speed of the walk-behind tractor is low, then the protective mechanisms for contact with the ground lose their meaning. Moreover, the factory models do not have mechanisms for lifting and turning the unit. In this regard, the price of the factory design is reduced.
For higher performance, it is recommended to replace conventional rubber wheels with factory or homemade lugs. This will speed up the work process.
Prices for snow blowers may vary. Basically, the cost of these varies from 4 thousand to 6 thousand rubles.
User manual
In order to respond to emergency situations in a timely manner, thereby preventing damage to the unit, you need to carefully study the instructions, as well as methods for quickly stopping the engine. This can help not only save your snow blower, but also prevent possible harm to the health of you and others.
Instructions for use
In general, snow blowers Lynx, Tselina, Stiga, Huter, Kraftsman, MTD have the following instructions, which reflect the main points:
- Persons under 18 years of age should not operate a snow blower. The same applies to those who have not studied safety precautions and a detailed description of the unit’s design.
- Before starting work, you should carefully inspect the surface from which snow will be removed. The fact is that there may be various stones and other small objects that, when flying out of the gutter along with snow, can cause significant harm not only to property, but also to people’s health.
- You need to make sure that there are no people or animals in the direction of the snow.
- You must wear suitable clothing to operate the snow blower. We are not talking about specialized overalls or anything like that. It is enough to wear warm clothes that do not allow the wind to pass through, as well as shoes that do not slip.
- There is no need to immerse your limbs in those parts of the snow blower body where the rotating elements are located. Failure to comply with this rule may result in amputation.
- If a foreign object gets into the snow blower bucket, you should immediately turn off the engine until the problem is completely eliminated. The same recommendation applies to the case when the tension belt breaks.
- Persons who have previously consumed alcohol are not allowed to operate a snow blower.
The same applies to people who are under the influence of drugs, as well as those who take potent drugs that affect consciousness. Gutter - There should be no glass or similar surfaces in the direction of the gutter. Rocks flying out of the gutter can cause significant damage to them.
- There are no headlights in the design, so snow removal needs to be done only during the daytime. With the onset of dusk, you can simply not notice people standing nearby.
- It is not recommended to use the snow blower on surfaces where slopes and inclines are clearly visible.
- It is worth taking breaks from work periodically so that the engine has time to cool down and does not overheat.
- If excessive vibration occurs, which is not typical for normal operation of the snow blower, you must immediately turn off the engine. Vibration is a sure sign that there is some problem inside the case, so it is not possible to continue working until the problem is corrected
- Make sure that there are no people in the direction of the snow throw, or that they are standing at a considerable distance from you. The optimal distance is 20 meters.
If you follow these rules described in the instructions, you can significantly increase the service life of your mounted snow blower. In addition, knowing and following these recommendations will allow you to avoid injuries and injuries at work.