What materials may be needed?
To remake a walk-behind tractor, you will need simple tools, as well as drawings. Only when everything you need is at hand can you start working on the remodel.
Tools you will need:
- a set of keys and drills;
- electric drill;
- welding machine;
- Bulgarian;
- various elements for fastening;
- Screwdriver Set.
Recommendations
To simplify the work, it is best to assemble the ATV with two people. Oil for four-stroke engines is changed after the first, or maximum after the second start. If you don’t have a syringe on hand for refilling oil cans, you can contact any car service center - they will definitely do this job. Electrical connectors should be filled with lithol or sprayed with a waterproof spray. The wheels are inflated with a simple pump or taken to a tire shop.
Here are some more tips:
- read reviews of the design you like;
- provide power reserve;
- Put tires with good tread on the rear wheels and regular road tires on the front;
- consider using fenders and mudguards.
The following video provides an overview of a homemade ATV.
How can you make an ATV and a tricycle?
If we talk about an ATV, it is important to know that this is a fairly powerful four-wheeled motorcycle. It has high speed, and you can drive this unit anywhere. One of the most important parts in it is the motor. That is why ATVs and tricycles converted from walk-behind tractors performed well. For this, you can use any model, however, motors from the Neva are best suited.
In order to make such devices with your own hands, you don’t need to modify the walk-behind tractor much. The only thing you need to get or make yourself are the drawings. After this, you can begin the alteration itself.
The work can be divided into several stages:
- first you need to widen the wheels;
- Next, you need to install more powerful wheels;
- after that you should work on the frame.
Since most walk-behind tractors have wheels directly under the motor, they need to be widened a little. Inserts for this must be turned on a special machine. If you can’t do this at home, then you just need to go to the store and buy adapters designed to widen the wheels of the walk-behind tractor.
After this, you can begin to remake the frame. For an ATV or tricycle, you can take a frame from a bicycle or motorcycle. If it is not there, then any scraps from water pipes can do. You can attach such a frame using two pins using a rotary hinge.
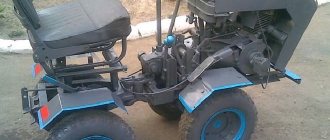
We are building a homemade trike with an engine from a walk-behind tractor. (Part 2)
The frame, as I already wrote, was assembled from what was lying around in the yard. A profile and round pipe and a frame from a bicycle. Everything is visible in the photographs, so I won’t write much. I’ll describe it in general terms. I got the idea for the frame from my head and the Internet. But mostly he improvised on the fly. The bottom of the frame is a professional pipe 24 and 1.51.5 cm.
I cut out the wings from the door of a VAZ 2107. For rigidity, I rolled them on a special machine. The fastening for screwing the front fender was mounted on rivets.
I painted all the fenders orange. I welded the front wheel fork as follows. I cut the stays off the bike, welded a 4040 corner, welded new stays in the form of inch tubes to it, and plates for the wheel axle with a hole were welded at the ends of the tubes.
Next I installed the bicycle handlebars. Everything is in standard mounts. Friendship chainsaw gas trigger was welded to it.
The seat was made of plywood. I put foam rubber from an ancient sofa on it and covered it with leatherette. I also inserted and glued 6 mm bolts in advance to secure the seat to the frame. I secured the upholstery with a stapler and everything was ready.
The triangle at the front of the frame was sewn with iron. This is necessary to prevent dirt from flying onto the engine and driver. Well, I also drew a billiard ball on it. A kind of protection.
READ How to Repair a Screwdriver with Your Own Hands
The frame is apparently painted black. And as the most attentive noticed, there is no brake on this device. It will probably appear soon (BUT THIS IS NOT EXACTLY). It turned out to be an interesting drink. You need to drive it mainly on asphalt because... It does not have off-road qualities. My son is simply delighted with it. Now let’s talk about the cost. Engine with gearbox 12,000 rubles; Rear wheelbarrow wheels 1,200 rubles; Front wheelbarrow wheel 380 rubles; Profiled pipe 500 rubles; Axle 280 rubles; Turner services 800 rubles; Drive sprocket 150 rubles; Driven star 550 rubles; Spray paint 150 rubles; Dermantin 150 rub; Bearings 2 pieces 350 rub; IZh motorcycle chain (I had one) approximately 500 rub. TOTAL: 17010 Not all materials are indicated in this estimate because I had some of them. An expensive toy of course. But there was a goal to do it. The goal has been achieved, let's move on. Good luck to everyone in your endeavors. And for those who have finished reading, I inform you that there will be a third part with sea trials and breakdowns. Well, photos for your feed.
Automatic clutch on trike lie and g.o! All the mistakes and cons!
Tips for making karakat
To assemble a homemade caracat, you first need to decide which equipment you can use the frame from. A frame taken from a Ural motorcycle would be perfect. Next, you need to make the suspension, as well as rear-wheel drive. Then you need to use a corner to connect the steering column, side members and a special bracket.
After this, you can begin attaching the wheels. You can take tires from cars such as Ural or KamAZ. The last thing to install is the motor from the walk-behind tractor, as well as all additional systems - you need to connect the brakes and clutch, and also take care of the gas emission system.
After assembly, it is necessary to test the made karakat. With the help of such a homemade all-terrain vehicle, you can easily travel even to swampy areas.
Choosing a Frame for Caracat
A carat from a walk-behind tractor, naturally, requires the skilled designer to have a walk-behind tractor, preferably belonging to the heavy or middle class. In fact, a carakat is nothing more than a home-made all-terrain vehicle mounted on four or three wheels (depending on the design), with wheels “shod” in low-pressure tires, driven by an internal combustion engine.
To ensure that the karakat made from a walk-behind tractor does not disappoint your expectations and becomes an indispensable vehicle for long hunting or fishing trips on difficult off-road terrain, you need to clearly imagine all the stages of its production.
First you need to decide on the frame. In principle, many designers of home-made caracats took frames from IZH motorcycles, or even from URAL, which is determined by the financial capabilities of the participant(s) in the caracat manufacturing process, as well as what is available at hand.
Karakat from IZh has good maneuverability, which predetermines its main use when moving through the forest, as well as when overcoming rough terrain with large differences in elevation, slopes and ravines.
How to properly design a mini-tractor?
The conversion of a walk-behind tractor into a mini-tractor is carried out in several stages. First you need to take care of the frame. It is made of durable metal, which is cut into pieces of the required length and then welded together. When the frame is ready, you can start assembling the chassis.
If the motor is placed in the front part, then the width for the wheels can be left the same as in the walk-behind tractor. In order to attach the wheels to the rear, you will need an additional axle. It is made to the required length; an ordinary piece of pipe is suitable for this, the main thing is that the width is suitable. Bushings and bearings must be installed at the ends of the pipe. You can then install wheels on them.
If you decide to place the engine at the rear, then the width of the wheels must be increased, otherwise the minitractor will not have the necessary balancing. So, you need to remove its wheels from the walk-behind tractor, after which you need to make the bridge a little wider.
To control the mini tractor, you can take the handles from the walk-behind tractor. However, this will make the converted tractor look like a motorcycle and will be a little awkward to drive. For convenience, it is better to install a regular steering column.
The driver's seat can be made from a sled frame that needs to be welded. In addition, you need to remember to install the headlights, as well as the dimensions. After fully assembling the mini tractor, you must definitely lubricate all the parts and also run it in.
From all this it follows that almost every person who is at least a little familiar with technology can convert a walk-behind tractor into a mini tractor.
Mini tracked all-terrain vehicle
Before starting work, get familiar with the tools. We can say with 100% certainty that you will need:
- a variety of screwdrivers;
- hammer;
- electric welding;
- device for bending pipes (if there is no prepared frame).
Before creating drawing materials, familiarize yourself with the typical structure.
- Frame. Any tracked snowmobile has a frame: the more sophisticated the structure, the stronger and more reliable the frame must be. The ideal option is to borrow from a scooter, ATV or motorcycle. If you don’t have such an element, you can weld it yourself from steel pipes with a diameter of at least 40 millimeters.
- Sitting. The seat for an all-terrain vehicle must be strong, since the structure itself is quite low. An indispensable condition: it must be made of moisture-proof material.
- Motor. When choosing a motor, focus on its resource. If you want the all-terrain vehicle to be powerful, then the engine should be the same.
- Fuel tank. A tank with a capacity of 10-15 liters, made of iron, is ideal for a fuel tank.
- Skis. If you do not have ready-made skis that can be adapted for an all-terrain vehicle, you can create them yourself from wood. It is desirable that it be 9-layer plywood, no less.
- Steering wheel. When choosing a steering wheel, think about your comfort. It is desirable that it be borrowed from two-wheeled vehicles.
- Caterpillars. Creating caterpillars must be a particularly difficult task.
- Actuator. To make the tracks rotate, you will need a power drive - it is preferable to use a motorcycle chain in this case.
If you do not have a completely finished frame, then you can simply weld it from a profiled pipe and give it its configuration using a pipe bending device.
Once the frame is complete, treat it with an anti-corrosion solution and paint it with high-quality paint that can withstand both humidity and winter frost.
We make a wood splitter
Among other things, you can make a wood splitter from a walk-behind tractor. To do this, you will need to grind a cone on a special machine, as well as a thread. After this, the finished cone must be mounted on a shaft that has suitable bearings. Then you need to install a flange at the end of the shaft, as well as a sprocket. It can be taken from a motorcycle wheel.
You can fix the cone on the shaft using a bolt. After this, between the motor and the shaft itself, you need to install a spacer made of pipes, as well as a pair of nuts. This will help tension the chain. In order to make supports for the shaft, you can take supports from Zhiguli cars. The motor must be taken from the walk-behind tractor. With the help of such a redesigned design, you can easily cope with splitting firewood.
Other modification options
In addition, you can also make other equipment from a walk-behind tractor. For example, you can get a dumper, a pneumatic duct or a vibrating plate. Also, some craftsmen make a loader or snowmobile from a walk-behind tractor. Many people use walk-behind tractors to harvest corn.
Snowmobile
This design allows you to move comfortably in the snow. To do this you will need fairly wide wheels. The caterpillar can be obtained from an old snowmobile. It will be able to fit under the wheels of a walk-behind tractor. The snowmobile itself is made from a frame, tracks, and some suspension elements. The mount can be used from a walk-behind tractor. After the modification, you get an excellent snowmobile, which is also suitable for hunting in swamps. Therefore, the result is both a swamp vehicle and a snowmobile.
Motorized towing vehicle
Sometimes when buying a factory motorized towing vehicle you have to face many disadvantages. Therefore, most often they are made with their own hands. They turn out to be quite durable if you use a walk-behind tractor for this. This design will do its job perfectly and also save fuel. In addition, it will be possible to attach compartments to this design to store the necessary tools.
Excavator
As a result, this technique will turn out to be quite compact and convenient. However, to cope with this work, you first need to make drawings. All work with drawings must be done in great detail - this will greatly facilitate further work. After this, you can move on to the design itself. First you need to make a frame, you can use a channel. After this, you need to attach the beam (up to 11 meters in size) to the frame. Springs and springs are not needed. For a simpler option, you can use a homemade axle on which wheels are mounted. The result is a chassis. Next, using a special machine, you need to grind out all the mechanisms that will be needed for movement, as well as brackets and fastenings for hydraulic cylinders.
The ladle can be purchased at the store. For hydraulics, you will need to buy a pump, and you can also use cylinders from an old KamAZ. You also need to purchase a hydraulic distributor, which will be needed to control the excavator.
When all spare parts have been purchased, you can begin assembly. Then you need to connect the power take-off shaft of the walk-behind tractor, as well as the oil pump through the cardan. After this, you need to connect all the hydraulics with high pressure hoses. Next, the finished structure must be painted, and all parts must be lubricated, after which it must be tested in operation.
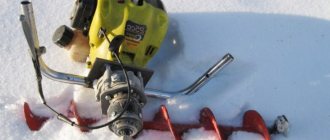
Motor drill
Many fishermen no longer want to go fishing with a conventional drill, so some of them decide to convert a walk-behind tractor, which is not needed in winter, into an ice ax. You don't need to use any special effort for this. You just need to rearrange the wheels of the Zhiguli, and also make an attachment to set the drill in motion. After which you can safely go fishing. In the summer, the walk-behind tractor will be able to be used for its intended purpose again.
Motor winch
This homemade walk-behind tractor can be made at home. This will help save money. For manufacturing you will need a motor, a frame, and both shafts: upper and lower. The motor for this can be taken from a chainsaw. In addition, it is necessary to make drawings, and then begin assembly.
In addition, factory walk-behind tractors can be converted at your discretion into other designs, for example, a trike or a circular scooter.
Thus, if you show a little ingenuity, as well as get some parts and make high-quality drawings, you can use the walk-behind tractor as the starting material for the manufacture of a large number of devices that will become indispensable assistants in the household at different times of the year. However, it is important to strictly follow the assembly instructions and follow all recommendations.
Required materials and tools
There are quite a lot of purposes for which a homemade ATV will be used:
- Hunting.
- Fishing.
- Going for a picnic or just a walk across rough terrain.
- Moving cargo and not very large items.
The engine power, suspension, the presence of a trunk and its size, and additional functions depend on the principle and region of application. For example, an engine removed from a scooter, although small, is very light, therefore, if it gets stuck in sand or mud, the unit can be pulled out without any problems. But if it is necessary to transport heavy objects, then its volume and power will not be enough for these actions.
You can make the drawing yourself, depending on your desires, or you can find ready-made ones on the Internet, of which there are countless numbers.
To complete the work you cannot do without the following tools:
- Welding machine.
- Grinder or electric jigsaw.
- Drills and screwdrivers.
- A set of wrenches.
- Vernier calipers for precise measurements.
- Hammer and screwdriver.
- Knife.
- Pliers and other small tools.
If you plan to make the frame yourself, you need to take care of finding equipment that bends pipes. If you are unsure of your own abilities, it is better to entrust these actions to specialists.
The ATV consists of the following parts:
- Motor. Suitable for both car and motorcycle. The smaller the engine , the more fuel consumption decreases. If the unit will be operated in hot weather, then you should choose a part that has cooling.
- Frames. the engine well on it using bolts and connect the drive and transmission.
If the frame is made independently, pipes are taken and welded together in a certain order. The ears are immediately welded, serving as fasteners for shock absorbers and levers, as well as brackets.
When the finished frame is being altered, only the frame should be left and the necessary components should be attached by welding. Next, the racks are attached and painted:
- Suspensions front and rear. You can take the rear axle of the car, with a differential present, or use a cardan-geared design. The levers are attached to the frame with silent blocks, tilted struts and shock absorbers are attached.
- Steering. It comes in the form of a car wheel or a motorcycle steering wheel. Some combine both options. It is better to replace the gear drive with a chain drive, which will help save on maintenance. The gearbox is usually made mechanical, which improves the maneuverability of the unit.
READ How to Make a Motoblock From a Chainsaw Ural
Attention! The input shafts must be directed directly to both the front and rear axles.
Important! It is advisable to purchase a new brake system to ensure your safety.
How to make karakat and other homemade products from a walk-behind tractor
Many people ask how to make their own karakat from a walk-behind tractor. Now craftsmen are trying to modernize any equipment they can get their hands on and make something unusual. Every year there are more and more such people. Especially often, craftsmen try to build all-terrain vehicles; one of the types is the carakat, which is built from an ordinary walk-behind tractor.
How to make a karakat from a walk-behind tractor with your own hands
Even the simplest version of the karakat is capable of reaching speeds of up to 70 km/h and can easily pass any off-road terrain and withstand all the loads placed on it. It can perform all these functions thanks to a strong suspension, which can easily be made from steel pipes connected by hinges and welding.
No expensive materials are needed to make such a unit. All that remains is to slightly adapt to the way you drive this vehicle.
Let's look at how to make a karakat from a walk-behind tractor with your own hands. In the process of creating a karakat, the following stages can be distinguished:
- Making the frame - it is advisable to use a walk-behind tractor of medium or heavy weight (using a Neva walk-behind tractor is the best option for making such equipment), using this you will get a good quality all-terrain vehicle with three or four wheels. Some designers use spare parts from a Ural or IZH motorcycle as a frame.
- Creation of the suspension and rear axle - the suspension design consists of two parts connected to each other by hinges. At the request of the developer, it is possible to design the front and rear suspension, ensuring their high independence.
- The production and installation of wheels is the most expensive and time-consuming part of the caracat.
- Most craftsmen do not buy ready-made wheels, but use homemade ones, which are tires and low-pressure chambers (it is preferable to use these products from trucks: Ural, KamAZ or their trailers).
- Installation of the engine and systems (brake, clutch, exhaust of burnt fuel products).
Before using it fully off-road, you should test the manufactured device.
Making a tricycle with a differential
The stable design of a tricycle is chosen not only by parents of small children, but also by people in old age, so more and more people are interested in how to make a tricycle without any help. The convenient design of the vehicle with three rims ensures the safety of the cyclist, prevents injury during sharp turns and minimizes the load on the back and legs.
Another advantage is that the three-wheeled unit is comfortable to ride regardless of physical fitness, the low-mounted frame ensures a comfortable fit, and the high load capacity allows even obese people to engage in cycling.
DIY assembly steps
- At the very beginning, the rear axle is removed from the car.
- A beam is attached to the cut.
- Mufflers, an air filter, an oil cooler and pipes are installed on the rear wheel axle. If you use engines from the 90s, then all these elements will already be installed.
- A frame is being made that will be the basis of the tricycle, so it is necessary to make it strong and reliable.
- An extended front fork is manufactured by welding with shock absorbers attached to it. Lengthening occurs by replacing the fork rods with longer ones or by welding more tubes to the Ural fork.
- Welds the frame and rear axle of the car, forming a solid structure.
- The fork is connected to the frame by welding, just like with the rear axle of the ZAZ.
- After this, the seats, gas tank and other elements are attached.
- Finally, the new tricycle is painted and chromed.
Homemade ATV from a walk-behind tractor
In addition to the caracat, you can also build a homemade ATV from a walk-behind tractor, which is a four-wheeled, safe and maneuverable motorcycle.
The main thing is that it must be equipped with a high-quality motor.
But it is worth remembering that a homemade ATV will be quite maneuverable and durable, like its original, but in terms of speed it will be much inferior to it.
The process of transforming a walk-behind tractor into an ATV is carried out in 3 successive stages:
- Increasing the wheelbase, the need for which arises due to the location of the wheels on the walk-behind tractor under the engine. This process can be carried out by turning inserts on a machine or by purchasing ready-made options in the store.
- Creating a frame that can be used as a basis for a bicycle or motorcycle. If they are not available, you can use ordinary steel pipes, which must be welded together. The frame is attached to the walk-behind tractor using the rotary joint using 2 pins.
- Selection and installation of wheels - low-profile tires should be used. You can't do without disks here. You can use inner tubes from trucks, which will avoid installing additional shock absorbers. In order for the rubber to last longer on the ATV, you need to take a regular canvas watering hose and wrap the wheels of the unit in several layers. To prevent it from unwinding, its ends are fixed with glue.
Choosing a motor for a pneumatic duct
Very often, the lack of sufficient funding leads to restrictions when choosing an engine, therefore, you have to use what is available. These, as a rule, are two- or four-stroke motorcycle engines, and also use old automobile power plants, but much less frequently.
For such a homemade all-terrain vehicle on pneumatic wheels, it is best to take the engine from a motorcycle; for this you need to choose a motor that is most suitable in terms of power and conditions of use. For the motor, you need to have a forced cooling system (air or water), since the all-terrain vehicle does not have all the conditions that are necessary for normal, natural cooling.
Four-stroke engines have a number of advantages over their two-stroke counterparts, which is why many designers use them. For example, you can take boxer engines from heavy motorcycles. In such devices, you can also use a motor from a car, which is most suitable for installing it on a homemade tracked all-terrain vehicle.
Such an engine has sufficient torque, is also reliable in use, and it has (and importantly) a good price-to-required performance ratio. What type of engine to use - diesel or carburetor - will be your decision.
Both schemes have their advantages and disadvantages. For example, a diesel engine is more economical than a gasoline engine, although in severe frost conditions it can be difficult to start it stably and make it work stably without using additional equipment (preheater). (What can be said about gasoline engines, but to a much lesser extent).
Tricycle from a walk-behind tractor
Let's look at how to make a tricycle from a walk-behind tractor. The creation of such a vehicle will differ quite a bit from the construction of an ATV. The only thing is that you can use a scooter or motorcycle as a frame, and the walk-behind tractor itself will be located under the driver’s seat or immediately behind it. The construction of a trike is similar.
A tricycle is any three-wheeled vehicle from a bicycle to a car, and a trike is a three-wheeled motorcycle. At the same time, some experts argue that “trike” is translated from American English as “tricycle.”
There is also a buggy with a walk-behind tractor engine. Do-it-yourself buggies are not created as often as the units discussed above.
To create it you will need:
- pipe;
- wheels from trailers, carts, scooters, sidecars or ATVs;
- wheel hubs, steering wheel, rear axle, brake disc;
- braking system;
- walk-behind tractor;
- seat.
The manufacturing process itself is reminiscent of previous homemade products.
This way you can use regular motor cultivators. Just a few additional spare parts, a little cunning, ingenuity and imagination, and you can make with your own hands various types of all-terrain vehicles that are not afraid of ravines, hills and even swamps.
Light all-terrain tricycle
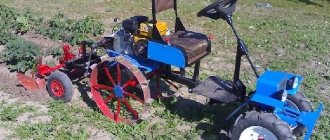
Dear visitors to the “Homemade Friend” website, from the material presented by the author, you will learn how you can independently assemble a lightweight three-wheeled caracat in your garage. Today, all-terrain vehicle construction is quite well developed among hunters and fishermen; guys assemble their off-road vehicles right in their garages from the spare parts and parts they have, it turns out very well, and most importantly, on a budget, which is important in our time.
How to make a cargo tricycle with an engine from a walk-behind tractor with your own hands! Part 1
Due to the nature of their activities, fisherman and hunters have to travel long distances through complete off-road conditions, ravines, snowdrifts, weeds, and water. And thanks to the all-terrain vehicle, everything becomes much easier and the next trip for prey turns into a pleasant walk.
So, let's look at what exactly is needed to assemble an all-terrain vehicle? We will also analyze all the stages of creating a tricycle.
- Engine "Lifan 6.5 l/s
- Gearbox from Honda CITY
- scooter variator
- generator
- fiberglass
- conveyer belt
- wide section muffler
- corner 32 mm
- professional square pipe
- alloy wheels R-15
- headlight
- welding machine
- lathe
- drill
- emery
- set of wrenches
- hammer
- screwdriver
- knife
- brush
- pulivizer
- compressor
The process of assembling a lightweight caracat with your own hands.
The master carried out all his work in his garage, where there are all the necessary tools and machines for working with metal and its processing. The author prepared a variator for a scooter. Next, the rear axle and cones are bored on a lathe. I installed the hub on the axle. The author made the wings and seat from fiberglass and epoxy resin. First, a master model was made and the base was created from it. A layer of fiberglass is applied, coated with epoxy resin, and so on in several layers. After drying, the edges and irregularities are cut off and the surface is sanded. Gearbox from Honda "CITY" Rear axle and drive. Wheels and rims from BMW are installed. Generator from a moped. The original carburetor was replaced with a starter from a tractor. The all-terrain vehicle frame is welded from 32 mm angle iron. As mentioned above, the carburetor was used from a tractor starter and showed good performance. The axle has grooves for a key. Bearings used during assembly. The drive is on the rear axle. Well, our author has come up with such a wonderful three-wheeled all-terrain vehicle. The weight is about 200 kg, it belongs to the class of light all-terrain vehicles, perfect for a fisherman or hunter, cutting through off-road spaces. As they say, “For an all-terrain vehicle, you don’t need a road, you only need a direction)))
READ How to Attach the Engine from a Trimmer to a Snow Scooter
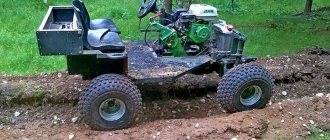
Homemade all-terrain vehicle based on a walk-behind tractor
The walk-behind tractor is one of the most successful designs of agricultural machinery. That is why folk craftsmen have learned to create other vehicles based on it - swamp vehicles, caracats, etc. Despite the synonymity at first glance of these concepts, they all have their own nuances and are adapted to specific operating conditions. The similarities and differences between homemade types of transport from small agricultural machinery will be discussed in this article.
Tricycle with Chinese engine
Hi all! As you already understood from the title, this article will focus on a tricycle with a Chinese Forza engine (similar to Lifan). Initially, the tricycle was made from a Ural motorcycle, which is discussed in detail in the article of the same name. Here we will consider the process of installing the engine, connecting it to the Zhiguli gearbox, preparing the mount for all this, and related issues. So, let's begin.
If you don’t want to read a lot, there is a video that is similar to the article:
Sources:
https://josri.ru/raznoe/motoblok-trexkolesnyj-samodelnyj-kvadrocikl-tricikl-baggi-svoimi-rukami-samodelki-samodelnyj.html https://stroy-dvorik.ru/svoimi-rukami/samodelnyj-kvadrotsikl-s -dvigatelem-ot-motobloka.html https://zemlyconsalt.ru/motobloki/tritsikl-s-dvigatelem-ot-motobloka.html
DIY all-terrain vehicle based on a walk-behind tractor
The classic definition of an all-terrain vehicle is that it is a car or other type of transport for off-road driving and on roads with any road surface.
An all-terrain vehicle based on light and medium-sized agricultural machinery, it belongs to the category of mini all-terrain vehicles with small dimensions and reduced weight. Before you start making a mini all-terrain vehicle with your own hands, you need:
- find a working diesel or gasoline engine, the traction potential of which will allow you not only to move, but also to transport the driver;
- decide on the type of chassis. It can be tracked or wheeled. A tracked mini all-terrain vehicle is more passable. However, its implementation is always an order of magnitude more difficult, and the management process may not be within the power of a person with primary technical knowledge.
Engine mounting feature
Installation of the engine and its systems is the most serious and important stage of manufacturing. The master installs the engine, the clutch system and the exhaust of fuel combustion products, as well as the brake elements with his own hands.
Typically, a manually controlled tow motor is preferred. The walk-behind tractor is selected as a base with a four-stroke single-cylinder air-cooled engine.
After the homemade karakat is assembled, you need to test it in operation. Its power will be the same as that of the walk-behind tractor on the basis of which the all-terrain vehicle was created.
Controlling a caracat from a walk-behind tractor requires some skill, since it is based on a worm gear.
If the design of the unit, assembled with your own hands, was carried out according to the rules, then it will serve the owner for a long time, allowing you to move off-road and in bad weather. Caracat will be an excellent assistant on trips for fishing, hunting, mushroom picking, etc.
Step-by-step instructions for making a homemade all-terrain vehicle
- Creating the base of the all-terrain vehicle structure. It is advisable to take ready-made frames, for example, from old motorcycles such as URAL or IZH. Thanks to them, the future all-terrain vehicle will be durable and maneuverable;
- After the frame we move on to the rear axle. The strut, mowing and steering wheel bushings bring together two suspensions - rear and front;
- At this stage, the wheelbase of the all-terrain vehicle is assembled. A used spare wheel from trucks is suitable. If low pressure chambers are installed on them, the all-terrain vehicle will be guaranteed excellent controllability and maneuverability. We will talk about their step-by-step implementation at the end of the article;
- Integration of an engine into the prefabricated structure, without which mini all-terrain vehicles on wheels will not be able to perform their function;
- After installing the motor system, the homemade product is supplemented with a transmission, exhaust elements and brakes, which can be taken from an old car or motorcycle to reduce power and time costs.
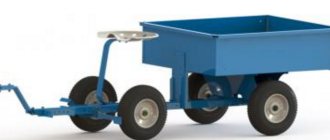
Determining the main characteristics of the trolley
Many village residents have a walk-behind tractor at their disposal.
This is an excellent assistant when performing a variety of field and garden tasks. It allows you to significantly reduce the time and effort spent on working on the ground, making it possible to process more space. But, a trolley for a walk-behind tractor further expands its functions. Now each owner will be able to transport vegetables, soil, apples, or bags of other crops on their own unit. In addition, it is easy to do it yourself if you have a minimum set of necessary tools.
Homemade carts have a number of advantages over commercially available ones, which include:
- There is not always a trailer on sale that will suit you both in size and characteristics. But when making it with your own hands, you can take into account the desired size, height, and functionality.
- The quality of most products leaves much to be desired. But by making a trailer with your own hands, you will be sure that it will last a long time.
- The price of a homemade device is significantly lower than that of a purchased model.
- It is much more pleasant to use those made by yourself.
Before you design your own cart, be sure to think about what goals you set for it and what you will use it for. Based on these facts, it will become clear which parts of the cart will need to be given maximum attention.
Before you start work, you need to draw up a project that you will adhere to during construction. If you find it difficult to do this yourself, or you are not confident in your own abilities, it makes sense to seek help from a competent mechanic.
The diagrams try to show the cart as accurately as possible in different positions and angles. At this stage, all the parameters of the device are planned, the joints and seams will be drawn especially clearly. The essence of this stage is not only to draw a rough diagram of the work, but also to think through all the little things and important nuances that will arise during the work.
You need to think about:
- How non-separable units and parts will be connected to each other. This can be regular welding, riveting or screwing together.
- How the moving units will be connected, using hinges, axles or bearings.
- What will the nodes be like and how will they work?
- What type of seat will it be: simple or swivel?
- If you plan to make the body self-dumping, then additional parts will be needed, such as a mechanical body tipper.
- Legs that will act as a support
- Various additional nodes that depend on exactly how you see the final result.
Once everything is ready, you can start assembling the structure using:
- Holder (bracket) for mounted trolley parts
- Console
- Carrier
- A footrest that is best made from a board
- Driver's seat, made of the same board as the footrest
- Frame
- Wooden board body s20
- Three support beams made of 50x50 timber
- Bolt M8
- Thrust ring made from metal pipe
- A wheel from a motorcycle or an old Moskvich
If you use such a clear drawing, then you will get an excellent cart for a walk-behind tractor.
Karakat based cultivator: distinctive features and assembly
The caracat from a walk-behind tractor is similar in purpose to the device discussed above. The differences are:
- extended wheelbase with belt clutch;
- bulkiness;
- extended conditions for operation - the karakat is capable of generating speeds of up to 70 km/h on rough terrain.
Due to the fact that the main emphasis in this alteration concerns the tires, we will dwell on them in more detail.
Among the existing methods of manually recreating powerful and large stingrays, several basic ones can be distinguished:
- considered the easiest. Two metal disks are taken and aggregated onto a sleeve. They put cameras on them, secured with a conveyor belt. The walk-behind tractor has good stability and endurance;
- Only one of the disks is attached to the hub. Jumpers are also installed on it. Rings are fitted to the latter welding machine;
- resembles the previous method, however, the central disk requires an additional spoke, which can be made from a metal billet or pipe;
- will allow you to give new life to disks from an old scooter, which are standardly attached to a hub.
You can use the proposed drawings as a reference outline for further assembly of the caracat.
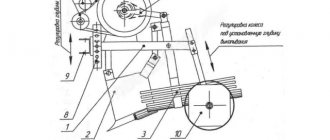
A homemade caracat based on an engine from a soil cultivator such as “Neva” or “MTZ” is assembled as follows:
- we prepare a frame from a metal profile or pipes;
- We install front and rear wheel drive. It is allowed if they are without a differential and solid;
- the front axle can be borrowed from the chassis of the car. The steering rack is also taken from it;
- The engine is borrowed from the tillage machine. You can leave the original gearbox or replace it with a multi-stage gearbox. In this case, it will be easier to control speeds in karakat. With a gearbox, you will have to stop before changing the speed of movement;
- install the ramps and proceed to testing the Karakarta.
Step-by-step assembly of an all-terrain vehicle
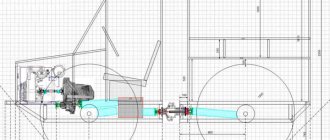
Preparation for making an all-terrain vehicle does not end with making wheels and choosing an engine. It is extremely important to study the drawings in advance, which will tell you how and in what order to install the elements of the unit.
To make a mini-all-terrain vehicle with your own hands, you will need to proceed in this order:
- First of all, you need to choose the frame base for the all-terrain vehicle. A frame from old Soviet URAL and IZH motorcycles is suitable for this. Moreover, mini-all-terrain vehicles on wheels with a frame from IZH are the most maneuverable. If none of the listed options is suitable for the all-terrain vehicle you have planned, then you can weld the frame yourself, using channels, pipes and angles with different diameters;
- At the second stage, you will need to make the suspension and rear axle of the all-terrain vehicle. A walk-behind tractor with inner tubes must have independent suspension - it is more complex to manufacture, but a unit with such a mechanism will be more maneuverable and comfortable when driving. To make an independent suspension, connect the side members together with a strut, a steering bushing and a separate strut;
- The next step involves installing previously manufactured wheels on the all-terrain vehicle. This is done using steel hubs. Each of them must be equipped with strong tapes that will braid the wheels across;
- At the last stage, you will need to install the motor and other systems necessary for the operation of the all-terrain vehicle, and securely fasten them to the frame. Both wheeled and tracked all-terrain vehicles must be equipped with a clutch, brake and exhaust system;
- At the end of assembly, be sure to check the homemade all-terrain vehicle. If you do not find any defects, then you can begin daily operation of the unit.
The made walk-behind tractor on pneumatic wheels will become an indispensable assistant in cases where its owner needs to quickly overcome swampy areas and river beds. The excellent buoyancy of the wheels makes the all-terrain vehicle a suitable means of transportation over various water obstacles. At the same time, on land, an all-terrain vehicle based on a walk-behind tractor will be able to reach speeds of up to 70 km/h.
ATV from a walk-behind tractor: conversion in 4 steps
An ATV is a vehicle on four wheels, characterized by good maneuverability, maneuverability and increased safety.
Designers often compare it to a 4-wheeled motorcycle. Homemade ATVs are most often recreated on the basis of powerful Neva-type units. The process looks like this step by step:
- modification of the wheel part. Due to the fact that the walk-behind movers are structurally located under the body, in an ATV they need to be spaced at an equal distance from the body. To do this, it is best to use factory adapters;
- alteration of the frame - it should be strengthened. If possible, take a ready-made one from an old motorcycle. It will be stronger than a homemade one and will not create problems for the quad in the future;
- installation of rims – low-profile rims are suitable for an ATV. To smooth out friction between the rubber and the rim, fabric pads are installed;
- installation of tires on an ATV - traditionally using inner tubes from trucks. You can also use low-pressure wheels, the advantages of which will be discussed further. An undoubted bonus for the ATV will be that it will not need shock absorbers.
After some simple manipulations, the ATV can be tested on a country road.
Swamp vehicles and pneumatic vehicles as a modified version of all-terrain vehicles
A swamp vehicle is a vehicle with high cross-country ability.
Swamp walkers have proven themselves to be excellent in marshy areas, shallow waters, muddy and marshy soils. Very popular among fishermen, hunters, and researchers who are forced to overcome tens of kilometers of impassable off-road terrain. The process of assembling swamp vehicles is similar to constructing an ATV or caracat from a cultivator, which is why we will not dwell on it in detail.
A pneumatic vehicle is a type of transport that arose in the middle of the last century. Today, the design of pneumatic ducts has been significantly improved. In some versions of pneumatic runners, the number of wheels has been increased to 6 instead of the standard 4. Conventionally, a pneumatic runner can be called a walk-behind tractor with pneumatic wheels.
Based on the name itself, the main difference between a pneumatic drive and other home-made motor cultivators is the wheelbase. Low-pressure wheels used in this unit, due to minimal force on the ground, allow you to avoid loading, slipping and other unpleasant moments.
Pneumatic vehicles are assembled in a manner identical to the process of assembling an all-terrain vehicle or carakat. Detailed instructions for creating low-pressure wheels will be outlined below. It is universal because it can be useful in improving other homemade vehicles - an ATV or a swamp vehicle.
Industrial self-propelled trolleys
If you set a goal and find a suitable self-propelled vehicle, you will be offered either a hydraulic self-propelled trolley - loader, or a Chinese version of a mini-dumper on caterpillar tracks. For work in the field or at the construction site of a large facility, such a mini-tractor with a lifting capacity of 300 kg may be suitable, but there are few people willing to pay 2 thousand dollars for the opportunity to transfer cargo at a snail’s pace.
Self-propelled vehicles from Honda will be very interesting for households. Its mini-dumpers can hardly be called a self-propelled trolley; they are more construction equipment, but in a private home a small device would be very useful.
For example, the ANTBY800 model is equipped with a 13 hp gasoline engine. Essentially, this is a hydraulic self-propelled cart, since it is based on a hydraulic drive that distributes torque to orbital engines. The trolley is capable of moving up to 800 kg of cargo in the cargo compartment, lifting up to 300 kg to a height of 1.4 m and transporting a trailer weighing up to 2 tons.
The hydraulic circuit made it possible to equip the minitractor with a working shovel-blade like a bulldozer. But, like the Lunokhod, Honda’s miracle does not have a cabin or even a place for the operator, which is not entirely convenient, especially if you have to work on the trolley for quite a long time. The cost of a self-propelled cart is almost 700 thousand rubles.
Lighter self-propelled carts, as in the video
They are an order of magnitude cheaper, but in terms of their capabilities they are of little use for housework. As a rule, self-propelled designs have a high center of gravity, a weak engine and a short wheelbase. It is convenient to transport loads up to 50 kg over relatively short distances. For construction work or transportation of materials, the engine is clearly not enough.
All that remains is to make a self-propelled vehicle with your own hands:
- Adapt existing transport equipment with an engine, for example, a snow blower, walk-behind tractor or walk-behind mower, to a self-propelled cart;
- Assemble an original self-propelled structure based on a chainsaw engine and a homemade welded frame;
- Modify an old scooter, use the engine and transmission;
- Assemble an electric self-propelled cart.
All of the listed options have long been tried by craftsmen in practice, and many of the assembled homemade carts have shown good results. The main advantage of making a self-propelled cart with your own hands is the ability to customize the design to your needs. In addition, building a self-propelled carrier from spare parts and components will cost much less than a purchased cart.