Homemade snowmobiles and tracks for them are a solution for those who do not want to overpay several times for a new model from the showroom. Despite the simplicity of the conversion process, there are some peculiarities: you need to know exactly how to make a snowmobile, also understand drawings, diagrams, and understand tools and materials.
To begin with, it is recommended to understand how to choose the right materials and tools for remaking a moped, and to understand whether this work is even feasible in practice.
Crawler snowmobile from a walk-behind tractor: the manufacturing process at home
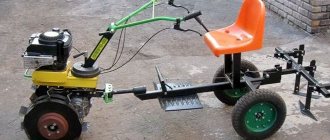
The snowmobile, the picture of which is presented below, is based on the motor of the Neva cultivator. Its production begins with the frame.
DIY snowmobile frame
The frame is made of metal pipes with a diameter that is used for motorcycle frames. Water pipes are also suitable. A pipe bender is used to give the desired shape.
To simplify the task and reduce design time, we suggest using ready-made drawings. Designations according to the drawing:
- frame;
- intermediate type shaft sprocket;
- intermediate shaft;
- sprocket with teeth;
- gear parts;
- track drive elements;
- track shaft;
- ski support stands;
- tensioner rollers for tracks;
- axis for tensioning rollers;
- towbar;
- tensioner;
- drum flanges;
- steering column
After welding the frame elements to the established dimensions, a subframe is made in its front part - the motor is localized on it. To do this, a stand with holes for it is welded. The same holes should be in the traverse itself. Through these slots it will be convenient to tension the drive chain and adjust the position of the traction unit.
In order to ensure that the device can be started with a handle, the underframe frame is moved to the rear of the unit. Equipping the original walk-behind tractor with a forced cooling function will be an invaluable bonus. This will reduce wear on the carburetor and traction mechanism.
Intermediate shaft for a snowmobile made from a walk-behind tractor
The diagram shows a general view of the intermediate shaft. The numbers in the figure indicate:
- support part for the operator's seat;
- cross member - made of stainless pipe 28 x 28;
- rack axle - made of pipes 18 x 18;
- traverse - from a metal corner with a side of at least 25 mm;
- jib - a steel billet 0.4 x 0.05 m is taken as it;
- bearings No. 204;
- shaft (pipe based);
- toothed sprocket (like element 10);
- spar;
- rubber casing.
All these details can be made with your own hands.
Making a steering column for a snowmobile: basic drawing with dimensions
A properly assembled and adjusted steering column is a prerequisite for a snowmobile made from a walk-behind tractor to be able to navigate through deep snow and to easily overcome uneven terrain.
According to our proposed scheme, the steering block is formed by:
- frame traverse;
- steel stand in pipe design;
- corner steering support;
- a shaft made of stainless steel pipe;
- crossbar;
- bipod;
- bronze washer;
- sleeve;
- nut type M10.
After connecting them, we move on to the tracked part of the snowmobile.
Tracks for a snowmobile based on a walk-behind tractor
The tracked snowmobile attachment is made by hand using one of the proposed options:
- conveyor belt;
- water pipes;
- motorcycle chains.
For a light snowmobile, you can limit yourself to a conventional conveyor belt, to which a roller chain is adapted.
For more serious homemade products, it is better to make caterpillar tracks from slats in quantities of at least 30 pieces with a distance between adjacent ones of 3.8 cm. The recommended size of the tracks according to the drawing is 50 x 3.8 x 1.8 cm. It is advisable to acquire a template-slipway so that prevent curvature and discrepancies in values.
According to the picture:
- nut ties;
- star element;
- track drive;
- tensioner;
- ice rink;
- rack and pinion track;
- homemade spar;
- driven mechanism;
- ski;
- ski harness;
- bolt, like 12 and 13;
- guide;
- screw;
- support shoe;
- bearing fasteners;
- roller axle.
Don't forget about the front skis. They are reinforced with side members, additional springs and equipped with a lever for pulling out the snowmobile if it gets stuck.
After the base blocks are prepared, we move on to the assembly stage.
Manufacturing methods and materials
When choosing material for a future caterpillar with your own hands, you should take into account the type of work for which they are intended. The product must not only be extremely durable, but also lightweight for convenient operation of the unit.
The first step is to install additional wheels on the walk-behind tractor so that there are a pair on each side. Future units will be mounted on them, the length of which will be the circumference of each wheel plus the distance between their axles, multiplied by two. All wheels must be the same diameter.
The most popular starting materials for making caterpillars with your own hands include:
- Conveyor belts and bush-roller chain.
- Unnecessary car tires.
- Chains and belts.
Each method implies its own course of action.
Conveyor belt and chain
The method of manufacturing a unit from these materials, according to most, is the simplest. It does not require a large number of tools and materials. It is recommended to consider the following tips:
- The thickness of the conveyor belt should be more than 7 mm, since it will be subject to strong physical stress that must be withstood.
- The tapes are fastened together using a bushing-roller chain.
- To increase the strength of the structure, it is recommended to sew the tape on the sides and ends using frequent stitches. The step between them should be about 1 cm.
If you follow this simple list of recommendations, you should get a durable and high-quality track for a walk-behind tractor that will serve its owner for a long time.
Tire construction
In addition to making a product from a transport belt, you can make a caterpillar from a tire with your own hands. Here you won’t have to stitch or hook anything together, since the tire already has a closed structure with a special clutch protector.
Tyres for regular passenger cars will not work. You need to find products for trucks or tractors that have a pronounced tread pattern.
The manufacturing procedure for such a unit can be divided into three main stages:
- A goose tape of the required width is cut out of the rubber. To do this, you need to use a very sharp knife dipped in soapy water.
- Using an electric jigsaw and a sharp, fine-toothed file, cut the sidewalls off the tire.
- The inside of the tire also needs to be cut with a knife or jigsaw.
- All that remains is to put the finished tire on the pre-installed wheels.
It is worth carefully studying the tread pattern. It must be clearly defined to maximize the throughput capacity of the walk-behind tractor by increasing the adhesion of the track to the surface.
Belts and chains
This method uses standard V-profile belts. They are attached to each other using rivets that are placed on them. Such a caterpillar is made from two pieces of identical chain and belts. The algorithm of actions is as follows:
- The ends of both circuits are opened and connected to each other to form a closed system. After joining, they must be compressed back and welded together for greater strength.
- Take suitable steel thickness. Small sections are cut out of it to be used as lugs.
- Using double-sided bolts, the lugs are attached to all links of both chains, and all the belts are attached to them.
Thus, you can get a durable and high-quality track made from belts and chains, made by yourself. This method is the most labor-intensive of all presented.
Other creation options
There are other ways to build a snowmobile using skis or a crawler rear. These makeshift snowmobiles and snowbikes use bicycle wheels.
Snowmobile from scooter
One of the simplest homemade options you can create yourself from any scooter or moped. The only differences here are the frames, the sizes of the tracks, and other parts. Such a snowmobile is unlikely to be powerful and will have difficulty moving through snow-covered snowdrifts. Therefore, they use wheels of a smaller diameter and increase the frame. This homemade moped moves well on light snow or crust. In the spring, you can replace the ski or track back with wheels and get a scooter or moped again.
Chainsaw snowmobile
Using a motor from a trimmer, many craftsmen can independently make various devices: cultivators, motorbikes, snowblowers and, of course, snow scooters (or snowmobiles).
Important How to make a lawn mower from old tools and household appliances with your own hands
The product is not particularly powerful, but reliable, lightweight and easy to use.
Snowmobile from a motorized dog
It is even easier to get a snowmobile from a motorized towing vehicle or a motorized dog; there is practically no need to reassemble it - just add skis with steering and make minor changes.
Snowmobile from ATV
The ATV undergoes even less alteration for better maneuverability in winter snowy terrain. Essentially, everything is limited to tuning, which consists of installing tracks, although this process is expensive and time-consuming.
Snowmobile on tubes
About homemade products using cameras or pneumatics has already been noted above. The homemade device consists of a control support ski and a leading support pneumatic.
The advantages include the high cross-country ability of the vehicle, and the disadvantages include low maneuverability.
Transformable snowmobile
A folding snowmobile is called a mini snowmobile or transformer. Its main difference is convenience and ease of use. It easily fits when folded in the trunk or even on the seat of a car.
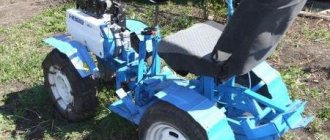
Snowmobile from a cultivator
And another savvy option for inventive use - a snowmobile made from a cultivator. Usually, every farm has a cultivator and sits idle in the winter. Using the engine according to the assembly diagram, we make an apparatus for winter movement. The power is small, but in reality it is practical and effective.
Recommendations
If necessary, you can use a bicycle handlebar instead of a scooter handlebar (Figure 9). To prevent problems during the installation process, it is recommended to make sketches and mark the dimensions in advance.
It is important to pay attention to the connection between the engine and the flywheel. Those mistakes that were made at this stage often become the basis for unpredictable behavior of the device - and they are difficult to notice. Those snowmobiles that are homemade often do not require the use of a brake system.
The exception is children's models, as well as models intended for use in hard-to-reach areas.
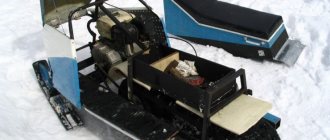
How to make a homemade snowmobile from a walk-behind tractor on tracks
Four wheels are installed inside the track. When movement occurs, they roll along a conveyor belt with fixed lugs. The caterpillar drive is carried out by a chain from the motor, special drive sprockets, through the driven shaft. They were taken from Buran.
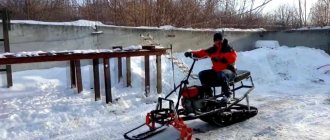
The engine is taken from a conventional walk-behind tractor with a power of 6 hp. You won't be able to accelerate quickly on it. The soft ski and track suspension have been removed because the sled is designed to ride on powder. This simplified the design and reduced the weight of the snowmobile.
Making tracks for a snowmobile
Let's look at the process of making a caterpillar. Plastic water pipe 40 mm, cut to length 470 mm. Blanks for lugs will be made from them. After which each of them is sawn lengthwise into equal parts with a circular saw.
The lugs are attached with furniture bolts to the conveyor belt
When making a track, it is extremely important to maintain the same distance between the lugs. Otherwise, there will be a “running” on the teeth of the drive sprocket, as a result of which the caterpillar will slip and slide off the rollers
To drill holes for the mounting bolts in the conveyor belt, a jig was made. To drill the holes, a wood drill with a special sharpening was used.
This jig allows six holes to be drilled simultaneously into the conveyor belt to attach three track lugs. Drive sprockets (2 pcs), an inflatable rubber wheel (4 pcs), sealed bearings No. 205 (2 pcs) were also purchased.
The turner made a support for the bearings and the drive shaft of the track. The snowmobile frame is made independently. For this, square pipes 25x25 mm were used. The articulated axes of rotation of the steering wheel and skis are in the same plane and on the same line, so a continuous steering rod without ball ends was used.
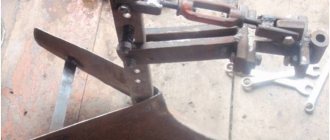
Ski turning bushings are quite easy to make. A plumbing coupling with a 3/4-inch internal thread is welded onto the front cross member of the frame. The pipes with external threads are screwed in there. I welded the bipod of the ski rack and steering rod to them. Angles are installed on the skis, which serve as an attachment to the snowmobile's rotating stand. A metal undercut is made at the bottom to better control the snowmobile while driving on compacted snow or crust.
Chain tension is adjusted by motor offset
Driving a snowmobile is quite simple. To increase engine speed, use the gas handle, which is located on the steering wheel. This engages the automatic centrifugal clutch, causing the snowmobile to move. Since the engine power is low, the speed of the snowmobile is 10-15 km/h. Therefore, brakes are not provided. To stop you need to reduce the engine speed.
Tracks are manufactured in any width. Choose what is more convenient to make: a narrow but long track, or a wide but short one
It is important to remember that a larger track will put more strain on the engine and make the snowmobile more difficult to control. If the caterpillar is made small, the car may fall through in deep snow
The weight of the snowmobile with all parts was 76 kg. It included: steering wheel and engine (25 kg), skis (5 kg), wheels with axles (9 kg), drive shaft (7 kg), caterpillar (9 kg), seat with racks (6 kg).
Important Modernization of the T-150: do-it-yourself cabin tuning
You can reduce the weight of some parts. For this size of a snowmobile with a caterpillar, the weight indicator is quite satisfactory.
Rework price
To calculate the cost of the entire alteration, let’s denote in rubles the prices of each part that needs to be purchased:
- plastic pipes - 308
- two wheels from a children's scooter - 685
- small sports wheels - 2000
- flat roofing metal - 649
- from the snowmobile "Buran" driven type star - 300-600
- two wheels with bearings from a wheelbarrow - 366
- metal type corners and square pipes - 73+47=110
- ski from a children's scooter - 445, 1 pc.
In general, the cost of all parts is approximately 4873-5000 thousand rubles.
Advantages of a homemade snowmobile from a walk-behind tractor
Externally, a homemade car is less attractive compared to a factory-made analogue. However, there are many positive aspects to be found. One of the advantages is the fact that the snowmobile is customized. That is, the owner clearly knows what he wants: to transport cargo, go fishing, to the forest, and do other things.
Externally, the homemade product is not attractive, but it meets all the owner’s requirements
Other advantages include the following:
- Buying a walk-behind tractor and a snowmobile for your farm is expensive. You will need space to store two cars, and each of them will be idle during the off-season. It’s cheaper to get one walk-behind tractor. Use it in winter instead of a snowmobile, and in summer for its intended purpose.
- A homemade design will not require large expenses. Many spare parts are suitable for used cars. At scrap metal you can cheaply buy scraps of pipes, channels and other metal.
- The snowmobile can be used even in summer. The tracked vehicle has good cross-country ability in mud.
Homemade products are a big plus for craftsmen who are accustomed to doing everything with their own hands. A person who shows interest in technology constantly improves it and comes up with new devices.
What is better: replacing the suspension with a factory one or a homemade one?
Should I buy a ready-made suspension for a snowmobile or make it myself? This is a question that must be decided by the vehicle owner himself. Several factors may influence the decision. If the snowmobile is purchased and not made yourself, then most likely it is better to buy a suspension for it. It will be easier to do this, because for each factory model of snowmobiles there is a certain type of suspension.
However, the rear suspension on a homemade snowmobile should most likely also be homemade? It can be difficult to find a factory one. Also taken into account is the purpose for which the snowmobile will be used. What if its purpose? professional winter sports, then you definitely need to take a professional factory suspension. If the main purpose of the snowmobile is to transport its owner, then it is quite enough to make the suspension yourself. In addition, if you make the suspension yourself, you can save a lot of money.
How to make a homemade wheeled all-terrain vehicle
An example of a drawing of an all-terrain vehicle on low-pressure tires
It makes sense to equip the basic unit with a reduction gearbox. The reason is that gasoline and diesel engines have the best torque performance at a crankshaft speed of approximately 75-85% of the maximum.
All-terrain vehicle frame
An example of a frame-fracture drawing
A frame is created between the front and rear axles. It is better to use profile pipes of rectangular or square cross-section as the basis. They provide greater rigidity than rolled angles, channels and I-beams of the same mass.
The joining of the frame elements of a wheeled all-terrain vehicle can be rigid, then it will be formed in a single-volume format. When using heavy Neva or MTZ walk-behind tractors, this option will be preferable.
As an option, a breakable frame (fracture) is made; this option is used for areas with a complex profile. Here the articulation is performed through the kingpin. The front and rear axles have independent suspension from each other. Craftsmen create such all-terrain vehicles based on the Neva and Ugra walk-behind tractors.
Rear axle and suspension of a homemade all-terrain vehicle
To simplify the design, some DIYers use a ready-made rear axle from a passenger car. For example, from the Moskvich-412 car: its low weight allows installation on a light all-terrain vehicle. The suspension is performed on shock absorbers for a smooth ride and reduced vibration.
Other craftsmen make independent suspension on each rear wheel. This approach is implemented on the Ant scooter. When driving, a slight rocking is felt, at the same time the wheels experience less resistance on uneven surfaces, and fuel consumption is noticeably reduced.
The rear axle is connected to the frame with long, hardened bolts. For elastic joints, rubber inserts are used, for example, silent blocks. This improves the performance characteristics of an all-terrain vehicle based on a walk-behind tractor.
Wheels (low pressure chambers)
To move on wet and unstable ground, you can use lugs. They provide high grip. Large-diameter low-pressure chambers perform even better. Pneumatics have minimal ground pressure, and the presence of air contained in the all-terrain vehicle’s chambers will make it possible to create a floating all-terrain vehicle.
For installation on the rear axle, homemade or special wheels for all-terrain vehicles, swamp vehicles and snowmobiles are used. They can be purchased assembled or as separate elements: tire, tube, disc. The wheel is easy to assemble.
- Homemade discs for pneumatics are made by welding ordinary discs and mounting plates using metal tubes. This expansion is necessary in order to adjust the small diameter of the car rim to large cameras and better fix them.
- A large camera is placed on a specially expanded disk - either a proprietary one or from other units (GAZ 53, Ural, Kamaz or another truck, an aviation camera, etc.).
- An air valve is installed in the hole of the disk.
- The wheel is inflated with air.
- The resulting tires are installed on a homemade all-terrain vehicle.
You can increase the cross-country ability of regular wheels on low-pressure chambers by creating an additional tread. For example, additionally secure the cameras with chains, conveyor belts, homemade tracks or another method.
Important 2-section all-terrain vehicle Berkut-8 for heavy off-road
Another option is to cut a patch lug from the tire. The depth of the structure’s hook reaches more than 20-25 mm. Rolling resistance increases, while at the same time the slip coefficient decreases sharply.
Assembling a homemade all-terrain vehicle from a walk-behind tractor
When all the tools, spare parts and components are prepared, you can begin assembly. This is a rough plan for how to assemble a homemade all-terrain vehicle, it all depends on the chosen design.
- A walk-behind tractor is installed on a welded or finished frame.
- The rear axle and, if necessary, the front axle are mounted.
- The seat is placed on the frame.
- If provided in the drawing and diagram, the steering control is installed.
- The protection is attached to the frame; it is made of plastic or metal sheet.
- The future driver should try out the comfort of the seat; if necessary, provide auxiliary devices for adjusting the seat.
- The functionality of the brakes is checked.
- Electrical circuits and lighting fixtures are installed.
After completing the bench tests, they begin the field tests. You need to know how the car behaves in difficult conditions.
Engine selection
Gasoline engines are used for walk-behind tractors or strollers. Engine speed is controlled by a throttle handle located on the steering wheel. To make a homemade tracked snowmobile with your own hands, the easiest way is to use ready-made small-volume engines for walk-behind tractors with pre-installed:
- Fuel tank.
- Ignition system.
- Reduction gearbox with a ratio of 1:2.
- Centrifugal clutch, automatically activated when the speed increases.
The power of these engines does not exceed 10 horsepower, but they are easy to install: the technician does not need to separately assemble the ignition system, connect fuel pipes, adjust the clutch, etc. There are different options on the market:
| Brand | Model | Power, l. With. | Volume, cm3 | Weight, kg | Approximate price, thousand rubles. |
| Kipor | KG160S | 4,1 | 163 | 15,5 | 20−25 |
| Sadko | GE-200R | 6,5 | 196 | 15,7 | 15−20 |
| Lifan | 168 FD-R | 5,5 | 196 | 18,0 | 15−20 |
| Zongshen | ZS168FB4 | 6,5 | 196 | 16,0 | 10−15 |
| Nomad | NT200R | 6,5 | 196 | 20,1 | 10−15 |
| Brait | BR-177F-2R | 9,0 | 270 | 30,0 | 10−15 |
| Honda | GX - 270 | 9,0 | 270 | 25,0 | 45−50 |
If it is not possible to purchase a ready-made engine from a walk-behind tractor, then you can use an engine from a stroller. Such engines are 10-15 horsepower more powerful, but require self-assembly. The system includes:
- Engine.
- Clutch.
- Gearbox.
- Gas tank (volume 5-10 liters).
- Muffler.
- Generator.
- Electronic ignition switch and coil.
Some of the elements will come from old motorcycles (“Minsk”, “Vostok”, “Java”, “Ural”). The gas tank is located as close as possible to the carburetor to reduce the length of the pipes.
Is it necessary to register such changes with Gostekhnadzor?
Probably everyone already knows that when purchasing a snowmobile, it must be registered. You also need to have a category A license to drive such a vehicle. Using a snowmobile without a license or while intoxicated is strictly punishable by law. However, are there rules regarding the registration of small changes to the design of a snowmobile, such as rear suspension changes?
The law establishes the rule that owners of any vehicle must present it for technical inspection from time to time. Snowmobile? not an exception. The interval at which this needs to be done is determined depending on the terrain and type of vehicle. If a tracked vehicle is designed for eight or more seats for passengers, then it must be presented for technical inspection every six months. If this is an ordinary snowmobile, then it needs to be inspected every year. When undergoing regular technical inspection, there is no need for additional registration of minor changes in the design. Main ? ensure safe movement on a snowmobile.
Snowmobile front suspension - its types and schematic representation
The shock absorption system on a snowmobile consists of rear and front suspension. I would like to focus my attention specifically on the front suspension, since there is not so much information regarding this unit. What are the challenges facing the nose suspension of a snowmobile? - This is, first of all, ensuring the smoothest possible ride so that the pilot does not feel any vibrations from moving over various uneven surfaces. We’ve sorted out the main function, now it’s worth considering the types of front suspensions.