Cand. tech. Sciences A. Dmitrievsky
At our request, Anatoly Valentinovich prepared an article on all carburetors installed on ZMZ and UMP engines of commercial vehicles. However, the volume of the article turned out to be excessively large. And that's why we broke it into parts. The first is devoted to the most common carburetors, the second to the rest is “Carburetors of small trucks and utility vehicles,” and the final part, “Carburetors of UAZ and Gazelles,” is devoted to the repair and fine-tuning of these carburetors.
In a separate article, “Distributed injection on UAZs and Gazelles,” systems with distributed gasoline injection onto the intake valve for ZMZ and UMP engines will be considered.
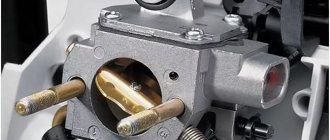
UMZ and ZMZ engines with a displacement from 2.5 to 2.9 liters use two-chamber K-151 carburetors of various modifications, manufactured by OJSC Fuel Systems (PEKAR) in St. Petersburg. These carburetors have sequential opening of the throttle valves, which ensures the maintenance of high vacuum and air speed at the main metering system (GDS) atomizer, necessary for high-quality fuel atomization at low crankshaft rotation speeds, and low aerodynamic resistance at the inlet at high speeds.
Let us consider in more detail the design features of these carburetors, their advantages and disadvantages, as well as ways to improve the economic and environmental performance and driving properties of the car.
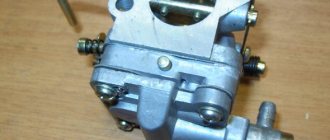
Carburetor design K 151
The K 151 Pekar carburetor works according to the same scheme as similar carburetors. The task of preparing the air-fuel mixture and then feeding it into the engine cylinders always remains unchanged.
Structurally, the carburetor consists of the following elements:
- Float chamber;
- Throttle valve;
- Jets;
- Diaphragm;
- Metal case with lid;
- Adjustment screws.
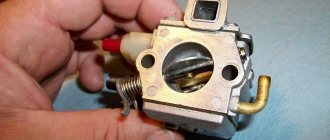
In the event of a malfunction, the carburetor begins to work incorrectly. This means that the UAZ in our case “Bukhanka” begins to consume too much fuel or does not develop full power. There are times when the engine may not start at all. To fix this problem, the carburetor must be removed, inspected and adjusted.
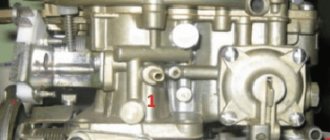
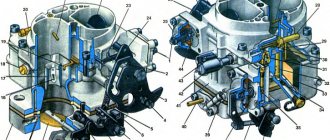
Carburetor diagram K 151
Explanation of the diagram:
- lid;
- float chamber imbalance valve;
- float;
- air jet of the transition system;
- emulsion jet of the transition system;
- screw securing the econostat sprayer of the secondary section;
- air jet of the main metering system of the secondary section;
- Econostat sprayer;
- emulsion tube of the main dosing system of the secondary section;
- accelerator pump release ball valve;
- accelerator pump nozzle;
- air damper;
- small diffuser of the primary section;
- air jet of the main metering system of the primary section;
- emulsion tube of the main dosing system of the primary section;
- air jet unit with emulsion tube of the idle system;
- emulsion jet of the idle system;
- idle air jet;
- accelerator pump system fuel bypass adjusting screw;
- displacer;
- float chamber housing;
- accelerator pump bypass jet;
- accelerator pump release ball valve;
- spring;
- accelerator pump diaphragm;
- accelerator pump cover;
- accelerator pump drive lever;
- main fuel jet of the primary section;
- a tube;
- forced idle economizer diaphragms;
- economizer valve;
- restrictive cap;
- mixture adjustment screw;
- hole in the EPHH body;
- forced idle economizer housing;
- idle system outlet hole;
- idle speed adjustment screw;
- gaskets;
- idle system transition holes;
- primary section throttle valve;
- accelerator pump lever drive cam;
- accelerator pump lever roller;
- bypass channel of the idle system;
- secondary section throttle valve;
- gaskets;
- mixing chamber housing;
- vacuum supply tube to the solenoid valve;
- tube to vacuum corrector;
- main fuel jet of the secondary section;
- crankcase ventilation fitting;
- electronic control unit;
- microswitch;
- filter;
- solenoid valve;
- union;
- fuel filter;
- fuel supply pipe;
- cork;
- fuel valve travel adjustment tongue;
- fuel valve;
- tongue for adjusting the fuel level in the float chamber;
- electric drive of the float chamber unbalancing valve.
Connecting hoses
The complex structure of the K-151 is also evident when it is connected to the engine. It provides for the use of a whole range of hoses, but only two different sizes are used, so it is quite possible to confuse them, and the motor will malfunction in certain modes. The order of connecting the hoses to the carburetor:
- Fuel is supplied through the fuel pipe to a fitting located under the float chamber on the engine side;
- the return hose is put on the lower fitting - it looks in the direction opposite from the power unit and is located below the inlet;
- two small cross-section hoses are connected to the solenoid valve, the other end of one of them is connected to the economizer valve;
- the second end of the thin hose is put on the fitting located in the lower part of the K-151 on the back side of the DZ body (there are two of them standing next to each other, we use the lower one);
- onto the upper fitting of this pair we pull the hose that goes to the vacuum ignition advancer (it is located on the distributor);
- a large diameter fitting on the DZ housing is used to connect the forced crankcase ventilation pipe, a device usually located on the valve cover;
- a small diameter fitting located in the middle part of the K-151 is used to connect a thermal vacuum switch, however, this pipe is used only if the engine has an exhaust gas recirculation system. If such a system is not provided for a particular modification of the motor, a plug is simply installed on this fitting. True, such a precaution is unnecessary - there is no air leak through this fitting.
If you lack experience, these connections should be made by consulting the instructions for the device.
Connecting carburetor hoses K-151D
How to remove the K 151 Pekar carburetor on an UAZ?
To do this, you need to go into the car's interior in the driver's or passenger's seat in the front and open the engine compartment hatch. The next step is to remove the air filter. To do this, first unscrew the upper fastening nuts, after which the filter element itself is removed. Be careful not to drop the nuts into the diffuser!
Now unscrew the nuts securing the filter housing. Lift it up, disconnect the thin hose and set the housing aside. Now disconnect all the linkages associated with the throttle valve. To avoid breaking the plastic elements, it is recommended to use a flat-head screwdriver.
Unscrew the fastenings of all hoses holding the unit and remove them. There will be four nuts that hold the carburetor to the manifold. Unscrew them and remove the unit.
Still have questions about withdrawal? Let's watch this video:
Cleaning the UAZ carburetor
Before setting up, the unit must be cleaned. To do this, completely disassemble the carburetor: remove the top cover and separate the throttle part from the diffuser.
Cleaning is carried out using special means for cleaning throttle valves or any other liquid intended for these purposes. You can also use gasoline or kerosene.
Cleaning is 100% necessary. This will save you from the problems associated with contamination and remove the need to do it in the near future. Therefore, it is necessary to perform it in order to prevent malfunctions.
How to adjust the fuel level in the float chamber
After assembling the carburetor, you need to adjust the level in the float chamber. This is the very place on which the fuel consumption of the UAZ Bukhanka vehicle depends. You can adjust it yourself in the garage. To do this, the carburetor is installed in its regular place, tightened with nuts, and the top cover is unscrewed and simply pressed by hand. Insert the fuel hose and pump up gasoline using the manual fuel pump.
Fuel level in the float chamber
Now you need to lift the lid and put it aside, and use a ruler to measure the level in the chamber. It should be 21 millimeters. If the parameter differs from the nominal value, then you need to set the float position at which the level will always be maintained at the specified level and the needle valve will be in the closed position.
To do this, you need:
- Bend the float adjusting rods;
- Put the cover in place;
- Repeat level check.
The cycle is performed until the level in the float chamber is normal. By the way, you can see in detail how to do this in the video. After the level becomes nominal, you need to reassemble the carburetor. All attachments are installed on it, except for the air filter and its housing. It will interfere with adjusting the air damper drive. Installation is carried out in reverse order.
Repair
During the operation of the car, various malfunctions may occur in the carburetor; the main signs of malfunctions in this device are:
- increased fuel consumption;
- black smoke from the muffler pipe, it is especially noticeable if you press the gas pedal sharply;
- unstable operation at idle, the engine may also stall when the speed is reduced;
- poor car dynamics;
- failures when accelerating.
If the carburetor is faulty, the engine may not develop speed, and popping noises and shots from the muffler are often heard in the intake manifold. K-151 is a rather complex unit, and almost any element of it can fail.
There are reasons why a carburetor most often fails:
- jets, fuel and air channels become clogged;
- heating causes deformation of the body;
- the float chamber shut-off valve stops working;
- Over time, the jets wear out.
Many repairmen, when restoring the functionality of the carburetor, first of all try to replace the jets, believing that because of them, fuel consumption increases and the engine runs unstable. One rather important note - the jets wear out very rarely, and most often wear occurs when the carburetor is often operated in dusty conditions. The most common reason for poor carburetor performance is its clogging, but in order to thoroughly clean the unit, it is necessary to completely disassemble it. Repair of the K-151 carburetor is carried out with the removal of the device, complete washing and purging of all its parts.
How to adjust the air damper of a K-151 carburetor?
To start the UAZ in cold weather, you need to use a starting device, which is a manual air damper drive. The bottom line is that during a cold start, you need to pull the handle towards you, thereby closing the damper, and start the engine. As the handle warms up, it should be gradually returned to its original position.
Now you need to adjust the position of the cable so that the damper opens completely and closes without jamming. To do this, completely pull out the handle on the carburetor car and close the choke manually. Fix the position of the cable as in the video and tighten the nut. Try opening and closing the damper. The system must operate accurately without jamming. After this, you can begin adjusting the idle speed.
Malfunctions and their elimination
Freezing of the economizer housing
The K-151 carburetor on some engines has one unpleasant feature. In humid subzero weather, the fuel mixture in the carburetor actively condenses on its walls. This occurs due to the high vacuum in the channels at idle (the mixture moves very quickly, which leads to a decrease in temperature and the formation of ice). The economizer body freezes first, since air enters the carburetor from here, and the flow cross-section of the channels here is the narrowest.
In this case, only drawing warm air into the air filter can help.
The trunk of the air intake hose can be thrown directly to the manifold. Or make a so-called “brazier” - a heat shield made of a metal plate, which rests on the exhaust pipes and to which the air vent hose is connected (see figure).
"Brazier"
Also, in order to reduce the risk of the economizer freezing problem, before the trip we warm up the engine to an operating temperature of 60 degrees . Despite the thermal insulation gasket from the engine, the carburetor still receives some heat.
Flange straightening
With frequent disassembly and removal of the carburetor, as well as with excessive force when tightening the flange to the engine, its plane may be deformed.
Working with a damaged flange leads to air leaks, fuel leakage and other serious consequences.
There are many ways to solve this problem. But the simplest and most accessible method is the following:
Useful video
For more information about the method of straightening a flange, we recommend watching this interesting video:
To prevent further bending of the flange, simply tighten it evenly once to the engine and do not remove it again. As we saw above, the carburetor can be cleaned and adjusted without removing it from the engine.
Adjusting the idle speed of the carburetor on a UAZ
The 151 Pekar does not have a quality screw, like its receiver DAAZ 4178. The car does not provide for the installation of a tachometer, so you will need to connect it yourself while the work is being performed. Now start the engine and warm it up to operating temperature.
The following procedure is as follows:
- As in the video, use the quantity screw and the throttle adjustment screw to set the desired idle speed.
- Despite the absence of a quality screw, the system provides for enrichment and leanness of the mixture by adjusting the amount of air supplied. For this purpose, a mechanism for adjusting the throttle position is installed.
- After the speed reaches 800-900 rpm, you need to tighten the quality screw until the engine starts to jerk a little. This mode is the most economical and optimal in terms of power conservation and will protect against startup-related malfunctions.
Still have questions about idle speed adjustment? Then watch this video material that will help dispel them!
Problems with the carburetor when installing gas equipment
Often, car owners switch cars with carburetor engines to gas; for example, it is profitable to install LPG on a working Gazelle. But with the constant use of gas in the carburetor, various types of problems appear, and one of them is a malfunction of the cold start system on the carburetor.
On many cars, the gas system uses a gas spacer for the K-151 carburetor; it is placed between the main body and the throttle body. Due to the additional insert, the distance between the lower and upper parts of the carburetor increases, so the cold engine starting system begins to work irregularly - you have to constantly keep your foot on the gas pedal, while holding the choke. On gas, a choke that is not fully working does not affect the operation of the engine, but the whole point is that cold starts of the engine, and especially in winter, are carried out on gasoline. Therefore, it is quite problematic to start the internal combustion engine with the air damper not completely closing; even due to the resulting vibrations, the fastening of the damper axis is often unscrewed. How to get rid of such an unpleasant problem?
One of the options for solving the problem is to weld an additional strip onto the air damper rod, which allows you to compensate for the difference in the thickness of the standard gasket between the housings and the gas spacer.
The bar can be made from an electrode with a diameter of 2 mm.