Instruments and indicators GAZelle Business.
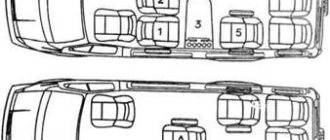
Location of devices.
The instrument cluster is equipped with a sound signal to additionally inform the driver about critical and emergency operating modes of the main vehicle systems.
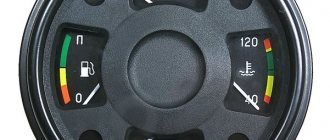
- Fuel level indicator.
- Speedometer.
- Parking brake indicator.
Lights up with a flashing light when the ignition is turned on, if the car is slowed down by the parking brake (duplicated by a short-term sound signal when the car is moving).
- Low battery indicator.
- Signal indicator for turning on the left direction indicators.
- Emergency oil pressure indicator.
Lights up when the ignition is turned on (duplicated by a short-term sound signal when the engine is running). After starting the engine, the warning light should go off. It is allowed for the indicator to light up briefly at a minimum engine speed in idling mode and during sudden braking.
If the warning light comes on under normal driving conditions, you must immediately stop the engine and determine the cause of the low oil pressure. Operating the engine with insufficient oil pressure will lead to engine failure.
- "STOP" signal indicator.
Lights up simultaneously with one of the indicators 3, 6, 13, 15 and 23.
When these warning lights come on, further operation of the vehicle is not allowed until the malfunction is eliminated.
- Engine management warning light.
If the control system is working properly, the indicator lights up after turning on the ignition and lights continuously for 5-10 seconds, then goes out. This indicates that the system is ready to start the engine. Variable lighting of the indicator while driving indicates a failure of some elements of the engine control system.
- Signal indicator for turning on the right direction indicators.
- Anti-lock brake system (ABS) fault indicator – installed on parts of cars.
- Tachometer.
Indicates the crankshaft rotation speed in min*1.
- Electronic brake force control (EBD) fault warning light - for vehicles with an ABS system.
- Door opening alarm – for GAZ-E221 and mod. (duplicated by a short-term sound signal when the car is moving).
- Indicator for turning on the center differential lock for 4x4 vehicles.
- Alarm indicator for abnormally high coolant temperature (duplicated by a short-term sound signal when the engine is running).
When the warning light comes on, you must immediately stop the engine, determine and eliminate the cause of the drop in coolant level. Running the engine with insufficient coolant levels can lead to engine overheating and failure.
- Coolant temperature gauge.
It is allowed to operate the engine when the pointer moves to the beginning of the red zone of the scale until the alarm for abnormally high coolant temperature comes on.
- Mode button.
- Rear fog light indicator.
- Headlight high beam indicator.
- Indicator for turning on the side light (duplicated by a short-term sound signal when the ignition is turned off).
- Low beam headlight warning light.
- Signal indicator for turning on the front fog lights.
- Indicator for emergency drop in brake fluid level (duplicated by a short-term sound signal when the engine is running).
Lights up when the fluid level in the master cylinder reservoir drops below the permissible level. The vehicle must be checked immediately by a service facility.
- Indicator of total and daily mileage.
The top row is the total mileage readings.
Bottom row – daily mileage readings.
Setting the daily mileage indicator to zero.
- Indicator of the minimum fuel reserve in the tank (duplicated by a short-term sound signal when turned on for the first time).
Lights up when the fuel level float is in the region of 8 liters. It is not allowed to drive the car for a long time after the warning light comes on, because this will lead to failure of the submersible electric fuel pump module.
ATTENTION!
If any of the red warning lights on the instrument cluster come on while driving, you must stop the car, identify and eliminate the malfunction.
ATTENTION!
To avoid malfunctions in the operation of the instrument cluster, it is prohibited to disconnect the battery (disconnect the wires from the “+” and “-” terminals) when the ignition is on.
To eliminate the consequences of malfunctions in the operation of the instrument cluster, you must:
- Turn off the ignition.
- Restore the connection between the battery and the vehicle's on-board network.
- Press the “Mode” button on the instrument cluster and, holding it, turn on the ignition. The arrows will return to their original position.
Is it worth installing a new Gazelle instrument panel in the car, or is the old panel quite suitable for use? The question is quite common, especially among those drivers who have had the opportunity to slightly update their car. It’s worth installing a new thing, but how much it will cost is another question.
Classic Gazelle dashboard
Panel purpose
The instrument panel performs one function - informational. In a small area in the dashboard of the car, all the instruments with indicators about the car’s performance are located, this is both good and not very good. While the driver is looking for the indicator, the speed indicator, he is distracted from the road, creating conditions for an emergency situation. However, most Gazelle users eventually get used to the appearance of the panel and intuitively examine one or another section of it to obtain information.
The standard panel on most modifications of the Gazelle looks like 3-5 round dials surrounded by several signaling devices. The main gauges—the speedometer and tachometer—are large.
The speedometer is always located in the center, since it is the main device that the driver focuses on.
The three largest devices most often include the coolant temperature sensor. The remaining dials indicate either the amount of gasoline, or the battery charge, and less often, the amount of oil. All the indicators that the driver needs can also look like warning lights. Their indicators light up from time to time. The devices are placed compactly and do not interfere with each other.
Purpose of elements on the GAZ instrument panel
1 — the voltmeter indicates the voltage in the on-board network of the GAZ car; 2 — warning lamp of the engine management system; 3 - reserve (or abs malfunction warning lamp on a Volga GAZ car equipped with an anti-lock brake system); 4 — “STOP” light display. Lights up simultaneously with one of the malfunction indicator lamps, if further movement with this malfunction is prohibited; 5 - indicator lamp for turning on the left turn signal. The lamp lights up simultaneously with the left turn indicators. If one of the indicator lamps malfunctions, the control lamp blinks at double frequency; 6 - warning lamp for emergency drop in brake fluid level. The lamp lights up when the fluid level drops (below the minimum allowable) in the brake master cylinder reservoir. As the brake pad linings wear, it is necessary to add brake fluid; 7 — odometer (total mileage counter); 8 — the speedometer indicates the speed of the car; 9 - indicator lamp for turning on the parking brake. The lamp lights up when the parking brake lever is raised and the ignition is on. 10 — control lamp for turning on the right turn signal. The lamp lights up simultaneously with the right turn indicators. If one of the indicator lamps malfunctions, the control lamp blinks at double frequency; 11 - reserve; 12— warning lamp for unfastened seat belts (installed on some Volga GAZ 31105 cars); 13 or 18 - warning lamp for emergency drop in oil pressure in the engine lubrication system. The lamp should light up when the ignition is turned on and go out after starting the engine. If the light remains on after the engine has started, or comes on while the engine is running, stop the engine immediately and check the oil level. The level is normal - the engine is faulty. For a car with high mileage, the lamp may come on when the warm engine is idling; 14 — reserve (for installing additional warning lamps); 15 — fuel level indicator. The device shows the approximate amount of fuel in the tank. The scale has divisions: 0 - empty tank; 1/2 - half a tank; 1 - full tank: 16 - fuel reserve warning lamp. The lamp turns on when the remaining fuel in the tank is less than 8 liters; 17 — oil pressure indicator in the engine lubrication system allows you to assess the technical condition of the engine; 19 — control lamp for turning on heated seats (for GAZ 31105 vehicles with heated seats); 20 — coolant temperature gauge allows you to control the engine temperature; 21 — control lamp for turning on external lighting (side light); 22 - the coolant overheating warning lamp turns on when the coolant temperature rises above the permissible value; 23 - control lamp for turning on the high beam headlights. The lamp turns on when the high beam headlights are turned on; 24 — button for setting the daily mileage counter to zero. In order to reset the counter readings, you must press the button; 25 — car daily mileage counter. To reset the counter readings, you must press the zero setting button (pos. 24); 26 - tachometer. The device shows the engine speed; 27 - battery discharge warning lamp. The lamp should light up when the ignition is on, and go out after starting the engine. Illumination of the lamp while the engine is running may indicate a malfunction of the generator or its circuits.
Appearance of the update
The reason why many drivers install a Gazelle business dashboard is simple - it looks better. The second reason why you should buy this particular panel option is the functionality and increased number of opportunities to monitor the performance of the car.
Gazelle business dashboard design
The disadvantage of such a panel is that on most Gazelles you will have to sweat a little when connecting. The device's pinout diagram is included in the kit, so there will be problems with the connection if you have not encountered such work before. You will also have to add several terminals and change several contacts so that all devices and sensors work correctly.
Functional
In most cases, everything works properly without the slightest breakdown, but the new panel can still be improved. Many people do not like the dim illumination of devices, which is practically useless at night. It is recommended to install LED lighting and diodes inside the devices and around the entire perimeter of the panel for better visual perception. The new Gazelle instrument panel has almost 20 indicators that light up when a malfunction occurs.
4 of them, which indicate the level of emergency oil pressure, overheating of the coolant, emergency amount of fluid in the brakes and the parking brake sensor, may indicate serious damage to the system.
If one of the mentioned indicators lights up along with the STOP button, it is recommended not to start driving until the damage has been repaired.
In addition, the dashboard has various alarms about the lighting system, brakes and engine status. The driver has access to the most complete information about all the main components of the car.
Controls and instruments GAZ 2705
On the instrument panel (
Rice. 3.3. Positions of the turn signal and headlight switch lever (with sound signal)
5. Lever for switching direction indicators, headlights and horn*.
The lever has six fixed positions - I, II, III, IV, V and VI and four non-fixed positions "A" (
Rice. 3.4. Turn signal and headlight switch positions (without horn)
* On some vehicles, the sound signal is turned on by the windshield wiper and washer switch (Fig.
Rice. 3.5. Key positions of the ignition switch, starter and anti-theft device
6. Ignition, starter and anti-theft switch (instrument and starter switch).
With the key positions shown in
Rice. 3.6. Windshield wiper and washer switch positions (without horn)
7. Lever for switch, windshield wiper, washer and horn**.
At the lever positions shown in
Rice. 3.7. Windshield wiper/washer switch positions (with sound signal)
If the switch is equipped with a horn switch (
Rice. 3.8. Hazard switch button
8. Hazard switch.
When the position is on, all four turn signal lamps and the indicator lamp (red) inside the button (
20. Ashtray.
Removing the ashtray is shown in
Rice. 3.10. Parking brake lever
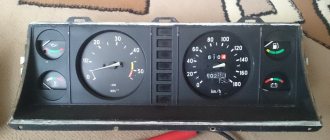
Rice. 3.15. Instrument cluster
22. Parking brake lever.
To brake the car, you need to pull the lever up; in this case, if the ignition is turned on, then indicator 9 on the instrument cluster lights up intermittently (see.
Rice. 3.11. Gear shift pattern
The gear shift diagram of the gearbox is shown in
Rice. 3.12. Position of the central light switch
26. Central light switch.
The switch has five fixed positions (
Rice. 3.13. Steering column locking handle
29. Steering column locking mechanism handle
(
Rice. 3.14. Disengaging the hood fuse
33. Hood lock handle.
To open the hood, you need to pull the handle towards you until the latch opens the lock and the hood opens slightly, and then move the handle forward again until it stops. To open the hood completely, you must remove the fuse mounted on the lower front edge of the hood by hand (Fig. 3.14).
The instrument cluster (Fig. 3.15) shows the following devices.
2. Indicator (orange) of the engine control system ZMZ-4063, ZMZ-4061.
If the control system is working properly, the indicator lights up after turning on the ignition and lights continuously for 5-10 seconds, then goes out. This indicates that the system is ready to start the engine. Variable lighting of the indicator while driving indicates a failure of some elements of the engine control system.
3. Warning light (red) for anti-lock braking system (ABS).
Installed on vehicles equipped with ABS
4. Signal indicator (red) “STOP”.
5. Signal lamp (green) left direction indicators.
6. Alarm (red) for emergency drop in brake fluid level.
Lights up when the fluid level in the supply tank of the master brake cylinder drops below the permissible level.
Possible problems
Even if you change the panel to a Gazelle, you won’t be able to get rid of all the problems. Quite often problems occur after replacement. Here are the most common ones:
- individual sensors or the entire panel stops working;
- instrument readings “freeze”;
- The sensors lie, the indicators are incorrect.
Most drivers panic and then take the panel apart, which only makes things worse. Here are some solutions for most panels:
- The first thing you should always do if such devices malfunction is to check the wire contacts. A break or breakdown can cause a malfunction. You should also inspect the food.
Pinout and instrument cluster on the Gazelle panel
Since the electronic system is not improved by replacing the panel, and the devices are more demanding, problems occur with the electronics. Replacing the wiring and fuses most often solves the problem. Generally, reviews about the operation of the instrument panel are favorable, but on some older car models there are a number of problems that can only be solved by installing original instruments.
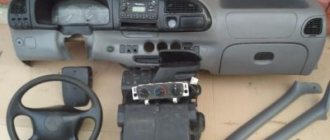
Installing and removing the torpedo
The instrument panel is only part of the euro kit for the Gazelle business.
Gazelle instrument panel lighting
In some cases, for example, to repair the heating system, it is necessary to completely dismantle the torpedo. This process is not the easiest, since you need to know from which side to approach such an issue.
In fact, the panel can be removed in just half an hour. To do this you need the following:
- Use a Phillips screwdriver to unscrew the 3 upholstery fasteners.
- Carefully remove all upholstery pads so as not to damage anything.
- We dismantle the steering column with all connections to it.
- We remove the instrument panel by disconnecting all wires.
- Next you will need to turn off the interior lighting and rear fog lights. Then we turn off the electric headlight adjustment.
- We arm ourselves with keys 7 and 8, get to the bolted fastening of the choke cable. Hold it with one key and unscrew it with the other.
- We unscrew the screw of the cable sheath and disconnect the cable from the Gazelle carburetor.
- We turn off the hazard warning lights and cigarette lighter plugs.
- Again, take a screwdriver and tighten 2 screws near the stove control.
- We unscrew all the screw fastenings of the panel, there are 10 of them in total. Lightly pull the panel towards you so that it comes off the installation site. Now you can disconnect the air duct hoses from the deflectors.
- We take out the damper from the carburetor. We remove the panel. We turn off the right and left air ducts of the stove.
- We remove the torpedo. You will need an assistant here, since the torpedo is very heavy.
- We twist the fastenings of the torpedo lining and remove the lining itself.
- Installation is carried out in reverse order.
Source
Section 3. CONTROLS AND INSTRUMENTS
The instrument panel (Fig. 3.1) contains the following controls and instruments.
1. Handwheel of the headlight range control unit, depending on the vehicle load.
When the vehicle is unloaded, the number “0” on the control unit handwheel should be aligned with the “-” mark on the control unit body.
When the vehicle is fully loaded, the “-” mark must be combined:
— number “1” on the handle — for buses with 8 (9) passenger seats;
— number “2” — for vans and buses with 12 (13) passenger seats.
3. Switch for checking the serviceability of indicator lamps.
4. Side ventilation grilles.
Rice. 3.3. Positions of the turn signal and headlight switch lever (with sound signal)
5. Lever for switching direction indicators, headlights and horn*. The lever has six fixed positions - I, II, III, IV, V and VI and four non-fixed positions “A” (Fig. 3.3 and 3.4).
Rice. 3.4. Turn signal and headlight switch positions (without horn)
* On some cars, the sound signal is turned on by the windshield wiper and washer switch (Fig. 3.7).
If the switch lever is in position I, and the handle 26 of the central light switch is in position II, then the low beam headlights are on. If you move the lever to position II, the high beam headlights are on and the blue indicator light comes on. When the switch lever is repeatedly moved from position I towards you along the steering column (non-locking position), the high beam headlights are signaled. When you press the lever button (from any position) along the axis, a sound signal* is activated (without locking) (Fig. 3.3).
** On some cars, the sound signal is turned on by the turn signal and headlight switch (see Fig. 3.3).
** On some cars, the sound signal is turned on by the windshield wiper and washer switch (Fig. 3.7).
When the lever is moved from position I or II up to position VI or IV (right turn) or down to position V or III (left turn), the direction indicators turn on and the green flashing indicator on the instrument cluster lights up.
The switch has an automatic device for returning the lever to position I or II after the end of the turn. To briefly turn on the direction indicators, the switch lever must be moved to the corresponding non-fixed position “A”. When released, the lever returns to position I or II.
Rice. 3.5. Key positions of the ignition switch, starter and anti-theft device
6. Ignition, starter and anti-theft switch (instrument and starter switch). With the key positions shown in Fig. 3.5:
0 - everything is turned off, the key cannot be removed, the anti-theft device is not turned on;
I — ignition is on, the key cannot be removed;
II - the ignition and starter are turned on, the key cannot be removed;
III - the ignition is turned off, the anti-theft device is turned on when the key is removed.
To turn off the anti-theft device, insert the key into the ignition switch and, slightly rocking the steering wheel left and right, turn the key to position 0.
Rice. 3.6. Windshield wiper and washer switch positions (without horn)
7. Lever for switch, windshield wiper, washer and horn**. At the lever positions shown in Fig. 3.6 and 3.7:
0 — windshield wiper off;
I — low speed windshield wiper is on;
II — high speed windshield wiper is on;
III - intermittent operation of the windshield wiper is turned on.
If the switch does not have a horn switch (Fig. 3.6), then moving the lever towards you (in the direction of the arrow) from position 0 briefly turns on the washer and windshield wiper.
Rice. 3.7. Windshield wiper/washer switch positions (with sound signal)
If the switch is equipped with a sound signal switch (Fig. 3.7), then to turn on the washer and wiper for a short time, the switch lever must be moved from position 0 away from you (in the direction of arrow “A”), and to turn on the sound signal, the lever must be moved (from any position ) toward you (in the direction of arrow “B”).
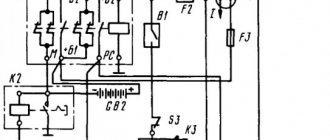
Gazelle instrument panel pinout
Many car owners of a gazelle or Volga car with an old-style instrument panel strive to replace it with a new-style instrument panel, in which most of the indicators have been replaced with modern LED ones, and such an instrument panel looks much more attractive and brighter. But there’s just one problem: you won’t be able to change the instrument panel one-on-one. Either half of the indicators will not light up, or, on the contrary, extra indicators will light up. Let's figure out how to install a new type of instrument cluster (panel) 385.3801-10 instead of the old panel with light bulbs 384.3801-10, which has served for many years. To begin with, let us present to your attention a combination of instruments of the old and new models.