From the book by E.N. Orlova and E.R. Varchenko "UAZ Cars" maintenance and repair
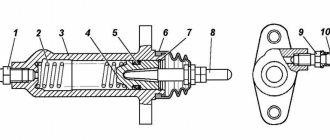
UAZ clutch device
- pull lever pin;
- pull lever;
- finger;
- pull-off lever roller;
- pull lever fork;
- thrust bolt;
- clutch release spring;
- clutch release clutch;
- clutch release bearing;
- compression spring;
- clutch cover;
- heat-insulating washer;
- lower part of the clutch housing;
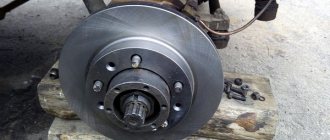
- flywheel;
- driven disk;
- pressure disk;
- front bearing of the gearbox input shaft;
- crankshaft;
- gearbox input shaft;
- needle bearing;
- clutch housing
The clutch of UAZ vehicles is single-plate, dry, and consists of a pressure plate 16 with a casing, clutch release levers 2, support forks 5 and pressure springs 10 and a driven disk 15 with friction linings and a torsional vibration damper. The characteristics of pressure springs are given in the table.
| Spring catalog number | Loaded spring length, mm | Spring designation | Spring load, N | Spring color |
| 51-1601115 | 40 | A, B | 760…790, 790…820 | Red, Brown |
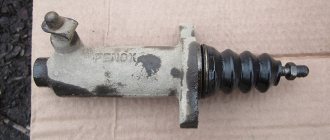
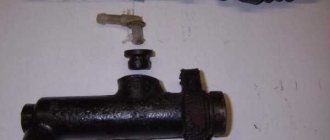
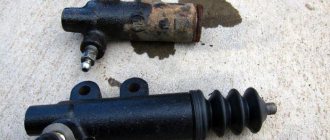
Replacing the clutch master cylinder of a UAZ Patriot
The clutch is an integral part of any vehicle. The purpose of the clutch is to separate the engine and transmission for a short time, thereby enabling gear shifting and vehicle control. The SUV is equipped with a hydraulic clutch system, which includes one of the main elements - the clutch master cylinder. This material will tell you about the master cylinder of the UAZ Patriot SUV.
Clutch system: structure and functions
The clutch is an integral element of any car, and the principle of its operation is approximately the same for all brands of cars. This unit enables/disables rotation transmission from the engine to the gearbox, which is a necessary condition for changing gears. The clutch design contains a number of elements, the control of which requires efforts that significantly exceed the physical capabilities of an individual person.
To simplify the control of this unit, a hydraulic drive was introduced into its design. Thanks to this solution, the driver can, without much effort, by pressing the clutch pedal, turn off the transmission of rotational force from the power unit to the gearbox (such a shutdown is necessary to stop the car and change gears while driving).
The hydraulic drive also ensures smooth switching on/off of gearbox speeds. The main elements of such a drive include the clutch master cylinder.
The clutch drive, based on hydraulics, which is equipped with different brands of cars, includes the following parts:
- clutch control pedal;
- master cylinder (located behind the pedal);
- clutch slave cylinder;
- fork;
- clutch bearing;
- hydraulic drive tubes.
Clutch hydraulics are not fundamentally different from hydraulic drives of other vehicle systems (for example, brake system hydraulics). The operating principle of the hydraulic drive is based on the properties of the fluid, which practically does not compress at high pressure, but effectively transmits force to the actuators.
What is
The master cylinder is a device that contains a piston and brake fluid. The piston is driven by a rod or pusher attached to the clutch pedal. When you press the pedal, the piston is activated, thereby supplying fluid to the working element. Without the presence of the main element or if it malfunctions, the functioning of the clutch becomes impossible. Let's consider the main malfunctions of the master cylinder, their elimination and replacement of the element.
Possible faults
Although the main element is a simple structure, it can be a source of serious malfunctions. In particular, malfunctions of this device include:
- Lack of fluid in the device.
- Presence of air in the system.
- Mechanical damage to component devices.
Each malfunction has characteristic solutions, namely:
- A lack of fluid in the system can be corrected without resorting to major repair work. To do this, you need to fill the tank to the mark. To prevent it from decreasing in the tank, it should be checked periodically.
- The presence of air in the system can be corrected by bleeding. But first it is necessary to eliminate the reason why air entered the system.
- If the main cylinder has obvious mechanical damage, then it is necessary to replace it or repair it if the defect is minor.
Let's look at how the process of replacing the clutch master cylinder on a UAZ Patriot SUV is carried out, as well as the process of removing air.
Replacement
Replacing the master cylinder on a UAZ Patriot SUV is carried out when the product cannot be repaired. In this case, there is a leak on the cylinder through the rubber seals. Internal leaks are also possible, which leads to ineffective functioning. In this case, we will consider the process of replacing it on the UAZ Patriot SUV.
To carry out the work, you will need keys for “12” and “13”, as well as a syringe. Let's proceed with the immediate replacement:
- The brake fluid is pumped out of the system. A syringe is used for this.
The element is removed in the engine compartment.
This completes the removal of the product. Installation of a new element is carried out in the reverse order of removal.
To facilitate installation of the new element, it is necessary to pass a longer pin through the lower mounting hole. Next, the product is attracted to the partition between the passenger compartment and the engine compartment. Finally, the long pin is replaced with a standard one.
Bleeding the system
After replacing the clutch master cylinder, the system will definitely need to be bled to remove air. It is recommended to carry out pumping together. The pumping process is as follows:
- After assembling the system, pour brake fluid into the reservoir.
- Remove the protective cap from the bleeder fitting on the working cylinder. You need to put a piece of hose of the appropriate diameter on it, lower the second end of the hose into a container with brake fluid.
- Now the assistant must sharply press the clutch pedal 4-6 times and not release it.
- We unscrew the fitting until air begins to escape into the container, then liquid with air. The pedal will fail until the end of its stroke. The assistant continues to hold it pressed.
- We tighten the fitting.
- We repeat steps 3, 4 and 5 until liquid without air begins to come out into the container.
- Pumping is complete. Disconnect the hose from the fitting and put the protective cap on it.
During bleeding, do not forget to monitor the level of brake fluid in the clutch barrel and top it up periodically. You must not allow it to run out in the barrel, otherwise you will have to pump it again.
In conclusion, it is worth noting that the serviceability of the main device on the UAZ Patriot SUV contributes to the proper functioning of the clutch, so you should monitor the serviceability of every part on the car, especially those that are visible.
Source
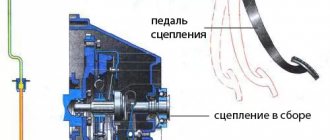
Clutch drive and its types
Clutch device The drive is designed for remote control of the clutch directly by the driver from the passenger compartment.
Pressing the clutch pedal directly affects the pressure plate. The following types of drive are known:
- mechanical;
- hydraulic;
- electrohydraulic;
- pneumohydraulic.
The first two types are most widespread. Trucks and buses use a pneumatic-hydraulic drive. Electrohydraulic is installed in cars with a robotic gearbox.
Some cars use a pneumatic or vacuum drive booster to make driving easier.
Mechanical drive
A mechanical or cable drive has a simple design and low price. It is unpretentious in maintenance and consists of a minimum number of elements. The mechanical drive is installed in passenger cars and light trucks.
Mechanical clutch drive
Mechanical drive elements include:
- clutch cable;
- clutch pedal;
- clutch release fork;
- release bearing;
- adjustment mechanism.
The clutch cable, enclosed in a sheath, is the main element of the drive. The clutch cable is attached to the fork, as well as to the pedal located inside the car. When the driver presses the pedal, the action is transmitted through the cable to the fork and release bearing. As a result, the engine flywheel is disconnected from the transmission and, accordingly, the clutch is disengaged.
The connection between the cable and the lever drive has an adjustment mechanism that ensures free movement of the clutch pedal.
The clutch pedal travel is free movement until the drive is activated. The distance covered by the pedal without much effort from the driver when pressed is free play.
If gear shifting is accompanied by noise, and at the beginning of the movement there are slight jerks of the car, then adjustment of the pedal travel is necessary.
The clearance in the clutch should be within 35-50 mm of pedal free play. The standards for these indicators are indicated in the technical documentation of the car. Adjustment of the pedal stroke is carried out by changing the length of the rod using an adjusting nut.
Trucks use a lever mechanical drive rather than a cable drive.
The advantages of a mechanical drive include:
- simplicity of the device;
- low cost;
- reliability in operation.
The main disadvantage is considered to be lower efficiency compared to a hydraulic drive.
Hydraulic clutch drive
The hydraulic drive has a more complex design. Its elements, in addition to the release bearing, fork and pedal, also include a hydraulic line, which replaces the clutch cable.
Hydraulic clutch diagram
In essence, this line is similar to the hydraulic drive of the brake system and consists of the following elements:
- clutch master cylinder;
- clutch slave cylinder;
- reservoir and pipeline with brake fluid.
The clutch master cylinder is similar to the brake master cylinder. The clutch master cylinder consists of a piston and a pusher located alone in the housing. Its elements also include a fluid reservoir and sealing collars.
The clutch slave cylinder, which has a similar design to the master cylinder, is additionally equipped with a valve to remove air from the system.
The mechanism of action of a hydraulic drive is the same as that of a mechanical one, only the force is transmitted using the liquid in the pipeline, and not through a cable.
When the driver presses the pedal, the force is transmitted through the rod to the clutch master cylinder. Then, due to the incompressible properties of the fluid, the clutch slave cylinder and the release bearing drive lever are activated.
The advantages of the hydraulic drive include the following features:
- hydraulic clutch allows you to transmit force over a considerable distance with high efficiency;
- resistance to fluid flow in the hydraulic drive elements contributes to smooth engagement of the clutch.
The main disadvantage of a hydraulic drive is that it is more difficult to repair compared to a mechanical one. Leakage of working fluid and entry of air into the hydraulic drive system are, perhaps, the most common breakdowns that the clutch master and slave cylinders can boast of.
The hydraulic drive is used in passenger cars, as well as on trucks with a tilting cab.
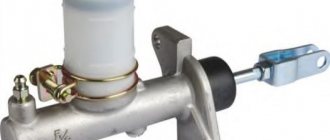
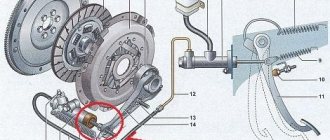
Replacing the master cylinder of the clutch release drive UAZ Patriot 3163
Remove the master cylinder for replacement if there is a fluid leak or the clutch is not fully engaged (may be caused by wear of the front sealing ring or clogged compensation hole).
You will need: keys “13”, “12”, syringe.
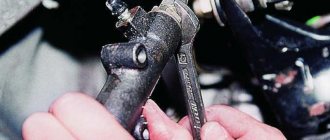
1. Using a syringe, pump out the brake fluid from the master cylinder reservoir.
2. Unscrew the nut securing the tube to the clutch master cylinder and move the tube to the side.
To prevent hydraulic fluid from leaking out of the clutch release pipeline, place a rubber cap on the end of the pipeline.
3. Remove the cotter pin from the hole in the clutch release pedal pin...
4. ...unscrew the two fastening nuts...
5. ...remove the tip of the pusher from the clutch release pedal pin...
6. ...and remove the master cylinder.
7. Install the clutch release master cylinder in the reverse order of removal.
8. Remove air from the clutch release hydraulic drive (see “Bleeding the clutch release hydraulic drive system”).
Video about “Replacing the clutch release master cylinder” for UAZ 3163
Problems with the clutch drive UAZ Patriot 2015 Repair of the clutch drive on the UAZ Patriot Clutch master cylinder. Replacement.
Source
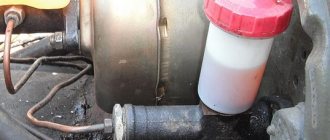
Removing air from the drive hydraulic system
Quite rarely, but it happens that the clutch needs bleeding. This can be understood from the fact that it does not turn off completely and the pedal is not pressed so softly. Bleeding is the removal of air from the hydraulic system. This process is carried out when the liquid in the tank is at a normal level.
During work, it is necessary to remove the rubber cap located on the bypass valve and install a hose in this place. Then the other end of the hose is lowered into a 0.5 liter container containing brake fluid in a ratio of 1:3.
Pumping the clutch
Afterwards, the bypass valve must be turned one turn while another person presses the pedal all the way. You need to press the pedal until the air bubbles stop being released. The bypass valve must then be tightly closed.
Important Powerful tractor VTZ-2048 from the model range of the Vladimir Tractor Plant
Some UAZ owners may recommend tightening the bypass valve after each pedal press. This will help to significantly increase the pumping speed and achieve complete neutralization of air. Usually the air disappears from the system after the third or fourth repetition of the operation.
UAZ cars are very reliable. It doesn't take much effort to fix clutch related problems. You can carry out all the work yourself or contact a technical service. Clutch repair or adjustment is not an expensive service. As the owner of one of the UAZ series of cars, you need to carry out timely and constant care of the car, since an unscrupulous attitude can lead to severe pollution and lead to a number of difficult-to-solve problems.
Clutch master cylinder UAZ Patriot
Replacing the clutch master cylinder of a UAZ Patriot
Remove the master cylinder for replacement if there is a fluid leak or the clutch is not fully engaged (may be caused by wear of the front sealing ring or clogged compensation hole).
You will need: keys “13”, “12”, syringe.
Using a syringe, pump out the brake fluid from the master cylinder reservoir.
Unscrew the nut securing the tube to the clutch master cylinder and move the tube to the side
To prevent hydraulic fluid from leaking out of the clutch release pipeline, place a rubber cap on the end of the pipeline.
Remove the cotter pin from the hole in the clutch pedal pin.
Remove the tip of the pusher from the clutch release pedal pin.
Unscrew the two master cylinder mounting nuts
Remove the master cylinder.
Install the clutch release master cylinder in the reverse order of removal.
Remove air from the clutch release hydraulic drive (see “Bleeding the UAZ Patriot clutch”).
Source
#What did the replacement of the Main CA lead to or the ADS sucks. Patriot 2020.
In the article on how to adjust the clutch on a Patriot, you will learn all the intricacies of replacing and adjusting the UAZ Patriot clutch in normal garage conditions. In what cases is the clutch replaced, what can it be connected with?
This material reveals such topics as the principle of operation, as well as types of clutch and their advantages on Patriots, what parts are included in the clutch mechanism and operating features. Also, why do you need to adjust the UAZ clutch, detailed photos and video instructions for adjusting the clutch and adjusting the UAZ Patriot clutch sensor and malfunction errors. After this, you can safely go and make a diagnostic card for your car.
The device of the UAZ clutch master cylinder
The main clutch for UAZ 3151, “Hanter”, Patriot with article number 420.469-1602300 has some differences, but not dramatic ones. It just has a tank installed, not a tube and an eye instead of a cylinder piston pusher fork. For “tadpoles” and “loaves” the article number is 420.3741-1602300.
It is quite possible to replace the necessary parts and assemble what you need. How the GTZ works is shown in the figure below.
The device shows how the free play of the clutch pedal is adjusted. To do this, you need to screw in or unscrew the pusher fork.
GCS cuffs consist of a ring and a so-called “mushroom” with a diameter of 22 mm.
Operation of the GVC
Briefly, the clutch operation looks like this:
- When the clutch pedal is depressed, the pusher moves the piston and the compensation hole closes.
- It pushes fluid into the system in front of it creating pressure.
- This pressure acts on the piston of the working cylinder, which pushes the fork through the rod.
- The fork, moving the release bearing, presses on the petals of the basket and moves the pressure plate away from the clutch disc.
The valve and plate play an important role during pumping. Even if the system is not pumped, it will still fill up. It is enough to fill in the liquid and unscrew the valve on the working cylinder. It will fill the system by gravity, this also applies to the brakes.
The liquid enters the cavity in front of the piston through the compensation hole through the valve into the line. Once everything is filled, the liquid will flow out through the valve. Here, the main thing is that the rod is not extended and the compensation hole is not blocked by the cuff.
When pumping, everything is a little different.
- When the piston moves forward, valve 19 is open.
- When it goes backwards, the valve is closed and a vacuum is created at the front.
- There are holes in the piston covered by plate 3. It moves away and opens the holes. Liquid flows from the cavity above the piston and the reservoir through the bypass hole into the discharged cavity in front of the piston. The cuff (fungus) allows it to leak.
- Having reached the locking ring, the piston stops, the spring presses the fungus and the plate. This is readiness for a new cycle.
Using the pedal lever
First, slowly release the clutch pedal. The driven disk comes into immediate contact with the flywheel. The friction power contributes to the rotation of the flywheel, and the machine begins to create the first movements along the roadway.
Next, the circulation of the disk and flywheel must be equal. The pedal holds a certain level for some time, slowly returning to its original position. The speed increases little by little.
Everything works together: the flywheel, the release plate, the driven disk - they gain a similar amplitude of rotation, then transmit the torque to the machine’s gearbox and wheels. The mechanism is engaged, the car is moving, you can remove your foot from the clutch.
Replacing the bearing and clutch release fork
To disengage the clutch, you need to press the clutch pedal with your foot. At this moment, the pressure disk moves away from the flywheel, the driven disk is released, and the torque period to the gearbox from the motor is interrupted. The pedal pressure should be soft and fast, but there should be no harshness.
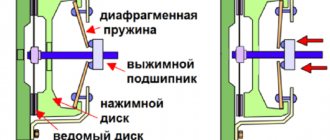
Petal clutch is called diaphragm clutch. This is a type of clutch where a diaphragm spring transmits the force to the pressure plate. The outer diameter of the pressure plate is standardized, and the inner diameter, in contact with the clutch release bearings, consists of metal petals. The clutch petal basket consists of a pressure plate, a housing, and a diaphragm spring. It can be press or pull, the latter is not often used.
Design
The main components of the clutch of the UAZ-452 car:
- driven disk assembly with friction linings;
- a pressure disk or basket assembled with a casing;
- release levers.
The stamped steel casing is attached to the engine flywheel with six centering bolts. It is made with three windows, where the projections of the cast iron pressure plate fit.
Six steel springs are installed between the pressure plate (basket) and the casing.
Their compression force ensures the transmission of torque from the flywheel further through the casing, pressure plate to the driven disc. In order to prevent heat transfer from the springs, washers made of heat-insulating material are installed on the pressure plate side.
Modern cars are equipped with a hydraulic drive instead of a mechanical drive . The fluid creates increased pressure, making it much easier for the driver to control the pedal.
everything useful is here
Removing the clutch pressure and driven discs SEQUENCE OF ACTIONS
We remove the gearbox.
Removing the hydraulic clutch slave cylinder
Using a 12mm wrench, unscrew the four bolts securing the lower part of the clutch housing. One of the bolts secures the end of the ground wire to the clutch housing.
Remove the lower part of the clutch housing with the gasket.
We use a chisel to mark the relative positions of the flywheel and the clutch drive plate (“basket”).
While holding the flywheel from turning with a screwdriver or a mounting spatula, use a 12mm wrench to evenly unscrew the six bolts securing the “basket” to the flywheel. Only two “basket” mounting bolts are accessible at a time. To access the remaining bolts of the flywheel, turn it, engaging the teeth of the ring with a screwdriver.
We remove the “basket” and the driven disk.
The driven disk hub protrudes more on one side than on the other. This side should be facing the gearbox. We install the driven and driving disks on the flywheel and secure them with bolts. We do not tighten the bolts to maintain the mobility of the driven disk.
We center the clutch driven disc using a special mandrel or the gearbox input shaft. Without removing the mandrel, evenly tighten the drive disk mounting bolts to the recommended torque. We take out the mandrel and install the lower part of the clutch housing and the slave cylinder. We install the gearbox by applying CV joint-4 lubricant to the splined end of the input shaft.
The clutch serves to briefly disconnect the engine shaft from the gearbox when changing gears and smoothly attach it when moving away.
UAZ loaf cars or officially UAZ-452 are equipped by the manufacturer with a dry mechanism with one disk. This device has a torsional vibration damper.
The device ensures the transmission of torque from the power unit to the transmission with a force of 17 kg/cm.
Malfunctions
The main malfunctions of the GTZ are damage to the cuffs. If the “fungus” is damaged, the piston will not create pressure in the system and the clutch will stop squeezing. Usually these are burrs, cracks, or simply worn down. Frequent, repeated pressing will, of course, help, but not for long. It is impossible to turn on the speed and move away. It is necessary to change the cuffs or replace the entire main one.
In the second option, if the second annular cuff malfunctions, the liquid will leak out. DOT will drip onto the cab floor. It is quite possible to replace it with a ring from the repair kit.
Possible malfunctions and their diagnosis
Signs indicating malfunctions in the clutch drive can be diagnosed based on the following: - The level in the clutch reservoir has dropped significantly, this indicates that brake fluid is leaking somewhere in the system; if the connecting tubes are intact, then this may be caused by worn cuffs or piston failure in the master cylinder. — A visual inspection showed the presence of places where fluid was leaking: tubes, cuffs, etc. — When pressed, periodic failures of the pedal occur, this indicates that there is air in the clutch drive, this happens when hoses are cracked or when the level in the reservoir drops below the minimum. — When changing gears, a characteristic sound is heard in the gearbox, reminiscent of a “crunch”; the cause may be a malfunction of the piston or spring of the master cylinder.
When adjustment is required on a Patriot freewheel
It is necessary to adjust the stroke of the pusher directly in the working cylinder, if necessary, so that the clutch correctly performs its task. If the adjustment is not correct, various problems will certainly arise, and in some cases it may even be necessary to replace the slave cylinder.
It happens that incomplete pressing of the pressure plate against the working cylinder occurs. This usually happens when the rod stroke is completely absent or it is significantly below the required norm. Also, at such moments, the driver may notice the clutch slipping, which will certainly and quickly lead to wear and tear on the elements of the entire mechanism.
It happens the other way around, when the free step is greater than permissible, in this case you will notice the clutch is completely disengaged. The driver will certainly feel obvious problems with shifting gears; at first they will shift very poorly, and then stop shifting altogether. Along the way, severe wear of the synchronizer blocking rings will occur.
Stroke adjustment
Need for adjustment
Adjustment of the pusher pitch in the clutch slave cylinder is carried out to ensure that the clutch performs its tasks correctly. If the adjustment is incorrect, two types of problems can occur.
Video of clutch adjustment UAZ Patriot
In the first case, incomplete pressing of the pressure plate against the driven one may occur. This happens when the free play of the rod is completely absent or it is less than normal. In this case, clutch slipping will occur, which will inevitably lead to wear of the components.
In another case, when the free play is greater than necessary, a phenomenon such as incomplete disengagement of the clutch will be observed. In this case, the driver of the SUV will experience problems with shifting gears, they will turn on poorly, or stop turning on completely. This entails increased wear on the synchronizer blocking rings.
At this point we should summarize and note that it is very important to monitor the serviceability of the clutch and add brake fluid to the reservoir on time.
A clutch malfunction on a UAZ Patriot SUV can have serious consequences.
We recommend that you begin adjusting the cylinder rod pitch by cleaning the threads of the adjusting nuts. To do this, it is necessary to lubricate the threads and nuts with a special lubricant such as WD-40. After this, we proceed to the actual process:
One key secures the adjusting nut on this element, and the second one loosens the lock nut.
Using a hand vice or an “8” wrench, it is necessary to clamp the end of the pusher from turning it. When the rod is fixed, it is necessary to unscrew the locknut a few turns back.
After this, the free pitch is adjusted, bringing it to normal.
The locknut returns to its original position and fixes the stroke of the rod.
At the end of the work, it is necessary to check the presence of a free step. If it is within the normalized range, then everything was done correctly. This process is not labor-intensive and can be done with your own hands at no extra cost.
Sometimes it is necessary to adjust the UAZ clutch, which consists of changing the position of the clutch pedal. For this purpose, the main cylinder has an adjustment unit.
Adjusting the full travel of the UAZ clutch pedal.
The position of the clutch release pedal and its full travel is regulated by changing the length of the pusher of the clutch master cylinder. To do this, loosen the nut of the pusher adjustment unit, disconnect the pusher fork from the pedal and turn it in the desired direction to achieve the required result.
The full pedal travel for clutching with a diaphragm-type pressure spring must be within:
— For cars of the UAZ-3160 and UAZ-3162 family: 130-170 millimeters.
— For cars of the UAZ Patriot family until 2007: 130-170 millimeters.
— For cars of the UAZ Patriot family after 2007: 120-140 millimeters.
— For cars of the UAZ-3741, 3962, 3909, 2206, 3303 family of carriage layout: 180-220 millimeters.
And for UAZ vehicles with clutches with pressure springs and release levers -165-205 mm. More precisely, the amount of free play of the clutch pedal can be clarified in the operating manual for a specific vehicle.
Adjusting the free play of the clutch pedal UAZ.
The free travel of the clutch pedal with a diaphragm-type pressure spring in the range of 5-30 mm is ensured by the clutch design itself and is not adjustable. Adjusting the free travel of the clutch release pedal with pressure springs and pull-out levers, which can be installed on some UAZ vehicles with a UMZ-421 engine, is done by changing the length of the working cylinder pusher in the following order:
- disconnect the spring from the clutch release fork and loosen the lock nut, - by tightening or unscrewing the screwed part of the pusher, set the free play of the outer end of the clutch release fork within 2.5-3.6 mm, which will correspond to the free travel of the clutch release pedal within 35-55 mm.
Adjusting the clutch pedal contact sensor on a UAZ with ZMZ-409 Euro-3 and Euro-4 engines.
On UAZ vehicles with ZMZ-409 engines of Euro-3 and Euro-4 environmental class, a clutch pedal contact sensor (switch) 21.3720 is installed. Based on its signal, the electronic engine control unit determines whether the clutch is depressed or not.
When the clutch is depressed, the control unit briefly reduces the dose of injected fuel, thereby reducing the likelihood of jerks when changing gears. If there is no signal from the contact sensor, due to its malfunction or incorrect adjustment, jerking may occur when shifting gears.
The contact sensor (switch) of the clutch pedal is adjusted using two nuts so that a gap of 0.5 mm is provided between the buffer and the sensor rod. On UAZ cargo-passenger vehicles of carriage layout with ZMZ-4091 and ZMZ-40911 engines, the clutch pedal switch may not be installed.
Clutch master cylinder repair kit
The quality of UAZ clutch cylinders leaves much to be desired. Some car enthusiasts converted them to VAZ cars, which are more reliable. I also refused to use repair kits, since there are no fewer problems with them. Given the low cost of repairs, the service life of the repaired GVC was from a month to six months.
To replace cuffs:
- unscrew the main fitting;
- remove the retaining ring;
- push the cuff with the piston towards the stopper;
- wipe all parts and the inside of the cylinder with a clean cloth;
- make sure his mirror is not scratched;
GCS assembly
- replace the ring cuff;
- on the stopper side, put the piston in place and install the stopper;
- on the side of the fitting, place a plate and 2 cuffs;
- insert the spring and tighten the fitting by squeezing.
Which one is better to put
On the VAZ 2101 it is necessary to install a hydraulic clutch designed for the VAZ 2101–07. Cylinders designed to work in UAZ, GAZ and AZLK vehicles are not suitable for installation on a “penny” car. The situation is similar with imported analogues. It will be quite problematic to introduce a GVC from any foreign car, which is due to different mounting of the unit, different threads and tube configuration. However, a hydraulic drive from a VAZ 2121 or from a Niva-Chevrolet is suitable for the “classic”.
Manufacturer's choice
Today there are many companies that manufacture clutch master cylinders. However, when choosing and purchasing the unit in question, preference should be given to the following manufacturers:
- JSC AvtoVAZ;
- Brick LLC;
- Kedr LLC;
- Fenox;
- ATE;
- TRIALLI.
When choosing GVCs, it is better to give preference to well-known manufacturers
The average cost of a hydraulic clutch is 500–800 rubles. However, there are products that cost about 1,700 rubles, for example, cylinders from ATE.
| Manufacturer, country | Trademark | Cost, rub. | Reviews |
| Russia, Tolyatti | AvtoVAZ | 625 | Original GVCs are made with high quality and are more expensive than analogues |
| Belarus | Fenox | 510 | Original GVCs are inexpensive, made with high quality, and are popular among drivers |
| Russia, Miass | Brick Basalt | 490 | Improved design: the absence of a technological plug at the end of the cylinder and the presence of an anti-vacuum cuff increases the reliability of the product |
| Germany | AND THOSE | 1740 | The originals are of the highest quality. The price is tied to the EURO exchange rate |
| Germany | HORT | 1680 | Original GCS are reliable and durable in operation. The price is tied to the EURO exchange rate |
| Russia, Miass | Cedar | 540 | The original GVCs do not cause any particular complaints |
Instructions for adjusting the free pitch of the rod on a UAZ
Adjusting the rod pitch yourself must begin with completely cleaning the threads of the so-called adjusting nuts. To do this, as many have already guessed, you will need to lubricate the nuts and their threads with a special lubricant; WD-40 is perfect for this purpose. And after thorough lubrication, you can begin the adjustment process on the UAZ Patriot:
- The adjusting nut should be fixed with one key, and the lock nut should be loosened with the second key.
- Next, we will use an 8 key or hand cleats. The end of the pusher must be fixed so that it does not rotate. When the rod is properly secured, you need to unscrew the locknut a few turns.
- At this stage, you can adjust the pitch and bring it back to normal.
- The locknut must be returned to its original position and the stroke of the rod must be fixed.
When the job is finished, be sure to check for free play. If, according to the measurement, it is within the normal range, then you did everything right. As you can see, adjusting the clutch cylinder on the popular UAZ Patriot in our country is not at all difficult and requires a minimum of tools.
Replacing the clutch master cylinder
Prepare keys for 12 and 13, pliers and a screwdriver. Before starting replacement work, pump out any remaining DOT from the reservoir.
- loosen the clamp with a screwdriver and disconnect the tube from the tank;
- Using pliers, remove the cotter pin from the pin in the pusher fork and remove it;
- unscrew the cylinder mounting nuts;
- unscrew the line pipe;
- remove the part.
GCS piston with plate and fungus
To remove the main clutch you will have to sweat because of the inconvenience
You can unscrew the tube onto the working cylinder at the end
After replacing with a new one, do not screw the outlet tube until liquid flows out of the hole.
How to check free play on a Patriot
You can check the free play of the rod in the clutch system of a domestic SUV using the instructions below:
- There is a so-called tension spring on the rod, and it should be removed. To do this, you will need to disconnect the fastener that secures the fork to the spring, and then disconnect the spring from the cylinder.
- At this stage of the test, you will need a ruler, with its help you need to measure the free current stroke of the rod. In order for the measurement to be correct, the ruler must be placed correctly. Next, you must press the fork all the way with your hand and, at the same time, put a corresponding mark on the ruler. Then release the fork and make another mark. If the measured distance, which is the free play, exceeds the norm by 1-3mm, then adjustment is definitely required.
When you managed to identify the free play of the rod in the car’s clutch system itself, then only adjustment is required, and not, as many believe, replacement of the master cylinder.
Cooling system UAZ Patriot 409 engine
Output of UAZ Patriot breathers
Repair
If the clutch pedal fails, in order to avoid unreasonable disassembly of the cylinder, it is worth initially bleeding the system and expelling any air that could get in when the fluid in the tank drops below the minimum permissible level. If this does not help, you should start repairing. For this case, there is a repair kit for the clutch master cylinder on sale, which, depending on the make of the car, contains the main wearing parts: cuffs, return spring, rod, retaining ring, etc.
Disassembling the main circulation pump 1. Remove the cover 7 and the mesh filter 8 of the filling tank. Remove any remaining fluid from the cylinder by turning it upside down and pressing the piston pusher 13 several times. 2. Remove the protective cap 14 from the cylinder body 5 and slide it along the pusher 13. 3. Remove the retaining ring 16 and remove the pusher 13 with thrust washer 15 from the body 5. 4. Remove piston 2 with sealing lips and return spring 6 from the body. To avoid damage to the sealing collars, when removing the piston, supply compressed air into the hole for fitting 21. Fittings 20 and 10 of the main cylinder with gaskets should not be unscrewed during disassembly if there is no leakage of working fluid through them.
When repairing the clutch master cylinder, you need to follow some tips : - when repairing the cylinder, you don’t have to completely remove the fluid from the hydraulic drive; — it is not recommended in kerosene, diesel fuel or gasoline, after which the cuffs and other rubber products may swell; the best option for washing is brake fluid; — before assembly, all parts must be lubricated with brake fluid; only the spherical surface of the rod in contact with the pusher needs to be treated with grease.
If faults are found that cannot be eliminated with the spare parts contained in the repair kit, then a complete replacement of the clutch master cylinder is necessary.
Since my UAZ 3303 was produced in 1989, in stores I always asked for the old-style clutch master cylinder. However, it is similar for UAZ “loaf” and its modifications, for example, UAZ 3741, UAZ “farmer”, 3909, etc.
What does it take to bleed the brake master cylinder?
Before starting work, you should determine the purpose for which the procedure is being carried out. It helps remove air from the hydraulic system. The reasons for the formation of air in the system include:
- any intervention (for example, during repairs) in the brake system; caliper overhaul;
- depressurization of the system during repairs;
- damage to hoses;
- replacing the brake fluid and reducing it to the minimum level in the brake cylinder;
- reuse of liquid.
Excess air can be detected when braking. Vehicles will be characterized by a sharp stop with increased braking. Pressing the brake pedal will be “soft” with increased travel. If you notice such “behavior” in your vehicle, you should urgently pump it - it is not safe to drive a car in this condition.
Bleeding involves removing air from hoses, calipers and tanks. Actually, it is necessary for the brakes to work smoothly. If there is air in the master brake cylinder, or it has been replaced, then it must be bled first.
What will you need?
Those who have had to pump the GTZ know that it is difficult to do it alone. It is indeed inconvenient to carry out bleeding on your own, so I advise you to involve an assistant in this matter, whose main task will be to press the brake pedal. You will also need automotive tools (spanners, including a bleeder wrench), fresh brake fluid and a hose.
Before you begin, I always recommend checking for damage to the hoses and tubes. If there are any, you should first replace them and then continue. Repairing a car with your own hands requires certain skills and abilities, but it is much cheaper than service stations, the main thing is to know a few rules and follow the algorithm. In order for pumping to be carried out correctly and successfully, it should be done according to a certain algorithm.
Bleeding instructions
- I check the fluid level in the tank (it should be at the maximum level), top up if necessary.
- I'm removing the plug. I insert a screwdriver between the piston and the plate to unlock the pressure regulator. I secure the plug so that air does not flow back. I clean the valve from dirt.
- I loosen the front nut of the fitting in the main brake cylinder with a metal tube. The main thing is not to completely unscrew the nut.
- I put unnecessary fabric or rags under the fitting - liquid will flow onto them.
Alternatively, you can use a transparent bottle (any utensil) with liquid. Then the escaping air bubbles will be visible. - I give the go-ahead to the assistant sitting in the cab, after which he smoothly presses the brake. When you press the pedal sharply and quickly, the brake fluid in the cylinder whips into foam, small air bubbles are formed, which will take a very long time to come to the surface. That is, it is practically impossible to expel such air.
- I unscrew the union nut until the fluid begins to leak. A little liquid comes out of the fitting along with bubbles that shouldn't be there. The pedal will drop a little.
- I tighten the nut and give the assistant the command to slowly release the pedal. If you do not release it smoothly, a vacuum will form in the cylinder.
- I repeat this sequence several times until air bubbles stop coming out. The time interval between procedures should be about 20 seconds. Since during this time the air bubbles will rise up, and when you press the pedal, they will immediately come out through the fitting. Only after the liquid begins to flow out is the GTZ considered to be pumped.
- I carry out the same procedure with the rear nut of the fitting.
I would also like to give some tips that it is advisable to follow for a successful procedure:
It is important to ensure that the liquid in the tank does not run out. If the indicator approaches the minimum value, it should be topped up
Before you start pumping the liquid, there should be at least half of it. After removing air from the main brake cylinder, you should begin bleeding the working cylinders. You should use the brake fluid that is already poured into the system, or the one recommended by the manufacturer if you do not know which one is filled. Another option is possible: drain the one that is in the tank and pour a new one. Otherwise, serious problems may arise in the further operation of the system. You should also check to see if there are leaks anywhere. There is no need to start the engine. ABS, if installed on a car, should be disabled.
Adjusting mechanisms
Parameters after adjustment
It is generally accepted that correct adjustment of the clutch can ensure its greatest reliability . First, you need to measure the amount of free play at the drive pedal, which disengages the clutch. If the clutch has a diaphragm spring, then the recommended value should be in the range from 5 to 30 mm. After pressing the pedal all the way, it is necessary to measure its full stroke, the recommended value of which should be approximately 16.5 centimeters. This size can be determined using an ordinary ruler.
If it is necessary to change the position of the pedal, we adjust the length of the pusher, which is located in the master cylinder. This adjustment is carried out as follows: unscrew the lock nut with a wrench, begin to rotate the rods, using pliers. This way, the desired pedal position is established, which will be more convenient. Ideally, a 13 key can be used for this operation.
It should be noted that the clutch with a diaphragm spring does not need to adjust the release mechanism, since the spring itself can provide optimal values. In other words, adjusting the clutch of the UAZ 469, UAZ loaf and UAZ Patriot will not be difficult. Clutch baskets can be purchased at specialized stores.
Adjustment Guide
The mechanical principle of the clutch is driven by a cable. By adjusting the cable, the pedal stroke length is adjusted. So:
- We find the corresponding cable under the hood, at its end we see a bolt with lock nut 1. Turn the adjusting nut 2 and set the free travel distance of the pedal to 13 cm.
To increase the length of the idle stroke of the pedal, the nut must be tightened, and, accordingly, to reduce the length of the idle stroke of the pedal - unscrew. - After adjusting the pedal distance, you need to press and release the pedal three times. Then, again measure the distance from the floor to the pedal. If the distance has changed, we adjust it again so that the distance is 12-13 centimes.
Setting the hydraulic clutch drive
The main problem in hydraulic systems is the formation of an air lock. The method for adjusting the clutch hydraulic drive is to set the required clearances between the rod and the piston of the master cylinder. The required distance between the friction ring of the pressure plate and the release bearing is also set.
Work order:
- Remove the spring from the master cylinder bracket and fork.
- Measure the gap between the pusher and the release fork. The normal distance is 5 mm.
- Turn the adjusting nut on the rod and set the gap to 5 mm. 5 mm is the gap, that is, it is the free play of the fork.
There are drives of a different principle of operation, but in cars either hydraulic or mechanical clutch drives are installed. On VAZ 2101, 2102, 2103, 2104, 2105, 2106, 2107 cars there is a hydraulic clutch drive. On VAZ 2108, 2109, 21099, 2110, 2111, 2112, 2113, 2114, 2115 cars there is a mechanical drive.
Causes of wear
Clutch replacement occurs in the following cases:
- Wear due to slipping when starting off,
- discrepancy between engine speed and driving speed as a result of clutch wear,
- The car jerks when starting off.
In the first case, the car does not have enough torque to start moving. When the speed is turned on, sufficient speed is maintained, but the car does not start to move. In such situations, the clutch linings wear out.
The latter case is associated with weakening of the damper springs on the clutch disc. Weak springs do not absorb shocks. This malfunction is aggravated by frequent off-road driving and when replacing standard wheels with larger wheels.
Source
The need for the unit and types
Clutch disc for Patriot
The clutch must always be engaged. It is used only for stopping completely, starting to move, and changing gears. The resource of the release lever will be reduced if you keep your foot on the clutch pedal all the time. Sometimes it is partially squeezed out, then the brake discs become unusable.
The box is an engine, the wheels are automatically separated from each other. The clutch facilitates the disconnection of the motor from the box, and then a uniform connection.
- mechanical;
- hydraulic;
- galvanic;
- drive in combination.
- dry;
- moist (in an oily sphere).
Number of driven disks:
Placement of spring releases:
- cylindrical springs are located at the edges of the pressure disk;
- central diaphragm spring.
- flywheel;
- driven disk;
- disk compression springs to the flywheel;
- switches;
- hydraulic pressure coupling;
- accelerator pin;
- the pedal itself;
- pressure disk;
- release lever;
- release (thrust) ball bearing;
- original box shaft.