With the beginning of winter, especially snowy ones, problems associated with movement appear.
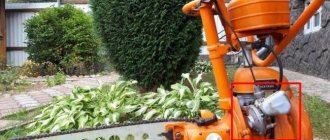
Few people know that a snowmobile can be constructed from available materials as an alternative means of transportation in winter conditions. At the same time, there is no need for serious expenses. Moreover, if there is a lot of snow, you won’t be able to get far by car, but a snowmobile will allow you to move in such conditions without any problems.
Choosing a chainsaw
In retail outlets you can find several models of chainsaws. The most popular of them are the Druzhba chainsaw, the Ural chainsaw and the Shtil chainsaw. Before choosing, you should think carefully by comparing their technical characteristics.
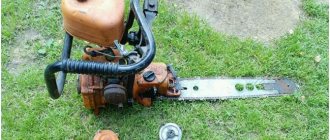
Chainsaw "Friendship"
This is the simplest chainsaw that can be used as an engine for a snowmobile. The result is a simple design without anything superfluous.
The only drawback is the heavy weight with relatively low power. In addition, the structure does not have parts for attaching safety covers. In addition, this design is outdated in all respects.
Specifications:
- Power – 1 kW;
- Weight – 12 kg;
- Engine (two-stroke);
- Tire length – 45 cm;
- Fuel (gasoline).
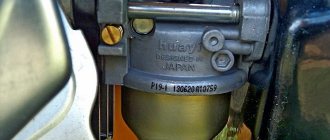
Chainsaw "Ural"
This is a specialized model that has greater reliability, power and less weight in relation to power. This is an environmentally friendly unit capable of operating in extreme conditions.
If you decide to use a Ural chainsaw, then this is a good choice. Its technical characteristics fully correspond to those stated.
Specifications.
- Power – 3.68 kW;
- Weight – 11.7 kg;
- Engine (gasoline two-stroke);
- Overall dimensions – 46x88x46 cm;
Chainsaw "Calm"
It is also suitable for creating a snowmobile with your own hands. This is an environmentally friendly device, absolutely harmless to humans. The main advantage of the chainsaw is its light weight and quiet operation, compared to the Ural chainsaw, and even more so when compared to the Druzhba chainsaw.
Calculation and assembly of caterpillars
Do-it-yourself homemade snowmobile from a walk-behind tractor: homemade video
The caterpillar is a tape, on the outer surface of which the tracks are attached. Tracks are rigid lugs installed along the entire length of the tracks. Track options:
- Made from 3mm thick transport tape.
- From a car tire.
- From V-belts.
- Ready-made factory-made tracks.
The conveyor belt must be looped. Its strength is only sufficient for light snowmobiles with engines no more powerful than 10 liters. With. Car tires are stronger than tape and are suitable for powerful engines. Solid tires do not need to be looped, so the likelihood of a rupture is minimal. It is more difficult to choose a tire of the required length than a tape.
Finished tracks are removed from other similar equipment (snowmobiles “Buran”, “Sherkhan”). They are equipped with lugs from the factory. The products are not suitable for use with low-power motors from walk-behind tractors. Homemade snowmobiles made from Buranovsky tracks must have gears from the same “donor”.
The size of the caterpillar is selected according to the required driving characteristics: the larger the width, the lower the handling, but the higher the maneuverability. The minimum area of the contact patch from the snowmobile (skis and tracks) must be such that the pressure from the equipped vehicle does not exceed 0.4 kg/cm2 of surface. Light snowmobiles use a 300 mm wide conveyor belt, cut lengthwise into 2 strips of 150 mm each.
Preparing the Tape
The tracks are attached to homemade tracks with M6 bolts with a wide head. The bolts are fixed with a nut, a washer and a groover are used. Before fastening, leading holes with a diameter of 6 mm are drilled in the tape and tracks. When drilling, use a jig and wood drills with special sharpening.
The conveyor belt is also looped with M6 bolts. To do this, the edges of the tapes are overlapped with an overlap of 3-5 cm, the connection contains 1-2 rows of bolts. For a 150 mm wide track, the following distances are maintained:
- From the edge of the tape 15-20 mm.
- Between bolts on tracks 100-120 mm.
- Between the bolts when banding 25-30 mm.
Homemade lugs
The tracks are made of polyethylene pipe with a diameter of 40 mm with a wall thickness of 5 mm, sawn in half in the longitudinal direction. The entire section of the lug is adjacent to the tape. In light snowmobiles, one track connects the tracked pair. With a track width of 150 mm, the track length is 450-500 mm.
The lugs are cut using a wood circular saw. They use a special machine with two guides (metal and wood), rigidly fixed on a fixed tabletop. The walls of the pipes are sawed one by one.
The distance between the tracks depends on the parameters of the gears on the drive shaft. Typically 5−7 cm. The specified distance is maintained with an error of no more than 3 mm. Otherwise, the operation of the drive is disrupted: the lugs “run” onto the teeth of the drive wheels, the caterpillar begins to slip and fly off the rollers.
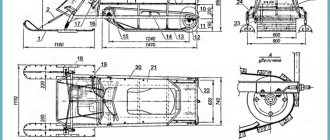
Scheme for making a snowmobile from a Ural chainsaw with your own hands
Schemes for assembling a snowmobile from a Ural chainsaw: 1 – steering wheel; 2 – fuel tank (from the Druzhba chainsaw; 3 – power unit (from the Ural chainsaw); 4 – steering ski stand bushing (pipe with a diameter of 30-2 pcs.); 5 – steering ski (2 pcs.); 6 – caterpillar drive gear (nylon, sheet s15, 2 pcs.); 7 – caterpillar (from the Buran snowmobile, shortened); 8 – frame; 9 – support roller (from potato sorting, 18 pcs.); 10 – strut backrest limiter (pipe ½); 11 – caterpillar tensioner (2 pcs.); 12 – caterpillar tension gear (nylon, sheet s15, 2 pcs.); 13 – bearing No. 80204 in the housing (4 pcs.); 14 – trunk box, bottom plywood s4, sides board s20); 15 – seat (cover-plywood s4, foam rubber, leatherette); 16 – 1st stage of chain transmission; 17 – 2nd stage of chain transmission; 18 – seat backrest limiter (½ inch pipe); 19 – driven sprocket of the 1st chain drive (large sprocket of the creeper, intermediate shaft); z=38; 20 – drive sprocket of the 2nd stage of the chain drive (small creeper sprocket), z10; 21 – driven sprocket of the 2nd degree of chain transmission (drive sprocket of the track drive shaft), z18; 22 – drive sprocket of the 1st stage of the chain drive (gearbox output shaft sprocket), z12; 23 – steering knuckle lever; 24 – steering rod (2 pcs.); 25 – steering shaft with bipod; 26 – front axle beam (pipe with a diameter of 30); 27 – caterpillar drive shaft; 28 – tension axis of the caterpillar.
Without creating a diagram and drawing, it is unlikely that it will be possible to connect together the main units of the structure, such as:
- Engine;
- Transmission;
- Skis and tracks.
To simplify the design process, you should take a caterpillar from the Buran all-terrain vehicle. If a children's version is being designed, then skis will be enough.
Racks
Steering ski : 1 – runner (nylon, sheet s20, from a children's snow scooter); 2 – spring (normally stretched, from the rear shock absorber of the moped); 3 – spring support; 4 – undercut (duralumin corner 20x20); 5 – spring cover (angle 35x35); 6 – fastening the spring to the cover (M8 bolt with washer); 7 – support lever (pipe 30x30); 8 – spring for fastening the rack-fork to the ski lever (steel, sheet s2); 9 – spring for attaching the support lever to the ski (steel, sheet s2); 10 – axles (M8 bolt, 2 pcs.); 11 – steering knuckle stand (bicycle steering stand with crown and part of the fork); 12 – steering bipod (steel, sheet s4); 13 – fastening of the steering bipod (type M16); 14 – fastening the spring bearing and the lever spring to the ski (M5 bolt with a countersunk head, 7 pcs.); 15 – lever bushing (steel pipe with a diameter of 30 mm); 16 – plain bearing (nylon bushing, 2 pcs.); 17 – stand bushing (steel pipe with a diameter of 30 mm). In the top view, parts 11, 12, 13 of the steering knuckle are not shown.
Snowmobile racks can be made from 3x3 cm corners. They are connected to each other by steel jumpers. As a result, there is a relatively small portal. To create a platform, you need to take a sheet 2 mm thick and connect it to the portal and the middle of the right side of the vehicle elements. This platform will serve as a mounting location for the chainsaw gearbox and the chain drive shaft.
On part of the rear portal and the middle of the snowmobile, a small space should be created for the seat structure.
The front part of the frame and the front axle crossmember are connected by means of a beam. The beam is an ordinary water pipe with a diameter of 1.5 cm. At the end of this pipe, steering ski bushings are attached by welding, and a stand is installed in the center. The stand will serve as a support for the engine subframe.
Particular attention should be paid to the mounting points of the racks. For greater reliability, the attachment points are reinforced with steel gussets, 2 mm thick. This approach will strengthen the vehicle and make it more reliable and durable.
Caterpillar
Snowmobile frame with tracked block : 1 – rear part of the spar (steel sheet s2, with flanges, 2 pcs.); 2 – tension device (4 pcs.); 3 – rear portal (corner 30x30); 4 – middle part of the spar (angle 50x63, 2 pcs.); 5 – bracket-fork for installing the axis of the road wheels (steel sheet s2, 10 pcs.); 6 – middle portal (corner 30x30); 7 – platform for mounting the power unit gearbox and the intermediate speed reducer shaft (steel sheet s2); 8 – scarves (steel sheet s2, 4 pcs.); 9 – front portal (corner 30x30); 10 – front component of the spar (steel sheet s2 with flanges); 11 – axis of tension gears; 12 – caterpillar tension gear (2 pcs.); 13 – axis of road wheels (steel, circle 10, 5 pcs.); 14 – axle fastening (M10 nut and spring washer, 20 pcs.); 15 – spacer bushing (duralumin pipe); 16 – roller (18 pcs.); 17 – bearing unit (4 pcs.); 18 – caterpillar drive gear (2 pcs.); 19 – caterpillar drive shaft; 20 – drive sprocket of the drive shaft (driven sprocket of the 2nd degree of chain transmission), z=18; 21 – steering knuckle bushing (pipe with a diameter of 30 mm, 2 pcs.); 22 – front axle beam (pipe with a diameter of 30 mm); 23 – scarves, 4 pcs.; 24 – engine stand (pipe with a diameter of 30 mm); 25 – roller tire (rubber ring, 18 pcs.).
To assemble a mini-version of the snowmobile, you can take the tracks from the old Buran and modify it, shortening it by almost a whole meter. Gears can be made from a sheet of nylon, 1.5 cm thick.
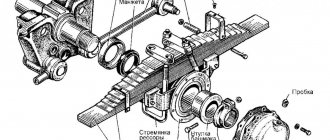
Drive shaft
Caterpillar drive shaft (tension shaft is the same, only position 4, replaced by position 1) : 1 – left (along the way) tip (steel, cylinder 22); 2 – shaft (steel pipe 0.28x20; 3 – flange for fastening the gear to the shaft (steel sheet s4, 2 pcs.); 4 – right (along the way) shaft tip (steel, cylinder 29); 5 – track drive gear (2 pcs.); 6 – frame spar, 2 pcs.); 7 – bearing housing cover (steel, 2 pcs.); 8 – bearing 80204 (2 pcs.); 9 – bearing housing (steel, 2 pcs.); 10 – drive shaft sprocket; 11 – fastening the sprocket to the shaft (M12 nut with wide and spring washers); 12 – key (steel 20); 13 – seal (felt, 2 pcs.); 14 – fastening the bearing housing to the spar (M6 bolt, with 4 sets of screwdriver); 15 – fastening the bearing housing to the spar (M6 bolt with spring washer, 4 sets).
The drive shaft is made of a steel pipe with a diameter of 1.4 cm. Special flanges are attached to the shaft, to which gears are attached. Trunnion tips are mounted at the end of the drive shaft by welding. The journals must have space for installing bearings.
Step-by-step instruction
The manufacturing diagram and drawings greatly simplify the process of making a snowmobile yourself. But if you understand how the power plant, track, skis and transmission need to be connected, then you can operate without these applications. By the way, it’s quite possible to assemble a children’s mini-snowmobile in an intuitive way from a bicycle, snow scooter or sled. The schematic diagram for making a homemade snow scooter consists of 4 main stages.
At the first stage the front skis are created , after which the master decides how he will secure them. At the second stage , methods of transfer to the wheel are organized . to weld the support frame for the vehicle , and finally - at the fourth stage - install all the attachments.
Before starting work, you should definitely stock up on polished metal corners, spacers with ties, plywood and steel sheets, as well as clamps and bolt fasteners.
Engine
This unit is considered the most critical mechanism of a snowmobile. Compared to other structural elements, such as a tire or chain, the engine must work properly and without it the snowmobile will not even move. Therefore, the long-term performance of the device will depend on the reliable and trouble-free operation of the engine. If you want to install an engine from an imported chainsaw, you can purchase a used Shtil.
Another important design element on which the trouble-free operation of a snowmobile depends is the gearbox.
Asterisks
Immediately noticeable is the fact that the right tip has a keyway for installing and securing the chain sprocket. This is the track shaft sprocket, which is securely fastened with a nut. To make fastening possible, a corresponding thread is cut on the tip.
The tip of the tension shaft has the same overall dimensions, and the fastening of the structural elements is carried out similarly to the fastening of the track shaft sprocket.
The first gear stage should have a sprocket with the highest gear ratio (number of teeth). The Ural chainsaw engine has 38 teeth.
Steering
On a homemade device, you can install a handlebar of any design, even a bicycle. In this case, it is very important to put manual control of engine speed on the steering wheel. In order not to bother too much, it is better to use a steering wheel from a moped, scooter, etc., which already has a mechanism for controlling engine power. This will make the design more reliable and easier to manage.
Principle, device diagram, theory, how everything should work out
All work begins with a plan and drawings, which can then be relied upon. Diagrams and drawings will be required in order to take into account all the components and their location, the relationship between each other and the operation of the mechanism as a whole. Pay close attention to the location of each unit, as if you make a mistake, the snowmobile simply will not move.
Work plan:
- First, the chainsaw motor is attached to the made frame.
- Skis are installed in the steering part of the snow scooter, which are the main element of movement.
- Then the steering is installed.
- To set the mechanism in motion, it is necessary to install tracks at the rear.
- Connect the track disk and the chainsaw motor sprocket.
- Finally, the driver’s seat is installed, which is mounted on a specially equipped place.
The main goal is to save money, so it is not necessary to buy all parts of the structure. You can do many of the details yourself. Craftsmen recommend using tracks and skis from the Soviet Buran snowmobile.
To equip the steering on a snowmobile, borrow the handlebars from a moped or bicycle. The main task will be to properly secure the steering wheel so that when you turn, the skis also turn.
Tips for use
It’s worth immediately noting that a homemade design, no matter what it is, is unlikely to be registered (legalized) with the relevant authorities. And therefore:
- According to the law, a homemade snowmobile does not belong to the category of vehicles. Therefore, its further use, as well as responsibility for the consequences, rests solely with the person who made it. It is better if it is operated somewhere in the outback and does not come to the attention of the relevant services.
- A snowmobile and an amphibious all-terrain vehicle are completely different vehicles, although they have certain similarities.
- Since the engine has low power, it is not advisable to transport cargo with this vehicle. It's better to travel alone.
- To travel at night, you can install lighting (headlights) on your snowmobile. This will increase the functionality of the device and comfort when moving.
Reviews
* Mikhail 54 noticed that this type of transport is very convenient and most importantly (for him) not expensive. With a minimum supply of spare parts, you can make a quite decent model with your own hands, which can reach a speed of 30-35 km/h according to the navigator; * Klim did not at all expect that he would be able to build such a beautiful unit himself. And I didn’t even spend a lot of time on it. In just a couple of weekends everything was ready. Therefore, he has already fully prepared for the coming winter; * Khukutuh advised to stud the wheel from the inside with self-tapping screws, and to lay a thick-walled rubber gasket between the very surface of the tube and the tire; * Vlad 1978 was most captivated by the lightness, compactness and maintainability of the homemade snowmobile. Since it was precisely these moments that did not suit him in the existing transport; * Boa constrictor supported the topic and said that it is most relevant now. Because it is necessary to travel short distances in rural areas. And even in snowy winters. But he does not have the opportunity to buy an SUV, and is unlikely to have one.
One hundred percent of the reviews about creating a snowmobile from a chainsaw are positive. There was not a single person who would not be happy with such a homemade product. In just a few days, with a minimal set of spare parts, a man can create an excellent vehicle for traveling through the harsh snowy expanses of the country.
Components
Particular attention should be paid to the constituent parts
The engine is the most important part of the mechanism and is selected with special attention. Its condition must not only be working, but it itself must be installed after maintenance.
The gearbox must also be in good condition
Its condition must not only be working, but it itself must be installed after maintenance. The gearbox must also be in good condition
The engine is the most important part of the mechanism and is selected with special attention. Its condition must not only be working, but it itself must be installed after maintenance. The gearbox must also be in good condition
The gearbox must also be in good condition.
Sprockets are elements for transmitting translational motion from the engine. You need to create a tip on the right that is longer than on the left.
The steering is suitable for a scooter, moped or bicycle. The most important thing is to connect the engine to the steering part correctly.
The brake system is not provided for in the presented diagrams, but it can be made. However, first think about whether it’s worth racking your brains over this, because motor sleighs do not develop high speeds.
Why do you need a drawing?
Assembling a snowmobile begins with a plan, that is, with a drawing.
It is recommended to do it yourself, taking into account the non-standard and unique nature of the planned man-made mobile vehicle. Here it is necessary to remember that this working diagram is needed for internal use, therefore the level of drawing art does not matter, but the main thing is how clearly the plan will be embodied in the diagram. When drawing up a drawing, it is important to take into account the weight of the structure: the lighter the snowmobile, the higher it will be cross-country ability
Frame
According to an individual drawing, the frame is welded in the form required for this version of a homemade snowmobile. Wooden bars or metal pipes are used as the starting material. The easiest way is to make a wooden frame. Its main advantages are that it is easy to repair in the field (there is a lot of wood around), and it holds the car well on ice. The metal frame is welded from pipes of a certain square section, the size of which depends on the load. Its advantage is that it is a stronger and more durable structure than a wooden one. As always, there is a ready-made option - take a frame from a moped.
Track assembly
After making the frame, they begin to create tracks, consisting of tracks and rigid hooks installed along their entire length. Caterpillars can be made from conveyor belts or car tires. You can use ready-made industrial tracks. An advantage of purchasing ready-made tracks may be their special regional purpose, where climate, terrain and travel conditions are taken into account.
Wheels are installed inside the homemade tracks. With their help, the tracks on which the lugs (or simply hooks) are located rotate.
A common option for their manufacture is plastic pipes. They are cut into pieces
The lugs are attached to the tracks with bolts, and it is important to maintain the same distance between the lugs so that they do not disturb the movement of the caterpillar
The wider the tracks, the more difficult it is to control the vehicle, but the higher the maneuverability becomes. The thickness of the tracks must correspond to the engine power.
Chassis
After the frame and tracks are ready, they begin to assemble the structure with the chassis.
- Using front suspensions, the steering and skis are attached to the frame.
- The steering wheel is often taken from a motorcycle or scooter, but in case of non-standard solutions, it is assembled independently, based on personal preferences and convenience.
- Skis are often used ready-made. Typically, a ski consists of the following parts: base, shock absorber, link leg, fork, its rod and bipod. But there are options for making your own: from plywood, plastic, metal.
- The rear suspension connects the engine to the tracks.
- A motorcycle chain can be used as a drive.
- The fuel tank is chosen based on safety, economy and practicality. The capacity of the container (made of plastic or metal) is determined by considerations of the necessary distances to be overcome.
- The seat is made to order according to individual preferences, since the control of the snowmobile will depend on convenience and comfort. The best choice is a seat made from quality materials.
Drive shaft
It will be tubular type with a diameter of 28 mm. A round flange with holes for the gears should be put on it. Press and weld solid pin tips into the ends of the drive shaft. The latter must be machined for bearings.
It should be noted that the left tip should be slightly shorter than the right one. On the extension, make a keyway to fit the driven sprocket of the second stage of the chain drive. This part is also called the track drive shaft sprocket and is secured with a 14 mm nut. The appropriate thread must first be made on this part.
The dimensions of the tension shaft tips must be the same and fastened similarly to the drive devices.
How good should it be?
The most important element in this device is the engine. All other details, such as a chain or tire, do not play a significant role in the design of such a vehicle, so the main thing is to monitor and control the operation of the motor. If it is in good working order, the snowmobile will always be on the move. If you decide to take the engine from imported chainsaws, you don’t have to purchase a new device under warranty in the store. A used option is also quite suitable.
The only part in a chainsaw that must also be in working order along with the engine is the gearbox. It will also be useful to us in our work.
Factory brands of children's snowmobiles
?Taiga RM Lynx? ? the first Russian-made children's snowmobile. Four-stroke engine with 6.5 hp power. air-cooled is one of the most powerful among similar devices. The maximum speed is limited to 13 km/h. The system has an ignition switch and an emergency stop device. Such vehicles are characterized by ease of control, ergonomics, and stability.
Polaris 120? its powerful four-stroke engine has a volume of 1.9 hp. The independent front suspension has been strengthened. Such vehicles are characterized by a rapid decrease in speed. The snowmobile is popular due to its technical properties, ergonomics, steel shock absorbers and a removable seat with luggage rack.
SnowRunner Max 80? The popularity of this model ensures its small size and ease of operation. The snowmobile is equipped with a four-stroke engine with one cylinder, an air cooling system and a displacement of 80 cm3.
Yamaha SRX 120? Such a vehicle will allow children to feel like adults and get maximum pleasure from entertainment during the winter season. The easy-to-handle children's snowmobile features a smooth motor, automatic clutch, comfortable handle and seat, and adjustable suspension.
Walk-behind tractor base design
You can make a snowmobile from various equipment, for example, a moped, scooter, trimmer, etc. However, the best choice can be considered a walk-behind tractor. Since this unit remains unclaimed in winter, it can be safely taken as the basis for creating a snow scooter. The snowmobile attachment can be made on wheels and this design is simpler. The most difficult thing is to make a snowmobile with your own hands from a walk-behind tractor on tracks. However, it has higher cross-country ability, which can become the main criterion when choosing the type of structure.
It should be remembered that not every walk-behind tractor can be converted into a snowmobile. It is best to use units equipped with:
- Rear towing device.
- Medium-power air-cooled power plant.
The optimal choice can be considered Neva units. They are attractively priced and their engines are assembled in Japan. The design of a self-assembled motor sleigh can be divided into two main parts - the driving and driven ones.
The first category includes the motor from the walk-behind tractor, drive elements and the supporting frame. The driven part consists of:
- Steering column.
- Shock absorbers.
- The chassis, for example, is tracked.
Frame making
You should first study the drawings well. If you wish, you can make a mini snow scooter of your own design, but many people prefer ready-made solutions. To make the frame, you should use iron pipes. To give them the desired shape in accordance with the drawing, you will need a pipe bender. When this work is completed, it is necessary to connect all the frame elements by welding.
The next step is to fabricate the main subframe structure at the front. This is where the power plant and gearbox, for example from a Zhiguli, will be mounted. To solve this problem, a stand with holes for the motor is welded to the frame. The drive chain is installed in a special slot.
Chassis
One or two skis must be attached to the steering column using a swivel joint. It is better to use ready-made shock absorbers for the front suspension, for example, from a motorcycle. You should also decide whether tracks will be used for movement, or whether you plan to make a mini snowmobile on inner tubes. Each of these drive types has not only advantages, but also disadvantages.
The wheeled unit is more maneuverable, but is inferior to the tracked unit in cross-country ability. Tracks can be made independently from various materials, for example, a conveyor belt.
Manufacturing the main elements of a snow blower
It is simply impossible to consider the assembly of a snow blower as a whole. Yes, some parts are already ready and, for example, you can use a power plant from a chainsaw, but the remaining structural elements will have to be made independently, and you will even have to use a welding machine. If you do not have sufficient experience in welding, you will need to find a specialist.
Frame and powertrain design
If you decide to actually assemble a snow blower with your own hands using an old chainsaw, then first of all you need to understand the basics of the frame and power plant design. The frame, as a rule, is assembled independently, and you will need to prepare all the necessary tools and materials in advance. The quality of the frame will determine the operation of all equipment, because all other parts of the snow blower are attached to it.
First of all, you need to find pipes of the same diameter and weld them to each other
Particular attention should be paid to the two longitudinal pipes, which not only serve as one of the parts of the frame, but also represent the runners of the snow blower
That is why the front parts of the pipes must be cut at an angle and the holes welded so that snow does not accumulate there. If this is not done, the snow clogged in the pipe will melt over time, and the humidity will begin to form a corrosion process on the inner walls of the material. Naturally, it is difficult to clean the rust inside the pipe, and, most likely, by the beginning of next winter the entire frame will simply fall apart.
Two sections of pipes are installed longitudinally, and the remaining 2 parts are welded on the frame in a transverse position. Crosstubes are installed at the rear of the frame as they serve as a mounting location for the powertrain. The first pipe is usually installed in the rear position, and the second at a distance of 200 mm. You can choose any distance between two transverse sections of pipes, but it should not exceed 700 mm. The result should be a frame in the shape of the letter “P”, only two longitudinal pipes are installed on the lower part of the structure.
Types of technology
There are many different snow blowers on the market. All variations are divided into several types according to the method of work. Since rotary variations are the most popular, we will consider three classes in this category:
- Rotary auger - used to clear a small area of fresh and compacted snow. This technique is capable of throwing the mass to the sides or collecting it in a snow collector. A self-made auger cleaner has a simple design that takes into account the presence of augers.
Design of the screw-fan unit
- The rotary plow unit is most suitable for removing fresh snow. The homemade device is placed on a mini tractor, mini loader or chassis and is equipped with a plow with 1-2 rotors.
- The rotary milling harvester has capabilities identical to the first option. This is a powerful snow blower with parameters that allow you to overcome three-meter snowdrifts and throw the snow mass at a distance of up to 20 m.
Before you make a snowblower, you need to know that the types in question are equipped with cutters-feeders and a rotor-thrower. This is an important aspect to consider when designing a construction drawing.
Racks
At the next stage, it is necessary to weld 3 racks made of steel angle to the spar. The best option would be corners measuring 30 x 30 mm. They also need to be connected with steel crossbars. This way the structure will form a small portal. Make a platform between its front part and the middle on the right side - weld a 2 mm steel sheet. After this, place the chainsaw gearbox and the intermediate chain drive shaft here.
A box can be installed in the space between the rear portal and its middle part. For what? It will serve as a support for the seat, which must be welded there at the final stage.
The front part of the frame must connect to the front axle crossmember. As a beam, you can use a regular water pipe with a diameter of at least 30 mm.
Weld steering ski bushings to the ends of this pipe. Attach a stand in the middle of the beam that will serve as a motor subframe. All these parts also need to be made from pipe, and at the joints on the posts and beams, gussets from a 2 mm steel sheet should be additionally welded. This way the structure will become strong and, accordingly, reliable.
Now about the propeller, the propeller.
Making it, in general, also does not cause any particular difficulties. There are a lot of video materials on the Internet. Here is the link - https://paraplan.ru/forum/post/658794 Detailed description of the creation.
- The second option is to order on Aliexpress. Price about 2.5 thousand rubles.
- Diameter – 65 cm
- The screw pitch is 21 cm.
- Of all the other options tested, this one turned out to be the most productive.
- The thrust, with the carburetor adjusted, was slightly less than 20 kg.
- This is not enough for paragliding, even “in the horizon”, but on skis: on crusty roads – 40 km/h, on shallow “powder” – 20 km/h, and on a broken track – 30 km/h. According to the GPS navigator.
- Consumption is the same as in the Ural when sawing: 0.8 l/h.
Feel? Not transferable! The unusual thing is that you are not pulled forward, but pushed in the back. It's unusual, but you get used to it quickly.
[custom_ads_shortcode2]
Rework principle
The principle of alteration is very simple and combines the entire range of home-made devices and assemblies. A chainsaw is used as a drive. The unique qualities of the chainsaw motor, capable of operating at very large tilt angles, perhaps not upside down, allows this universal drive to be used in many designs. In the case of using a chainsaw as a drive for a homemade hand-held power tool, most of the parts of the original chainsaw are retained, and only the working part is changed.
Walk-behind tractor from a chainsaw
If, on the basis of a chainsaw, you make a stationary machine or vehicle with your own hands, the alteration becomes deeper. A gearbox, variator or belt drive is added to the design, the fuel tank is replaced with a more capacious one to ensure long-term operation without refueling.