In the modern world, many people have country houses where a lot of manual labor is used. In order to make their life easier, many people decide to buy a mini-tractor. However, such a purchase can hit your budget hard.
In order to avoid this, many decide to make homemade mini-tractors. This will help to significantly reduce labor costs for working in the garden and save money.
Choosing an engine for a homemade tractor
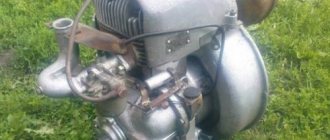
If you decide to assemble a mini tractor with your own hands, then first of all you need to select a power unit for it. The ZID engine is often used as the latter. This is a four-stroke unit with a volume of 0.52 liters. and a power of 4.5 l/s, which is quite suitable for cultivating 2-3 hectares of land. The engine is easy to maintain, so it is often installed on various home-made equipment; moreover, it is easy to buy on the Internet.
Another option for homemade products is the UD-25 engine. This is a two-cylinder unit with a power of about 12 l/s and a volume of 0.42 l. Although this type of motor has long been discontinued, there are a large number of offers on the Internet for the sale of this unit. It can be bought for approximately 5,000 – 8,000 rubles.
Often, when making homemade tractors, craftsmen use motors from cars. For example, you can find mini tractors with an Oka engine.
This engine has a power of 29.3 l/s and a volume of 0.649 l. In fact, this is a VAZ engine (VAZ 21083), only in a lightweight version, since it weighs 2 times less. A distinctive feature of the Oka engine is its low gasoline consumption and high efficiency.
A more expensive option is a Zhiguli engine. The engines of the VAZ car line have an engine power of 59 l/s (VAZ 2101) and higher. A tractor with a VAZ engine is a fairly powerful unit that can cope with almost any agricultural work.
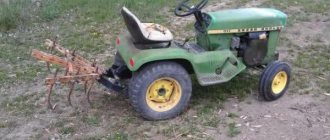
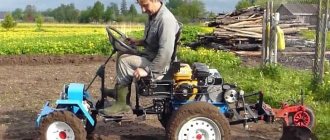
It is easiest for owners of walk-behind tractors to make a mini tractor for the household, since this unit already has all the necessary control units. All that remains is to make a suitable frame, and the tractor is ready.
Model 4x4
A DIY 4x4 mini tractor will be very convenient due to its versatility. It can be used for a wide variety of needs. This is a standard option that will suit everyone. In addition, this will be an ideal option for those who want to make a tractor with all-wheel drive.
What to make a frame from
Assembling a mini tractor always begins with making the frame. The frame of the mini tractor acts as a base on which all components and parts of this unit are fixed. The frame should be strong enough and at the same time not very heavy. It is usually made from a metal angle, a profile pipe or a channel. The parts are connected by welding. The frame can be solid or consist of two parts.
A solid frame is the easiest to make. It is enough to weld a rectangle from a channel or corner. Frame dimensions are calculated based on the dimensions of the engine, gearbox and other components.
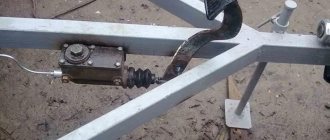
Also among owners of personal plots, 4x4 mini tractors are very popular. These are all-wheel drive mini tractors with a breakable frame. The word “all-wheel drive” means that the unit has both drive axles, front and rear. An example of such a frame, made from channel No. 10, is shown in the following photo.
The frame fracture unit is most often made from the driveshaft of a car, for example, from a GAZ-52.
The main advantage of a homemade tractor with a breakable frame is the small turning radius of the unit. Thanks to its high maneuverability, the fracture minitractor is successfully used in small areas where turning a minitractor with a solid frame would be difficult.
Below are drawings of a frame connected by a hinge.
Technology capabilities
In the agricultural sector, these machines are capable of doing a huge amount of work. Thanks to its maneuverability and the ability to attach additional attachments, the assembled classic 4x4 mini tractor can cope with the following operations with its own hands:
- deep plowing of the soil;
- cultivation to remove weeds;
- harrowing of certain areas;
- implementation of sowing spring field operations of cereal crops;
- planting/harvesting potatoes.
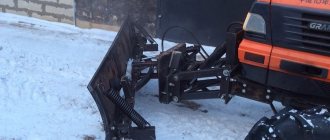
In winter, the fracture mini tractor can also not be parked in the garage, but can be used to clear roads of snow. A trailer is attached to the tow bar, which helps in transporting loads of up to several hundred kg. Owners can even use mini tractors at home to mow lawns.
Technical characteristics of the fracture mini tractor
A mini tractor assembled with your own hands has a number of positive characteristics, including certain savings on purchase costs. The advantages of homemade products include:
- the compact dimensions of the transport ensure its convenient operation even in small areas, and since most farms include small cultivated areas, a DIY assembled mini-tractor will be very appropriate;
- homemade devices with a single-axis drive or with a full drive in the vast majority of cases pay for themselves in one or two seasons, and subsequently allow you to save on components;
- agricultural new products have decent performance indicators that can compete with factory models, since a master can make a mini tractor independently using selected units and components that have a large margin of safety.
Homemade mini tractor fracture (with breakable frame) 4x4
It is worth considering that a homemade 4x4 mini tractor may also have disadvantages. The disadvantages lie in the following factors:
- sometimes the process of searching for the necessary components or individual parts is delayed;
- in the case of using non-standard structural elements, repairs are difficult;
- It will be possible to assemble a homemade 4x4 mini tractor if you have the appropriate set of tools and have the skills to work with them;
- Frequent breakdowns can occur due to the use of old used technical components.
Frame assembly
The frame design is optimal for homemade products assembled in the garage. The key parts for it are the longitudinal spars and a pair of transverse crossmembers. It is preferable to make the spar beams in a three-stage form from a tenth channel, and for traverses a sixteenth square profile at the front and a twelfth at the rear are suitable.
Dimensions of a machine with a breaking frame
During the assembly process, it is important to ensure that the front half-frame can be rotated relative to the rear half-frame at a certain angle. Car hinges from trucks are suitable for this. In most cases, cut driveshafts are used. When folded at an angle, they continue to transmit rotation.
Motor and clutch for fracture mini tractor
After assembling the frame, they begin to install the power unit. It is recommended for cars with a single-axle drive to take engines in the range of 15-30 hp, and for all-wheel drive, the optimal solution would be an engine with a power of 30-40 hp. Preference should be given to water-cooled diesel units. They are quieter in operation than analogues with air removal of excess heat.
Kinematic diagram
As a ready-made solution, engines from walk-behind tractors or old cars can be mounted on the frame. There are drawings where the central place is occupied by power plants from the following models:
- walk-behind tractor "Neva";
- model with walk-behind tractor “Bison”;
- homemade from the Centaur walk-behind tractor, etc.
A minimal exhaust system may involve an empty metal fire extinguisher with metal shavings from a lathe stuffed inside it. If an air-cooled motor is used in the design, then some of the partitions can be eliminated in the lower docking area. It is also important to ensure the presence of mounting holes for fixing the power unit.
Engine UD-2
The next step after installing the engine is installing the transfer case and gearbox. An acceptable option is to choose them from GAZ-53. To ensure a good connection between the clutch and the engine, the flywheel will have to be rebuilt. In such a situation, turning work will be needed.
The back part is cut off, the excess with tides. A hole is bored in the center for a new shaft. The clutch basket cover is optimized in terms of dimensions to the required dimensions.
What to make a chassis from
To assemble a mini tractor, you need to prepare its chassis. It includes wheels, front and rear axles, and transmission elements.
When choosing wheels for a mini tractor, you should take into account the purpose of using the latter. If the unit is being built for transporting and pulling loads, then a disc diameter of 16 inches will be sufficient. When using a tractor in field conditions, it is better to use more massive wheels with discs with a diameter of 18 to 24 inches.
If the drive axle in your tractor is only the rear one, then the front beam is made quite simply.
- It is necessary to prepare 2 steering knuckles from a VAZ Classic car.
- A piece of the required length is cut from a profile pipe (40x40 mm square). The width of the track will depend on the length of this beam.
- Next, racks of 35x35 mm corners are welded to this pipe. The steering knuckles will be attached to them. There is no need to disconnect the steering bipod - it will be useful when installing the steering mechanism.
- Brackets are welded to the corners into which ball joints are installed.
- The front beam of the mini tractor also has a swinging mechanism in the center. In this case, it, together with the cross, was removed from a UAZ vehicle.
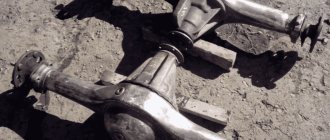
To make a homemade front axle, as well as its rear analogue for an all-wheel drive unit, you will need to take 2 identical chassis units, for example, from a VAZ or Moskvich car, and shorten them. You can learn how to shorten the bridge from a VAZ car from this video.
Important! Axles must have the same gearboxes, with the same gear ratio. Otherwise, the front and rear wheels will rotate at different speeds when the tractor moves.
Since the bridges already have a built-in mechanism for transmitting rotational motion to the wheel axle, there is no need to make a homemade gearbox.
Features of device collection
Assembling such a complex device as a tractor will require significant time and financial investments.
In addition to purchasing parts and components of the unit, you need to take into account that you will need some tools. If you don’t have them, you can ask friends for help or rent them.
What tools will you need?
Since many parts will have to be adjusted to each other, and some will even have to be made independently, you will need a lot of tools:
Necessary materials for construction
The device consists of several components, some can be taken entirely from other equipment, some will have to be redone:
- composite frame;
- engine;
- chassis, including suspension, axles and wheels;
- assembly with brake discs;
- steering mechanism;
- seat;
- mechanism for attaching attachments.
Important! To create a homemade fracture, it is not advisable to use new materials and parts; it is better to use a “second-hand machine.” The ideal option would be to purchase an old passenger car: a Zaporozhets, Moskvich or Zhiguli, then there will be no need to connect the engine to the chassis and transmission
Pros of installing hydraulics
Hydraulics are installed on a minitractor in order to ensure the operation of some of its mechanisms and facilitate the control of this unit. A unit with installed hydraulics has its advantages.
- The car becomes easy to control. The steering wheel can be turned with virtually no effort, with one hand.
- Hydraulics makes it possible to use various attachments.
- The use of hydraulics allows you to modernize the brake system. Thanks to the hydraulic cylinders installed on the unit, the unit brakes instantly.
You can make hydraulics on a mini tractor if you purchase a ready-made system in advance in a store or use parts from old agricultural machinery.
Important! When installing hydraulics on a mini tractor, it should be taken into account that some of the engine power will be spent on servicing this unit. Therefore, for tractors with low-power engines, installing hydraulics will not bring any benefit.
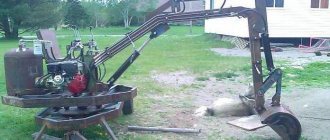
Why do you need a PTO?
The power take-off shaft (PTO) is designed to drive various agricultural machinery connected to a mini tractor, for example, various tillers for tillage, potato diggers, mowers, snow blowers, etc.
PTO can be either dependent or independent. In the first case, the shaft is driven by a transmission that transmits rotational motion to the wheels. As soon as the wheels stop, the PTO stops rotating. The independent PTO receives rotation from the engine crankshaft. Therefore, the higher the engine speed, the faster the shaft rotates.
In addition, there are tractors with a synchronous PTO. The rotation speed of the synchronous shaft directly depends on the transmission ratio of the moving tractor. Synchronization of movement and rotation is required when the unit operates with sowing equipment.
Useful tips
When building and operating a homemade tractor, the owner should consider a number of points:
- do not start work without drawings or diagrams;
- provide for the installation of a power take-off mechanism;
- install a canvas canopy over the operator’s workplace;
- controls should be located at an optimal distance and not interfere with the operator;
- If you do not plan to move on roads, then the equipment does not require registration.
Homemade tractors have a low cost and pay for themselves in 1-2 seasons. The owner should remember that during operation of the machine, breakdowns caused by design flaws are possible. Failed components will have to be repaired and the design modified to ensure trouble-free operation of the all-wheel drive mini tractor.
Manufacturing a three-point hitch
The hitch is used to connect additional equipment, such as a plow, to the tractor.
The hitch must be movable both in the horizontal and vertical planes . In the first case, mobility helps to reduce the overhang of the nozzle when taxiing. Vertical movement of the suspension is required to lower the equipment into a working position or raise it into a transport position.
The hitch on a mini tractor is made from various parts removed from old agricultural machinery. It is quite difficult to describe how to make a three-point hitch at home. Therefore, it would be more correct to use the following video, which shows the dimensions of all parts of the device.
Selection and installation of brakes and clutch
Brakes must be installed on the rear wheelset. The easiest way is to take ready-made blocks from a UAZ car. The brake pads must be installed on the wheel disks, and the control must be placed on a pedal or lever installed inside the cabin.
To install a clutch on a homemade mini tractor, you can also use a ready-made version from a car. For example, you can use a belt clutch from a Moskvich or UAZ.
The clutch unit is attached to the gearbox, also taken from a car. You can see how the clutch is installed in this video.
Steering installation
Making a steering mechanism yourself is quite difficult, and in principle there is no point, since all the parts can be taken from any passenger car.
The following is a diagram that shows how the standard steering control installed on most self-propelled vehicles works.
When installing the steering mechanism, the steering shaft with gear is connected to the steering bipods, which are located on the steering knuckles mounted on the front beam (the manufacture of the beam was discussed above).
How to make a cabin for a mini tractor
If in the summer you can work on a mini tractor without a cab, then with the onset of the autumn-winter period, using the unit becomes quite uncomfortable or even impossible. Therefore, craftsmen are trying to assemble tractors with cabins in order to use this equipment all year round.
The cabin for homemade equipment is made of sheet steel according to a pre-prepared drawing. You can take the cabin from the MTZ tractor as the basis for the calculations. The following photo shows a drawing, based on which you can make a cabin yourself.
Advice! If the cabin dimensions shown in the drawing do not fit the dimensions of your mini tractor, then they must be changed. But the main thing that needs to be taken into account when adjusting the dimensions is the size of the windshield and the height of the cabin. Its ceiling should be 25 cm higher than the head of the person sitting in the cabin.
The cabin is manufactured as follows.
- First of all, you need to assemble a frame from wooden blocks according to the dimensions of the drawing.
- Next, a metal profile pipe is cut to the size of the wooden frame parts. All parts are connected by welding.
- The welded structure is placed with the roof on the ground and glass holders are welded inside the cabin.
- The roof is made of 1 mm sheet steel. The fragment can be cut out with a grinder and welded to the top of the cabin.
- The floor and side parts of the cabin are made of 2 mm thick sheet steel.
- The door frame is also welded from a profile pipe. To automatically close the doors, gas elevators can be installed on the frame.
- After installing the glass, the inside of the cabin can be lined with foam rubber and covered with leatherette.
- The cabin is installed on the frame, in a place prepared in advance for it.
In general, to better understand how to make a mini tractor with your own hands, you can watch this video, a kind of guide for beginners.
Completing the build
- The brake system is removed from cars or motorcycles and installed without modification.
- The fuel tank is selected for specific tasks. On average, a tank of 10 liters of fuel will be sufficient. If necessary, the container dimensions can be increased.
- If you plan to work in the field at night, you should install a path lighting system on your homemade breaker tractor. To do this, headlights, wiring, battery and generator are installed.
- The driver's seat must be installed taking into account the stiffness of the suspension, otherwise the driver will feel every uneven terrain.
- The cabin will help to give an aesthetic appearance to the assembled agricultural machinery, and will also protect it and the driver from weather conditions. Finishing is done based on your own tastes and preferences.
The use of a homemade tractor is permitted only after it has been fully tested under various conditions. Otherwise, shortcomings may appear at the most crucial moment.
The attractiveness of a homemade tractor from Oka can hardly be overestimated. The cost of spare parts and components needed to manufacture a tractor is quite low. The total cost can be recouped in one harvest season. This solution is suitable for beginning farmers who do not have the funds to purchase factory-made agricultural machinery.
The nuances of making a caterpillar tractor
Homemade tracked mini tractors are a technique whose main feature is high maneuverability and good cross-country ability. Also, a tractor on tracks creates minimal pressure on the soil, which cannot be said about its wheeled counterpart.
To make a mini tractor on caterpillar tracks, you will need the following structural elements.
- Frame. It is made from a profile pipe or channel.
- Engine. For a caterpillar mini tractor, it is better to use a diesel engine.
- Main bridge. As in the manufacture of a wheeled tractor, for a tracked unit you can also use a ready-made axle from an old car, which should be shortened.
- Transmission. The ideal option would be a box from GAZ-53.
- Clutch. A clutch block from a GAZ-52 will do.
- Caterpillars. They are made from tires from the wheels of large equipment, for example, from a tractor.
To make tracks, you need to take 2 tractor tires and cut off the side parts of them. These tires are then put on the wheels mounted on the frame, as shown in the following photo.
In order for the tractor to turn, a differential must be installed on the rear axle, which will disconnect the right or left wheel from the drive. Also, each wheel must be equipped with a brake that can be controlled separately. When you press the brake pedal and shift the differential, one wheel of the drive axle stops, while the opposite wheel continues to rotate. Due to this, the tractor turns in the desired direction.