779 ₽ More details
Sasha Bread Bakery bread Buckwheat/mini baguette, 160 g
59 ₽ More details
Women's winter boots
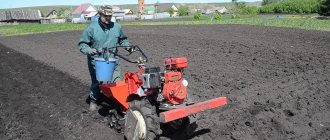
Modern means of mechanization make it possible to plow fairly large plots of land. Moreover, such devices are highly mobile, which allows them to be used in places where tractors and other large agricultural machines cannot access. In addition, plowing with a walk-behind tractor allows you to carry out work independently, without depending on other people.
Choosing the right model
Before purchasing a walk-behind tractor, you need to determine for what work the unit will be used. The simplest devices are lightweight (up to 100 kg) and are equipped with 4–8 hp engines. With. and are equipped with a small set of working attachments.
They allow you to perform the minimum required list of works:
- plowing;
- disking;
- harrowing;
- ridge catching.
Some devices are universal. They allow the use of additional equipment, for example:
- potato digger;
- snow blower;
- motor pump;
- lawnmower.
Small walk-behind tractors with a 4-5 liter engine. With. and a working area width of 0.5-0.6 m are suitable for plowing a small plot of land not exceeding 15-20 acres in area. For larger plots, more serious equipment is needed. If the size of the plot exceeds 20 acres, it is more advisable to use a unit with a capacity of 7-8 liters. With. and a processing width of 0.7-0.8 m. Land plots up to 1 hectare are cultivated with walk-behind tractors with 9-12 hp engines. With. and a working area width of up to 1 m.
Important! The heavier the earth, the more powerful the unit must be used.
When choosing a walk-behind tractor, you need to pay attention not only to the parameters of the unit, but also to its manufacturer. High-quality models are equipped with engines from well-known manufacturers (Forza, Honda, Subaru), have a disc clutch and gear reducers. Such models are the most reliable and, when using high-quality fuel and oil, last for quite a long time.
What is better to plow: a walk-behind tractor with a plow or a cultivator
Plowing is the simplest soil cultivation operation. If the area of the plot is small and the soil is quite loose, then you can use a cultivator. These devices are lighter and more maneuverable than walk-behind tractors with a plow, and their less powerful engines consume less fuel. If the soil is heavy or you have to plow virgin soil, then you can’t do without a walk-behind tractor. Unlike motorized cultivators, these self-propelled units can cultivate areas using attachments: a plow, a disk, a cutter.
Motoblocks, as a rule, are equipped with rubber pneumatic wheels, which makes it possible to use them as a tractor, for example, when towing a trailer.
Can a walk-behind tractor plow virgin soil?
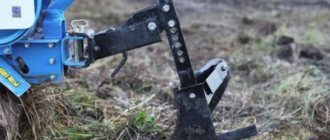
Unlike a cultivator, which works only on loose soils, a walk-behind tractor can be used for plowing heavy soil, including virgin soil. The ability to use a variety of attachments makes it possible to use a rotary plow, best suited for cultivating neglected areas.
Varieties
There are rotary cutters of various designs, as well as with different numbers of knives and their location. However, there are two main categories. Let's see what their differences are:
- Active sabers. The most common option, which is why it is considered a classic. Often supplied as a factory-fitted attachment. The versatility lies in the fact that the tool is able to work with almost any type of soil. Saber-type knives are made from especially strong grades of hardened steel with a high carbon content. The collapsible design simplifies installation and transportation of the equipment. To improve the physical characteristics of the metal, thermal hardening is additionally used, as well as treatment with high-frequency currents.
- “Crow's feet” are indispensable where it is necessary to cultivate virgin lands, or those that have not been cultivated for a long time. This design began to be used relatively recently. It has proven itself to be especially effective when cultivating hard and even rocky soils. Despite the fact that ordinary carbon steels are used in production, the “legs” are easy to repair and weld. Therefore, this option is ideal for hard soils, and for less difficult soils you can get by with more affordable saber-shaped ones.
How to plow correctly with a walk-behind tractor and plow
If conditions permit, it is recommended to plow with a walk-behind tractor along the long side of the plot. Often the first furrow is plowed along a stretched rope, which makes it level. Subsequently, each subsequent furrow is plowed so that one wheel runs along the edge of the plowed area of the previous row. This results in smooth and uniform plowing of the entire area.
How to properly adjust a walk-behind tractor plow for plowing
The plow adjustment process consists of several stages:
- Depending on the required plowing depth, the walk-behind tractor is hung above the ground at the same height. To do this, you can drive it onto a stand made of boards or bricks.
- In accordance with the operating instructions, install the attachment on the unit. The plow stand must be vertical, and the field board must touch the soil along its entire length.
- If necessary, adjust the angle of the field board.
- Depending on the type of plowing, make one or two row furrows.
After the row-crop furrow is ready, it is necessary to set the angle of the plow stand. Since one of the wheels will go along the plowed furrow, the walk-behind tractor itself will tilt, but the stand must remain vertical. To adjust the angle of the stand, you need to place a stand under the left wheel of the walk-behind tractor of the same height as it was when adjusting the depth.
After this, the plow stand must be installed perpendicular to the ground surface.
Which wheels are better to plow with a walk-behind tractor?
Most walk-behind tractors are equipped with rubber pneumatic wheels. This allows the unit to move over the ground and roads without damaging them. For normal movement and even for transporting a trailer with a load, the traction force of the rubber wheels with the road is quite enough, but the plow exhibits much more serious resistance when plowing. Therefore, on site, rubber wheels are usually replaced with lugs - all-metal cylinders with a welded herringbone made of metal plates. These devices significantly increase the weight of the walk-behind tractor, due to which such wheels literally bite into the ground.
Practice shows that the use of lugs as a propulsion device significantly improves traction with the ground and increases traction force, while rubber wheels, even with a large pattern, are prone to slipping. This is especially noticeable when plowing heavy soil or virgin soil. Another danger of using pneumatic rubber wheels when plowing is that the rim can simply “turn” and the wheel inner tube will become unusable.
How to adjust plowing depth on a walk-behind tractor
The plowing depth can be adjusted by raising or lowering the plow. The design of the plow stand provides several holes into which an adjusting bolt is inserted. The holes are at different heights. To ensure the required plowing depth, the adjusting bolt is threaded through the desired hole and secured with a nut.
What speed should you use when plowing with a walk-behind tractor?
As a rule, the gearbox of a walk-behind tractor allows you to change the speed of movement. This is done so that the unit is more versatile and can move in transport mode at a higher speed. However, for plowing, especially if the work is carried out manually on dense and heavy soils, the transport speed is too high and will not provide the force necessary to operate the plow at the required depth.
The normal plowing speed in manual mode is 5 km/h. This allows the plowman to move behind the walk-behind tractor at a calm pace. However, this speed can be doubled if you use a transport and arable module to attach the plow not to the walk-behind tractor frame.
Attention! The use of this link significantly increases the smooth running of the unit, the quality of plowing increases, and the walk-behind tractor is less loaded. This reduces mobility and maneuverability, but when working in large areas this does not matter significantly.
How to plow a garden with a walk-behind tractor
Depending on the time of year and the goal, there are two ways to plow the soil in the garden with a walk-behind tractor.
- Waddle. With this method of plowing, the layers are turned over in opposite directions relative to the central axis of the site. Work begins from the right edge of the field, goes through it to the end, then drives the unit to the left edge and returns along it to the starting point. Then the right wheel of the walk-behind tractor is installed in the furrow and plowing of the second row begins. The cycles are repeated until the last furrow is plowed, which should run exactly along the central axis of the plot.
- Dump. Plowing a site using this method begins with plowing a central furrow running along the axis. The right lug is then placed in the furrow and returned to its original location. Then the cycle repeats. Plowing is carried out in both directions from the central axis, gradually filling the entire area. In this case, the layers turn out to be inverted towards each other relative to the central axis of the area.
The first method is most often used during spring plowing; it allows you to evenly incorporate fertilizers spread or scattered over the surface into the soil. When plowing with the second method, deeper furrows are left, so they are often plowed before winter. In this case, the ground freezes more strongly, which kills pests, and snow remains in deep furrows longer, maintaining soil moisture.
How to plow virgin soil with a walk-behind tractor
Plowing virgin soil with a plow is quite a serious test, both for the walk-behind tractor and for its owner. Heavy compacted earth, intertwined with grass roots, creates very high resistance, often leading to breakage of the hitch and other unpleasant consequences. Therefore, it is better to develop virgin soil with heavy equipment, namely a tractor. If the site does not allow this and the only option left is to dig up the ground with a walk-behind tractor, then it is better to choose the following procedure:
- Clear the area as much as possible of weeds, dry grass, and anything that could interfere with the walk-behind tractor.
- Go through the area with cutters with a slight depth to destroy the top layer of turf.
- Set the plow to a small depth (about 5 cm) and plow the area.
- Increase the depth of the plow. Re-plow the area.
It should be noted that the concept of “virgin land” is rather arbitrary. This is usually what untreated soil is called, but its density and composition can differ significantly. Therefore, not all virgin soil can be plowed with a plow. Sometimes it is more expedient to use cutters for this purpose; if you go through the area with them 3-4 times, then even serious dense soil can be literally smashed to smithereens.
Video on how to plow with a walk-behind tractor:
Installation
If the user purchased cutters without assembly, they must be assembled correctly. Today this is not difficult, since the buyer has at his disposal not only detailed instructions from the manufacturer, but also a wide range of video materials that can be obtained on the Internet
When assembling the product, it is important to ensure that the active part of the unit enters the soil during operation. Side options are installed on both sides of the walk-behind tractor; they operate from drive shafts and wheels
In this position, the cutters are a practical replacement for the wheels of a motorized cultivator; they are the ones that set the motorized equipment in motion.
The cutters, whose operation is carried out by the power take-off shaft, are located behind the cultivator. They do not take part in the movement of the device.
To install the cutters on the cultivator, you need to use special wooden trestles with a height of about 50 cm. Also, in this case, the equipment must not only be lifted, but also rested on the coulter, and also tilted at an angle of 45 degrees. Then the wheels are removed from the cultivator and cutters are placed in this place. Next, special plates should be installed on the outer ends on both sides, due to which the movement of the device will be smooth and stable.
Additional sections are installed to the main ones through the use of pins. The restrictive metal disk is connected to the frame using bolts. In this case, the number of blades should be selected for the cultivator, based on its power. To assemble cutting blades, it is possible to use one or more axes
When assembling a four-blade cutter, it is important to consider the sequence of the right and left blades that are placed on the mounting plate
How to properly plow with a walk-behind tractor with cutters
The advent of tillers for walk-behind tractors has significantly simplified the procedure for cultivating land for many gardeners. Instead of traditional work, such as plowing and harrowing, a complex operation has appeared that allows one to obtain a loose soil structure suitable for sowing in one go. This significantly reduced labor costs and provided a significant gain in time.
Attention! The essence of the soil milling method is to use special metal cutters as a working body and propeller. Each cutter consists of several metal blades mounted on the axis of rotation of the walk-behind tractor wheels.
How to adjust the plowing depth with a walk-behind tractor with cutters
The maximum depth of cultivation with a walk-behind tractor (this is what is more correct to call the process of plowing with cutters) depends to the greatest extent on the diameter of the cutter and is usually half of this value. Attempts to plow to greater depths will result in the cultivator simply burying itself. The depth into the soil must be adjusted within the required limits using a coulter.
Important! If even at a small depth the cultivator sinks (buries itself in the ground), it is recommended to increase the number of cutters.
How to dig a vegetable garden with a walk-behind tractor with cutters
The standard process of cultivating land with a walk-behind tractor is usually carried out in 2 stages.
- Set the opener to a slight depth. Work the area over the entire area, going around it in a circle and gradually moving towards the center. In this case, the cultivator operates at low speeds or in first gear.
- Set the opener to the required cultivation depth. The entire area is processed at high speeds or at 2 speeds.
As a rule, to dig up a previously processed area with a walk-behind tractor, 2 passes are enough.
Warning! Heavy soil may require an intermediate pass with the opener set to half the required depth.
How to plow virgin soil with a walk-behind tractor with cutters
Plowing virgin soil with a walk-behind tractor with cutters is carried out in several steps. The first pass at low speed with minimal penetration violates the integrity of the turf and destroys the strongest surface layer. On the second and subsequent passes, the depth is increased, and the engine speed is gradually increased. A total of 3-4 treatments may be required, this greatly depends on the density and structure of the soil.
Cultivation of land with a walk-behind tractor in the video:
What attachments does the walk-behind tractor work with?
Any experienced farmer knows that with the help of a walk-behind tractor, cultivator or other motorized equipment, almost all agricultural work can be mechanized: starting with cultivating the land to prepare it for sowing and ending with transporting the harvested crop. Motor units have become universal due to the possibility of using a variety of attachments. In addition to moldboard and other plows, the following equipment has been created for processing plowed land and cultivating virgin lands:
- harrows;
- hillers;
- rotary cutters;
- flat cutters-weeders.
Harrows are used to plow virgin soil, as well as for pre-sowing (spring) or post-harvest loosening (autumn) of arable soil to a depth of 7-14 cm. Using harrowing with a walk-behind tractor or cultivator, the surface is leveled, moisture is covered, and weeds are destroyed. The working parts of such agricultural implements are metal teeth or spherical disks. In this video you can clearly see how to properly plow with a walk-behind tractor and a homemade harrow. And also from there you can learn improvements for the harrow.
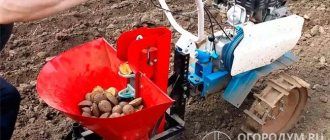
The hiller is used to hill up potatoes, cut furrows for sowing seeds, backfill planting material, and also sprinkle weeds directly in the row area. Hilling devices come in single-row and double-row, with fixed and adjustable working widths, distinguishable both by their design and their efficiency. Here is a video of how the Neva MB2 motor cultivator performs processing with a mounted two-row weeder-hiller.
With a rotary cutter you can plow virgin soil, carry out pre-sowing and basic cultivation of plowed land. This agricultural implement allows you to mill, cultivate the land and qualitatively prepare it for sowing. It is capable of not only plowing the soil, but also mixing it with fertilizer, crumbling large layers, crushing stubble particles, and leveling the sown area. Rotators for cultivation come in different types, depending on the number of cutting elements. This video shows how to actually plow a walk-behind tractor with a cutter installed on it, as well as cultivation.
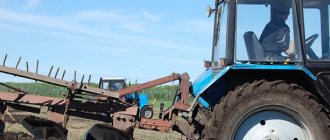
How to plow a garden with a walk-behind tractor with a front adapter
The use of a front adapter essentially turns the walk-behind tractor into a mini-tractor with all the ensuing consequences. Such units can be used for a wide variety of agricultural work, as well as for transporting goods. It is much easier to operate a walk-behind tractor with a front adapter, and thanks to the additional weight, the traction force of the unit with the ground increases.
The convenience of the design allows the machine operator not to waste energy on following the plow and constantly guiding it. A walk-behind tractor with a front adapter allows you to cover large areas, but it is not as maneuverable as a conventional power unit with manual control. Therefore, in conditions of limited space, the use of such units is difficult.
The procedure for plowing the site itself is no different from the usual one. Many adapters are equipped with a special hitch that allows you to control the depth of the plow using levers. The plowman can only drive his mini-tractor with one wheel along the furrow, maintaining speed and straight movement. Upon reaching the boundary of the site, the machine operator will raise the hitch with the plow to the transport position, make a turn and lower the plow again to the working position. This way the entire area is gradually processed.
Tillage
The advantage of a motorized cultivator is the ability to dig up the garden in parts, in separate beds, at the time of sowing.
Digging can be done in two ways: moving in a zigzag (along the rows in the forward and reverse direction) or in a circle (starting from the center and increasing the circles in a spiral). For a rectangular garden, the first method is more convenient, for a square garden, the second.
The processing procedure is as follows.
- Install the required number of cutters.
- Remove the wheels.
- Start the engine and warm it up.
- Press the clutch handle.
- Walk behind the cultivator, directing its movement.
- Make sure that there are no untreated areas left.
Is it necessary to plow the garden in the fall with a walk-behind tractor?
Autumn plowing is not mandatory, but this procedure has many positive effects.
- The depth of soil freezing increases, and weeds and insect pests and their larvae overwintering in the soil die.
- Plowed soil retains snow and water better, remaining moist longer.
- The soil structure improves, making spring plowing faster and with less labor.
In addition, during autumn plowing, many gardeners add organic fertilizers to the soil. Over the winter they will partially decompose, which will increase soil fertility.
Very dry soil
It is not recommended to dig up soil that is too dry with a motor cultivator. The soil will become excessively crushed and moisture will be retained very poorly. Dried soil should be watered generously 1-2 days before treatment. Tilling soil that is too waterlogged will also be ineffective. A large number of large lumps form on it. In addition, the work of the cultivator itself will be difficult; the cutters will become stuck. After heavy rain, treatment is postponed for 1-2 days.
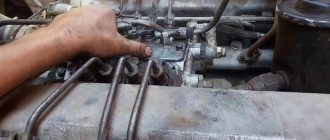
Why the walk-behind tractor does not plow: reasons and how to troubleshoot
The walk-behind tractor has a certain power and is designed to work with a certain type of attachment. Attempts to independently change anything in the design of the unit often lead to a negative result. In addition, there may be several reasons for poor performance of a walk-behind tractor with a plow.
- The wheels rotate, the plow stands still. This indicates insufficient traction of the wheels with the ground or the plow is too deep. It is necessary to reduce the plowing depth, and also replace the rubber wheels with lugs. Additional traction with the ground can be provided by increasing the weight of the walk-behind tractor; for this, additional weights are hung on the wheels or on the front part.
- The plow burrows into the ground or jumps out of the ground. Most likely, the angles of the stand or field board are set incorrectly. It is necessary to hang the walk-behind tractor with the plow and make the necessary settings.
- Wrong choice of plowing speed. Selected empirically.
In addition to these reasons, there may also be malfunctions with the walk-behind tractor itself; it may not develop the required power, the transmission or chassis may be damaged, the frame or hitch may be bent.
Pros and cons of mechanical plowing
Mechanical tillage has many obvious and secondary advantages. That is why it has become so widespread among farmers around the world. For small areas, a walk-behind tractor with cutters is quite capable of replacing an entire tractor. The most basic advantages of this processing are as follows:
- good soil loosening;
- mixing layers, leading to increased fertility;
- effective destruction of weed roots, resulting in clearing the area for several seasons;
- convenient distribution of fertilizers on the site;
- surface leveling;
- increasing farmer productivity;
- reducing the load on the operator of such an agricultural machine.
Most of the cutters that are installed on the cultivator are able to cope with any type of soil, including virgin lands. Therefore, such devices have become widespread in regions with a wide variety of climatic conditions, including dry and wet soils and even clayey soils.
However, this method of cultivation also has its own weaknesses. In fairness, it is worth noting some of them:
- a significant increase in the load on the gearbox when plowing neglected or heavily turfed areas;
- non-demountable design and complexity of installation;
- the need for periodic sharpening of knives, which become dull in a short time on difficult types of soil.
Setup accessories
You can create an assembly diagram of functional and structural elements and a detailed drawing of the plow yourself. Extreme precision will make it possible to eliminate complications during assembly and the negative impact of errors on the operating properties of the unit. It is necessary to take into account the dimensional characteristics of the elements. Even a minor miscalculation can significantly affect the functional properties of the equipment. In the drawings with the dimensions of the attachments for the unit, 3 structural planes are connected:
- lateral surface of the skid;
- horizontal bottom;
- dump front.
Walk-behind stick or depth gauge
The diagram of the simplest artisanal plow consists of the following elements:
- 2 handles made of metal pipe;
- frame;
- stand stopper with a screw of standard size M10 or M8;
- holding fork for articulated connection of the frame;
- coupling device;
- bearing;
- beams between handles;
- crosspiece;
- locking nut;
- adjusting washer;
- handle for hitch;
- T-connector.
Depending on the type and purpose of the instrumentation, other components may be included in this list.