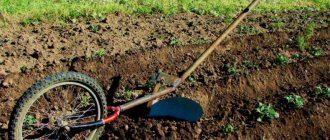
One of the devices designed to simplify human work and make it more comfortable is a do-it-yourself walk-behind cultivator. On the eve of the summer season, the issue of acquiring a variety of equipment for cultivating a plot of land and collecting the appropriate equipment becomes extremely relevant. However, the purchase of new factory devices is associated with fairly large material costs, which is not always justified, and in conditions of a small plot of land it becomes completely impractical. At the same time, an alternative to such expensive purchases are products made by hand.
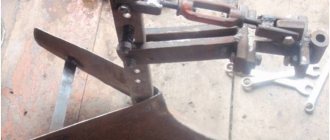
Convenient homemade seeder for walk-behind tractor
Conventionally, seeders for walk-behind tractors are divided according to the number of simultaneously sown rows - from 1 to 5; vegetable seeders and precision seeders are also distinguished. Vegetable seeders are used for dotted sowing of vegetables: carrots, onions, beets. The device for feeding seeds is driven by the support-drive wheels of the sections. In addition, the rotation speed of the device is regulated by replaceable sprockets.
Precision seeding vegetable seeders have a brush sowing device. In such a device, a rotating brush stirs up a layer of seeds in a hopper so that they fall out into a hole located in its rear wall. The hole is closed by a rotary disk having holes of different diameters. By turning the disk, you can change the size of the holes and thus change the seed sowing rate.
Strawberry bed former 2 review
A homemade seeder for a walk-behind tractor is usually connected to the walk-behind tractor using a universal hitch, thanks to which the walk-behind tractor can be equipped with two-row and four-row seeders.
Other popular screening potato diggers for walk-behind tractors
Let's look at a few more of the best models of screen-type potato diggers that are suitable for the Neva walk-behind tractor.
- Tselina KVM-01 is a vibrating potato digger with lugs with a diameter of 340 mm, designed for harvesting vegetable crops such as potatoes, onions, garlic, beets, radishes. Device characteristics: operating speed – up to 2.1 km/h; productivity – 0.2 ha/h; excavation track width – 400 mm; digging depth – up to 200 mm, assembly weight – 47 kg. The model is compatible with walk-behind tractors Neva, Ugra, Oka, Agat and others.
- Tselina KVM-02 is a device for digging up potatoes, beets, onions and other root crops and then laying them on the ground surface. Working digging track – 60 cm, maximum digging depth – 20 cm, unit weight – 45 kg, productivity – 0.2 ha/h. The attachments are equipped with pneumatic wheels. Suitable for any motor cultivator equipped with a power take-off shaft: Tselina, Cascade, Neva, KADVI.
- Kerland KM2090 is a screening digger for air-cooled walk-behind tractors equipped with a PTO. Using this attachment, you can harvest any root crops similar in size to potatoes. The speed of movement of a walk-behind tractor with a linkage is 2 km/h, which makes it possible to process up to 10 acres per hour of work. Working width – 40 cm, digging depth – 15 cm.
Bed formerfor walk-behind tractor
- We make homemade products for the walk-behind tractor with our own hands
- Homemade rake for walk-behind tractor
- How to make a homemade blade for a walk-behind tractor
- Convenient homemade seeder for walk-behind tractor
- Homemade shovel for walk-behind tractor
- Making a homemade disc hiller for a walk-behind tractor
- How to make a homemade plow for a walk-behind tractor
- Homemade crow's feet cutter for walk-behind tractor
The first thoughts of making homemade accessories for a walk-behind tractor appear after the need to transport cargo, so my epic with useful accessories for a walk-behind tractor began, and I was the first to make a homemade cart-trailer.
DIY potato planter for walk-behind tractor
A potato planter mechanizes the work of sowing potatoes. This attachment consists of:
- bunkers where seed material is concentrated;
- a dispenser in the form of a drum, rotating together with the wheels of a walk-behind tractor, it captures the potatoes and directs them into the seed tube;
- a seed tube that directs the seeds into the soil;
- ripper, which creates a seed furrow in the soil;
- disc hillers completing the potato sowing operation.
There are many different designs of potato planters. Craftsmen use their existing containers for the hopper and select options for making a dispenser using plywood. In separate planters, air flow accelerates the movement of planting tubers into the soil. There are very simple designs, in which plywood disks replace several actuators for dosing and placing potatoes in a furrow. Many homemade authors have invented original attachments.
To make a potato planter for a walk-behind tractor you will need:
- thin sheet galvanized steel;
- profile pipes for forming the body of attachments;
- strip steel 4-5 mm thick;
- small format rolled corner.
Do-it-yourself hiller for walk-behind tractor
The hiller creates a soil ridge. The soil is raked up to the roots, and the feeding area increases several times as the ground level around the stem of the cultivated plant rises. There are different types of hillers based on walk-behind tractors:
- The lister (fertilizer) hiller is structurally similar to the body of a plow with two moldboards; it moves between the rows, moving soil from the groove to the ridge. They are used with relatively small row spacing;
- disk hiller in the form of two disks covering the ridge. When they move, a ridge is created on both sides at once;
- rotary (propeller), having active plates that throw soil into the ridge.
Lister hillers are often equipped with adjustable blades. This allows you to change the grip width of the working element. Many people use propeller attachments for hilling potatoes, but by cutting the rhizomes of perennial weeds, they contribute to clogging of the field.
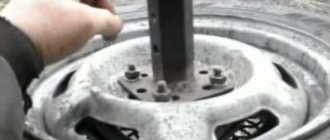
DIY lugs
The engine torque is transmitted through the transmission to the wheels. To move across arable land, you need to create sufficient force. You can increase traction by increasing the coefficient of adhesion of the wheel to the ground. Therefore, the lug increases this coefficient several times, making it possible not to increase the mass of the power unit.
To make this attachment, you need to purchase:
- sheet steel 2-3 mm thick, steel of ordinary quality st3 is sufficient;
- isosceles angle 35-50 mm;
- pipe with an internal diameter of more than 25 mm.
This set of blanks is sufficient to get started. All that remains is to choose a design or develop your own.
What are the advantages of using hedgehogs for weeding?
The advantages of using hedgehogs on a walk-behind tractor are obvious to every farmer.
They allow:
- perform effective weeding of an area planted with potatoes - during operation, they do not cut off the stems of weeds, but wind them together with the roots, which allows you to achieve the best results when processing the beds;
- loosen and hill up the soil, which will increase the amount of moisture, oxygen and heat received by plants;
- get rid of pests - hedgehogs on a walk-behind tractor effectively repel the ubiquitous rodents and turn out harmful insects, which feel comfortable and actively reproduce only with a layer of soil;
- help to level the soil layer on a planted bed and cultivate the bed.
By using hedgehogs on a walk-behind tractor, the owner of the plot has the opportunity to save his time and effort, which is very important when growing large quantities of potatoes on large plots.
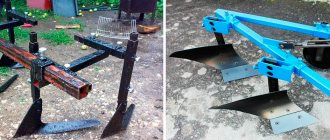
How to make a homemade plow for a walk-behind tractor
Is it necessary to make a plow for a walk-behind tractor if you don’t have any special metalworking skills? Yes, it's worth it. The design of this agricultural implement is quite simple and therefore anyone can correctly make a homemade plow for a walk-behind tractor.
Before you begin to implement your plan, you need to look through the previous posts on our website, where we described the manufacturing process in detail with drawings.
Professional tools are best suited for the job; they will allow you to perform all technological operations with your own hands at the required level and at the same time maintain their quality. An amateur tool is unsuitable for such work because its level of strength is insufficient to perform some of the operations.
DIY plow and cutter
The plow, for all its apparent simplicity, is quite difficult to manufacture. Usually, production begins with a hitch - special attachments. The body is fixed to the hitch - this is the main working body. A walk-behind plow cuts the soil layer. Next, a layer is formed, and then its turnover occurs.
The design of the plow body includes several components:
- ploughshare – cuts into the soil;
- dump - serves to create a given movement of the formation and turnover;
- field board – stabilizes the direction of travel of the entire agricultural unit.
If the plow can be conditionally considered a passive working attachment, then the soil tiller is active. When cultivating the soil, the wheels are removed, and the unit moves due to the rotation of the cutters. The working blades perform a rotational movement and loosen the soil.
For the manufacture of cutters, rolled strips with a thickness of 5 mm or more are used. To reduce resistance during operation, the blades are sharpened.
Cultivator for MTZ walk-behind tractor. Description
The active growth and development of small farming in the 90s provoked industrial enterprises to produce compact units to facilitate agricultural work. These machines were significantly superior to tractors, which the average farmer could not afford to maintain. They were not only compact in size, but also highly maneuverable and productive.
However, by this time the Minsk Tractor Plant (MTZ) had already introduced small-sized models Belarus-05, MTZ 082 and MTZ 112 to the agricultural market, which immediately gained popularity due to their reliable design and ease of maintenance. Serial production increased and it was decided to move further production to the Smorgon Aggregate Plant, which was a branch.
The MTZ model range was expanded with walk-behind tractors with different characteristics and, accordingly, they had different indices in the name 05, 06, 07, 08, 09, 10 and 12. But only some 05, 06, 08, 09 and 12 gained popularity thanks to a successful combination functionality and reliability. Today, the main focus at MTZ enterprises is on the production of models 06 and 09.
Advantages of MTZ models
- Versatility, thanks to which you can connect any attachments to the walk-behind tractor to facilitate agricultural work. The design provides not only for the use of plows, cutters, harrows, and other things, but also brushes, blades and snow blowers for cleaning the area.
- Small dimensions allowing the walk-behind tractor not to take up much space when stored.
- Maneuverability, which is achieved through a well-thought-out design despite the significant weight of the unit.
- Easy to maintain.
- Possibility to repair without resorting to service centers.
- Low requirements for the quality of fuel and lubricants.
- Availability of spare parts.
Disadvantages of MTZ walk-behind tractors
- High cost compared to analogues from other manufacturers;
- Unclear gear fixation (as noted by owners);
- The need to apply effort to switch the differential;
- Mandatory running-in before use.
- Weight. It can be considered as advantages and disadvantages at the same time, because such walk-behind tractors are quite difficult to control on wet soil.
How to make an adapter for a walk-behind tractor with your own hands?
- Required tools and materials
- Manufacturing process
- With movable joint
- Commissioning
- On a square profile 180 cm long, a piece of the same steel sheet, but 60 cm in size, should be welded across.
- Braces are installed on the frame and wheels and secured with bushings. To strengthen the main frame, an additional steel beam is welded onto it.
- Channel No.10 is used to create an additional beam. It is manufactured in accordance with the drawings and using a welding machine.
- The frame created in the previous stage is welded to the wheel axle. A small piece of square metal beam or steel angle is used as a connecting element.
- The first control lever, on which there are 3 knees, is installed on the frame. An additional, but smaller size is installed on this lever. All work is performed using a welding machine.
- Using bolts, both levers are securely fixed to each other.
Small agricultural equipment, such as walk-behind tractors, cultivators and mini-tractors, greatly facilitate people's work. But in the pursuit of perfection, even such units are subject to modernization. In particular, manufacturers or the owners themselves equip them with adapters - special seats that make the use of such equipment more comfortable and less energy-consuming. There are walk-behind tractors already equipped with such a device, but there are also models without it. But you can make an adapter with steering or a movable joint yourself. How to do this work correctly will be described in detail below.
READ DIY glass grinding machine
With movable joint
This type of adapter is the easiest and fastest to make at home with your own hands.
When the main lifting mechanism of the adapter is ready, you can begin to directly assemble it and connect the equipment to the walk-behind tractor itself.
- A stand for the future seat, which is made from a piece of steel pipe, is welded onto the central frame.
- Two more similar sections of pipe are attached perpendicularly to it on top using a welding machine. This design will allow you to securely secure the seat to the walk-behind tractor and minimize vibration and shaking during its operation.
- Next, the pieces of pipes are welded to the frame, and the seat itself is secured to them with self-tapping screws or bolts. For additional reliability, the bolts can be screwed into the seat stand, and not just into the frame.
- The finished coupling device is welded to the front of the resulting adapter.
With steering
This homemade adapter is made even faster than its previous version. But it is worth knowing that this option involves the use of a larger number of different corners and pipes. And one more thing - such attachments are made on the basis of a frame with a ready-made fork and bushing. It is its presence that will allow the walk-behind tractor to rotate freely in the future from steering input. The sequence of actions will be as follows.
- The frame is made of steel of the selected length and thickness. Using a grinder, blanks of the required size are cut out of the sheet, and then fastened together with bolts or self-tapping screws.
- The creation of the chassis should be based on where the motor of the unit itself is located. If he is in front, then the main criterion is the size of the main wheels. That is, the track size should be based on it. The wheels are attached only to the rear. Weld them to the axle. If the engine is at the rear, then the distance between the wheels should be wider. Here the standard ones are removed from the walk-behind tractor, and the same ones as on the adapter are installed in their place.
- The axle itself is made from a pipe, and bearings with bushings are pressed onto its ends.
How I make a mound for strawberries.
- The steering wheel is either like a car or like a motorcycle. There is no fundamental difference. Experienced craftsmen recommend removing the finished steering wheel from the vehicle and attaching it to the adapter base. Making a steering wheel yourself is quite difficult, especially for a beginner. It is worth noting that a motorcycle steering wheel creates great inconvenience when reversing the walk-behind tractor. And this factor must be taken into account.
- If an all-metal frame is used, the steering control will be connected to the front of the unit itself. If you make a special additional support - articulated, then the control will rotate the additional frame completely. In this case, two gears are used: one is installed on the steering column, and the second on the upper half-frame.
- The next step is installing the seat. As in the case of manufacturing the previous type of adapter, it can be either ready-made or made by hand. It must be secured with a welding machine to the rear frame of this attachment.
- If in the future the modernized walk-behind tractor is planned to be used to install replaceable attachments, it is necessary to attach another bracket with a welding machine. An additional hydraulic system should also be created. The easiest way is to remove it from any type of small agricultural equipment and weld it onto your own walk-behind tractor.
- A towbar must be welded to the rear of the main frame. It is necessary in cases where you plan to use the walk-behind tractor to transport some small cargo. If you do not plan to use a trailer or semi-trailer, then this step can be skipped.
- The final stage is the coupling. To do this, small holes are drilled in the steering column into which screws and brackets are inserted. It is with their help that the hitch itself is attached under the steering column.
Perhaps a step-by-step description of making such a device with your own hands may seem complicated. However, with detailed diagrams and drawings, this problem completely disappears. In order for the created adapter to be functional and durable in use, it is necessary to correctly weld all the main elements and pay special attention to the normal operation of the brakes.
Required tools and materials
You can make a manual adapter or a dump truck adapter with your own hands and even without outside help. Therefore, first of all, it is necessary to decide on the type of additional equipment. The next stage is drawings. You can use ready-made ones, based on the instructions for walk-behind tractors of the same brand, but sold with adapters, or you can create it yourself. When making drawings with your own hands, careful attention should be paid to the main elements:
- steering control:
- frame;
- seat;
- frame;
- adapter portal;
- suspension;
- coupling mechanism.
When the diagram is ready, you need to make sure you have the following tools at hand:
- welding machine;
- drill;
- Grinder;
- two wheels with an axle;
- lathe;
- ready-made chair of suitable size;
- metal profile for frame;
- steel angle and beams;
- fasteners;
- bolts, screws;
- screwdriver;
- control levers;
- a steel circle with special holes - the basis for the clutch;
- bearings;
- means for lubricating and priming the finished structure.
Commissioning
Before immediately performing any agricultural work using a self-improved walk-behind tractor, it is necessary to perform several final checks:
- make sure the seat is securely installed;
- check the quality of all welds and reliable fastening of bolts and screws;
- start the walk-behind tractor and make sure that the engine is running normally and smoothly;
- install, if necessary, mounted gardening tools and try them in action;
- Be sure to check the operation of the brakes and make sure they are in good condition.
If, after performing all these simple works, no problems were found in the operation of the walk-behind tractor, it is necessary to bring it into proper appearance. To do this, a self-created adapter is primed and painted in any color desired. This stage not only gives the walk-behind tractor a beautiful appearance, but also protects the metal from corrosion.
To learn how to make an adapter for a walk-behind tractor with your own hands, see the following video.
How to do it yourself?
In order to independently create a harrow for a walk-behind tractor, you will first need clear drawings. And it is recommended to learn how to compose them using the most simple agricultural implement - a tooth harrow, which, in combination with a walk-behind tractor, will successfully cope with the plowing of small seed and other material, as well as pre-planting loosening of the soil. In appearance, it will look like a lattice frame with welded teeth or bolts attached to it.
- It is imperative to equip the front side with a hooking device. The hook can also be an ordinary beam with a hole, which is placed in the tube of the towing device with fixation by means of a cylindrical or conical rod. After complete assembly, the moving chains must be welded between the hook and the chassis.
- In order for the tool for loosening the soil for a walk-behind tractor to be reliable, it is preferable to make the grate from reliable corners or tubes with a square cross-section and a steel thickness of more than 3 millimeters. You can give it a finished look by using a cage with elements located across and along. During the process of assembling the structure, it is necessary to ensure that each segment of this grid is at an angle of 45 degrees to the straight line along which the walk-behind tractor moves in order to reduce bending stresses. Additionally, you need to take into account that the entire supporting base must fit within the boundaries of the motorcycle handles. In terms of dimensions, it is acceptable to make it at most one meter - only a real tractor can handle anything wider.
- Next, you need to prepare fangs with a height of 10–20 centimeters. Reinforcing steel with a diameter of 1.0–1.8 centimeters has shown itself to be excellent in this capacity. The most important thing here is to follow the principle: the longer, the thicker. In addition, the teeth are hardened and sharpened before welding them to the grille. There they should be placed 10 centimeters apart from each other (a sparser arrangement is ineffective). It is possible to install teeth with a slight shift across the row to make them more comfortable to cook and allow the required depth of loosening. Along with this, it is necessary to balance so that their counteraction is oriented symmetrically to the traction shaft, otherwise the walk-behind tractor will begin to “twirl its tail,” as a result of which it will not be able to harrow.
READ DIY Circular Saw Guide Rail
Disc agricultural implements are the most advanced modification, carrying out more activities when cultivating the soil. At home, a disc harrow can be created exclusively for cultivator-type motorized equipment (motor cultivator). 2 pipes are made; they must be securely fixed to the axis of the cultivator. Due to the complexity of carrying out this work at home, you will need to take it to a turner at the enterprise or use shafts from a faulty motor cultivator. The total length of the pipe should be no more than one meter - the motor cultivator will not be able to handle an overly heavy device.
Discs with a diameter of approximately 25 centimeters are mounted on the axle. In order to reduce the resistance on them along the edges, cuts are made with an angle grinder every 10 centimeters of the circumference.
The holes for mounting the disks are made slightly larger than the diameter of the axles. The discs are mounted with a slight slope towards the center of the shaft. On the left edge of the axis the slope is in one direction, on the right - in another. The number of disks is taken so that they mutually compensate for each other along the slope - basically they are installed every 5 centimeters.
Creating a disc harrow on your own is much more difficult than producing a toothed sample. A homemade device requires the most precise adherence to the dimensions of the elements (in strict accordance with the diagram). It’s easier to buy an inexpensive Chinese one and have it modified, thoroughly welding all the welds, which, as a rule, is not done at the factory.
Varieties and their structure
There are several options for tools for loosening the soil, differing in design and having a number of characteristic properties.
Harrows are divided into the following types:
- rotary (rotary);
- disk;
- dental
Tooth harrow
Cultivation with a walk-behind tractor with a similar device is practiced if it is necessary to obtain a uniform and loose layer of soil. The teeth are arranged regularly and can have all kinds of configurations and sizes: square, knife, round, and so on. The height of the teeth depends directly on the weight of the agricultural implement: the higher the weight, the higher the teeth. Basically, their parameters vary from 25 to 45 millimeters.
This equipment can have several methods of assembly with the chassis. In one version, using a spring strut, and in the other, hinged.
The tooth harrow is divided into:
- general equipment;
- specialized (mesh, meadow, hinged, etc.).
Strawberry mounds with a walk-behind tractor
Disc device
A disc harrow is used on dry soils; it performs the same function as a rotary harrow, but is completely different in structure. Here, the key components of loosening are discs, which are similar in configuration to stars. They stand on one shaft at a specific angle, guaranteeing maximum penetration into the soil.
Rotary agricultural implements
If we talk about a rotary harrow for a walk-behind tractor, its main advantage is the optimal removal of the top layer of soil. Leveling the ground with her participation is also not a question. The depth of loosening the soil ranges from 4 to 8 centimeters; it can be adjusted, taking as a basis the specific features of the work.
The width of the harrow is also very important; not only the resource of the walk-behind tractor is taken into account, but also the area of the cultivated area. As a rule, this value is 800–1400 millimeters. Such parameters are explained by the ability to work comfortably while maneuvering in areas with a small area.
Industrially manufactured rotary harrows are made of a high-quality metal alloy, which makes it possible to actively use the equipment for decades (with appropriate care and maintenance).
On high-quality agricultural implements, the blade has an oblique configuration, and the teeth are at an angle to the ground, having an ideal penetration angle for high-quality cutting of the soil, leveling it and eliminating weeds.
How to make a harrow for a walk-behind tractor with your own hands?
- Varieties and their structure
- Rotary agricultural implements
- Disc device
- Tooth harrow
To increase work efficiency and increase productivity, special attachments are used - a harrow. In the past, horse-drawn horses were used to carry out work on the land, but now the harrow is mounted on a mobile power unit - a walk-behind tractor (if the plot is small) or attached to a tractor (when the cultivated area is large). Therefore, a harrow for a walk-behind tractor becomes an extremely important device for every understanding farmer, and when it is made with one’s own hands, it becomes an object of pride.
It is simple to make a harrow for motor vehicles on your own, but for this purpose, according to the rules, developed diagrams, drawings, raw materials and tools are required. The choice of device directly depends on the skills of the craftsman and the intentions of using the device.
To learn how to make a harrow for a milk block with your own hands, see the video below.
Cultivator for the Neva walk-behind tractor. Equipment for plowing land
Most often, a motor unit is purchased to be used as a motor cultivator to perform the hardest work on earth: autumn plowing and cultivation of the fertile layer. Thanks to the very large torque output from the gearbox, the power is 7-10 hp. enough to process even loamy or saline soils in several passes.
To restore the soil structure, the manufacturer offers the following tool options for work:
- A plow for a Neva walk-behind tractor with a coupling device is most often equipped with a standard or universal design of a coupling device with a frame. The walk-behind tractor allows you to plow medium-heavy soil, roots and young growth of trees;
- Cultivators and cutters for the Neva MB 2 walk-behind tractor allow you to more deeply and thoroughly fluff up the soil, chop the roots of weeds, turn vegetation debris into mulch, and use the walk-behind tractor as a multi-cultivator.
In addition to the single design, there are paired plows that allow processing with a pair of cutting edges with soil dumping in two rows, as in the photo. But it is recommended to work with such serious devices on the Neva MB 23 or Neva MB23SD motor units.
You should not expect to plow virgin soils with a walk-behind tractor; medium-heavy soil with a lot of roots and weeds is usually too tough for even the heavy MB 23 walk-behind tractors. The Neva was created to work on already plowed soil. In this case, cutters, cultivators, and plows work great.
On salt marshes and clayey soils, the rotational power of the lugs and their weight are not always enough to plow the compacted layer of soil. Often, the hooks are welded with additional weights, for example, flywheels from trucks, which lowers the center of gravity of the walk-behind tractor, makes it more stable and makes it heavier by 20-25 kg. The width of one lug wheel is 210 mm with a diameter of 460 mm.
Using the attachment on the hiller's motorized unit, you can quite successfully loosen the soil, both before planting and to remove weeds in the rows between plants. But working with such a device is quite difficult; knowledge of the specifics of setting up the tool is required.
How to make attachments for a walk-behind tractor with your own hands
The walk-behind tractor is one of the most useful and popular technical devices used in the garden. However, this statement is only true if additional equipment is available. If the size of the cultivated land is small, then it is advisable to purchase branded units. That is why the question of how to make attachments for a walk-behind tractor with your own hands is popular.
- Homemade devices for walk-behind tractors
- DIY trailer adapter
- Homemade disc hiller
- Making a potato digger
Homemade devices for walk-behind tractors
The list of additional units is not limited to a mower, plow or harrow. This list is quite large, and not a single walk-behind tractor has such a strong package. After calculating the amount it will cost to purchase all the necessary equipment, many abandon this idea. It should also be remembered that not every model can be considered universal.
Their drawings are often found on the Internet, but it is important to ensure compatibility. When developing attachments from scratch, you need to focus on the available walk-behind tractor model.
Homemade disc hiller
The optimal type of hiller for a personal plot is a disk one. When working with it, you do not need to exert much effort, and when the speed decreases, the power increases. Do not forget that the disc hiller is a universal tool, because it can be used not only after planting crops, but also during their growth.
READ DIY Disc Harrow for Walk-behind tractor
The design of this type of attachment is not very complex and includes:
- Ramu.
- Disks.
- Screw type talpers.
- Racks.
The discs can be taken from agricultural equipment that has become unusable, for example, an old seeder, or made from high-quality steel, the thickness of which is 1.5-2 mm. The outer edges are bent, and a hole is drilled in the center for attachment to the frame.
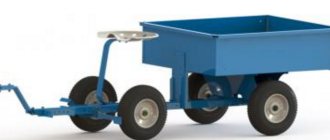
DIY trailer adapter
With the help of this unit, the walk-behind tractor can easily be converted into a mini-tractor, which allows you to automate a large number of works on cultivating a personal plot. The design of the trailer adapter consists of the following elements:
- Metal supporting frame.
- Hitch.
- Cross rod.
- Braces.
- Chassis.
- Controls.
- Seat.
To make a supporting frame, you should use a pipe of any cross-section, the length of which is in the range from 1.5 to 1.7 meters. On one side, a device for attaching to the walk-behind tractor is welded, and on the other, a transverse beam. The width of the second element is selected in accordance with the dimensions of the wheelbase of the walk-behind tractor. Then braces and wheel stands are attached to the rod to increase the rigidity of the structure.
Making a potato digger
This unit can significantly facilitate the work of harvesting all tuber crops, not just potatoes. Among the main design elements of the unit it is necessary to highlight:
- Welded frame.
- Ploughshare.
- Cleaning drum.
- Editorial node.
The ploughshare is a movable element of a potato digger and can be made of sheet iron. The cut plates should be sharpened, but all edges should be blunted so as not to damage the tubers. Making the frame should also not cause serious difficulties. To solve this problem you will need a corner, channel No. 8 and a profile pipe. The frame dimensions are selected individually, and the required amount of materials is determined on site.
The main element of the entire design of the unit is the editorial unit. To make it, you will need two metal cylinders, into which connecting sleeves are then installed. After this, you have to make hubs from a metal pipe with a diameter of 25 mm. They are used for fastening sprockets, pre-fixed to the bushings using keys.
The torque from the walk-behind tractor engine is transmitted to the ploughshare connected to the casing. During movement, the angle of inclination changes and digging movements are made. To regulate the angle of inclination of the working element of the structure, and, consequently, the depth of the dig, you can make a slider. An excellent material for the manufacture of this part would be fluoroplastic.
How often is it done?
It is not enough to know how to quickly weed potatoes. It is important to understand when it is best to do this, and whether it is possible to do such work during flowering. During the season the shelf is made only twice.
Weeds are removed for the first time a month after planting the crop. The second is when the bushes reach 20–25 cm in height. In this case, weeding is combined with hilling. Many people are interested in whether it is allowed to weed potatoes during flowering.
The second is carried out a few days before the flowers appear. Why do this? As soon as flowers appear, this indicates that the bush has already formed and the crop does not need such care. Typically this period falls in mid-July.
What it is?
The walk-behind tractor is similar to a mini-tractor; its real participation in work begins with equipping it with attachments. The “symbiosis” of the engine and all kinds of attachments allows you to plow, loosen, chop wood, transport cargo, mow grass, clear snow. All these devices can be placed on the walk-behind tractor and get a miniature excavator, tractor or lawn mower.
But it should be understood that the capabilities of the first are much wider than the second, although they completely depend on the attachments. A walk-behind tractor is more powerful than a cultivator; its traction is due to the wheels. It also has an engine, often internal combustion, a transmission that regulates the speed and gearbox, and a steering wheel (remote control). As you can see, the device is simple and can be repaired independently.
Various types of attachments are purchased for the walk-behind tractor, for example, stationary equipment is mounted on an adapter. The activator one depends on the rotational power of the gearbox. On axial equipment, the nozzles rotate under the weight of the walk-behind tractor. Landing and steering accessories refer to adapter attachments.
Attachments for walk-behind tractors: types and subtleties of choice
- What it is?
- Typical components
- Complex attachments
- Plow
- Harrow
- Hillers
- Milling cutters
- Equipment for working with potatoes
- Bed former-film layer
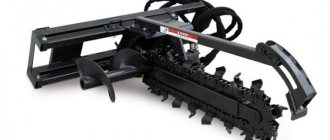
- Trencher
- Grain thresher
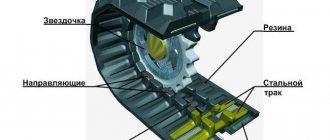
- Caterpillar belt "Krutets"
- Rotary mower
The walk-behind tractor itself is an engine, a traction force. It becomes useful on the farm thanks to attachments. This technique can work all year round: in the spring, plow the ground and plant seeds and potatoes, and in the summer, hill up and water the plants. In autumn, the unit is capable of harvesting crops, and in winter – removing snow. The walk-behind tractor is also used for collecting firewood, when mowing grass, as a small truck for transporting weights. Every year new models of equipment for the universal worker appear.
Using a trimmer
There is another option for quickly getting rid of parasitic plants - a potato weeding trimmer. It is a scythe equipped with a motor. A special nozzle is provided for removing weeds. How to weed potatoes:
- Before starting work, you need to put on safety glasses and, if possible, a respirator. This will protect a person from dust and small blades of grass.
- The regimen should be carried out once a week. The small plant has not yet had time to take root properly, so it is easier to get rid of it.
- During operation, do not put pressure on the trimmer, as the motor may overheat.
- After use, the nozzle is disinfected to destroy infectious agents.
Not every summer resident knows how to weed potatoes correctly, but it’s very simple. To avoid giving weeds a chance to take root, you should choose the right weeding tool. This point depends on the size of the plot and the planting method.
Typical components
The industry produces simple and complex equipment for walk-behind tractors. Typical components include simple attachments that are included with the unit at the sales stage. Or they can be purchased at the time of purchase of equipment for an additional fee. Let's look at some of them.
- A mandatory addition to the walk-behind tractor is lugs. These are special iron wheels with studded elements that give stability to the equipment during field work. With the help of lugs, the walk-behind tractor can easily move on any, even difficult, soils. In addition, they contribute to better soil treatment.
- An all-season attachment for a walk-behind tractor will ensure its operation on caterpillar tracks. Thanks to increased traction, it improves maneuverability on difficult soils and snow cover.
- Typical components include a lifting mechanism for the hitch. It is horizontal to the surface in any position of lifting the load. The force on the hitch pedal does not exceed 10 kg per 100 kg of load.
- Flat cutters-rippers are mounted on a walk-behind tractor to grind weeds in the ground. Over time, cut weeds turn into humus (organic fertilizer).
- A three-point hitch is installed on the walk-behind tractor, but it is important to know the type of structure (plow, harrow, etc.).
- Hedgehogs are disks with spikes of different sizes; they are used for hilling and weeding potatoes.
- Walk-behind tractors equipped with brushes are used to clean sidewalks and roads from falling leaves and snow drifts.
What to weed with?
At the moment, there are various devices for weeding vegetables. It could be:
Modern man does not want to waste time and comes up with newer devices for the shelf. These include a walk-behind tractor. Makes work several times easier. This will be especially noted by the person who planted root crops under a shovel.
Walk-behind tractor
A special device designed for soil cultivation. Weeding potatoes with a walk-behind tractor is carried out using paws or a weeder. The most commonly used are paws. They are fixed on holders, adjusted to the size of the row spacing.
They should overlap each other slightly. When attaching the paws, you need to place them so that one is in front of the other. This placement prevents cut plants from clogging the tool. Experienced specialists know how to make them at home.
Paws are a special device for weeding. They can be one-sided, two-sided or lancet. Depending on the installation, it processes the row on one or both sides. With the help of a walk-behind tractor, it is easy to weed potatoes, since the device has high productivity.
As a rule, walk-behind tractors are used on farms.
Cultivator
Growing potatoes is a labor-intensive process that requires effort and time. Weeding potatoes is one of the important stages of growing. To facilitate the process of removing weeds, use a cultivator. The device can be manual, electric, or equipped with a gasoline engine.
You can also remove parasitic plants from the garden bed manually. This is a real godsend for older gardeners who suffer from arthrosis. For weeding potatoes, you buy the tool in the store or make it yourself. A cultivator removes plants along with their root system.
The technique of use is as follows. The tool is screwed completely into the soil, the entire length of the teeth should go into the ground. Then, in one motion, they lift it up along with the pulled out weed. Most suitable for processing row spacing.
Types of attachments for cultivators
To cultivate beds, cultivators equipped with a pair of knives are most often used. They are located at an angle of 45 degrees to each other. They do not miss a single plant or device, which, instead of knives, is equipped with small pitchforks with teeth. To make it easier to operate such a weapon, wheels are installed on them.
The farmer pushes it, pressing down on the soil. Thus, labor productivity increases.
Weeding potatoes with hedgehogs is a convenient way to get rid of parasitic plants and at the same time hill up the garden bed. Hedgehogs for weeding potatoes are a structure made of two cones. Both cones have 3 wheels, the material of which is metal. All differ in size, as they have different diameters to make work easier.
Sharp spikes are welded onto metal wheels. Before work, potato weeding hedgehogs are placed on the cultivator frame. As the wheel rotates, the spikes pull out weeds and hill up the beds. The use of hedgehogs in this case increases labor productivity.
This device was also improved by providing it with a motor. After this, using the motor cultivator became even more convenient. It makes it easier to process the crop. Using a motor allows the mini-device to make work in the garden easier.
Complex attachments
Complex attachments are a type of walk-behind stationary equipment. They are purchased for cultivating land, seasonal crop care, harvesting and other household needs. Thanks to them, sowing occurs in the shortest possible time, when the count is in a matter of days. Walk-behind tractors are equipped not only with seed drills, but also with potato planters. In addition, a large amount of equipment is intended for other uses. Having familiarized ourselves with simple attachments, let’s try to understand those that are classified as complex.
The plow is perhaps the most popular attachment for a walk-behind tractor. It can be fully appreciated by those who had to dig up a plot of land by hand for long days. Equipment equipped with a plow will plow the field quickly, completely taking over the physical labor. The plow is capable of plowing the ground to a depth of 15-25 cm. At the same time, it looks quite simple, in the form of a steel plate on a metal lever, with a skimmer element. The simplicity of the design allows many craftsmen to make it themselves. This mechanism is ambiguous, it has its own variations.
- The plow is standard. It is equipped with a wide share (knife) and a curved blade, which gives it the ability to cut weeds and turn over layers of soil.
- Reversible plow. A more complex design, consisting of two plows mounted at a certain angle on a frame, with moldboards “looking” in opposite directions. While one is plowing the soil, the second is in reserve condition; the plow is changed on the next furrow, this greatly simplifies the work of the plowman.
- Zykov's plow. This device turns over and crushes the soil layer more efficiently thanks to the improved shape of the moldboard plane.
Sources:
https://stroy-podskazka.ru/motobloki/sdelat-adapter/ https://stroy-podskazka.ru/navesnoe-oborudovanie/sdelat-boronu/ https://sotka.guru/stroitelstvo/navesy/kak-sdelat- navesnoe-oborudovanie-dlya-motobloka-svoimi-rukami.html https://stroy-podskazka.ru/motobloki/navesnoe-oborudovanie/
Potato processing
Weeding
A week after planting, it is worth loosening the soil. During this time, a dense crust formed on the ground, preventing the germination of plant stems and the access of oxygen. Weeding is carried out weekly. This helps fight weeds that negatively affect root crops.
Trailed grain harvesting equipment is classified as agricultural equipment and is used for harvesting grain and leguminous crops. A trailed grain harvester is reliable, high quality and productive.
Snow removal equipment is ideal for owners of suburban areas, since snow removal occurs with their own efforts. By clicking on the link, you will become familiar with the various models and characteristics of the Lynx snow blower.
Challenger tracked and wheeled tractors are used in work in difficult terrain conditions over large areas for cultivating land. The Challenger tractor is a reliable and smart work assistant.
For weeding work, a rotary or mesh harrow, paws and a weeder are used.
Hilling
Shoots appear in 3-4 weeks. Now after planting you need to hill up the potatoes. A walk-behind tractor will help with this. For hilling, one, two or three row hillers are suitable. If desired, you can apply fertilizer by installing an additional nozzle.
Potato harvest
The walk-behind tractor is used not only for planting, but also for harvesting potatoes. By autumn, the potato tops dry out and everything is ready for harvesting. You need to dig potatoes in August - September, in dry weather. For digging with a walk-behind tractor, a mounted plower or potato digger is installed.
But you can get by with a single-row hiller, which will lift the soil and the potatoes will lie along the edge of the ridge. All that remains is to go through and collect the potatoes. Planting and processing potatoes with a walk-behind tractor is not the only area of its application. Technical innovations have made the work of summer residents much easier.
The walk-behind tractor has now become a necessary tool for cultivating land. The unit is well worth the investment. You can see how walk-behind tractors can be used, in addition to planting potatoes, on the “Advice from an Old Plowman” website.
The choice of attachments depends on the owner’s requests. Using the example of planting, hilling, weeding and harvesting potatoes, you can see how using a walk-behind tractor makes life easier for gardeners.