Grain processing is one of the leading types of business in many countries. Not only large enterprises are engaged in the production of flour and other products. Small agricultural firms equipped with compact flour-grinding equipment successfully compete with them. In Russia, the need for mini-mills increased in the late 90s, which led to the emergence of numerous developments of equipment in this category by different manufacturers. It is easy for a farmer or company to select a mill model with optimal performance and the required set of functions.
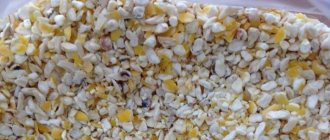
To produce flour-based food products, varietal and wallpaper grinding of wheat or rye grain is used. Cereal grains are hard and tough, and have a structure that is heterogeneous in strength and density. Therefore, equipment for processing crops must meet a number of requirements, the main one of which is the sufficient completeness of the technological line.
The process of grinding grain to the desired fraction is handled by mini-mills equipped with roller machines (roller mills). Mills have a mechanical effect on grains and destroy their structure . Modifications of equipment with a different number and arrangement of rollers, type of feeding mechanism and rest of the working rollers (manual or automatic) are supplied to the market. Despite the variety of models, the operating principle of all devices is the same.
Description and purpose
The mill complex includes modules: grain cleaning, humidity adjustment, grinding, and transportation.
The grain cleaning department is equipped with machines that remove impurities of various types. The grain continuously moves along the production line.
- A pneumatic separator cleans grain from particles with aerodynamic properties different from grains.
- The machines of the grain cleaning unit separate impurities that differ in grain size (sieves are used), cockle and chaff; clean the stuck dust, loosen the stuck lumps of earth, remove the top shells (hard wallpaper).
- The second pneumatic separator removes light impurities.
The cleaned grain is sent for humidification, and then fed through a magnetic separator into the soft upholstery. Here the covers are removed from the grains.
Several blocks of roller machines are installed in the grinding sector.
Each block is equipped with 3-4 machines and a common electric drive for all. Grain and cereals are ground using two types of grinding systems: torn (coarse grinding) and grinding (fine grinding). Roller machines are designed for grinding wheat and rye grains. Wheat is used to produce premium, 1st, 2nd grade flour and feed flour. From rye - seeded, peeled baking flour and feed flour.
When choosing a model, take into account the characteristics of the original product:
- Type of cereal – rye, wheat;
- Wheat variety - hard or soft;
- Grain quality – moisture content, content of individual impurities.
Most of the developments have a compact design, which reduces the cost of building premises and installing machines, i.e. operating costs.
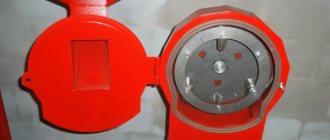
Making a stator
The stator is a little more difficult to make than the rotor, as it requires extreme precision. The work can be divided into several stages. First grind the workpiece on the machine, then leave a small technological allowance. To do this, drill out the opening in the center to 70 mm, mark a circle with a diameter of 105 mm on the workpiece, and mark the central points of future openings. Subsequently, they will create the stator work plane. Markings should be applied strictly according to the drawing.
Mark the outlines of the holes at the top and bottom, and then drill out blind “windows” about 26 mm deep. On the machine, remove the allowance that you left earlier and bore the place where the working chamber will be located (105 mm). Turn the resulting workpiece over and make a landing recess where the bearings will be inserted. You will also need to machine a groove for the sealing lip if you are installing one, but in practice the unit works just fine without this part.
When the stator is ready, you can start creating threaded holes for the bearing and stator covers, the nozzle and the loading box. Finally, the stator, like the rotor, must be subjected to heat treatment using the technology described above.
In order for the grain grinding mill to work properly, it is necessary to correctly and precisely set the stator coordinates. Bolts are used for this. During operation, the rotor should move easily and smoothly, without jerking or jamming. Only when you are sure that all the parts are moving as they should, can you test run the mill. To do this, it must be fixed on a table or stool so that the device does not fall to the floor due to vibration.
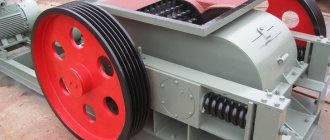
Roller machine design
The machine is equipped with rollers made of two layers of cast iron: gray (internal) and white (external). The surface of the outer layer is corrugated; Moreover, the number of grooves on the grinding roller is twice as large as on the torn roller. An important characteristic is the hardness of the roller material. It varies between 48-55 Rockwell units. Different models differ in parameters: roller diameter, length of the working area, depth of the bleached layer.
The number of rollers and their orientation in space (horizontal, vertical) depends on the model. The rollers rest on bearing supports. On a massive, stable frame, as a rule, there is a connector for removing the rollers.
There are numerous options for technological flour milling lines on the market. They differ in productivity and range of finished products.
Conclusion
Now you know how to make decorative windmills with your own hands. Additionally, watch the video in this article. If any points are unclear to you, ask questions in the comments, and I will be happy to answer.
Similar articles
- Details about building a gazebo with your own hands: drawings, choice of design and building materials, installation. Photo and video instructions for building a gazebo at the dacha A gazebo is a great opportunity to spend time outdoors in comfort. And it’s almost impossible to imagine a personal plot without this...
- Folding table: tourist designs and others, instructions on how to make, video and photos
A folding table will make outdoor recreation more comfortable. A folding table can accompany you on a hiking trip, help you receive guests on… - How to properly attach a block house, video instructions and advice from professionals.
Block houses are often used for exterior decoration of the facade or interior of a house. The material is a modified lining, which…
Principle of operation
The mill must include a receiving hopper. The grain from it is fed to a torn system, the rollers of which are distinguished by large grooves.
After the first stage of processing on a tattered system, particles of different sizes are fed into a basement bunker, and from there to a mill sieving machine. In installations there are up to three torn systems, where the grinding cycle is sequentially repeated .
At the same time, sorting is carried out into fractions: flour, bran, other products (cereals, duns). These sieves are fed to a roller machine with fine cutting grooves. Here the product also goes through three stages of grinding, during which flour and bran are again separated from the mixture.
The next stage is knockout. The grinding product arrives here via pneumatic transport. This type of transportation creates air currents that favor better aspiration. At the same time, the flowability of the product increases by reducing its temperature. Another advantage of using pneumatics is the absence of condensation on the internal surfaces and rollers of machines, on gravity feeds and sieves.
Wind turbine assembly
Windmill frame
The shape of the windmill resembles a cross, so the frame should be cross-shaped. To do this, the longest strip is taken as a basis - 91 cm. Then the 45.5 cm strips are screwed in with self-tapping screws. The required shape is obtained. What follows is a step-by-step process.
- At each end of the 4 parts of the frame, 17 cm long strips are attached to form a swastika shape. Now you need to attach a 26 cm strip in parallel to the added strip, and close the resulting rectangle with a piece of 8 cm. We cover the frame with 5 strips 19 cm long in increments of 2 cm, nailing them with small nails. The blades are ready.
- For the axis of rotation in the center of the windmill, we fix two circles of plywood with 4 screws. We drill a through hole in the center with a drill, the diameter of which should completely correspond to the spire. A hole is also drilled in the center at the ends of the mill roof at a height of 9 cm in accordance with the diameter of the bearing. Hammer the bearings. We thread the pin through, put on washers and secure with a lock nut (a simple nut will do). We put 2 nuts on top, then the windmill itself, and the nut again.
Ready windmill
All that remains is to install the roof, which, together with the fixed windmill, is placed on the frame of the mill and secured from the inside with long self-tapping screws.
Note!
To drill a small hole in the roof for the bearing, use a pin drill.
Advantages and disadvantages of roller mills
Small-sized roller machines are designed for the needs of flour mills, farmers, and private producers of different types of flour. Such mills, for example, model R6-АВМ-7, are allowed to be used in explosion- and fire-hazardous areas for storing and processing raw materials.
Mini-mills do not require large staff to operate them. The mechanisms are usually operated by 3-5 people.
Roller systems are used not only by enterprises that sell flour. Mini mills do an excellent job of crushing grain to produce high-quality feed. The degree of flattening is regulated by simply moving the valve in the hopper.
The production process is carried out continuously, operations replace one another without loss of time and labor thanks to direct-flow technology. Raw and partially processed grain products are transported by mechanical or pneumatic transport. Through gravity pipes they sequentially reach the line machines to go through all stages of grinding. Thus, the process lends itself to mechanization and automation.
Advantages of roller mills
Varietal grinding allows you to focus on the production of flour of the most popular grade - the highest. Selective crushing can be achieved by compact and easy-to-use small-sized roller machines. For this purpose, it is better to purchase units that include several pairs of working rollers. Using multi-step grinding of a grain product, grinding modes can be adjusted to take into account the properties of the grain. The process will be as close as possible to the technology for producing flour on an industrial scale.
The modular configuration of the systems allows you to change the number of modules, increasing the productivity of the mill. It is possible to combine components of different brands of equipment in modules. The mill can be equipped with different machines, for example, a grain cleaning module from one manufacturer, a sieving unit, a roller machine from another. Using such opportunities makes production cheaper and more efficient. Each owner completes the system based on the needs of his enterprise.
Examples of innovations: plate springs are used to prepress the rollers; a magnetic frame in front of the receiving chamber separates metal objects, preventing them from getting onto the rollers.
Competition between manufacturers leads to continuous improvement of flour-grinding equipment. By updating the designs, the models are becoming more and more reliable. The undeniable advantages of all models and modifications are mobility and autonomy.
Disadvantages of roller mills
Purchasing an installation requires large financial costs.
Roller mills are configured at the stage of assembling the technological scheme. They are practically not reconfigured due to technical difficulties.
Roof assembly
Assembling the roof is somewhat easier, since the whole process is divided into only two stages. First, using the previously drawn pattern, the ends of 4x4 cm bars are knocked together into a triangle. You also need to make two triangles. For them you will need 2 bars 38 cm long and 4 35.5 cm long. The ends of the bars must be cut at an angle, secured with self-tapping screws, the result will be identical triangles. They are connected using 38 cm bars at the top and bottom.
The second stage involves fixing the lining to the prepared frame with self-tapping screws on both sides. For the roof slope you will need 5 elements 36 cm long. All that remains is to fix the decorative ridge from a 3x3 cm corner.
Note!
For beauty, the roof slope should protrude slightly on the sides, so the excess should not be trimmed.
Examples of popular roller mill models
Here are two brands of flour roller milling machines with the characteristic features of this type of equipment.
Р6-АВМ-4/7/15/30/50 – aggregate roller mill from Kharkov
Equipment control is electrical. Accepts wheat, rye, oats, barley, buckwheat, as well as legumes and corn for processing. Allows you to obtain flour of the first and highest grades.
Weight and dimensions parameters:
- Weight: ≤6400 kg.
- Dimensions: 7x3.4x5 m. Dimensions are given without taking into account the bunker, frame, ladders and ladders.
Technical specifications:
- High quality flour produced is achieved with low power consumption. The average productivity of flour from basic grain grain is 7 tons per day. At the same time, the first grade takes up ~23%, the highest - about 50%.
- The length of the rolling line is 102 cm, the screening area is 14.1 m2. Product transportation is pneumatic.
- The installation is powered by 10 electric motors with a total power of up to 27 kW.
- Control is carried out via a remote control.
Installation of the mill does not require the construction of a special building. Its mechanisms are installed on a prefabricated, durable two-story frame.
Flour roller mills "Kharkovchanka" Stankinprom LLC
The family of mills includes models for various purposes: obtaining seeded and peeled rye flour; production of pasta grinding to produce second grade flour and pasta grits.
- The buyer can choose the model of the required productivity from a wide range - 10-500 tons/day.
- The equipment produces 65% of premium flour that meets the requirements of GOST.
- The process is fully automated.
- The mechanisms provide a high degree of purification, quality of grinding, and give a high percentage of flour grinding.
The system is characterized by a quick payback and durability of the grinding system. Upon individual order, the mill is supplied with additional options and equipment: computer process control, accounting of the initial and finished product, energy consumption; bunker for grain and flour batches, granulation line, etc.
Finishing touches
The mill can be painted
At the final stage, the finished decorative mill is painted with varnish or paint. When the paint layer has dried, you can place the mill in the prepared area of the garden. It should be ensured that there is no direct contact with the ground.
To do this, you can place it on a large flat stone or a prepared concrete platform. You can also attach legs made of durable plastic to the frame of the mill, which are immersed in the ground.
Note!
The inside of the mill is hollow, so air will circulate well, which means that the likelihood of mold and rot will be reduced.
A self-made windmill will look appropriate in any part of the garden. Ideally, there will be a beautiful and trimmed lawn nearby, as well as several perennial plants. The decorative mill looks good at any time of the year: among lush greenery, fallen yellow leaves, and also lightly dusted with snow. But if you want it to serve you for a long time, then it is better to hide it for the winter.
How to make a mill with your own hands: a detailed guide
Garden mills are divided by type and size into wind and water, large and small. They are made from stone, wood, tires and even plastic bottles.
Step-by-step instructions for creating a mill:
- Prepare your materials.
- Cut the parts and draw a drawing.
- Make the body of the mill.
- Assemble the roof and windmill.
- Decorate the finished mill.
We explain all the steps in more detail below.
An example of a wooden mill.
Example of a stone mill.