We continue the theme of homemade products and this time we will breathe new life into an old washing machine, make a grain crusher out of the washing machine for grinding corn, wheat, barley and other cereals.
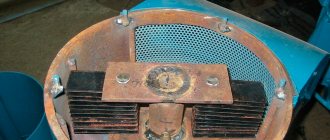
To make a grain crusher, we will need a washing machine in the form of a barrel of the “Riga” type and its analogues; the design of such a machine consists of a barrel body, a stainless steel tank, an electric motor of 180 W and 1350 rpm and a starting device.
The structure of the Riga washing machine.
Of course, for a grain crusher such an engine will be rather weak, it is not designed for high loads and will quickly overheat, so to increase productivity you need to replace the engine with a more powerful one of about 1 kW, 3000 rpm.
Grinder grinder
Grain crusher from a grinder
You can assemble a grain crusher using an angle grinder (grinder) with a disc size (diameter) of 115 or 125 mm as an engine.
The assembly process of such a device consists of the following steps:
- A rectangular or round base is cut out of waterproof plywood 8-10 mm thick with a jigsaw.
- A round hole is made in the center of the base for the grinder gearbox.
- Diagonally from the central hole on the base, another hole is made for the grain bin.
- The chopper knife is made from hard high-carbon steel 1.5-2.0 millimeters thick.
- If necessary, the knife is released over the fire and a hole is drilled in the center for mounting on the gearbox shaft of the grinder.
- Using sandpaper, the knife is sharpened.
- The grinder is placed on the base, its round protrusion is placed in a pre-cut hole.
- Using a homemade clamp made of metal tape and two screws, the angle grinder is secured to the base.
- A sharpened chopper knife is attached and fixed to the grinder shaft.
- The old pan is cut in half, holes are made in its bottom with a 4 or 5 mm drill;
- The resulting sieve is secured to the base on the knife side using 4 corners, rivets or screws.
- The assembled grain crusher is placed on a capacious container - a bucket or large metal pan. A plastic 5-liter bottle with a cut bottom is inserted into the hole for the grain bin.
During operation, the grinder is connected to the network, and the constant speed of the knife is set with a locking button on the handle. To obtain flour, grain is poured into a homemade receiving hopper - a plastic bottle.
Be sure to read:
How to make a vegetable cutter for livestock with your own hands from scrap materials.
In this case, to regulate the flow of grain, a movable tin valve is inserted into the neck.
DIY feed cutter
In agriculture, having available tools is very necessary, since the process of raising livestock or poultry takes a lot of time and causes a lot of trouble. Designs such as a feed cutter will make work easier and make it possible to provide all animals with food on the farm. A large number of animals will not allow you to make food manually; there is simply not enough time for this; various devices will help you cope with the tasks.
Design and technical description
A mechanical product will require a motor in the design. A single-phase motor is used with a prepared bushing, which is made in the form of an adapter. The emphasis of the cutting knife is created by the legs, which are fixed to the plate through an adapter; their purpose is to release the finished product from the container. The blade mount of a DIY feed chopper should be recessed into the design for a more consistent product output.
Making a body with your own hands requires the use of a steel pipe with a diameter of at least 30 cm, with a pre-prepared hole for the feed to exit. The structure is fastened to a support or wooden board, to which metal corners or studs are attached. The feed cutter drum is secured by welding to the corners, just like the engine.
Scheme of a homemade feed cutter
The housing has a front cover through which feed is loaded. The back cover serves as access to the cutting element and has a hole designed for unscrewing the bolt securing the knives. The front cover is complemented by a feed supply structure made of metal plate. The body is secured with metal plates around the perimeter by welding.
Principle of operation
When the electric motor starts, the mass for grinding is fed into the loading hole with your own hands. The knives rotate at low speed, cutting the product into the required pieces, the blades remove the finished mass to the outlet. By adjusting the gap between the cutting edges and the plate, you can achieve cutting quality and process different raw materials. The harvested feed is fed against the location of the stems to increase speed and also to prevent clogging of the structure.
An example of a do-it-yourself feed cutter
For increased productivity, the knives are installed in a cross-shape. If necessary, an electric motor with a power of 3000 rpm is installed. Drawings of a homemade feed chopper will help you calculate the productivity and degree of cutting of raw materials.
Advantages of do-it-yourself feed choppers
The main advantages of a homemade feed cutter is that it can be adapted to meet the necessary needs. A homemade design can be made from improvised materials available on the farm.
Making the simplest feed cutter involves using a stainless steel tin bucket; more complex designs are made from an old washing machine.
Using a grinder or a high-speed drill in feed cutting also provides the possibility of cutting grass varieties of feed. All designs and accessories of a self-made feed cutter are made according to drawings.
Feed cutter grater
The most common method of processing raw materials in the household is a feed cutter from a grater. A homemade feed cutter of this kind allows you to produce ready-made feed for a small household. Making a structure with your own hands is not difficult; drawings may not be needed at all. Some basic elements for making the case:
Making a manual feed cutter with your own hands is quite easy; you need to follow the correct sequence of steps. The lid holes are cut to the required diameter for high-quality cutting. The manufacturing process will not take much time if you have the accompanying materials and tools.
Source
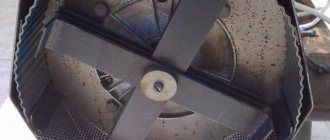
Grain crusher from a washing machine
Grain crusher from a washing machine
You can make a simple and productive grain crusher from an old vertical type activator machine (Oka, Volga, Fairy) as follows:
- The squeezing device is removed from the machine.
- With the washing machine on its side, unscrew the fixing (locking) screw or bolt on the activator pulley.
- Having installed the machine in the working position, the activator is removed along with the shaft.
- A plate of galvanized sheet metal of the appropriate size and shape is attached to the activator niche.
- The shaft is unscrewed from the activator.
- A trapezoidal knife is cut out of an old circular saw and rapid blade, the diameter of which is slightly smaller or the same as that of the removed activator.
- The knife is sharpened using sandpaper and secured to the shaft using two nuts.
- The shaft with the attached knife is inserted into the hole in the tank and secured in the pulley with a locking screw.
- To collect the final grinding product - flour - the drain hole at the lowest point of the tank is widened using a hammer and chisel, a piece of steel pipe is inserted into it and brought out at an angle.
- To prevent large particles from getting into the final product, a fine-mesh steel mesh or a sheet of galvanized sheet with holes 4-5 mm in diameter is installed in front of the hole for collecting flour at an angle of 60-700.
- To load grain into the removable lid of the machine, widen the existing hole and insert a 5-liter plastic bottle with a cut bottom into it.
The advantage of such a homemade grain crusher is that its assembly does not require drawing up a drawing or making a base for the engine.
In addition, it has good stability, has a spacious tank (up to 30-40 l) and low electricity consumption.
Preparatory work
The preparatory stage is associated with the selection of an engine and knives for the future grass chopper. The designs of the knives allow you to obtain different output results: from small dust to pieces of 10 cm. The circular knife allows you to chop grass and small branches. This is the most suitable option for home use. An old wood saw is suitable for making diamond-shaped knives.
Engine power is the main factor to keep in mind when choosing an engine. Low power engines are only suitable for cutting grass. If, in addition to the body of the washing machine, the engine is also in satisfactory condition, then you can use it. This will reduce the cost of manufacturing the shredder.
This is interesting: A chain-link fence without welding - detailed step-by-step instructions for craftsmen and photo examples of finished work
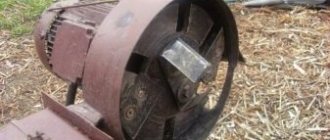
Grain crusher from a vacuum cleaner
Grain crusher with an engine from a “Raketa” vacuum cleaner
To make a simple and reliable grain crusher, working but unused Soviet vacuum cleaners such as “Raketa” and “Saturn” are used.
Be sure to read:
How to make a cone for slaughtering poultry with your own hands, how much does such equipment cost?
The production of such a grain crusher is carried out as follows:
- The motor in the housing is removed from the vacuum cleaner.
- The chamber with the suction impeller is removed from the motor shaft.
- A round base is cut out of thick sheet steel.
- A hole is cut out in the center of the base for the motor shaft, and a hole is made on the side for the grain bin.
- The motor housing is secured to the base using screws and brackets.
- A trapezoidal pre-sharpened knife is attached to the motor shaft.
- A sieve made from an old saucepan with 4- or 5-mm holes in the bottom is attached under the knife.
For convenient operation of such a unit, it is attached to the container with special clamps and short self-tapping screws.
Important! The hole into which the grain bin is inserted and through which raw materials are supplied for grinding must be located in the rotation zone of the chopper knife. If the rotation zone of the knife does not completely cover the feed hole, not covering 1 centimeter or more, most of the grain will spill out and not be crushed, thereby clogging the sieve.
DIY feed cutter knife
A knife for a feed cutter must be made of durable metal so that it does not tear due to centripetal acceleration during operation. If such material is not at hand, but you need to make a knife, then sharpen the ends with a triangle, lightening the weight at the edges. This approach will increase the safety of the structure, but will weaken the inertia, which will have a bad effect on the operation of the structure if it is equipped with a weak electric motor.
To make a feed cutter knife:
- Cut a piece of metal plate at least two millimeters thick, suitable in size for the previously made case;
- Sharpen it in the right places;
- Mark the center as accurately as possible;
- Drill a hole for the fourteen bolt;
- Secure the bolt into the knife with a nut;
- Calibrate the width of the bushing (thread) using a washer to the size of the seat.
- We weld the bolt head to the axis that transmits torque from the motor to the knife.
On the side of the body, we weld a bearing or bushing, which will act as a seat for the end of the axle (calibrated in size above the bushing/thread).
Instead of a washer, it is better to use a small bearing or a thicker bushing (I wore it out after two hundred buckets of potatoes, and I replaced it with three).
When assembling the feed cutter, be sure to leave a gap in the places where the electric motor is mounted so that it can move around a little. Since you will not be able to make a perfectly straight shaft and your unit will vibrate when the motor rotates, which means a rigid mount will lead to failure.
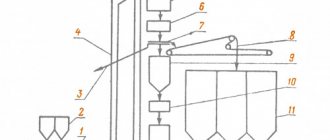
Types of grain grinding machines
Types of machines for grinding grain
Depending on the grinding method, design and location of the working parts, there are 4 types of grain crushers:
- Rotary – crushing of grain in such devices occurs due to a rotor located horizontally and moving at high speed.
- Hammer crushers - the design of such grain crushers includes a rotating vertical drum and stationary hammers located in a circle, against which the grain is crushed. When grinding in this way, the finished flour is poured down and, passing through a sieve, ends up in a container placed under the deck of the housing.
- Roller crushers crush grain due to 2 rollers located in one chamber, rotating towards each other. At the same time, the gap between them is so small that the incoming raw material is not simply crushed, but, due to high speed, is crushed into dust. The advantage of such devices over others is the ability to crush grain with high humidity.
- Millstones are grain crushers in which grain is crushed when it gets between two discs (millstones) located with a small gap. In this case, one disk rotates at high speed, and the second is stationary.
Be sure to read:
How to make an incubator with your own hands: with automatic and manual turning, types, description
Among these varieties, the most common are rotary and hammer ones - they are more productive, reliable, and easier to repair and maintain.
Crushers for home use
“Vikhr ZD-350K”
Among factory-made grain crushers, the following models are most suitable for private farms:
- "Whirlwind ZD-350K";
- "Zubr-2";
- "Three Little Pigs 350";
- "Farmer ISE-05";
- "Cyclone-350";
- "Bison 400";
- "NIVA IZ-250".
"Zubr-2"
Important! The average cost of a factory installation, depending on power, performance and brand, ranges from 2000-2300 to 6200 rubles. Assembling a homemade device if you have an unnecessary working washing machine, an old vacuum cleaner, or an angle grinder will cost only 500-1000 rubles.
"NIVA IZ-250"
Grain crusher performance
Productivity is the most important characteristic of grain crushers, which indicates the amount of grain they grind per hour (kg/h).
For homemade and factory models, the average is:
- Homemade units - up to 150-200 kg / h;
- Factory models - from 180 to 400-500 kg / h.
Moreover, in most cases, the productivity of factory crushers cannot be increased, while for any home-made unit this characteristic can be significantly improved by changing the power unit (engine) to a more powerful one.
Motor protection
It is worth noting that the electric motor located at the top of the structure will operate in a fairly aggressive environment (dust from grain, small particles, etc.). In order to avoid this, we cut out a protective casing from a tin can, which we screw in with bolts in the immediate vicinity of the engine.
By the way, in the place where the drain used to be located, i.e. in the grain outlet area, you need to place a sufficiently capacious container. Processed raw materials will go there.
If you are involved in livestock farming and have cows, we recommend that you familiarize yourself with the prices of milking machines for cows.