With the onset of cold weather, private farm owners are faced with the problem of snow removal. Previously, snow shovels were used for this; nowadays, almost every household has a walk-behind tractor, which can be adapted for these purposes using a special blade. You can buy a shovel blade (blade) in a specialized store (which is quite expensive), or you can make it yourself. By making such equipment yourself, you will save quite a significant amount and will not spend a lot of time.
Description of the blade for the walk-behind tractor
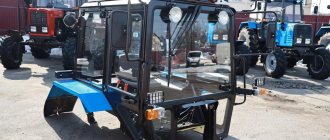
A blade (blade blade, shovel attachment) is a mounted tool in the form of a shovel or bucket, which is mounted on a walk-behind tractor for the purpose of removing snow and debris from a flat surface, and can also be used to level land for planting vegetables or a lawn.
It is a universal equipment, it can be used with any model of walk-behind tractor, without being tied to the power characteristics of the engine. The factory-made blade attachment has the following dimensions: width – 100 cm, height – 40 cm, however, for handicraft production, any dimensions can be selected.
When manufacturing a blade, you need to select such dimensions so that the load on it corresponds to the power of the walk-behind tractor. The use of a tool whose design is designed with too much performance can lead to overload of the unit and its failure.
Factory models
Any company that manufactures walk-behind tractors can also offer a range of snow plows. There are popular models on sale from such manufacturers as Centaur, Neva, Zirka, etc. The only big advantage of a factory design over a home-made one is that they are made of high-quality steel and are more difficult to damage. Moreover, such models last longer than homemade ones. But, on the other hand, they cost a lot.
There are a lot of options for factory dumps, so you should check before purchasing whether this model is suitable for your existing walk-behind tractor. At the factory, snow plows are not equipped with spring mechanisms due to the low speed of movement. If the speed of the walk-behind tractor is low, then the protective mechanisms for contact with the ground lose their meaning. Moreover, the factory models do not have mechanisms for lifting and turning the unit. In this regard, the price of the factory design is reduced.
For higher performance, it is recommended to replace conventional rubber wheels with factory or homemade lugs. This will speed up the work process.
Prices for snow blowers may vary. Basically, the cost of these varies from 4 thousand to 6 thousand rubles.
Why do you need a blade for a walk-behind tractor?
Using a blade you can perform the following basic work:
- clear snow drifts;
- level the surface of the earth;
- remove trash;
- perform loading operations (if the blade is in the form of a bucket).
A walk-behind tractor with such a hitch can also be used for:
- creating landscape design;
- construction of roads and paths;
- quick digging of trenches, wells and ravines;
- creating high beds;
- collecting bulk materials for their subsequent transportation in a cart (trailer);
- spreading soil or organic fertilizers around the site.
As can be seen from the list of works, the dump can be used all year round.
Blade classification
This simple mounted implement has the following classification:
- According to execution form:
- shovel blade (straight rotating, straight non-rotating);
- bucket (hemispherical, spherical, spherical for bulk materials).
- According to the method of attachment to the walk-behind tractor:
- standard bracket;
- using lugs and locks.
- According to the location of the working body relative to the walk-behind tractor
- front;
- rear (if the steering column can be rotated 180 degrees).
- By hitch type:
- adjustable:
- unregulated.
- By type of lifting mechanism:
- manual or mechanical;
- hydraulic.
Original attachments Agat
Working with the attachments of the Agat walk-behind tractor is very convenient and will save you a lot of time, since all products are designed for the most efficient and reliable operation. Thanks to the wide variety of trailed equipment, you can combine many different individual equipment in one copy.
Here is a list of attachments that are attached to the Agat walk-behind tractor:
- Plowing cutter
- Hilling wheels
- Rippers
- Weights
- Shovel
- Vegetable digger
- Potato digger
- Plow, hiller
- Cart.
This walk-behind tractor with attachments can work for a long time.
Blade design features
Structurally, the walk-behind blade is a curved metal surface and consists of the following elements:
- working body (the shovel itself or the bucket);
- fastening unit;
- mechanism for adjusting the angle of rotation of the working body.
As a rule, the shovel attachment is fixed in one of three positions during operation:
- directly;
- with a rotation of 30 degrees. left;
- with a rotation of 30 degrees. to the right.
Before starting work on the manufacture of a blade, carefully analyze the available recommendations and read the literature on this topic.
Some points to pay attention to when creating a blade for a walk-behind tractor
The manufactured product must meet the following criteria:
- Reliability. The strength characteristics of the knife and shovel must be high enough for the device to last as long as possible without repair. For the manufacture of all parts, it is necessary to select such materials, the use of which would ensure the maximum load on the device, but not exceeding the limit values for the power plant of the unit.
- Dimensions. Factory dumps have standard dimensions, but if you make them yourself, you can make them whatever you want. Of course, you want to make the tool as productive as possible, but you shouldn’t go too far beyond the standardized dimensions. This can lead to overload of the motor and damage to the walk-behind tractor.
- Availability of a lifting mechanism. It is needed to expand the possibilities for using the blade, since if it is available, it will be possible not only to clear snow and remove garbage, but also to remove it from the site. Also, the lifting mechanism will be useful, for example, when loading bulk materials onto a cart or moving them around the site. There are only two types of lifts: mechanical (the position of the shovel is changed manually using a lever) and hydraulic (using a hydraulic pump). A mechanical lift is not difficult to implement; a hydraulic lift will take a little more work, but it is also quite simple.
- The presence of a swivel joint. If it is possible to adjust the shovel vertically and horizontally, then snow removal will be more efficient.
- Security. A thick rubber strip on the blade of the blade will protect the device from impacts, breakages and deformations, and the surface being processed from damage.
- Quick installation/dismantling. Sometimes you need to quickly change the attachment to a walk-behind tractor; therefore, it is advisable to provide for this possibility when creating the mounting of the blade to the unit.
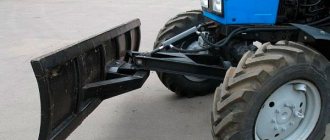
The rounded top allows the blade to roll the snow in front of it rather than simply moving the snow mass. Thus, the walk-behind tractor needs to use significantly less force than with a straight shovel.
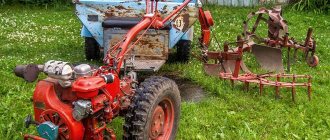
How to make a shovel for the MTZ tractor yourself?
Instructions for making a homemade blade for a tractor in Belarus.
From manufacturing to assembly. A tractor blade, also called a shovel, is one of the variations of attachments for MTZ brand tractors, the use of which allows you to turn an ordinary tractor into a kind of bulldozer and use it to clear the territory of snow, move soil and other bulk materials within the working or construction site. Today we’ll talk about how to make a similar design at home.
Required tools and materials
In order to make a blade for a walk-behind tractor with your own hands, you will need:
Materials:
- To create a working surface, a 200-liter steel barrel, an empty gas cylinder or a sheet of iron is suitable;
- iron piece 5 mm thick;
- a piece of pipe with a square cross-section of 40x40 mm and a length of 1 m;
- a strip of thick durable rubber;
- sheet steel 10-12 mm thick;
- fasteners (bolts, nuts).
Tools:
- roulette;
- welding machine;
- angle grinder (grinder);
- drill with a set of drills;
- a set of wrenches, a hammer, pliers and other plumbing tools.
conclusions
Despite the apparent complexity of creating a tractor blade, it is still possible to make it yourself. Of course, this will take a lot of time and effort, but the end result will justify the costs and will allow you to get not only moral satisfaction, but also tangible financial savings, thanks to the use of materials and inexpensive, used, but nevertheless working parts.
MTZ tractors are very popular in the agricultural industry due to their low price, ease of use, and high performance characteristics. Most owners want to modify their iron horses and maximize their capabilities. One of these modifications can be called a frontal blade, which will be indispensable when clearing snow and some other agricultural work.
Features of making a blade for a walk-behind tractor with your own hands step by step
The blade can be made in different ways from different materials. Let's consider the 2 most popular:
- from a steel 200-liter barrel;
- from a gas cylinder;
Drawings with dimensions
- Blade
- Left knife
- Medium knife
- Bolt
- Washer 16.65G.019 GOST 6402-70
- Nut M16-6N.5.019 (S24) GOST 15523-70
- Bolt
- Right knife
- Washer 20.65G.019 GOST 6402-70
- Nut M20-6N.8.019 (S30) GOST 15523-70
Blade from a barrel
Let's take a step-by-step look at how to make a shovel for a walk-behind tractor using a metal barrel:
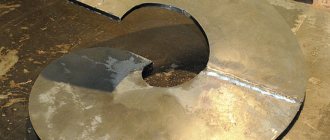
- Take an old 200 liter barrel and cut off the lid and bottom with a grinder.
- Apply markings to the barrel so that you get 3 identical sectors of 120 grams each. After that, cut it with a grinder.
- Connect the two segments at their ends with an overlap of 3 cm using a welding machine. Next, you need to strengthen the structure. To do this, cut the remaining part of the barrel into strips with a grinder. Attach one strip to the sides of the shovel, distribute the rest evenly along the entire length of the working body. You can also use a profile pipe.
- To protect the working surface of the blade, a knife is installed in its lower part. To do this, you will need a metal strip the same length as the grip of the shovel, 100 mm wide and 5 mm thick. Using an electric drill, make holes in the knife with a diameter of 5-6 mm at intervals of 100-120 mm for mounting the rubber strip.
- Place the rubber strip on the knife. It is better to make the width of the protruding part from 3 to 10 cm. The tape should be removable so that the blade can be used for working with bulk materials.
- Next, we attach the shovel to the walk-behind tractor. Make a U-shaped part from sheet iron (you can take a suitable channel).
- Make several holes in the resulting U-shaped part to set the required angles of rotation of the shovel. We also make holes for attaching a square metal profile.
- Weld the resulting part in the center of the work surface.
- Now you need to make an adapter. Take another piece of square pipe and make an L-shaped part from it. The short side of this adapter is attached to the U-shaped part, and the other end of the pipe is bolted to the walk-behind tractor frame.
- To adjust the height of the blade, weld two eyes to the lower profile (which is connected to the rotary sector) and a metal plate to the upper one (which is fixed to the walk-behind tractor bracket). Make a hole in the plate for the bolt. Take a piece of pipe and drill a hole. One end of this pipe will be bolted to the down pipe, and a bolt or threaded rod will be welded to the other end. Thread the bolt into the hole in the metal plate to make a handle.
- A shovel for a walk-behind tractor for clearing snow with your own hands is ready.
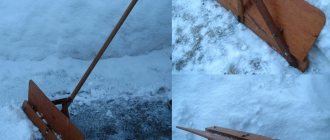
It should be taken into account that the thickness of the barrel walls is small. It is better to use such a blade for cleaning recently fallen snow, which has not yet compacted and is not covered with an ice crust.
Blade from a gas cylinder
Using a cylinder, a motorized cultivator-snow blower is made in the same way as from a barrel with minor differences. Assembly order:
- Release excess pressure from the cylinder.
- Cut off the caps from the ends of the cylinder so that the width of the resulting pipe is 1 m.
- Cut this pipe lengthwise into two equal parts.
- By welding, fasten the 2 parts so that the height of the blade is about 700 mm.
- Make a hitch.
Since the walls of the cylinder are quite strong (thick), their additional strengthening is not required. With such a blade, the walk-behind tractor will be able to work with compacted snow, level the surface, move sand and crushed stone without fear of damaging the working surface of the shovel.
Advice from professionals
When assembling a blade blade for a walk-behind tractor with your own hands, experts advise using sheet steel 3 mm thick. Thin sheet metal will bend under load. Thick metal will increase the weight of the hitch, which will create additional load on the walk-behind tractor engine.
Rubber for the knife is a must. It is attached so that the edges touch the edge of the metal bus. With this arrangement, the rubber wears off less and prevents the steel blade from destroying the hard paving surface.
When clearing snow drifts, anti-slip chains or lugs are placed on the wheels of the walk-behind tractor.
A walk-behind tractor with a mounted blade is optimal for removing snow drifts more than 50 mm thick. If there is not enough snow, instead of a shovel it is better to use another attachment - a brush. To prevent the wheels from slipping, wear anti-slip chains. When cleaning an area without a hard surface, instead of transport wheels, you can install metal devices - lugs.
During cleaning, do not allow the walk-behind tractor engine to overheat. Periodically it is given time to cool down. If the snow is wet, the shovel quickly sticks. It needs to be cleaned more often. In case of damage to the blade or towbar, work continues after the defect has been eliminated. Otherwise, when some parts are bent, the entire attachment will become distorted, which will lead to serious damage.
Rules for using a homemade blade
Follow these rules and your equipment will last longer:
- To save the resource of the power plant, use the blade only if it is necessary to remove snow more than 5 cm high. In other cases, it is better to use a sweeping brush or scraper.
- When working with a blade, it is advisable to equip the wheels with tracks or other devices that increase the traction of the walk-behind tractor with the surface.
- Periodically check the motor of the walk-behind tractor - when working with mounted implements, it is subject to increased load and wear.
- Regularly check the reliability of the fasteners; if any defects appear, replace them immediately.
- To prevent deformation and breakage of the blade, before starting work, carefully set the height of its position;
- Use protective equipment, both for yourself and for your equipment. For example, steel guards can be used to protect the unit.
- Carry out regular maintenance of the walk-behind tractor and additional attachments (the frequency is indicated in the instructions for use).
- At the end of the winter season, before storing the blade for long-term storage, thoroughly clean it of any remaining snow and dry it. After this, treat all elements with anti-rust agent, and lubricate the rotating mechanisms with oil or grease.
It is important to take care of the condition of the metal surface. It is best to periodically treat it with special chemical solutions that prevent the formation of rust and subsequent destruction of the metal. The surface of the dump can be coated with frost-resistant paint.
Thus, when making a blade for a walk-behind tractor with your own hands from available materials, it is recommended to adhere to the rules and recommendations for its creation. For anyone who decides to assemble a homemade product, it will be easy to determine the dimensions and mount the device to suit their needs and a specific walk-behind tractor model. With such a device, snow removal will turn from hard manual labor into a pleasant pastime.
What is a snow removal attachment for a walk-behind tractor?
A universal device for removing snow mass over large areas is called a snow blower. The design is created in such a way as to collect, sweep and throw away snow. The main function of the snow removal attachment is to automate manual labor and save time. Snow blower features:
- works in tandem with a walk-behind tractor;
- attached to the front;
- easy to maintain.
Nozzle for snow removal The body of the nozzle is made of metal, less often – plastic.
Inside the box there is a shaft on which steel blades of complex shape are attached. The shaft rotates due to bearings installed in it. Disc knives are welded onto the shaft in a spiral. They consist of two halves, which converge in turns towards the central part. When the shaft moves, the snow cover is captured by the blades and directed to the center. A thin stream transfers snow to a screw conveyor (auger). The snow and ice mass, moving along the augers, is destroyed and falls on the rotor blades. After this, being sucked in by a fan, it is thrown out through the outlet pipe (sleeve) in a given direction and at a certain distance.