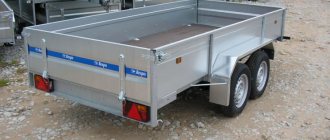
A certain part of motorists cannot make do with just the capacity of the trunk or interior of their car, since they need frequent cargo transportation. It is not at all necessary to buy a truck or something similar for such purposes.
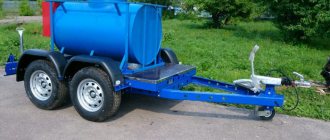
To expand the capabilities of the car, you can use a trailer. The classic single-axis design is not suitable for everyone, and they prefer biaxial designs. And here there are two options: either buy a ready-made trailer from the manufacturer, or assemble it yourself.
The second option is more complicated, plus it will require additional examination and registration for permission to operate on public roads. If you are ready for this, you can start assembling.
Self-assembly of axles for a passenger car trailer
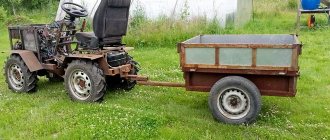
An ordinary car is poorly suited for transporting heavy and bulky cargo, so there is often a need to use a trailer.
Buying such a device allows you to solve many problems, but for craftsmen, a much more preferable option is to assemble the trailer on your own. The cost of a homemade trailer can be several times less than the factory one.
Today we will talk about one of the important components of the design of a trailer for a passenger car - its axle.
Design options
When starting to assemble a trailer, you need to prepare in advance for the fact that you will have to do a fair amount of work on its axle, and in particular, on its individual components - shock absorbers, springs, hubs. If everything works out, then such a trailer, regardless of the type of suspension used, will be no worse than the factory one.
In principle, no one bothers you to purchase a ready-made axle, but assembling it yourself will cost less, and besides, you will get an idea of what this part consists of and how it works.
Strictly speaking, if we consider the axle as a suspension element, then it is an ordinary pipe. Depending on the cross-section, it can be round or square.
From the point of view of bending strength, for two pipes with the same wall thickness and cross-sectional area, the square one will be better, but since it is necessary to take into account such characteristics as streamlining, pipes with a square cross-section are, as a rule, not used.
If we talk about finished products, they usually come with a hub, and often with brakes. When assembling a trailer axle with your own hands, you need to take into account that hubs come in two varieties:
The block hub is considered more reliable and durable, but it also costs more. The design of the chamomile is more simple, and accordingly, the maintainability of such a hub is higher. Replacing the hubs does not involve disassembling them, which, in general, is not so bad, since it simplifies the replacement of a failed unit, making it easier to maintain the trailer.
We weld the scabs to the pipe
The method of attaching the hubs to the axle is welding or screwing. From a reliability point of view, a welded structure is definitely better, but if you prioritize ease of repair, then replacing a prefabricated hub is much easier.
Trailers designed for trucks are often equipped with a steering axle. This design, equipped with a pivot pin, ensures rotation of the trailer axle along a vertical axis. In passenger cars, such mobility is not required in most cases.
From a shock-absorbing point of view, suspension designs can be torsion bar or spring.
Torsion bar and spring trailers - comparison
Torsion bar models are currently quite in demand, which is explained by the following advantages:
- durability;
- ease of operation;
- no need to use shock absorbers;
- compact size and low weight;
- reducing the free space between the trailer frame and the axle.
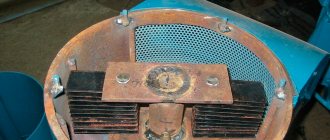
Torsion bar suspension is an independent type; this design is rigidly connected to the frame. It consists of a hollow polygonal pipe, inside of which is placed the same, but of a smaller diameter, and the space between them is filled with rubber gaskets in the form of bundles, ensuring the immobility of the inner shaft to which the wheel is attached.
Torsion bar suspensions should not be used if the trailer is expected to be used in harsh conditions, but for the city and asphalt roads this is an ideal solution.
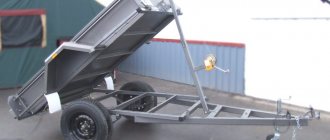
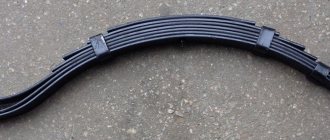
Spring suspensions are characterized by increased resistance to heavy loads, since they provide an increased stroke length when compared with the torsion bar version. The disadvantage of this solution is that the springs need to be looked after more often, but their maintainability is higher than that of their torsion bar counterparts.
How to assemble an axle for a car trailer with your own hands
If you have reached the stage of manufacturing the axle, then we can assume that you already have the frame and wheels. Let's look at how to make a full-fledged trailer axle from this kit. Approximate algorithm of actions:
- select a beam. Round or square – it doesn’t matter. The main thing is that it is of the required size and made of high-quality metal - otherwise it will not last long;
- the second step is to connect the hub axle on which the hub is mounted with our beam or pipe. It is desirable that the hub tube extends a few millimeters inside the main one - such a design will be stronger. From this point of view, a round pipe would be preferable. The method of connecting them is welding or bolting. Welding is more reliable, but if problems arise, it is unlikely that it will be possible to dismantle the hub axle;
- if the trailer is single-axle, then there is a rule according to which it is installed at a distance from the tailgate that is 40% of the length of the trailer;
- measurements of the location for the axle should be made with the greatest possible accuracy;
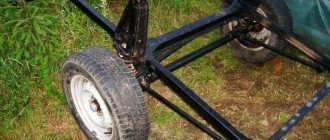
- to facilitate installation, turn the trailer upside down, make sure that hanging spindles will not interfere with your work;
- at the axle installation site, carefully clean the surface of the frame from dirt, measure and halve the distance between the bushings, mark all control points with a marker;
- the axle is connected to the frame by spot welding, which is applied along the entire length of the contacting surfaces.
At this point you can consider the process complete - all you have to do is mount the wheels and sides. As for the type of suspension, here, as we have already noted, you can use both options, spring or torsion bar.
However, many craftsmen install a spring-shock-absorbing type suspension on a homemade trailer to provide the trailer with a softer ride.
Whether this excess is necessary for a trailer that will transport exclusively cargo is up to you, just keep in mind that such a design is much more difficult to install and will require a lot of effort to maintain.
Typically, the two types of suspension listed above are quite sufficient to ensure sufficient driving performance of a car trailer.
If you don’t want to bother with making a cargo appendage for the car or it’s not possible, you can purchase a ready-made factory trailer (we can recommend the products “Krepysh”, “Sputnik”, MZSA, “Kremen”, etc.).
Types of trolleys
Construction and garden models can be distinguished. Wheelbarrows used for construction work are angular in shape and are usually made of metal. They are mainly used for transporting construction materials, waste and concrete. They are also great for clearing snow in winter.
For small gardening jobs, it is best to choose a garden cart. As a rule, garden wheelbarrows are smaller than construction wheelbarrows and are often made of plastic. The garden model is perfect for transporting firewood and coal for fuel, bags of soil or fertilizers for plants. Also useful when cleaning the area.
An interesting solution is also a garden cart, which is designed for gardeners. This cart is mainly used for collecting and removing weeds, grass clippings and other garden waste, which can be stored in a plastic container.
If your site frequently involves tillage and requires a cart to transport large items, you may want to consider a self-propelled cart or bicycle cart. It is possible to select trolleys with a wide range of load capacities.
DIY trailer for a passenger car: drawings
The best solution if there is not enough free space in the trunk is to make a homemade trailer for a passenger car.
Large luggage is not always convenient to transport, especially when it does not fit in the car and you have to travel with the trunk half-open. Moreover, this may raise questions among traffic police officers, who may also issue a fine to the driver.
Introduction
Naturally, every car is different, and there are quite roomy cars, but today we are talking about middle-class cars, which, alas, cannot boast of much spaciousness even for passengers, let alone the trunk. Moreover, there are an overwhelming number of such cars on the roads of Eastern Europe.
No one has canceled the cargo taxi, which can accommodate a lot of things, but the prices for such transportation are not small, and if you need to transport cargo over a long distance, it can hit your pocket hard. But what to do if you need to transport cargo repeatedly, for example, to the country or for work?
A homemade trailer is the best solution to the problem of lack of capacity. One thing is clear here, that such a vehicle will make each driver more independent, and will allow transporting a variety of cargo much faster and more profitably.
Initially, everyone has a choice: buy a new trailer or make a light trailer with your own hands. As for the first option, everything is generally simple here. It saves effort and time on registration, but, alas, not money. But today we will try to understand how to make a trailer for a car yourself.
To make a homemade trailer, you need some tools, as well as materials, which it is advisable to prepare in advance so as not to waste time later.
What set of tools and materials will you need?
If this is your first time making a trailer with your own hands, then you will need the appropriate drawings, and such important documentation should be drawn up not by some “garage Kulibin” on his knees, but by a qualified craftsman who knows a lot about this.
The drawings must indicate clear standards and requirements that comply with GOST - 37.001.220-80, which lists the basic requirements relating to the production of trailers: layout, dimensions, etc.
This is a fairly important component of further work, since at the registration stage you may have serious problems, including complete refusal to register such a trailer for a passenger car, and as a result, lost time, effort and money.
You can find a lot of useful information about assembling a car trailer on the Internet, but let’s still look in this article at how to assemble a car trailer weighing up to 750 kg yourself. The main advantage is that to operate such vehicles you do not need a special category on your driver’s license.
So, you decided to make a homemade trailer and found the necessary drawings. So now you can start preparing the materials:
- In order to weld the frame and the trailer assembly you will need a square pipe. It is recommended to choose material with a cross-section of 40×40 mm or more. You must understand that a larger and heavier pipe will increase the overall weight of the structure, so you don’t need to go too far. The pipe can be easily replaced with a channel with a cross section of 25x50 mm. The length is easily determined using the drawing;
- For the sides, it is recommended to use a metal sheet of 0.6 mm or more. Using the drawing, determine how many sheets you will need. To do this, multiply the length and height of the sides;
- For the bottom, solid metal sheets or high-quality, durable plastic are most often used. Polycarbonate plywood is also sometimes used. By measuring the bottom area, you will find out how much of this material you need;
- A bridge from old SZD motorized strollers is often used as a running gear, but you can make it yourself;
- Wheels are the simplest thing on a trailer. If you decide to use the chassis from an SZD motorized stroller, then feel free to leave the original wheels, as they are quite reliable and not expensive. As for the other chassis, which, for example, you made yourself, choose the wheels individually;
- Braking system. For these purposes, you can use the native SZD motorized wheelchair system;
- Mechanism for coupling a trailer for a passenger car with a car. Simply put, a tow bar;
- Electrical elements, such as dimensions, turn signals, brake lights, as well as wiring for connecting them;
- The material that will be used to cover the trailer. Most often, tarpaulin or other high-quality, water-resistant fabric, as well as elements for fastening it, are used for this;
- Hand tools such as jigsaw, screwdriver and grinder.
There are often situations when a person believes that he can independently calculate the material and take into account other important nuances without special drawings, but it is still strongly recommended that such a drawing be present.
This way you will ensure uninterrupted work and avoid many problems that may arise during work. You will also save your nerves and money from unexpected costs, which can be quite a lot.
When you start work, only then will you understand how important such drawings are in the work of creating a trailer for a car. Moreover, you will clearly understand what exactly you need and you will not need to draw abstract images in your head, which in the end may turn out to be incorrect.
The situation would be different if there was no Internet and such drawings would be difficult to find, but fortunately finding such information today will not be a problem.
Let's start assembling the car trailer
To make a trailer yourself, it is recommended to divide all assembly activities into certain stages.
- First you need to start assembling the structure itself (the frame of the future trailer). Naturally, it must be as reliable as possible and have high strength. This stage is one of the most important, since it determines how long you will use this vehicle. As we described earlier, we will use a square metal pipe with a cross-section of 40×40 or a channel 25×50 mm as the base. In accordance with the drawings, we begin cutting the metal into the necessary sections, which will be responsible for the width and length of the trailer. After the channels are cut, they must be welded into a rectangular structure. Next, we carefully check the quality of the seams and whether you have welded the structure correctly. If everything is fine, then we proceed to installing and welding the stiffeners.
- The part of the car trailer structure responsible for the hitch (connecting unit) should be as short as possible. This is due to the fact that the shorter this unit is, the more responsive the trailer will respond to maneuvers. Also carefully take the necessary measurements, since this part should be as centered as possible relative to the axis of the structure. To avoid rupture of the welding parts of the connecting unit, it is recommended to weld additional cables, which will not only strengthen the structure, but also protect it.
- A coupling is required to connect the unit directly to the vehicle. For fastening, it is allowed to use both bolts and welds. Please note that if welded, the structure will be more reliable, but in order to disconnect it you will have to completely cut off the coupling, and the bolted fastening can simply be unscrewed if necessary. If you are going to use bolts then make sure they are of the highest quality possible. It is not advisable to save on such materials, as they can simply burst if they cannot withstand high loads.
- To make a trailer for a car with your own hands with the highest quality possible, pay special attention to the trailer axle. It is often placed in such a position that the rear of the trailer and the axle are located at an average distance of 40% of the entire length. The axle must be installed using a bolted connection. After this, you can begin installing the frame, which must also be secured with bolts.
- If you have free time and, of course, the desire, then you can weld “stabilizing jacks” to the trailer. This additional element helps ensure that the trailer structure is positioned as horizontally as possible while driving. An excellent solution would be to weld them at the corners of the frame.
- Trailer sides and bottom. As a rule, sheet steel is used for these elements, less often wood or polycarbonate. The choice must be made based on the operating conditions of the trailer and what cargo will be transported on it. Whatever material you choose, the bottom must be attached directly to the frame using bolts. In principle, it is also necessary to fasten the sides themselves (the frame of the sides must be made of high-strength pipes or channels). The requirements for the design of the sides are not as strict as with the frame, therefore the use of materials with a smaller cross-section is allowed.
- We install the necessary electrical elements. Reflectors, side lights, turn signals, reversing lights and brake lights are installed on the rear side of the trailer. Orange reflectors must also be installed on the outside. The side that is closer to the car should be equipped with white side lights and orange reflectors. When the wiring is correctly connected to all elements, you can begin connecting it to the car. This connection is made using the towbar socket. If you do not have the relevant experience, then such work may take several days. The main thing is not to rush.
- After all of the above activities have been done, only one thing remains, this is the procedure for registering a new homemade trailer, but this, however, is a completely different story.
How to make a trailer axle with your own hands - Special equipment
Hi all! In our country there are many craftsmen who prefer to do everything with their own hands. Some even assemble the axle for a light trailer themselves. That’s why we’ll talk about this topic today.
Before you start assembling an element of your trailer for passenger cars, I advise you to decide on the choice of design. They are different, which introduces some differences into the device.
With a little work on the hub, springs, shock absorbers and other components, you can get an excellent homemade axle, and a trailer with dependent or independent suspension will perform no worse than the factory models.
Spring and torsion bars
Torsion bar models are now very in demand and popular. This can be explained by objective advantages:
- serve for a long time;
- no difficulties in operation;
- simple maintenance;
- it is not necessary to use shock absorbers;
- are small in size;
- the space between the axle and the frame is reduced;
- have a small mass;
- These are designs with independent suspension at the trailer wheels.
Torsion bar or rubber harness structures are equipped with a rigid fastening to the frame.
There is a polygonal pipe mounted to a frame, inside of which there is a pipe of a similar shape, only with a smaller diameter.
The free space between them is filled with special rubber bands. They make it possible to ensure the immobility of the inner tube connected to the wheel.
I would not buy such a suspension among used options. Used or used ones already have a noticeably reduced service life, since the long service life directly depends on the condition of the harnesses.
Plus, rubber harness models are not suitable for active use in harsh conditions. This is an option for those who intend to operate the trailer mainly around the city and on relatively smooth asphalt.
If the operating conditions are harsh, then it makes sense to make or buy a spring-type axle that is more resistant to loads.
It is not afraid of serious overloads due to the longer stroke length compared to its torsion bar counterpart.
But keep in mind that you will have to take care of the spring suspension more carefully and more often.
The spring, as well as the torsion, variation of the axle is available in Voronezh, in Belarus, it can be bought in Moscow, St. Petersburg, or contact Chelyabinsk or Kyiv.
Now the width of the assortment is so limitless that ordering an assembled pendant or components for self-production is not difficult.
I already wrote about leaf spring suspension HERE, so I advise you to follow the link and read it.
After all, it is also important to collect from yourself what to make an axle from and put it on your own passenger trailer. I advise you to pay attention to components from Al Ko.
Self-assembly of the structure
Let's assume that you already have a trailer frame and have chosen your trailer wheels.
Now you need to figure out how it all comes together and turns into a full-fledged axle as a structural element of your car trailer. Let's look at a few key steps.
- To begin with, the beam itself is selected. It doesn't matter whether it has a round or square cross-section. The main thing is that you take the appropriate dimensions and use high quality metal. Otherwise, the suspension will not last long;
- Next, we take the hub axle, on which the hub itself will be installed, and connect it to the pipe. How to connect these two elements? It will be ideal if the hub axle fits at least a few millimeters with its protrusion inside the pipe. Here, a round section has a better chance than a square one. Then it’s all welded or bolted together. Learn from Kurgan trailers if you want to make a collapsible model. If not, just weld the elements together efficiently. This is done on both sides;
- Now you have a full-fledged axle ready, to which a spring or torsion bar will then be mounted;
- According to current rules, the trailer axle is mounted to a length corresponding to 40% of the total length of the trailer on the rear side;
- Make the replacements accurately, mark the location for your axle;
- It is better to perform installation from above, that is, the trailer will have to be turned over and placed on a flat surface. Make sure the spindles hang freely and do not interfere with your work;
- Clean the area of the frame of the future trailer where you will mount your axle. Measure the distance between the bushings and divide into two equal parts. Don't forget to mark everything with a marker on the axis;
- For a control measurement, divide the frame width by 2, and apply the resulting value from the center of the axle. The position is adjusted in parallel. Only now begin the final installation process;
- The connection is made by spot welding along the entire length of the contacts.
Many craftsmen advise taking a spring-shock-absorbing type suspension.
Although its strength parameters are lower when compared with a rubber harness design, with such a suspension you will get a smoother and softer ride when the trailer is empty and loaded.
Judge for yourself how complex this process is. If you have never done such work, then I would not recommend starting at this stage. It’s easier to buy a ready-made design or initially take a good factory trailer like:
- Sturdy;
- MZSA;
- Satellite;
- Flint, etc.
Thank you all for your attention! Operate only reliable and serviceable equipment, do not create a danger on the road for yourself and other road users.
How to make a trailer with your own hands?
Speaking about how to make a trailer with your own hands, you should know that it is not difficult. Every vehicle owner has a need to transport cargo of significant size.
The luggage compartment is not suitable for such a purpose; the best solution is a trailer.
If you have a little free time, then you don’t need to spend money on purchasing such a design.
Materials that will be needed
If you don’t understand how to make a homemade trailer, then you should definitely prepare a drawing. It is better to entrust the drawing up of a trailer to qualified specialists.
The circuit must comply with all standards specified in GOST 37.001.220-80. If the design does not meet all the requirements, it will not be possible to register it and obtain permission to use it.
Ultimately, time and money will be wasted.
If you have no experience in making such devices, then it is recommended to make structures weighing up to 750 kg with your own hands.
An additional advantage is that you do not need an additional category of driver's license to operate such carts.
You will need to prepare the following elements:
- To make a frame structure, a square pipe will be needed. The cross-section of the element must be at least 40x40 mm. If you use a larger pipe, the overall weight of the structure will increase. If you cannot find a pipe of suitable dimensions, you can use a 25x50 mm channel.
- To make the sides, it will be necessary to prepare metal sheets with a thickness of more than 0.6 mm. The number of sheets is determined according to the drawn up drawing.
- The lower part of the trailer can be made from the following materials: tin, high-strength plastic, thick plywood or polycarbonate. The dimensions of the material are determined based on the area of the bottom.
- The chassis can be made by hand, but the easiest way is to take the corresponding part from a motorized stroller.
- Be sure to prepare wheels of suitable sizes.
- The suspension will require spring-hydraulic shock absorbers. These elements are installed in Ural motorcycles.
- A device for coupling a trailer with a car or mini tractor.
- Brake system.
- Electrical devices: turn signals, headlights, brake lights. You should also remember about the wires that will be necessary in order to connect the above-described devices to a car or tractor.
- Material for covering the trolley. You can use a tarpaulin or other durable fabric that is not afraid of moisture.
- Elements for fastening.
- Welding device
It is definitely worth remembering that without a drawing it will not be possible to determine the number of necessary elements.
Making the main element of the trailer
The main part of any trailer is the frame. The service life of the structure can be determined by the rigidity of the frame. A reliable connection can be achieved by using welding.
You need to start work by determining the appropriate length and width of the main element. Its size should be determined by the outer part of the frame structure.
Trolley parameters
Before purchasing a cart, it is worth considering its purpose and taking into account the main parameters. If you need a simple model for small construction or gardening work, the way you attach the wheel to the wheelbarrow is very important. The wheel mounting bolts must turn easily, which ensures uninterrupted transportation of goods.
You should also select the housing material. Plastic models are suitable for carrying light loads (such as leaves or garden waste). The disadvantage of such wheelbarrows is the fragility of the plastic, especially when exposed to low temperatures.
Metal options are much more durable. Before creating a cart, it is worth checking the thickness of the walls. When transporting heavy materials, the housing may become bent or damaged, making it more susceptible to corrosion.
It is also worth considering the capacity and depth of the wheelbarrow. It must meet existing needs.
Axle for a passenger trailer: types, how to make it yourself
Hi all! In our country there are many craftsmen who prefer to do everything with their own hands. Some even assemble the axle for a light trailer themselves. That’s why we’ll talk about this topic today.
Before you start assembling an element of your trailer for passenger cars, I advise you to decide on the choice of design. They are different, which introduces some differences into the device.
With a little work on the hub, springs, shock absorbers and other components, you can get an excellent homemade axle, and a trailer with dependent or independent suspension will perform no worse than the factory models.
Axle combined with suspension
You need to look not only at the axle itself, but also at the suspension design with which the axle is used. The following options are possible:
- spring dependent;
- independent rubber-harness (torsion bar);
- independent torsion bar;
- dependent spring;
- independent lever-spring.
Spring trailer suspension
Spring suspensions are less common than torsion bar (rubber-harness) and spring structures. But they still have every right to exist.