Dear visitors to the “ Samodelkin Friend ” website, today we will look at the step-by-step process of assembling a fractured all-terrain vehicle on Alexander Murashov’s wheels. Video of testing and photo of assembly is attached. This all-terrain vehicle has two semi-frames connected to each other by a steering knuckle from the front axle from the UAZ, and is driven by the steering control of the VAZ. The semi-frames are welded from square-section corrugated pipe, the rear part of the frame has a conical shape tapering to the junction with the steering knuckle - this is necessary to increase the steering angle. This frame layout is borrowed from the T-150 tractor, that is, the operating principle of the fracture.
The engine is installed from the Domestic car OKA 0.7 l 33 l/s VAZ gearbox and axles, rubber wheels, VAZ rims modified to the inner diameter of the wheel, additional protection for the camera nipple. The cardan shafts are shortened and adjusted.
Additionally, a lightweight cabin and kung were made from corrugated pipe, the kung was covered with a banner.
Materials
- ICE OKA 0.7 33 l/s
- Bridge VAZ 2 pcs
- professional pipe
- VAZ gearbox
- the wheels are strong
- steering knuckle UAZ
- finishing materials: aluminum sheet, polycarbonate, banner.
Tools
- welding inverter
- Angle grinder (grinder)
- drill
- set of wrenches
- measuring tool
- skillful hands)
Step-by-step photos of assembling an all-terrain vehicle with your own hands.
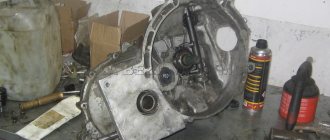
The frame is welded from professional pipe, in front of you is its front part, on which the engine will later be installed.
Rear part of the frame.
Place where the bridge is attached to the frame.
Trying on the bridge.
The wheel rims are mounted on the axle hubs.
checkpoint
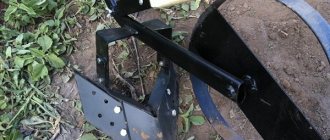
Two half-frames are connected to each other by a steering knuckle from the front axle of the UAZ. Brake system.
Shortening the driveshafts of an all-terrain vehicle. UAZ steering knuckle Please ATTENTION. The lever has been converted to a straight position.
Connection of shortened cardan shafts to the axle. Note! That torque is transmitted directly through the steering knuckle.
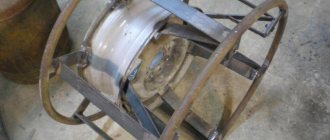
An engine from an OKA 0.7 l 33 l/s car is installed. The angle of rotation of one part of the frame relative to the other. Manufacturing of all-terrain vehicle rims.
Rim. Tire stripping. Note! The camera's nipple is well protected!
Steering and instrument panel installed.
Manufacturing of the body and kung of an all-terrain vehicle. The lightweight cabin is trimmed with polycarbonate.
Cladding with sheet aluminum. Engine and wiring connections. Video from all-terrain vehicle testing.
The topic of homemade vehicles is especially popular today. Many “traditional craftsmen” try to make carakat from standard means of transportation and special equipment. How can you make a budget karakat using a walk-behind tractor (even the simplest Neva will do). At first glance, doubts arise about the quality of the equipment, because visually it is a bulky and at the same time inconvenient machine. In fact, a caracat made from a walk-behind tractor, made with your own hands, shows simply excellent performance characteristics and can easily move in harsh climates and difficult terrain. And if we talk about moving through swamps, various river mouths, and in mud, then such an all-terrain vehicle will simply become an indispensable solution for every person.
What are the features of caracats
The vehicle includes:
- Wheeled chassis.
- Lightweight cabin.
- Low pressure tires (soft, oversized).
The machine has the following features:
- It surpasses tracked tractors in cross-country ability.
- Overcomes swamps and small rivers.
- Unlike all-terrain vehicles with steel tracks, it does not cause damage to nature, keeping the vegetation cover intact.
The name of the swamp walker comes from the word “cuttlefish”.
Execution options
At home, 2 types of caracats are collected. Each has its own advantages and disadvantages.
All-wheel drive design
The basis is taken from a Russian SUV - UAZ or Niva. An inexpensive Chinese car, for example Lifan Solano 452, is also suitable.
In order to reduce weight, they replace the standard engine with a motorcycle engine from the Dnepr or Ural.
Advantages of the 4x4 scheme:
- Large load capacity.
- Increased cross-country ability.
- Comfortable closed cabin.
- Reliability. If one of the axles fails, the car remains on the move.
- Minimum labor costs. Only minor changes are made to the design.
Disadvantages of homemade all-wheel drive:
- High price.
- Heavy weight.
- Low maneuverability.
An example of an all-wheel drive caracat is the ZIS 5 model.
A convincing argument in favor of this design is the presence of differentials, thanks to which the car turns freely.
Three-wheeled all-terrain vehicle
Assembled on the basis of a motorcycle. There are 2 wheels installed at the rear (half shafts or axle), and 1 at the front (on the fork).
If the vehicle is intended to be used only in the summer season, the cabin is not installed.
Otherwise, a primitive booth made of aluminum profile is attached.
Design advantages:
- Light weight.
- High maneuverability.
- Compact sizes.
Flaws:
- Weak traction (2-wheel drive).
- Low load capacity.
- A large amount of work involved in self-production.
In addition, the model with axle shafts turns poorly due to the lack of a differential. In early versions, a ski was installed in front. Such a machine is easier to assemble, but it does not have buoyancy.
The option with a single-wheel front end turned out to be more practical.
It crosses wetlands and rivers; does not go to the bottom if the ice underneath breaks.
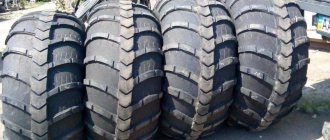
Low pressure tires - description
Low pressure tires are installed on minibuses, small trucks and cars. They have fewer layers of cord than regular tires and are much softer, giving the vehicle a good, comfortable ride.
Improved elasticity of the carcass is provided by: large volume inside the low-pressure tire; small side pocket and much thinner than the sidewall. Due to the fact that such tires have very good shock-absorbing characteristics, the level and comfort of the trip increases significantly.
Small road irregularities do not react to the car in any way. By reducing vibrations, shocks and shocks of the machine, all parts will last much longer.
If you have different types of roads on your way - dirt or asphalt, low-pressure tires will provide excellent movement and will not cause any obstacles. If you fall into a hole on the road, due to the fact that there is a large amount of air inside the tire, an impact on the rim is avoided. The likelihood of cord delamination and thread fraying is also reduced due to a good elastic frame.
Varieties
Two types of ultra-low pressure “rubber” can be installed on all-terrain vehicles, agricultural machinery and other machines - without tubes and with a tube. Tubeless products are considered more comfortable and safe when riding; they have a relatively low weight. But tires with tubes are practically not subject to damage and various deformations, since they better withstand mechanical loads.
According to the functional parameters and design features of the SND, which are equipped with all-terrain vehicles, there are:
- Wide-profile. They are approved for use at a variety of operating pressures. Such tires are usually installed on vehicles with a high load capacity, since wide-profile tires have unique frontal rolling resistance. Visually they have an oval profile.
- Arched. This rubber is 3–5 times wider than standard tires, its thickness is at the level of 50–70 cm. Arched SNDs are recommended for installation on drive wheels. All-terrain vehicles with such tires will overcome any off-road conditions (watch the video).
- Toroidal. They come in tubeless and tube versions, and are most in demand among drivers who want to make their car as passable as possible on rough terrain. The profile of toroid tires is average.
There are also so-called pneumatic rollers - tires with special lugs that act as a reliable stiffener and increase the vehicle’s performance when driving on unimproved roads.
Advantages
Like everything in our world, low-pressure tires have a number of advantages:
- They have a special design that provides a large area of contact with the road. This property gives the car truly all-terrain qualities;
- They have low specific pressure and guarantee minimal load on the ground. Consequently, such wheels can be installed on agricultural machinery and all-terrain vehicles;
- They increase the overall ground clearance of the car, which allows you to overcome even the most difficult obstacles (including water).
Flaws
One of the disadvantages is that these tires are still designed for use on standard asphalt surfaces. Also, if the car is equipped with low-pressure tires, the vehicle owner is strongly advised not to get carried away with sharp turns, because the profile is a weak point even for high-quality branded low-pressure tires - it can simply burst.
It is also logical that such tires have another significant drawback - their high cost. Not every car owner with an average income can afford such luxury. For comparison, one such tire can cost more than a whole set of fairly high-quality winter tires for a standard passenger car.
However, some enterprising motorists who do not want to overpay achieve the effect of low-pressure wheels on their own, using their own hands.
Device and main components
The all-terrain vehicle consists of the following components:
- Support frame.
- Engine. Rear placement is preferable, otherwise the car will nod off.
- Chassis: chassis, clutch, independent suspension, etc. Soft all-terrain tires with an increased diameter are installed.
- Steering.
- Cabins.
In the three-wheeled version, control is carried out using a simple motorcycle fork.
A 4x4 vehicle uses one of the following mechanisms:
- automobile rotating unit;
- breakable frame type.
The second option allows for high maneuverability with a long length. Vehicles with such a frame are called “fracture”. It consists of 2 parts connected by a steering knuckle.
This unit can be borrowed from the front axle of a UAZ car. The “turning point” principle is used, for example, in “accordion” trolleybuses, the T-150 tractor, etc.
Instead of a pneumatic chassis, the vehicle can be equipped with tracks.
How to make obodryshi
This is what homemade all-terrain tires are called. They are much cheaper than factory ones. As a basis, they take large-sized tires from a truck (GAZ-66, KrAZ-255, ZIL-131), tractor or airplane and cut off the excess material. The cross-country ability is explained by the low specific pressure on the ground, which in turn is due to the large area of the contact spot.
Before you make tires out of tires, you need to choose the type of tread.
It depends on what kind of surface you plan to move on.
It can be:
- Dirt. Requires a self-cleaning protector.
- Wetland. A pattern with lowered grooves is used to provide improved traction.
- Snowdrifts, sand. A protector with closely spaced elements is used.
Tools used:
- awl;
- construction knife with a set of blades;
- grindstone;
- clamps for straightening automobile bodies or clamps;
- winch with cable;
- hammer;
- cardboard or tin tread template;
- chalk.
Procedure:
- The tire is cleaned of dirt. It should not be worn out inside, otherwise holes will appear in the rubber as a result of peeling.
- The pattern of the future tread is drawn using chalk according to the template.
- Using a construction knife, make a cut along the inner circumference.
- Near it, rectangles are drawn with chalk. They cut them out with a knife.
- The wire that appears in the “windows” is hooked with a winch hook and removed. The tire must first be nailed to the base.
- Cuts are made along the tread pattern drawn in chalk.
- Use pliers to pinch the edges of the hole and open it.
- The exfoliated material is torn off using a winch. During the process, the rubber is cut with a construction knife, periodically sharpening and changing the blades.
- Excess is removed from the side surface in the same way.
- Treat the tire with sandpaper and, if necessary, correct it with a hammer.
The camera is mounted on a homemade disk. The latter is made from an aluminum basin and carefully ground.
The tire is tied to it with a fire hose.
The area of the contact patch is regulated by internal pressure. Before driving onto hard ground, inflate the tire.
Do-it-yourself low-pressure tires for UAZ
How to make a tracked all-terrain vehicle with your own hands
In order to make the structure in question with your own hands, you need to select the appropriate material. “Shoes” from airplanes or helicopters are ideal. However, this is a rather expensive option. In most cases, you can use rubber from tractors or trucks. The tools you will need are a sharpener, an electric winch, a knife, a hammer, wire cutters, and an awl.
Then the following manipulations are performed step by step:
- A new tread pattern is selected and cut at the owner's discretion. The most popular is the “Christmas tree” look.
- A cut is made around the circumference of the wheel being processed so that it is possible to remove the reinforcing wire.
- Gaps are made in the form of small rectangles along the inner base, through which the wire will be removed using a winch device.
- It is necessary to focus on the intended pattern of the design, using a winch and pliers to fish out the unnecessary layer of reinforcement. Taking into account the previously applied pattern, the drawn part is adjusted using a knife.
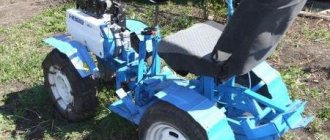
Homemade all-terrain vehicle from a ready-made walk-behind tractor
This unit is available in many households. The universal mechanism is used to solve a number of tasks depending on what replacement equipment is installed: a blade for clearing roads of snow, a cultivator, a plow, a mulcher, etc. By making small changes to the design, you can turn an agricultural device into an off-road vehicle.
Required Items
Anyone who wants to make a karakat from a walk-behind tractor with their own hands will need:
- Corner.
- Round and profiled pipe.
- Cameras from a truck, for example GAZ-53.
- Wheel rims from a VAZ passenger car.
- Steering column.
- Hubs.
- Bolts with nuts, self-tapping screws.
- Reinforcing bars, steel wire.
In addition to plumbing tools, you will need a welding machine, an angle grinder and a drill.
Auxiliary diagrams and drawings
Each kit is accompanied by a specification, which simplifies the preparation of materials and the assessment of financial costs.
Creating a Frame Frame
The rectangular frame is assembled from a profiled pipe and reinforced with a corner. The workpieces are connected by welding. The dimensions indicated in the drawings must be accurately maintained so that there are no distortions in the design.
If the frame is made of 2 parts with a steering knuckle between them, then the rear crossbars are reduced to the fracture site in the form of a triangle. This will increase the rotation angle.
Engine block
A thick steel plate with pre-drilled holes is welded to the frame. The power unit from the walk-behind tractor is screwed to it.
When the all-terrain vehicle is no longer needed, the engine can be returned to its place.
A generator and battery are placed next to the engine.
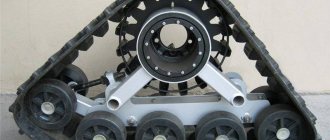
Chassis assembly
To install tires from the GAZ-53, wheels of increased diameter are required.
They are made in the following sequence:
- 6-8 sections of profiled pipe, laid transversely (parallel to the axis), are welded to the disks from a VAZ car evenly around the entire circumference.
- Reinforcement in the form of a ring is wound around the ends of the rods and secured by welding.
- Several concentric rings made of wire are placed in the inner space of the circles. All of them are combined into a single structure using spokes oriented from the center of the wheel to the edge. The intersection points of the round and radial parts are boiled.
Truck tires are put on the resulting rollers.
Follow these steps:
- They attach the Zhiguli transmission to the frame.
- The rear axle and steering gear are assembled.
- A brake drum from a Voskhod motorcycle is being installed.
- The wheels are attached.
Tire pressure is selected experimentally.
Final stage
At the end of the procedure, the metal frame of the SUV is sanded, primed and painted. A headlight is screwed onto the front for driving at night.
Self-production
To make rims, the first step is to pull out the side metal cord. To do this, make a cut, departing approximately 10 mm from the inside of the tire. Hook the cord with a screwdriver, and then, hooking it with a hook, pull out the metal rim using a winch.
Using a template, apply the future outline of the tread along the entire perimeter of the wheel. Some obradyshas can be seen with the protector left in the center. It is along the contour of the outline that it is necessary to make cuts in the rubber. For this, it is best to use a construction knife, as you can control the depth of the cut by setting the required blade length.
Cut the tire profile along the inner perimeter (where the metal wire ring used to be). It is the cut section that must be grasped with the clamp. Use a winch to create tension, and then use a utility knife to gradually trim off the peeling piece.
When working, do not stand in the direction of the winch tension so that the hook does not break and cause injury to you. Of course, it is worth thinking about the safety of things located in the affected area.
Particular attention should be paid to this point if you do the lifting using a winch installed on the car. It is not necessary to create a lot of force for peeling.
For extra safety, place an old jacket on the cable, which will serve as a kind of damper if the clamp does break.
How to make a walk-behind tractor from a chainsaw
The following products and materials are used:
- Motorcycle steering wheel.
- Transmission from an old moped.
- Stainless steel pipes with a diameter of 20-30 mm.
- Wheels with pneumatic tires from a car or agricultural machinery. An alternative option is homemade metal rims with lugs. To make them you will need a steel sheet and a corner.
- Bolts and nuts.
The engine is removed from the chainsaw. It is recommended to take a professional tool with a 10-13 hp motor.
The work is performed in the following order:
- The stainless steel pipe is bent into a U-shaped frame. The ends of the “legs” should be bent upward.
- The structure is reinforced with jumpers made of the same material.
- The steering wheel is welded.
- The plate for installing the battery is secured using electric welding.
- A muffler is made from a piece of pipe with a diameter of 7 cm and a length of 250 mm. The internal space is filled with sawdust so that the size of the outlet hole is no more than 1.6 cm.
- A small U-shaped frame for the engine is made from a pipe with a diameter of 4 cm. Brackets for bolting are welded to the edge and in the middle.
- Install the motor on the frame and screw it on.
- The axle shafts reinforced with a cotter pin are attached and the wheels are installed on them.
- To complete the process, the steering wheel, gearbox and gas tank are attached.
All that remains is to test the car in field conditions.
Engine
The power indicator on a homemade unit determines the performance of the selected walk-behind tractor. The higher this parameter, the more efficiently the equipment will function. On the other hand, high power causes increased fuel consumption. If the owner lives in the outback, far from a gas station, this aspect will play a significant role.
Those users who plan to use the equipment only in the warm season are advised to opt for a budget modification with a two-stroke engine. It is simpler and launches quickly. For fishing and hunting in winter, the best option would be a four-stroke power unit. Such variations warm up more slowly, providing longer engine life.
Snowmobile based on a walk-behind tractor, skis and bicycle parts
Agricultural work is carried out during the summer season. In winter, the engine of an idle walk-behind tractor is suitable as the power plant of an all-terrain vehicle for driving through snowdrifts, which you can assemble yourself. With the arrival of spring, he returns to his place.
Snowmobile diagram
A three-wheeled layout is offered. In front, instead of a skating rink, a double ski is installed. There is no cabin, the car is intended for short trips.
What you need
The following components are used:
- Bicycle frame.
- Cameras from a truck, for example KamAZ.
- Plastic skis (2 pcs.).
- Gearbox from an old Honda DIO scooter.
- Motoblock engine.
- Chains for transmitting torque.
- Sprockets (2 pcs.).
- Gas tank.
- A pair of wheels from a wheelchair.
- Metal barrel with a volume of 200 l.
- Steel shaft with bearings.
- Fire hose or strip of tarp.
A welding machine, grinder and plumbing tools are used. Bolts and nuts are used to secure some components.
Assembly algorithm
The construction of a snowmobile is carried out in the following order:
- The engine from the walk-behind tractor is screwed to the front of the frame.
- Place the seat in its place.
- Sprockets are welded to the gearbox shaft. Then the mechanism is attached under the seat.
- Put chains on the sprockets.
- The shaft is inserted into the rear bushing. A large asterisk is fixed on it. It is needed to increase traction force.
- Rollers are made by attaching rims cut from a barrel to the wheels of a wheelchair. Their diameters are the same.
- The rollers are mounted on the shaft and secured with bolts.
- They put truck tires on them and tie them with a fire hose.
- A bicycle handlebar with a fork is installed, and a double ski is attached to it. The controls must be positioned at an angle to the ground or the snowmobile will not turn.
- Install the gas tank.
The car overcomes deep snow and easily climbs steep slopes. By replacing the skis with a pontoon, you can turn it into an amphibious all-terrain vehicle.
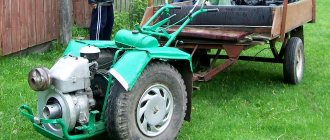
Conversion of the "Ant" scooter into a karakat
This vehicle is an almost finished all-terrain vehicle. Only minor modifications required. The disadvantage of the design is the low-power engine (11 hp). It is recommended to replace it with a 2-cylinder, for example Lifanovsky.
What parts and tools are needed
You will need:
- A bridge from a rear-wheel drive car, such as a VAZ or AZLK.
- Reduction gear.
- Axle shafts with constant velocity joints from the Oka passenger car.
- Profiled pipe.
Tools and accessories:
- welding machine;
- grinder or hacksaw;
- drill press or drill;
- roulette;
- spanners;
- screwdrivers;
- hammer;
- chalk (for marking).
Brushes are required for painting metal structures.
Step-by-step instruction
Karakat is made as follows:
- A frame is welded from a profiled pipe to a platform for mounting the motor.
- Bolt the rear axle of the car to it. Its body cannot be welded: such a connection will not withstand alternating loads.
- A shield is screwed to the front of the frame to cover the driver’s legs.
- A support structure for attaching the wheels is welded from a profiled pipe. It is fixed on the steering column of the scooter.
- Movable arms with spring shock absorbers are attached to the support, and hubs for the rollers are attached to them. This design will allow the latter to move in the vertical direction.
- Clean the product from scale and rust and prime it.
- Painted with impact-resistant enamel. Unlike simple paint, it will not crumble when transporting goods off-road.
- The motor is screwed to the platform on the frame, having previously placed a rubber gasket. Its function is to dampen vibrations. The dynastarter is left on the engine.
- Chains are thrown onto the sprockets of the gearbox and rear axle. To prevent them from jumping off during acceleration, tensioners should be installed.
- The battery is mounted at the top of the frame. There will be no splashes on it here.
- Hubs are attached to the rear axle. The brake mechanisms they have are connected by a cable to a lever on the steering wheel.
- The discs are screwed to the hubs. It is recommended to use products with a diameter of 15 inches. In order to increase the size, rims are welded to them.
- The rollers are fitted with low pressure tires.
The all-terrain vehicle is ready for use.