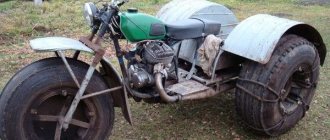
ATV based on the heavy motorcycle "Ural-2": 1 - front steered wheel (from a Zhiguli car, 2 pcs.); 2 — lower arm of the front suspension (pipe 25x25, 2 pcs.); 3 — upper arm of the front suspension (pipe 25x25, 2 pcs.); 4 — front shock absorber (from a Zhiguli car, reinforced with a spring from the shock absorber of a Ural motorcycle, 2 pcs.); 5 — front buffer (pipe Ø30); 6 — front luggage rack (pipe Ø20); 7 — front trunk (pipe Ø20); 8 — electric fan (from a VAZ-2108 car); 9 — air duct (rubber corrugated hose Ø100, 2 pcs.); 10 — fairing (duralumin, sheet A2); 11 — steering wheel with steering shaft (from the Ural motorcycle); 12 — fuel tank (from the Ural motorcycle); 13 — power unit (from the Ural motorcycle); 14 — kick starter; 15 - battery; 16 — brake light; 17 — rear shock absorber (from the Ural motorcycle, 2 pcs.); 18 — muffler (from the Ural motorcycle, 2 pcs.); 19 — rear drive wheel (from a Zhiguli car, 2 pcs.); 20 — rear drive axle (from a Zhiguli car, 2 pcs.); 21 — axle shaft (from a Zhiguli car, 2 pcs.); 22 — pendulum suspension (from the Ural motorcycle); 23 — driveshaft (axle shaft from the Oka car); 24 — hinge (CV joint from the Oka car); 25 — steering bipod (from the Zhiguli car); 26 — tie rod with tip (from the Zhiguli car); 27 — brake pedal; 28 — carburetor throttle control handle; 29 — brake lever; 30 — rear trunk strut (pipe Ø20); 31 — clutch release lever; 32 — gear shift pedal; 33 — saddle (from the Ural motorcycle); 34 — rear trunk (pipe Ø30); 35 — front wing (duralumin sheet A1.5, 2 pcs.); 36 — rear wing (duralumin sheet A1.5, 2 pcs.); 37 — headlight (2 pcs.)
The rear axle needs to be shortened if you don’t want to be as wide as a car.
ATV axle shaft based on the Ural-2 motorcycle: 1 - flange; 2 - rod; 3 - bearing; 4 - locking ring. L is the length of the through hole in the flange part of the axle shaft and the length of the groove on the rod; D is the diameter of the through hole in the flange part of the axle shaft and the length of the groove on the rod; t is the diameter of the blind hole for the key; d is the diameter of the blind hole for the key.
Dear visitors of the site “ Samodelkin Friend ”, from the material presented by the author you will learn how to independently assemble an ATV with an engine from a heavy Ural motorcycle with your own hands. Step-by-step assembly photos and drawings are included. The ATV belongs to the division of all-terrain vehicles; thanks to its 4x4 or 2x4 wheel arrangement, it is capable of overcoming a number of different obstacles on our off-road terrain: mud, ruts, fords, snow drifts, steep ascents and descents.
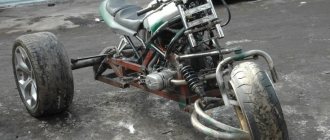
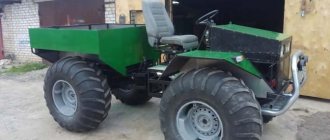
Self-made all-terrain vehicle fracture on the wheels
Dear visitors to the “ Samodelkin Friend ” website, today we will look at the step-by-step process of assembling a fractured all-terrain vehicle on Alexander Murashov’s wheels.
Video of testing and photo of assembly is attached. This all-terrain vehicle has two semi-frames connected to each other by a steering knuckle from the front axle from the UAZ, and is driven by the steering control of the VAZ. The semi-frames are welded from square-section corrugated pipe, the rear part of the frame has a conical shape tapering to the junction with the steering knuckle - this is necessary to increase the steering angle. This frame layout is borrowed from the T-150 tractor, that is, the operating principle of the fracture. The engine is installed from the Domestic car OKA 0.7 l 33 l/s VAZ gearbox and axles, rubber wheels, VAZ rims modified to the inner diameter of the wheel, additional protection for the camera nipple. The cardan shafts are shortened and adjusted.
Additionally, a lightweight cabin and kung were made from corrugated pipe, the kung was covered with a banner.
Materials
- ICE OKA 0.7 33 l/s
- Bridge VAZ 2 pcs
- professional pipe
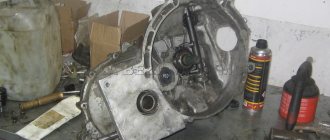
- VAZ gearbox
- the wheels are strong
- steering knuckle UAZ
- finishing materials: aluminum sheet, polycarbonate, banner.
Tools
- welding inverter
- Angle grinder (grinder)
- drill
- set of wrenches
- measuring tool
- skillful hands)
Step-by-step photos of assembling an all-terrain vehicle with your own hands.
The frame is welded from professional pipe, in front of you is its front part, on which the engine will later be installed.
Rear part of the frame.
Place where the bridge is attached to the frame.
Trying on the bridge.
The wheel rims are mounted on the axle hubs.
Gearbox Two half-frames are connected to each other by a steering knuckle from the front axle of the UAZ.
Brake system.
Shortening the driveshafts of an all-terrain vehicle.
UAZ steering knuckle Please ATTENTION. The lever has been converted to a straight position.
Connection of shortened cardan shafts to the axle. Note! That torque is transmitted directly through the steering knuckle. An engine from an OKA 0.7 l 33 l/s car is installed. The angle of rotation of one part of the frame relative to the other.
Manufacturing of all-terrain vehicle rims.
Rim. Tire stripping.
Note! The camera's nipple is well protected! Steering and instrument panel installed.
Manufacturing of the body and kung of an all-terrain vehicle. The lightweight cabin is trimmed with polycarbonate. Cladding with sheet aluminum.
Engine and wiring connections. Video from all-terrain vehicle testing.
Tools and materials
It is worth saying that assembling an ATV yourself is a very troublesome task. To pump it up, you will need to seek support from professionals; you will need: a turner, an electrician and an electric and gas welder. It makes more sense to make the front suspension system independent than to assemble a homemade all-wheel drive all-terrain vehicle from a 4x4 Ural. Otherwise, management can create problems. It turns out that to achieve all-wheel drive, you will need to add a gearbox to the design, which will entail an increase in the mass of the unit. To create a rear-wheel drive structure you need to prepare:
It should be said that the front hubs and rear axle must be taken from the same car. This will make it possible to eliminate the procedure of adjusting the disks to the mounting holes. It is advisable to borrow these components from VAZ or Moskvich. When working you will need the following:
How to make wheels
As tires on such homemade products, tubes from a truck are most often used, less often from agricultural trailers. Bicycles are not suitable. Experienced experts believe that cameras from airplanes and helicopters are suitable for a four-wheeled snowmobile based on a motorcycle.
This choice is understandable, because Only high-quality rubber is used for their production; another feature of such cameras is that the thickness of their walls is always the same at all points. When choosing, you need to follow the principle: the “squarer” the chamber is in cross-section, the better it is suitable for creating a caracat.
For lack of aircraft tires, because... It’s quite difficult to get them; designers have to take a simpler path, pairing tires from trucks.
Such wheels have one significant drawback - they quickly fail.
When choosing the number of wheels, keep in mind that a three-wheeled version is less stable than one that uses all four wheels.
Manufacturing
The first step in the process of creating an ATV is to make the suspension. First of all, the old vehicle will need to be disassembled. The frame of the unit must be freed from all its components; the steering wheel and shock absorbers must be removed. It would be a good idea to determine in advance what type of suspension will be installed on the Ural ATV, for example:
Of course, the best option would be a suspension with shock absorbers on springs. You can borrow them from an old motorcycle. Since the unit will be 4-wheeled, the missing components will need to be purchased additionally. The suspension in this version will have the shape of the letter “A”.
It is necessary to correctly calculate the mass of the future all-terrain vehicle. And then the shock absorbers will ensure a smooth ride when driving on rough off-road conditions.
The second step is the frame. The frame must be assembled in such a way that it is possible to mount the engine on it. It will be located in front or behind - it doesn’t matter, the main thing is that it is thoroughly fixed. There are 2 options here:
Assembly Features
The installation procedure for this vehicle is quite simple and similar to assembling a homemade all-terrain vehicle:
- At the first stage, a frame is assembled on which the engine will be mounted in the future.
- After the engine is secured, the frame is carefully painted to prevent metal corrosion.
- Steering will occur through the front chassis.
- The seats and fuel tank are taken from the same motorcycle.
- The installed gearbox has its own characteristics. Torsion in it occurs in the opposite direction, which does not prevent the unit from working normally, because the load on it will be minimal.
- Two coolers from the VAZ 2110 will be responsible for cooling.
- Wheels can be made from truck inner tubes.
- Disks can also be homemade.
- The lever is attached to the bridge, like spring-suspended clubs.
The result of the work should be a homemade all-terrain vehicle with low-pressure tires.
Its disadvantage can be the strong heating of the engine during prolonged operation, which is why cooling is required.
The appearance of a home-made all-terrain vehicle will depend on the capabilities of the person doing the assembly.
All-terrain vehicle from the Urals
In this case, the donor of the main components is the Ural motorcycle. For the needs of the carakat, a power of 32 hp is sufficient. It will be necessary to create air cooling. The rear axle in some versions of converted motorcycles can be taken from Niva.
Karakat from the Urals has a good load-carrying capacity. This design can comfortably accommodate four people. When overcoming water obstacles, some difficulties will arise, because... Water may enter the engine due to fan operation.
There are practically no problems when driving through mud. It’s a little more difficult when passing through deep snow, again the problem can be solved, the caracate’s speed just decreases slightly. Therefore, snowmobiles of this design can still be used when traveling on snowy off-road terrain.
Body and wiring
Attachments, a gas tank and other structural elements are attached to the assembled frame. Each node must be firmly fixed on the prepared platform. It is important that the vehicle remains stable after assembly.
For many motorcycle owners, it is important that the appearance of the ATV is spectacular. Therefore, the design must be thought out in advance, before assembly begins. You will need to install a driver's seat and lighting fixtures. Turn signals and headlights are also removed from the donor motorcycle.
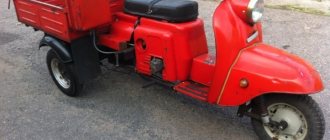
Homemade carakat all-terrain vehicle from a motorcycle
Swamp all-terrain vehicle Karakat made from the IZH Planet 3 motorcycle: photo of a homemade product with a detailed description of the design.
Wheeled swamp vehicle - has a low specific pressure on the soil surface, which allows it to move through wetlands and water surfaces.
This homemade karakat is made from an IZH Planet 3 motorcycle , its design is quite simple, and you can build such a vehicle with your own hands.
The wheels for the swamp vehicle are made as follows: KF-97 inner tubes from the T-150 tractor trailer. The tire for such a tube wheel is the same tube, only cut to a smaller diameter. First, the “tire” is put on, then it is tightened with belts. The transverse harnesses turned out to be approximately one meter long, and the longitudinal strip was 3.5 meters long. The width of the longitudinal strip is 30 centimeters. The transverse belts with the longitudinal strip are connected using bolts.
The frame of the motorcycle itself had to be lengthened and strengthened. To prevent the pendulum fork from dangling, it was welded. The chain and sprockets are borrowed from the combine. Their ratio is 2 to 1.
A small star with 25 teeth, it is attached to the drum using eight hardened 10-point bolts. A large star with 50 teeth. The brakes were left unchanged, the drum was upgraded to accommodate the sprocket mounts.
The rear axle of the tricycle is made from a bridge from Moskvich. The bridge had to be modified, I cut out the bearing mounts from the doll with a grinder, then welded the yoke to the bridge stocking (if it is not welded, the stocking will warp when you cut it in half), then the stocking itself was cut in order to secure the sprocket.
The chain tensioner is used from a combine harvester.
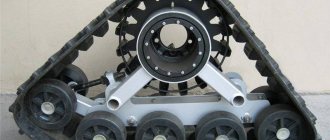
The wheels for the all-terrain vehicle are made from Niva wheels. To do this, they were cut in half using a grinder and extended by 300 mm with steel plates welded between the halves of the disks (6 plates in total).
The rims were covered with a Zhiguli camera, cut to a larger diameter. Since the disks were used from a Niva, and the axle from a Muscovite, the rear disks at the mounting points had to be trimmed.
The front fork is made 700 mm wide, the length of the fork stays is 800 mm. The front wheel axle is from an IZh motorcycle. On one side, an extension pipe 500 mm long is welded to the axle. This pipe is inserted into a modernized Izhevsk drum screwed to the wheel. On the other hand, the axle is screwed into the same mount as on the fork leg. The mount was cut off from the shock absorber and welded to the stay.
DIY karakat
The main feature of this swamp vehicle is its reliable design. During production, I proceeded from the availability of serial units that our industry produces. As an all-terrain vehicle engine, I used the existing one from IZH-Planet. I installed forced air cooling on it from the SZD motorized stroller, popularly known as “Invalidka”.
The crankshaft was kept from the original planetary one, because The seat for the generator at the SZD is not suitable, a smaller one is needed. I installed the ignition coil on the swamp vehicle from IZH at 6 W (photo 1)
.
The axle of the all-terrain vehicle was the rear axle from the Oka car (photo 2)
.