Where are the fuses under the hood of the Mitsubishi Lancer 9
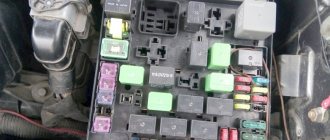
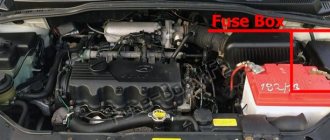
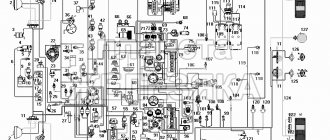
Under the hood, the fuse and relay box can be found on the left side (in the direction of travel of the car). In the image below, the block is numbered 7.
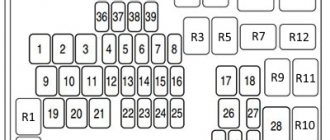
By pressing the latch on the block cover we get to the fuses and relays themselves. It looks like this:
| № | Denomination (A) | Purpose |
| 1 | 15 | Front fog lights, fog light relay power and power indicator |
| 2 | 10 | Sound signal |
| 3 | Relay | Fog light relay |
| 4 | 20 | Mass Air Flow Sensor, Exhaust Gas Recirculation (EGR) Sensor, Electronic Engine Control Unit (ECU), Crankshaft Position Sensor, Idle Speed Control, Ignition Coil Relay, Idle Speed Control, Fuel Injectors, Canister, Engine Cooling Fan Relay |
| 5 | 10 | A/C compressor clutch |
| 6 | Relay | Horn relay |
| 7 | 15 | Electronic engine control unit, ABS control unit, additional brake light and tail lights |
| 8 | Relay | Reserve place |
| 9 | 15 | Additional electrical appliances |
| 10 | Relay | Reserve place |
| 11 | 7,5 | Generator excitation circuit |
| 12 | Relay | Reserve place |
| 13 | 10 | ETACS control unit (responsible for the coordination and correct operation of all electronic systems), direction indicators |
| 14 | 20 | Automatic transmission solenoid control unit |
| 15 | 15 | Lancer 9 fuel pump fuse |
| 16 | Reserve | |
| 17 | 40 | Ignition switch circuit |
| 18 | 30 | Electric windows |
| 19 | 10 | Instrument cluster, steering column switches, ETACS control unit (responsible for the coordination and correct operation of all electronic systems) |
| 20 | 10 | Clock, audio system, ETACS control unit (responsible for the coordination and correct operation of all electronic systems) |
| 21 | 7,5 | Air conditioning control unit, ashtray and cigarette lighter illumination, instrument cluster, rear fog lamp switch, direction indicators, radio connector, |
| 22 | 7,5 | Side lights, license plate lights, instrument cluster |
| 23 | 10 | Low beam lamp, right headlight |
| 24 | 10 | Low beam lamp in the left headlight |
| 25 | Lighting control unit | |
| 26 | Relay | Electric cooling fan relay |
| 27 | 60 | ABS electronic control unit |
| 28 | 50 | Fan controller |
| 29 | 10 | Right headlight high beam lamp and high beam indicator |
| 30 | 10 | High beam lamp in the left headlight |
| 31 | 15 | Front fog lights |
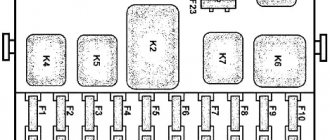
Next to the main fuse box there is an additional relay box:
| № | Purpose |
| 1 | connector for connecting the engine speed indicator; |
| 2 | spare space for relay |
| 3 | Throttle control module relay |
| 4 | spare space for relay |
| 5 | ignition relay |
| 6 | automatic transmission control relay |
| 7 | engine management system main relay |
| 8 | A/C compressor relay |
Sequence of detecting a faulty fuse and replacing it
During the operation of the vehicle, if a malfunction occurs in an individual device or unit of the Mitsubishi Lancer 9, using the tables and figures above, it is necessary to determine the installation location of the fuse(s) serving this device or the system as a whole. Next, with the ignition off, remove this fuse from the connector cell. This is easier to do with the help of special pliers, which are placed in the cover of the removable panel of the interior fuse box. Next, the fuse is checked. This can be done visually. This method is not 100% accurate, so it is better to check the health of the fuse using a multimeter.
If a fuse fails, you must replace it with a known good one of the same rating. Do not install a fuse with an unknown or different rating. It is allowed to temporarily install a fuse that exceeds the nominal value by no more than 25%, for example, 15 Amps instead of 10. Further operation of the vehicle is possible only after replacing it with a standard fuse. Under no circumstances, even temporarily, should a so-called “bug” be used. The consequence of this ill-considered action may be ignition of the electrical wiring.
If, after installing a new fuse and turning on the ignition or subsequent operation of the car, it fails again (burns out), it is necessary to begin examining the electrical equipment of the car and checking the devices that the fuse serves. The constant blowing of one of the fuses is evidence of a faulty wiring, one of the devices that the fuse serves.
As a result of long-term operation of the Mitsubishi Lancer 9 or a traffic accident, there may be cases of failure of the fuse and relay blocks, both in the interior and under the hood. In this case, it is necessary to dismantle and replace them.
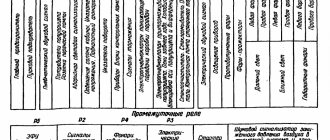
Purpose of the relay in the interior fuse box
| № | Purpose |
| 1 | Front fog lamp relay |
| 2 | Reserve space for relay |
| 3 | Electric fuel pump relay No. 2 |
| 4 | Heated front seats relay |
| 5 | Electric fuel pump relay No. 1 |
| 6 | Power window relay |
| 7 | |
| 8 | Electric Cooling Fan Relay |
| 9 | Heated rear window relay |
Where to begin
Most often, such problems are discovered with the onset of cold weather. If the owner forgets to replace the summer fluid in the tank with winter fluid, it may freeze at the most inopportune moment. What do they do in this case? The best thing you can do is to put the car in a warm room for several hours to warm up the fluid supply system to the injectors. After this, you should drain the summer fluid and fill it with the appropriate one for the season of operation of the machine.
When the fluid in the reservoir freezes, damage to the washer pump housing sometimes occurs in the form of cracking at the point where it is taken in and supplied to the nozzles. In this case, the pump must be replaced. To perform such a procedure you will have to work hard, since the tank in this model is located in a hard-to-reach place. To dismantle it, remove the front bumper.
Assignment of fuses in the cabin
| № | Denomination (A) | Purpose |
| 10 | 30 | Electronic air conditioning control unit |
| 11 | 30 | Electrical control unit for air conditioning |
| 12 | 7,5 | Joystick for controlling rear view mirrors |
| 13 | 7,5 | ABS electronic control unit |
| 14 | Spare | |
| 15 | 7,5 | Air conditioning compressor relay, air distribution selector motor, automatic transmission electronic control unit relay, rear window defroster relay, heater, heater relay, |
| 16 | 7,5 | Auxiliary relay and exterior mirror control |
| 17 | Backup fuse | |
| 18 | Backup fuse | |
| 19 | Backup fuse | |
| 20 | 10 | Rear fog light |
| 21 | 7,5 | Automatic transmission control relay, Supplemental Restraint System (SRS) electronic control unit, engine and automatic transmission electronic control unit (for vehicles with automatic transmission), instrument cluster, ETACS electronic control unit, output shaft speed sensors (for vehicles with automatic transmission ), reverse light, |
| 22 | 15 | Cigarette lighter fuse Mitsubishi Lancer 9 |
| 23 | 15 | Diagnostic connector |
| 24 | 7,5 | Battery lamps, ABS, CHECK ENGINE, SRS, oil pressure and brake system status lamps on the instrument panel, instrument cluster, ETACS electronic control unit, speed sensor |
| 25 | 7,5 | Electronic engine and automatic transmission control unit (for vehicles with automatic transmission), electronic engine control unit, fuel pump relay No. 1, fuel pump relay No. 2 |
| 26 | 15 | ETACS electronic control unit and rear window wiper motor (station wagon) |
| 27 | 10 | Capacitor (for 4G6 engines), ignition coils |
| 28 | 20 | Electronic lighting control unit, windshield wiper |
| 29 | Backup fuse |
The cigarette lighter does not work on Lancer 9, 10: how to remove and replace
For modern car enthusiasts, this device has much more functionality than the name suggests. After all, many devices are connected to the cigarette lighter socket. The most common:
- charger or power bank for mobile phones, tablets or other electronic devices;
- a navigator showing the way through city traffic jams;
- DVR recording traffic conditions;
- fan;
- compressor for inflating wheels.
Therefore, when the Lancer 9 cigarette lighter stops working and needs to be replaced, this is unpleasant news. Making repairs yourself is not difficult. You can learn from this material how to find out the cause of the malfunction, check weak points, and repair the device.
Why does the Lancer 9 cigarette lighter not work?
The device is located on the front panel of the car. The operating principle of the Mitsubishi cigarette lighter is simple. Inside the metal cartridge there is a nichrome thread, which heats up when the contacts close. When you press the cigarette lighter button, the contacts automatically close and the coil begins to heat up. When the maximum temperature is reached, the thermal relay gives a command to release the cartridge.
Over time, the device may break down and the fuse will trip. The Mitsubishi model 10 or 9 cigarette lighter does not work due to various reasons. Main sources of malfunction.
- Blown fuse. Especially for network safety, there is a safety element that burns out when the current exceeds 15 amperes. If one or more powerful devices are connected to the cigarette lighter socket, the current rating exceeds the resistance of the fuse, causing it to blow. This can be solved by replacing the element with a new one.
- The cigarette lighter may stop working due to poor cartridge contact or the appearance of oxides. Over time, the nest becomes loose, and rust or oxides appear on the antennae. Repairing such a device is simple - just remove the cigarette lighter, bend the contacts, and process them with a file or sandpaper for better contact.
- Broken wire or short circuit. If the fuses burn frequently or the cigarette lighter does not work completely, then you should look for an open circuit. To do this, you will need a multitester, which must be set to resistance and check the integrity of each wire connected to the cigarette lighter.
- Burnt out backlight bulb. There is a special lighting ring around the cigarette lighter. The lamp inside may burn out. It must be replaced with a new element. In the event of a breakdown, you should check fuse number 21 in the block located under the hood of the car. He is responsible for lighting the device.
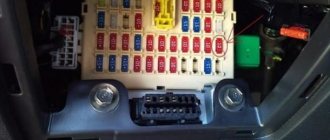
Cigarette lighter fuse Mitsubishi Lancer 9
If the device fails, this element should be checked. The Mitsubishi Lancer 9 mounting block is located in the cabin on the left side of the steering column. There is a drawer for small items here.
- We open the cover and then remove it, overcoming the resistance of the latches.
- On the back cover of the box there are tweezers to make it easier to pull out fuses, as well as two spare elements rated 20/30 amps.
- We are interested in element number 22 (see photo). It is he who is responsible for the car's cigarette lighter.
- To restore the device's functionality, it is necessary to replace the blown fuse with a new one. It is prohibited to install coins or metal jumpers. Fuses with a rating greater than 15 amps are not suitable. This may result in a short circuit or fire.
Wiring and terminals
If the fuse is intact, then the cause of the malfunction is elsewhere. To repair the Lancer 9 cigarette lighter, you will need to test the integrity of the wiring. To do this, you need to get a multitester and remember the pinout of the device. In total, three wires come to the device - two positive and one negative.
- Red, positive – connected to the battery. The circuit current is no more than 15 amperes, and if this parameter is exceeded, the fuse blows.
- Yellow. The positive wire is responsible for the backlight bulb.
- Black, minus. It comes to the body of the device, and the other end is a mass powered through the body of the car.