Drum brakes are only used on the rear of some vehicles. Today, many cars are manufactured with four wheel brakes. Vintage cars were made with four-wheel drum brakes, but braking response was not as good as disc brakes. With this in mind, drum brakes only provide a car with up to 25 percent stopping power. This means the front disc brakes do most of the work. If the rear drum brakes become misaligned (and this can be attributed to several common factors), the front ones will begin to overcompensate. Problems with the front brakes can become apparent if they are overloaded. Adjusting your rear brakes is a safe and effective way to balance your braking system and increase the life of your front brakes.
Tips
- Some vehicles are manufactured with windows that have not been "punched" from the base plate. This will require removing the drum (to get the tab out after it hits). You can use a hammer and punch to hammer into the metal latch, but you should also get a rubber stopper to close it. If you cannot turn the star wheel, you need to remove the rear drum and star wheel adjustment mechanism. Often this part can be repaired by disassembling, cleaning, applying lubricant to the threads, and then replacing them. If you cannot service the sprocket adjuster, it will need to be replaced. Imported cars use a self-adjusting cam lever. This type of vehicle does not have a star-shaped adjuster. The rear drum will need to be removed so you can check the cam adjuster to make sure it is working properly. On most of these vehicles, the rear brakes can be adjusted by repeatedly pressing the brake pedal and parking brake mechanism. You can also adjust the parking brake mechanism on these vehicles to tighten the inner handle ratchet. Refer to your repair manual for the location of this adjustment. Using the parking brake on most vehicles will increase the longevity of the rear drum brake adjustment. If you're not used to using it, try getting into it. However, don't drive with the parking brake on, as this will put stress on the rear brakes, wear out the brake pads prematurely, and put the engine and transmission under pressure.
How do drum brakes work?
When you press the brake pedal, the pressure of the working fluid in the system increases and puts pressure on the pistons of the brake wheel cylinder. This in turn overcomes the force of the connecting (return) springs and activates the brake pads. The cushions are strongly pressed against the working surface of the drum, slowing down the speed of the car's wheels. Due to the friction forces that are created between the pads and the drum, the wheel stops.
After releasing the brake pedal, return springs return the pads to their original position.
Preparing the car. What tools are needed?
To replace the pads yourself, you need the following tools:
- Anti-recoil shoes.
- Jack.
- Balloon wrench.
- Clamp for pressing in brake cylinders (you can use a powerful screwdriver).
- Wrenches (they will be needed to remove the drum and calipers).
- Pliers that can be used to remove and install drum springs.
It is advisable to carry out work wearing safety glasses and a respirator. This will prevent dust from the pads from getting into your eyes and respiratory tract.
Before starting work, you must place the vehicle on a level surface and secure the wheels with wheel chocks. This ensures that the vehicle does not fall off the jack during operation.
The bolts on the wheel you are going to remove must be loosened before lifting the car. This will eliminate the need for an assistant to hold the brakes while you use the wheel wrench.
Once you have the wheel jacked up, rock the car to make sure it is stable. If everything is in order, you can unscrew the bolts and remove the wheel.
Before installing new pads, you have to recess the pistons of the brake cylinders. Therefore, you should first remove the caps of the reservoirs containing the brake fluid.
Replacing car brake pads
If you hear extraneous noises when the car is braking, try to immediately check the condition of the brake pads. It is believed that the rear pads fail most often, but this is not entirely true. The front pads are subject to greater load when you press the brake pedal, so they wear out faster. To spread the rear or front brake pads, do the following:
- We put the car on the handbrake.
- We unscrew the bolts securing the front wheel (the other front wheel on the opposite side must be fixed in a stationary position!).
- Place a jack under the car and remove the wheel.
- We press on the brake cylinder and spread the pads, inserting a screwdriver between them so that the brake piston returns to its original position.
- Unscrew the bolt securing the brake caliper to the guide bushings. Problems may arise with this if the part is severely worn - then it is necessary to spray with WD-40 aerosol, which has a lubricating effect. After 10 minutes, you can start unscrewing again, which this time will be successful.
- We unscrew the bolt connecting the brake caliper to the bracket, while the bracket and caliper body should swing to the side.
- We remove the brake pads.
Now you know how to separate the brake pads yourself, without the help of service station employees.
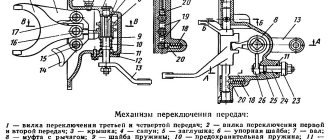
Adjustment
- All manipulations are performed in the position when the handbrake is “off”
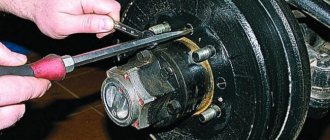
(the lever is fixed in the lowest position). To access the brake mechanism, remove the plastic plugs located on the brake shield. It is enough to pry them off with a screwdriver; - Then the eccentric nut is loosened
(no more than 2 turns). Further actions consist of moving the brake pads apart - to a position at which the drum is braked, after which the bolt is turned in the opposite direction, as a result of which the brake pads move in the opposite direction. The movement is carried out until the drum begins to rotate; - The process is monitored through inspection windows located in the lower part of the brake shield;
- At the end of the operation, the eccentric nut is tightened with reasonable force. It is important to prevent the eccentric from turning;
- The brake mechanism is adjusted in a similar way on the other side of the car, after which the plastic plugs are installed in place.
Next stage:
installing the leveler in a position “perpendicular” to the axis of the car. To do this, it is necessary to loosen the fastening nuts; they move along the thread until the desired position of the equalizer is reached. The position is fixed using locknuts.
The handbrake is set to the “one click” position. By rotating the rear end nut (sheath of the central cable), the cable moves to the forward position until the free wheel movement is slowed down. Having tightened – with moderate force – the fixing nuts, turn off the parking brake.
An indicator of operational efficiency will be the free rotation of the rear wheels.
In addition, the “activation” of the handbrake is characterized by a maximum movement of the lever of 15 clicks. In this case, we can safely state: the adjustment was made correctly, the desired result was achieved.
The above gives some idea of what actions need to be taken for proper adjustment.
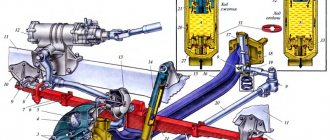
Pneumohydraulic drive device
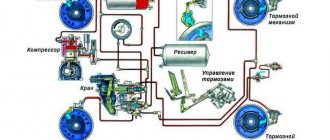
The Ural truck uses a mixed type drive, combining the functions of pneumatics and hydraulics - pneumohydraulic, which consists of two working circuits for the front and rear wheels, plus a third circuit responsible for connecting the trailer brakes (single-wire or double-wire drive).
The two main circuits of the Ural braking system have the following components:
- Different air cylinders located parallel to each other.
- A brake valve, the upper section of which belongs to the first circuit, and the lower section to the second.
- Cylinder wheels and general brake booster (pneumatic).
- The second circuit additionally includes a brake force regulator.
- Separate air tank.
- Special valves designed to control trailer brakes (separately for single and dual wire actuators).
- Connection heads for each type of drive.
The pneumohydraulic drive of the Urals operates according to the following scheme:
- The compressor, through a pressure regulator, directs compressed air to the safety valves (single and triple).
- The valves distribute the resulting air between all cylinders in each independent circuit.
When do you need to change brake pads?
With a calm driving style, the pads need to be replaced every 40-50 thousand km. However, the condition and integrity of the friction linings need to be checked much more often - every 5-10 thousand kilometers.
The most reliable and easiest way to check the condition of the pads is to remove the wheel and measure the thickness of the linings. Parts need to be changed if no more than 2-3 millimeters of the friction layer remains. The pad must be replaced if there are chips or cracks in the lining.
Some models have a special signal plate, which begins to make noise when the lining is heavily worn. In this case, visual control is not required.
On modern cars, the pads have sensors that are activated when the permissible level of wear is exceeded. In this case, the on-board computer warns the driver about the need to travel to a service station.
In addition to direct signs, there are indirect ones:
- Creaking noise when braking.
- Vibration, knocking or jolting when pressing the brake pedal.
- Traces of metal shavings on the inside of the rims.
The symptoms listed may be the result of other malfunctions. Therefore, when they appear, it is necessary to carry out a comprehensive diagnosis of the suspension and braking system.
Watch the video
Pads are parts of the vehicle brake system that, when pressed, interact with the brake disc. Due to this, the car begins to lose speed and stops. But all parts have their own service life and wear out over time. Failure of brake pads can lead to accidents with very serious consequences. Today we will tell you how to separate the brake pads of a car.
Video: replacing brake pads on VAZ 2109, 2110, 2114, 2115, Kalina, Granta, Priora
The safety of a car largely depends on the technical condition of the braking systems. During operation, KamAZ brake pads wear out and must be periodically replaced. This work is not difficult, but will require some physical effort. The degree of wear of the friction material is controlled by the stroke of the brake chamber rods. When the value reaches 40 mm and above, the brakes are adjusted, and if this is not possible, the linings are replaced.