Replacing the rear door lock with a Gazelle Next was required after the door stopped opening. A fault was detected when the lock was removed. Lever that operates the top bolt. Stopped working.
That is, when you press the door handle. The lever did not react and did not pull the cable going to the upper bolt. The cause of the failure was jamming in the upper gate. And as a result, force was applied to open the door. The lock itself is made of plastic. Plastic mechanisms are also installed inside. Any force caused by incorrect adjustment. Or failure of some mechanism. Leads to damage to the lock mechanism.
Installation of doors and locks
The GAZelle sliding door has the following device:
- Side windows.
- Upholstery.
- Glass.
- Edge of the opening.
- External and internal handle.
- Lock.
Door lock device:
- A locking mechanism that closes the lock and secures it.
- Lever mechanism - for opening the lock from the outside or inside and locking it.
- Retainer tires that hold the system in place in an emergency.
Automatic rear door lock. It complies with safety standards. The locking mechanism consists of:
- mechanism base;
- rotor with finger;
- fist with finger;
- return springs;
- buffers;
- base cladding;
- spacer bushings.
The lock includes external and internal drives. Structure of the lock and its drives:
- Tractions.
- Clamps.
- Stopper lock drive.
- Stopper body.
- Stopper latches.
- Adjusting gaskets.
- Power off button.
- Lever arm.
- Lever mechanism.
- Locking mechanism.
- External handle socket.
- Latch.
- Tips.
- Stopper slider.
Locks are used to prevent theft of objects from inside the car and unauthorized access to the vehicle.
Main causes of jamming
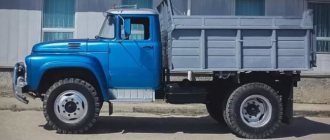
A Gazelle is a car that is mainly purchased for business. In Russia it is used as a minibus for personal purposes or transporting a large number of people in the form of a private cab. To open the structure without damaging the door leaf when the Gazelle side door guide is jammed, you need to choose the appropriate method of procedure. It is calculated depending on the situation and the nature of the fault. Causes:
- Damage to hardware. The door may stick. Sometimes the pawl flies off, which creates a smooth motion of the carriage.
- The middle or rear pin, which is responsible for fixing the blade during opening, sinks.
- One of the passenger door electronics has burned out. It may short out due to frequent vehicle washing or climatic conditions.
- Careless handling of the structure. Passengers often slam the door forcefully when leaving the vehicle.
- Lack of maintenance of the sliding canvas. The door may jam. Diagnostics, prevention, lubrication and adjustment work should be carried out regularly.
It is more difficult to find a breakdown when there are no visible causes, but the prerequisites are always present. If the door does not close well or cannot open the first time, there are extraneous noises and squeaks, then a comprehensive diagnosis should be carried out.
It is recommended to pay attention to the position of the door: the presence of deformation, the size of the gap between the leaf and the body, overhanging or skewed. Deformation may occur if the Gazelle was involved in an accident. In this case, the structure is first straightened, then the mechanisms are repaired.
How to open a gazelle without a key?
You can open Gazelle using the following methods:
To use this method, you need a wedge (wooden) no more than twenty-five centimeters long and up to four centimeters thick, and a metal rod with a hook at the end.
Using a wedge, you need to bend the edge of the door in the upper corner; for this purpose, it must be carefully driven between the frame and the stand. If you are not careful, you will likely ruin the door seal and remove some of the paint with the wedge.
You need to insert a rod into the gap that appears after driving in the wedge and use the hook to turn the blocker. If you don’t have a wedge, you can try to do without it; to do this, you need to press on the glass with your hands and try to lower it.
If you succeed, you will need to insert a screwdriver into the slot and widen it. Work very carefully as you may damage the window. Then everything is repeated, as in the example described above.
- Using an electric drill
This method is good because it allows you to quickly get into the car, but it is not always profitable, since after this you will have to change the lock. The essence of the method is to drill out the core of the lock with an electric drill, which makes it easy to open the door.
This is interesting: Replacing the ignition switch and its contact group
You need to take a piece of flexible but rigid wire eighty centimeters long and form a hook at one end. The length of the hook after bending should be approximately ten centimeters.
When the hook is ready, you need to bend the seal from the side of the door handle and insert the wire. Next, you need to engage the door rod on which the lock button is located. Once you have the pull hooked, you can pull the hook up and open the door.
Important:
By contacting a specialized company for emergency opening of locks, you get careful and professional work and do not risk damage to the lock mechanism and the integrity of the upholstery, rods and hooks.
Screwdriver and seal
If the side door on a new Gazelle is jammed in winter, you can still try to open the door without a key; for this you need:
- Use a flat-head screwdriver to pry out the glass seal.
- Manually lower the element.
- Enter the car through the passenger door next to the driver.
Using a screwdriver, you can unscrew the side door bumper; the round fasteners on the Gazelle are hidden under plastic plugs.
Wedge
If you have a strong wooden stick or an iron rod with a hook at the end at hand, you can try using them to unlock the mechanism. The wedge needs to rest between the frame and the stand. It is important to act carefully so as not to damage the paintwork. When a gap appears between the glass and the seal, you can lower the window or press the lock.
A loop
To get into Gazelle Next when the sliding door is jammed, use a wire. Its length should allow you to reach the locking button. You need to make a loop at the end of the metal cord. In size it should be slightly larger than the opening button. Lowering the glass a little, the wire is lowered into the target and placed on the blocker button.
Manual method
The door operates by an electric drive, so before starting, you should press the “emergency opening” button on the on-board panel. To unlock the Gazelle Farmer, if the door does not open from the outside, you need to do the following from the inside:
- Place your foot on the footrest.
- Place your knee on the door.
- Pull the handle towards you and push. The door leaf should slide out.
You can always call specialists for help or use barbaric methods. You can drill out the lock cylinder with an electric drill, knock out the locking mechanism with a hammer, or call the emergency service.
Removing the right rear door lock
When the driver was able to get inside, it is necessary to open the lock. If this cannot be done using the standard method, you will have to disassemble the door card. To do this you will need a set of screwdrivers, a socket wrench number 10, 8, and pliers. Algorithm:
- Remove the plugs to unscrew the handle fasteners.
- Unscrew the bolts with a wrench.
- Remove the screws that hold the limiter clamp.
- Remove the limiter bracket.
- Remove the inner handle rosette.
- Unfasten the top row of clips that secure the trim.
- Turn off the switch rod.
- Remove the cotter pin securing the leash.
- Loosen the lock switch fastenings with a 8 key.
- Unfasten the bottom row of clips. Remove the panel.
Once access to the lock is gained, it can be removed or the lock removed without dismantling.
Removing the left rear door lock
Remove the stop and door trim (see Removing the right rear door lock).
Remove the upper and lower limiters for the vertical movement of the door. Use a socket or an 8 key to unscrew the top...
...and the lower bolts securing the upper lock stop housing.
Using the same key, unscrew the two bolts securing the lock drive...
...and two bolts securing the stopper base.
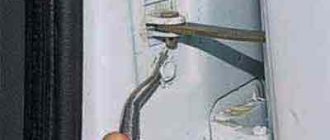
Having pulled the base of the stopper outward, use pliers with thin jaws to remove the cotter pin of the stopper lock handle axis.
We take out the handle axis...
...and remove the base of the stopper.
Through the resulting opening, pressing with a finger or prying with a screwdriver, we snap it off...
...and remove the spring clamp of the upper link of the stopper (for clarity, shown on the removed lock).
We remove the upper body of the stopper together with the stopper and rod from the door.
Using an “8” wrench, unscrew the two bolts securing the lower stopper housing, in the same way as removing the upper stopper. Having unfolded it, we recess the lower stop inside the door.
. and take it out together with the rod and the stopper lock drive.
Using the “8” wrench, unscrew two bolts each securing the two lower latches of the left and right door stoppers.
Similarly, remove the upper latches of the stoppers. We assemble the lock in the reverse order, lubricating all rubbing joints with engine oil.
Removing and installing a window regulator
You will need tools: TORX T25 and 10 wrenches, a special plastic mounting blade or a flat-head screwdriver.
We lower the glass to about halfway.
Remove the door trim and soundproofing gasket
Loosen the two fastening bolts and disconnect the glass from the slide
Raise the glass and secure it with tape in the upper position
Unscrew the bolt securing the front glass guide
We turn the guide so that it can be removed through the mounting hole in the door, and remove it from the door
Removing the sliding door and disassembling its moving mechanism
We work together or three, as the door is heavy.
1. Using a wrench or a 14mm socket, unscrew the two bolts securing the door opening mechanism to the middle guide. Remove the bolts along with the plate.
2. Holding the door suspended, remove the middle door opening mechanism from it.
3. Using a 6-point hex key, unscrew the two bolts securing the door to the upper support.
4. Lowering the door slightly (2–3 cm), remove the lever of the lower door opening mechanism from engagement with the lower guide
5. Remove the door
6. Using a 14mm wrench, unscrew the three bolts securing the lever
7. Remove the lower mechanism lever from the door.
We install the door in the following sequence.
First, we attach the upper support to the door.
Then we install the middle guide mechanism on the door.
We install the lower mechanism lever on the door, having previously engaged the lever roller with the lower guide.
After installation, adjust the position of the door.
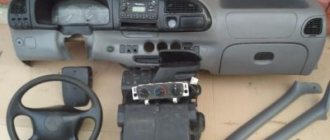
Device and tools for work
Adjustment of the Gazelle front doors is shown after their installation. To do everything correctly, you should study the principle of operation of the canvas. Most Gazelles have a sliding door; let’s take a closer look at the design:
- the sash opens to the side, parallel to the body;
- special fastenings help to travel;
- due to the clamps, bearings and running belt, the movement is smooth;
- during closing, the canvas reliably fixes the closing device;
- movable handles allow you to open the door from the inside or outside if the door is not locked.
For self-repair, you will need key No. 6, 14, 17.
Sliding door adjustment
It is more convenient to work together. We adjust the door if the door has been removed, as well as if its correct position is violated during operation. It is more convenient to make adjustments with the lock latches removed.
Door height adjustment
1. Use a 17mm wrench to loosen the locknut.
2. Rotating the adjusting bolt of the upper support using a 14mm wrench, raise or lower the front edge of the door, achieving a uniform gap between it and the middle pillar
Having adjusted the door to the required position, tighten the locknut of the adjusting bolt.
3. Using a 14 key, loosening the two bolts securing the door opening mechanism on the middle guide, raise or lower the rear edge of the door, achieving a uniform gap between the door and the side of the body. While holding the door in the required position, tighten the bolts securing the mechanism.
Adjusting the door position “in depth”
Having loosened the locknut of the adjusting bolt of the upper door support and moving the support within the adjustment slot, we move the upper edge in a horizontal plane, and then tighten the locknut.
Using a 12mm wrench, loosen the two bolts securing the lower arm with the roller and move the arm within the slot, adjust the position of the lower edge of the door in the horizontal plane, and then tighten the bolts.
If the described adjustments are not enough, we make additional adjustments.
Using a 14 key, loosening the three bolts securing the lower support to the door, move the support within the slots along the door, adjust the position of the lower edge of the door in the horizontal plane.
Removing and installing the side door
Having the necessary equipment, assistants and work space at hand, the removal of the structure occurs in several stages:
- Removing the middle guide - remove the facing panel. To do this, you will need to use a 14mm wrench to remove the screws, then the retaining plates.
- To remove the middle mechanism, the door is held suspended.
- Use a hexagon to unscrew the top bolts that connect the sash to the main support.
- The door lowers a little. This allows you to remove the lever of the mechanism, which is located in the lower part.
- The web is removed after unscrewing and removing the three screws on the lever fastener.
Reinstallation is performed in reverse order. It should be noted that in this process the upper support is attached first, and then the lower one.
How to remove the trim
- Use a thin screwdriver to pry off the 2 handle plugs.
- Using a socket or a 10 mm tubular wrench, unscrew the 2 bolts and remove the handle.
- Unscrew the screw securing the lock handle socket.
- When removing the socket, pull the handle towards you.
- Having pressed out the rubber socket of the window lifter handle, use a needle to press out the locking pin and remove it from the hole.
- The handle with the socket is removed.
- Using a screwdriver, remove the 8 plastic upholstery clips.
- The door trim is removed.
- Carefully remove the soundproofing gasket, which is glued to the sealant.
You can replace the old trim with the same one as the door trim on GAZelle Next.
Removing the sliding door opening mechanisms
Using a wrench or a 8-mm socket, unscrew the four bolts securing the upper guide casing.
We remove the casing. After loosening the locknut, unscrew the bolt securing the upper support to the roller carriage (see below “Adjusting the sliding door”).
Disconnect the upper support from the carriage.
Remove the carriage with the roller from the top guide.
Using a 10mm socket, unscrew the four bolts securing the upper guide.
Remove the top guide.
Using the same key, unscrew the two bolts securing the upper guide support to the body.
We remove the support.
By prying the 12 clips (see section “Removing the sliding door trim”), remove the hardboard trim above the right rear wheel arch.
Using a “13” socket, from the interior side, unscrew the four nuts of the studs securing the middle guide.
Using a 12mm wrench, unscrew the bolt on the outer fastening of the middle guide.
Remove the middle guide. A rubber sealing gasket is installed between the guide and the body.
Use a screwdriver to pry up and remove the plug (or lampshade) in the body step lining.
In the opened niche, use a 12mm head to unscrew the bolt for the front fastening of the lower guide.
Using a 10mm socket, unscrew the other three bolts securing the lower guide.
Remove the bottom guide. We install the sliding door guides in the reverse order and coat their working surfaces, as well as the axes of the small rollers of the middle guide and the bearing of the upper roller with Litol-24 or CV joints-4 lubricant.
Sliding door adjustment
After installing the structure, you will need to adjust the mechanism. Self-adjustment of a sagging sliding door on a Gazelle will require the same set of tools and one assistant. The need for adjustment arises immediately after installation and in cases where defects need to be corrected. Algorithm of actions:
- The fixing elements are removed from the lock. The tightening of the lock nut is loosened with a tool of 17.
- The top bolts are loosened with a 14 key. The door is now movable and adjustable. To do this, the blade is raised or lowered, depending on the nature of the malfunction. It is important to achieve a uniform gap.
- After the door is aligned correctly, all fasteners are well tightened. If you neglect this rule, the sash may fly off its hinges or open on its own while moving. Adjustment of the upper part is carried out in a similar way, only the screws of the support at the bottom are loosened.
- If “depth” adjustment is required, then after loosening the mechanisms it is necessary to move the support, moving the edge up in the horizontal plane. To move it down, unscrew the fastenings of the lower arm with the roller.
This is interesting: Instructions for replacing the fuel pump yourself
Sometimes car enthusiasts additionally place a washer under the mounting screws that hold the support at the top or bottom.
To replace the entire canvas, the old structure is removed and a new one is installed. Afterwards, the serviceability of closing, the position of the drives and the latch pins are checked.
If the body is deformed, it is unlikely that the door will be adjusted; straightening will be required.
Door height adjustment
1. Use a 17mm wrench to loosen the locknut.
2. Rotating the adjusting bolt of the upper support using a 14mm wrench, raise or lower the front edge of the door, achieving a uniform gap between it and the middle pillar
Having adjusted the door to the required position, tighten the locknut of the adjusting bolt.
We remove the door trim (see the article - “How to remove the trim and sliding door lock of a Gazelle car”).
3. Using a 14 key, loosening the two bolts securing the door opening mechanism on the middle guide, raise or lower the rear edge of the door, achieving a uniform gap between the door and the side of the body. While holding the door in the required position, tighten the bolts securing the mechanism.
Adjusting the door position “in depth”
Having loosened the locknut of the adjusting bolt of the upper door support and moving the support within the adjustment slot, we move the upper edge in a horizontal plane, and then tighten the locknut.
Using a 12mm wrench, loosen the two bolts securing the lower arm with the roller and move the arm within the slot, adjust the position of the lower edge of the door in the horizontal plane, and then tighten the bolts.
If the described adjustments are not enough, we make additional adjustments.
How to remove the doors and rear door locks of a Gazelle van
Removing the right rear door lock
Use a screwdriver to pry up and open the door handle plugs
Using a socket wrench or a 10mm socket, unscrew the two bolts securing the handle and remove it.
Using the same key, unscrew the bolt securing the limiter clamp and remove it.
Using the same key, unscrew the two bolts securing the limiter bracket and remove it together with the limiter
Using a screwdriver, unscrew the screw securing the socket of the internal handle
Removing the socket
Using a screwdriver, remove the eight plastic door trim fasteners.
We remove the upholstery.
Use a screwdriver to unclip the lock switch rod from the switch arm.
Using pliers with thin jaws, remove the cotter pin securing the leash and remove the leash from the switch (the leash can be removed from the switch and together with the rod).
Using an “8” key, unscrew the bolt securing the lock switch 2–3 turns.
We take out the switch.
Using a screwdriver, unclip the rod of the inner handle.
Use a screwdriver to remove two screws
Remove the inner handle along with the rod
Turn off the lock button by hand
Using a screwdriver, unscrew the two screws securing the lever bracket.
We move the bracket with the lever to the side and use a screwdriver to unclip the lock rod clamp through the opening.
Disconnect the rod from the lever and remove the lever with the bracket and the lock switch button rod.
Using a large screwdriver, unscrew the two screws securing the locking mechanism.
Let's take it off.
Using a socket wrench or 8-mm socket, unscrew the two bolts securing the outer handle drive.
We remove the drive together with the lock.
Using a 8mm socket, unscrew the two bolts securing the outer handle.
Remove the outer handle.
Using a 12mm socket, unscrew the right door lock latch (on the left door)
Remove the lock.
Using an 8 wrench, unscrew the two fastening bolts
Remove the upper and lower limiters for the vertical movement of the door.
We assemble the right rear door lock in the reverse order, lubricating all rubbing joints with engine oil
Removing the left rear door lock
Remove the stop and door trim.
Remove the upper and lower limiters for the vertical movement of the door.
Using a socket or an 8-point wrench, unscrew the upper bolt securing the housing of the upper lock stopper
Unscrew the lower bolt securing the upper lock stop housing.
Using the same key, unscrew the two bolts securing the lock drive.
Unscrew the two bolts securing the base of the stopper.
Having pulled the base of the stopper outward, use pliers with thin jaws to remove the cotter pin of the stopper lock handle axis.
We take out the handle axis
Remove the base of the stopper.
Through the resulting opening, pressing with a finger or prying with a screwdriver, we snap off and remove the spring clip of the upper link of the stopper (for clarity, it is shown on the removed lock).
10. Remove the upper body of the stopper along with the stopper and rod from the door. Using an “8” wrench, unscrew the two bolts securing the lower stopper housing, similar to removing the upper stopper
Having unfolded it, we recess the lower stopper inside the door and remove it along with the rod and the stopper lock drive.
Using the “8” wrench, unscrew two bolts securing the two lower latches of the left and right door stops
Removing the latches
Similarly, remove the upper latches of the stoppers.
We assemble the lock in the reverse order, lubricating all rubbing joints with engine oil.
Removing the rear door
We work together.
Having closed the door, turn and remove the limiter from the bracket.
Using a screwdriver, unscrew the four screws securing the limiter bracket to the door and remove the bracket
Use a 12" socket to unscrew the bolts securing the door to the hinges.
Removing the door
Install the door in reverse order.
Measures to prevent blocking
To ensure that the door can close correctly even after long-term use, it is important to timely adjust individual elements and take care of the car. Basic rules and actions:
- You should open the Gazelle door carefully to avoid slamming.
- Carry out lubricating actions, additionally use an anti-corrosion substance.
- It is good to dry the Gazelle after washing in winter.
- Adjust the door, lock, handle using special bolts on the stand.
- Periodically check the operation of the drive.
You should also remember to promptly change accessories that have worn out. The price of the sliding door kit is 1000 – 2000 rubles, depending on the manufacturer.