Pros and cons of homemade structures
Among the advantages of equipment assembled with your own hands, the following positions can be noted:
- Even a person with low qualifications can make attachments;
- Any mounted unit made in home-made conditions is quite inexpensive;
- to create equipment and repair it, you will need a standard set of tools;
- it is possible to enhance certain features of the device;
- From a safety point of view, attachments can be designed to a very high level.
Among the shortcomings, the following criteria stand out:
- setting up and servicing homemade equipment is a painstaking, labor-intensive process that requires skill and proper qualifications from the owner;
- During the entire service life, special attention is required to monitor the operation of the unit.
Preparatory stage
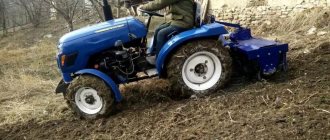
Most often a cylindrical plow is made. This mini tractor hitch is used when cultivating various types of soil. The soil is crushed well, but does not penetrate deeply into the formation. Such units are recommended for use on unplowed land during primary cultivation.
Simple plows, unlike the plowshare type, are easy to manufacture. Using the half-screw design, you can turn over the soil without loosening it. The share plow is a durable and reliable attachment for a mini tractor that can be used constantly. The structure processes the ground with cutting elements. The soil is thrown to the sides by two blades. This plow manufacturing technology provides a high level of loosening and depth of soil cultivation.
The drawing of the plow is carried out taking into account the type of structure. The single-hull model is presented in the form of a metal pipe of rectangular cross-section. On the opposite side of the product, a cutting element is attached, and on the other side, a wheel and fasteners to the mini tractor.
To process a large area, a two-body hitch for a mini tractor is assembled. The product is made from several frames equipped with different tools. Each component part of the structure performs specific tasks (harrowing, plowing).
Another interesting article: How to make a cultivator for a walk-behind tractor with your own hands
If the drawing is completed, then the device is detailed. Then the parts are cut out. To do this you will need a steel sheet and scissors. The shape of the blade depends on the tools used and equipment available. Plate bending machines allow you to achieve high precision.
Manufacturing of attachments
Attachments are divided into the following types:
- to prepare the soil for planting crops;
- for harvesting and processing.
Before installing equipment on a mini-tractor, drawing up drawings, and determining dimensions, you should understand:
- type of construction;
- features of the technology (advantages and disadvantages);
- monetary and energy costs.
We can highlight the most popular attachments for farmers, which are assembled with their own hands:
- plow - designed to prepare the soil for sowing (usually it is connected to the rear suspension);
- harrows – provide soil preparation;
- potato planter - works with engines that have a power of more than 23 hp. With.;
- a rake is an effective tool for cultivating land, has a size from 1.2 to 3.2 meters, the engine power should be more than 14 hp. With.;
- cultivator – provides proper care of plants during the growing season;
- sprayer - a device for treating agricultural areas with mineral fertilizers;
- potato digger, conveyor digger – designed for harvesting root crops (rear suspension is required to work with this equipment);
- trailed equipment, automatic coupling - equipment is necessary for transporting various cargoes;
- snow blower, rotary snow blower, rotary snow blower - units are used to clear snow drifts in the cold season;
- scythe, knife, milling cutter - tools for working with the earth;
- manipulator – a mini-unit with a bulldozer blade, which can be equipped with a mounted excavator or loader.
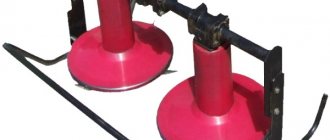
Hiller
A triple hiller is one of the most popular agricultural tools, which is practically not inferior in purpose to a plow or winch. It allows you to create furrows in which various crops are planted. The hiller moves along the beds, while its “wings” quickly pour soil into the holes that already contain potato seedlings.
The hiller is the simplest tool in design, which has a single grip width, while it looks like two wings fastened and spread apart.
- When working with a hiller, the width of the beds is adjusted to fit a specific tool, but not vice versa. Manufacturers make devices with a working width of 24-32 cm, which does not always meet the needs of homestead farms.
- Hillers are divided into several types. The simplest and most popular of them is a hiller for a small area. This unit is of the propeller type. It is placed on a mini-tractor that has forward and reverse gears.
- The principle of operation is as follows: special propellers loosen the soil, weed out weeds, then fill the beds with thinned soil. Work occurs in second gear with a rotation torque of up to 190 rpm.
To make the simplest hiller, you will need to use metal 3 mm thick. Fragments of the product are bent until the radii coincide. Then you should weld them 2-3 times. The seams are processed and protected so that the surface is smooth. The “wings” are made using the same method.
Types and mounting device
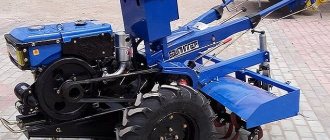
To connect additional equipment, minitractors are equipped with a rear linkage (MTZ 82, 595, 05, 330, etc.). This device consists of:
- external lever;
- rotary shaft bracket;
- top link;
- brace;
- lower thrust;
- lugs;
- ties and axles.
By type, additional equipment can be divided into the following groups:
- to prepare the soil for planting;
- for crop care;
- for harvesting.
To prepare the soil
To prepare the soil for planting seeds and root crops, a disk cutter, rototillers, cultivators and harrows are used. To install them on equipment, a three-point hitch is required.
These devices help loosen the soil, get rid of weeds and prevent wind erosion of the soil.
When making such attachments, follow the following recommendations:
- To increase the service life of additional equipment and the mini tractor, the materials used are subjected to anti-corrosion treatment.
- It is recommended to install a weeding or loosening paw. This will help smooth out the grooves left by the knife.
Devices to make planting easier
Equipment that simplifies planting grain and vegetable crops:
- Seeder. It consists of devices that form furrows, a reservoir for seeds and a mechanism that scatters these seeds and covers them with soil.
- Potato planter. With its help, a deep, even furrow is formed, into which seed vegetables are fed using rectangular pipes, and the installed mechanism sprinkles them with soil.
- By combining a mounted drill and a seedling tank, you can simplify the formation of rows. The dimensions depend on the expected scope of work.
To attach these tools to a mini tractor or walk-behind tractor, a front linkage is used.
For harvest care
Hitches for crop care:
- Rakes and tedders. They are used for raking grass from swaths, tedding the mown mass, and doubling shafts. They consist of wheels, teeth and a frame on which everything is attached.
- Hydraulic rake. Rake the mown mass at high humidity (up to 80%). Consist of a metal frame, teeth and rotor. The level of performance will depend on the engine power of the vehicle.
- Weeding cultivator. The working unit of this unit is a support-type frame, which is attached to the tractor on one side and rests on wide wheels on the other.
- Grass shredders, such as mulchers.
For watering and spreading fertilizers
For these purposes, it is recommended to use the following equipment:
- Sprayer. It consists of two wheels, a base (on which the tank and pump are located), a tank (water is poured into it), a pump, folding rods, and nozzles. This equipment comes in two types: which will spray liquid in the form of a mist (small droplets that evenly cover the plant) or in the form of a stream (used to feed the roots).
- Mounted hopper for applying fertilizers. Designed for intrasoil application of bulk mineral fertilizers. It consists of rotary axes, a cone-shaped frame, and a fertilizer supply mechanism.
Harrow
Manufacturer prices for harrows vary from 15 to 65 thousand rubles. For this reason, it is easier to make such a device yourself, because it will cost several times less, and will do the job no worse than the original version.
Before the land is plowed, it must be properly prepared. A disc harrow is best suited for this. The weight of the product ranges from 190 to 700 kg, the grip can be from 1 to 3 m. Several discs can be installed on the model, the tillage depth will be about 20 cm.
Harrows are divided into the following types:
- powered by a rotor;
- disk;
- dental
The first type removes soil in layers, the thickness of the cut can vary from 3 to 9 cm. This indicator can be controlled. It is also important to take into account when designing a harrow the area of land on which you will have to work. The strip width varies from 750 to 1450 mm.
When designed correctly, the blade has a sharp angle, which allows it to penetrate the soil with maximum momentum, cutting it and simultaneously destroying the roots of weeds. A disc harrow is used on dry soils, and a special star-shaped disk loosens the soil in such a unit. There can be up to 5-7 similar disks on one shaft - it all depends on the power of the engine.
A harrow with teeth is used to create uniform weeded soil. Here the protruding parts can be of very different configurations. Most often used:
- teeth;
- knives;
- squares.
- Sizes range from 20 to 40 mm. Coupling with the chassis occurs either using a spring strut or using hinges.
- The simplest harrow in design is the tine harrow. It may be enough to process the soil. In appearance, it resembles a lattice with teeth. A good hook can be an ordinary beam with holes that are placed in the tube of the towed unit, while the rod is fixed.
- Between the hook and the chassis, after the unit is assembled, dynamic chains are welded.
- The grate is made from blocks or reinforcement. Sometimes pipes with a perpendicular cross-section are used, and the walls must be at least 3.5 mm thick.
- The angle of inclination of the “teeth” should be about 47 degrees. It should also be taken into account that the created unit must fit smoothly into the turning radius.
- The “teeth” themselves are made up to 22 cm high, using steel that is used for reinforcement. The longer the “tooth”, the thicker the reinforcement should be. Sometimes the “teeth” are subjected to additional hardening and turning. Between themselves they are located with a gap of 10.6 cm.
- The arrangement of the “teeth” should be matched with the traction shaft, otherwise the harrow will crawl along the ground. Additional vibration will inevitably occur.
Homemade attachments
The user can make a hitch on the mini tractor with his own hands. To do this, you will need design drawings that will indicate the parameters of the equipment being manufactured.
Before you begin assembling the KUN, you need to decide on the dimensions of the attachment and prepare the tools:
- metal profile (metal thickness depends on the type of proposed work);
- 3 hydraulic cylinders;
- swivel type connections;
- welding machine and gas cutter;
- wrench and wrench.
KUN manufacturing process:
- Cut the inner frame from two metal sheets.
- Make an arrow, where 70% of the length is a support that will connect to a large cylinder.
- Using hinges, attach the middle part to the base.
- Attach a bucket to the middle part (it is made from a prepared metal profile).
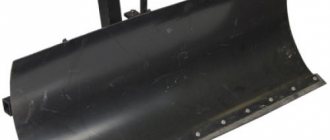
Bulldozer blade
In order to make such a homemade product for a mini tractor with your own hands, prepare the following tools:
- steel barrel;
- steel corner 10-15 mm;
- steel square 30 mm;
- 2 hinges;
- 3 hydraulic cylinders;
- fitting;
- hoses;
- transport tape (thickness 20 mm);
- rivets.
- Cut the top off the barrel, then cut it into 3 parts.
- Using pliers, bend all edges 3-5 mm.
- Make reinforcements from a corner (10-15 mm) and weld the slots. There should be 2 amplifiers at the edges, and the rest should be placed at a distance of 20 cm from each other.
- Weld a square along the entire frame from the bottom and top.
- Weld the braces.
- Install hydraulics between the corner and the square.
- Using hinges, hydraulic cylinders and angles, make a lifting and turning system.
The plow is made from a surface in the form of a cylinder (it is recommended to use steel to avoid bending of the blade). The workpiece is given the desired shape: it is fed to the rollers at an angle of 20-23°, bent, and then refined with a hammer according to the template.
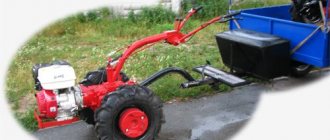
A hitch is used to attach the hitch to the tractor.
The plow can also be made from a steel pipe, the diameter of which is 55-66 cm and the thickness is 4-5 mm.
A template is made from cardboard, applied to the pipe and outlined with chalk. The blade is cut out using gas welding and treated with emery. If necessary, modify the shape with a hammer. For attachment to tractor equipment, a rear linkage is used.
Lift
Lifting various weights (up to 800 kg to a height of 3.5 meters) can be achieved using a mechanical device. In this case, you can use the “hydraulics” of the suspension.
The design is not labor-intensive, but it is not always convenient to use. You can make another lifting mechanism.
To make a lift, you will need the following components:
- corner "8";
- sheet steel (6 mm);
- corner jumpers “4”;
- two gussets and eyelets.
- A groove is made in the rear jumper - it is needed for fixation (it is equipped with a “triangle”).
- All elements are fastened together, holes with a diameter of 24 mm are drilled for engagement. The arrow is fixed at the top point of the tip - thus creating a lever that provides the lifting height.
- The arrow is made from the angle “8”. A channel is welded along the entire length as a fastening. All joints are reinforced with welded plates. The upper part is equipped with a hook-shaped hook that bends at an angle of 45 degrees. A ball joint is attached to the other end.
- An additional guide (65 mm) is provided. Holes (4-6 pcs.) are drilled along the length so that the equipment can be secured in different operating modes.
Factory Attachments
There is a wide selection of equipment for mini tractors on the market, for example:
- Double-furrow plows 1L-220, 1L-225, 1L-230. They are used in conjunction with tractors with a power of 12, 25 and 30 l/s and manual drive. The average cost of such a plow is from 10,500 to 20,000 rubles.
- Disc harrows 1BQX 1.1, 1BQX 1.9, BT-4. Necessary for preparing the soil for planting. Price - from 30,000 rubles.
- Potato planters UB-2 and DtZ-2.1. Suitable for units with engine power from 24 horsepower.
- Tedding rake 9 GL and 3. 1G. Suitable for cars with engine power from 12 horsepower.
Factory additional equipment also includes a front loader, mounted sprayers SW-300, SW-400 and SW-800, etc.
Overview of attachments for mini tractors
Small-sized equipment is widely used in subsidiary farming, on farmland and in many other sectors of activity. To perform various jobs, mini tractors are most in demand in combination with additional equipment necessary to solve the corresponding problems. One small-sized assistant with an arsenal of additional devices can replace a fleet of specialized machines. Attachments for mini tractors are available in a wide range on the Russian market.
Sprayer
The sprayer is usually made of two wheels. A container with fuel and a pump are placed on the block. Water is poured into the canister. You will also need nozzles and a hose. Sprayer differentiation:
- dispersed spraying - droplets in the form of fog cover the soil and agricultural crops with an evenly thin layer;
- jet spraying - usually used for the root system.
Areas of application of mini tractors
A mini tractor in combination with several factory attachments can be used in several areas of activity.
- Agriculture. Here, seeders, hiller cultivators, waterers, disc harrows, mowers and other equipment are used on tractors to mechanize work related to sowing vegetable and cereal crops, caring for plants and harvesting.
- Gardening. Sprayers, cutters, trailers, loaders and other equipment are used to care for fruit trees and shrubs.
- Animal husbandry. Examples of such equipment are carts and balers.
- Utilities. Buckets are used for digging trenches for laying communications, a bulldozer blade for clearing areas of snow or debris, and a device for spreading reagents along highways in winter.
- Construction sector. Front lifts, trolleys, and buckets are used here.
Despite this versatility, mini tractors are most widespread in the agricultural sector, and a large number of attachments have been developed for it.
It is worth noting that a three-point hitch is most often used to install attachments. The size of the nozzles should be selected depending on the power of the mini tractor.
Agricultural attachments
For use in agriculture, horticulture and livestock farming, modern industry produces a wide range of attachments for mini tractors. Depending on the type of work, factory equipment is divided into various types.
Soil preparation equipment
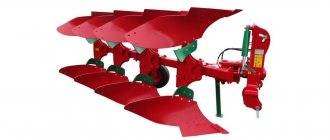
Loosening and mixing of the soil, saturating it with oxygen is carried out before planting the seeds. Cultivators, rototillers and harrows are used for these operations. With the help of these devices for a mini tractor, you can cultivate farmers' fields and vegetable gardens. During spring or autumn plowing, weeds are destroyed with a plow. All these devices come in 1-2 and 4-case types.
The choice of plow is carried out in accordance with the power of the tractor. Thus, a four-furrow plow can only be used on units with a motor of 35 hp or more. On low-power equipment, single- and double-furrow plows are used.
Front and rear attachments such as mowers and a plow blade will allow you to clear overgrown virgin soil for a new field. Tall weeds and shrubs are mowed down with a mower; with the help of a blade-shovel, the mown branches are quickly removed from the site.
Landing fixtures
The process of sowing grain and vegetable crops and planting fruit and berry seedlings can be mechanized using appropriate equipment.
- For sowing grain and seeds of legumes and vegetables, 1, 2 and 3-axis grain seeders are produced. The devices are a combination of devices that form a furrow, a reservoir with seeds and a mechanism that scatters the seed, followed by covering with soil.
Attachments for construction sites and municipal needs
In construction work and public services, several types of attachments are used using a minitractor, which can be mounted in the front or rear of the body. Thus, a front-mounted oval shovel can be used for collecting debris at a construction site and clearing snow from roads and sidewalks. A blade shovel and a rear-mounted ripper are used for leveling unpaved areas, raking snow and sand drifts, and clearing icy areas. The cost of such equipment depends on the model and complexity, prices vary between 10,000 - 40,000 rubles.
Mounted excavators are available for digging trenches for communications and foundations. This is equipment with a complex lever control system with hydraulic amplification. Models differ in bucket volume and mechanics and, accordingly, in prices, which start from 90,000 rubles.
Highly specialized canopies for mini tractors
It is not always advisable for mini tractor owners to purchase expensive, highly specialized awnings for their summer cottages. Many home craftsmen can make a homemade three-point hitch from scrap materials . An example of a homemade product at a summer cottage is a manure spreader. The cost of the device is cheaper, and if it breaks, self-repair is available. They also often make diggers and potato planters with their own hands, since they are quite easy to make, and there is always a use for such attachments in a summer cottage. Another popular homemade product is a blade, used in a variety of areas.
Whether to buy a factory one or make a hitch for a mini tractor yourself is a decision up to the owner of the equipment. In any case, the manufacture should be approached carefully, having previously calculated whether the home-made design will suit the power of the tractor.
Hitch on a minitractor with your own hands with manual drive. Manufacturing of KUN
To assemble a front-end loader for a walk-behind tractor or mini tractor, you will need to prepare drawings.
In this case, the carrying capacity of the equipment is taken into account. The walls of the attachments on the minitractor are made of sheet metal (6 mm thick). To do this you will need metal scissors or a gas cutter. Electric welding is used to secure the sheets together. The service life of attachments for a mini tractor depends on the quality of the seams. The next stage is the manufacture of racks and rods. For this, pipes (diameter 50 and 100 mm) are used. Then the hydraulic booster is installed.
To ensure greater mobility for the last element, the diameter of the bucket should not exceed 30 mm. To secure the racks, a pipe is welded to the front of the equipment. The design is reinforced with metal corners. In order for homemade tractor attachments to rotate, a cylinder is fixed to it.
To make your own bulldozer blade, use a water pipe (section radius more than 70 cm). The width of the device is selected individually in each case. The value of this indicator depends on the technical parameters. Experts advise making a hitch for mini tractors with your own hands from metal 8 mm thick.
To cut the pipe lengthwise, use a grinder. In this case, a distance from the edge is maintained (to ensure optimal bending of the bucket). A metal profile is welded below the center of the pipe. If necessary, do-it-yourself attachment to a minitractor is supplemented with transverse thrust elements.
To attach the blade to the equipment, an A-shaped structure is made. The product is complemented by longitudinal beams. A hydraulic cylinder is used to lower and raise the unit. A bracket is used for its installation. The hydraulic cylinder can be removed from the semi-trailer 2 PTS-4. To secure the blade, you will need a front linkage.
Features of attachments
When performing almost any work, a three-point hitch on a mini tractor is used. It provides high-quality fixation of equipment and the necessary mobility when turning and maneuvering.
Basic requirements for a homemade hitch:
- strength;
- compliance with the work performed;
- compliance with the power (traction class) of the tractor.
The former depends on the quality of materials and assembly, the latter on the correctness of the calculations. Many, having switched from a walk-behind tractor to a compact tractor, are in a hurry to equip the equipment with a “real” heavy hitch. However, it should be remembered that a mini tractor is still a transitional link from walk-behind tractors to real agricultural machinery, so it is important to focus on the manufacturer’s data and not demand too much. It is also important to take into account the type of soil. If on light sandy soils you can load the tractor more, then on dense loams the same model with the same equipment may not be able to cope or may work at its limit.
It is especially important to balance weight and power when making a homemade hitch for a homemade mini tractor, converted from a walk-behind tractor with an adapter or other equipment.
Constantly exceeding the capabilities of the tractor will lead to increased wear of the engine, chassis, power take-off shaft and other components and mechanisms.
Self-production
Most of the additional equipment is attached from the rear (ploughs, harrows, planters), so the equipment is equipped with a rear linkage. Main design elements:
- outer lever;
- rotary shaft bracket;
- upper and lower links;
- brace;
- eye;
- screed;
- axis.
The actual equipment is attached to this basic structure.
Main types of equipment for a mini tractor:
- plow - used for plowing the soil, i.e. turning over a layer of earth;
- harrows - crush clods of earth left after plowing and make it easier to plant crops;
- potato planter - makes it easier to plant root crops: potatoes, beets, Jerusalem artichoke, etc.;
- potato digger - speeds up the harvesting of root crops, moving them to the surface of the soil, from where they can be easily collected by hand;
- rakes - for caring for crops and row spacing;
- cultivator - for loosening the soil before planting and caring for plants during growth;
- sprayer - designed for watering and applying liquid fertilizers (both organic and mineral).
Before you start work, you need to prepare the necessary tools and materials and complete the drawings, ensuring that the weight and dimensions of the hitch match the capabilities of the mini tractor. You can find ready-made drawings on the Internet, or you can make it yourself.
Soil preparation equipment
A plow is a type of heavy equipment, the use of which often determines the choice between a walk-behind tractor and a tractor. Already at the stage of drawing up drawings, it is important to pay special attention to the size and shape of the cutting elements (coulter, ploughshare) - they determine the efficiency of work, the degree of penetration into the soil and the volume of soil turned over. A properly made plow should not move to the side during operation, bury itself in the ground or come out.
Breaking a mini tractor with your own hands from a walk-behind tractor. What you need
Before you begin, you should make sure that you have all the necessary parts, materials, and tools.
So, what is required for work:
- Motoblock. It must be selected taking into account the above recommendations. It is this that will serve as the basis for a homemade mini tractor.
Motoblock Neva - the best option for remodeling
- Additional wheelset with axle. It is necessary to purchase bearings for the wheels, as well as a steering unit.
- Metal sheets, pipes and corners. The material is needed to create the body and frame of the structure.
- Elements for fixing parts and mechanical components. In this case, washers, bolts, nuts, and welding are used.
To carry out the assembly, in addition to the parts, you still need to prepare a number of tools:
- welder;
- drill-driver;
- a set of wrenches of different sizes;
- pliers;
- Bulgarian.
A homemade unit has a number of advantages. First of all, this is the cost. Even if a home craftsman needs to buy a cultivator, he will in any case spend less money. In addition, you can create special equipment of the required size, degree of adhesion to the ground, and performance.
As for the disadvantages, they are that equipment made by hand is much inferior to factory models in terms of reliability. Also, such equipment often requires repair work.