The UAZ (loaf) car is one of the most common cargo and passenger vehicles, which has a spacious body, an impeccable safety system and a durable power unit. This is a fairly reliable car, however, during intensive use, malfunctions and breakdowns occur that require immediate attention.
In most cases, UAZ gearbox repair
necessary due to normal wear and tear, which indicates the excellent reliability of this device. The main reason for the premature failure of this unit is that there is an increased level of fuel in the system, so it is necessary to use oil of impeccable quality.
If this recommendation is not followed, noise of a special nature may appear in the design of the unit. The synchronizer or its internal components may also fail, which always results in difficult gear changes. These are not all the breakdowns that cause the need to repair the UAZ “Bukhanka” gearbox.
.
The main signs of gearbox failure:
- knocking out speeds;
- oil leaks in the gearbox area;
- extraneous noise when changing gears;
- inability to switch on one or more speeds.
If these problems occur, the device should be diagnosed to accurately identify the cause of the breakdown. This will save time in the process of repairing the UAZ gearbox.
, and will also contribute to a high-quality restoration of functionality. It is recommended that this procedure be performed by specialists.
The main tools needed to restore the transmission's functionality:
- bearing puller and various screwdrivers;
- chisel, copper pin, core, as well as a hammer and a small spatula;
- a set of special gaskets and retaining rings for vehicles;
- small containers for storing screws and nuts (for ease and convenience of assembly).
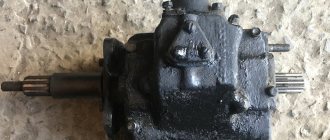
Repair of UAZ “Bukhanka” box
consists of a number of steps that must be performed one by one. In the process of professionally restoring the performance of a gearbox, qualified technicians perform a number of actions.
Dismantling the gearbox
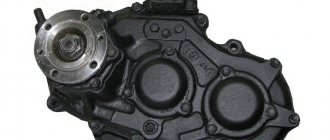
The transfer case and gearbox of UAZ vehicles are attached to each other into one unit, which is the correct technical solution. This unit weighs more than 80 kg, so it is extremely difficult to remove it yourself.
Before you start repairing the UAZ gearbox
the vehicle needs to be placed on a level surface, since during restoration activities it will be necessary to move back and forth by approximately a meter. After draining the oil, you should remove the seats, clutch release forks, and the two halves of the hatch. In addition to the above, components such as brake system levers and suspension mounts in the chassis are subject to removal. This will make it possible to extend the checkpoint.
The principle of operation of the gearbox on the UAZ Bukhanka.
The transmission is used to change the vehicle's traction and speed depending on conditions. Using the UAZ Bukhanka gearbox, you can change the direction of movement to reverse and disconnect the running engine from the gearbox when stopping.
UAZ 452, 469, 2206... has a four-speed manual gearbox equipped with inertial synchronization to facilitate engagement of first, second, third and fourth gears. The gearbox is attached to the clutch housing by four pins that screw into the clutch housing.
The gears drive the intermediate shaft, the second and third gears are helical, the first gear is helical and is in constant mesh. The gears of the first, second and third gears are mounted on the drive shaft in needle bearings.
The vehicle may be equipped with a gearbox that has synchronizer only for third and fourth (direct) gears.
Maintenance of these transmissions is the same. Complete UAZ Bukhanka gearboxes are interchangeable, but the parts of these boxes and gear shift mechanisms are not interchangeable.
Intermediate shaft assembly
- Press the bearing all the way onto the rear end of the intermediate shaft so that the groove on the outer ring of the bearing is shifted towards the gear.
- Install the disc spring with its convex side toward the bolt head.
- Tighten the bearing bolt (left-hand thread).
- Install the thrust ring onto the bearing.
The intermediate shaft assembly is shown in Fig. 110.
Rice. 110. Intermediate shaft assembly
UAZ loaf gearbox diagram.
Rice.
3.10 Synchronized transmission: 1 - main shaft; 2 — front cover; 3 - special nut; 4,14,17,28 — retaining rings; 5 - seal; 6,15,20,30 - bearings; 7 — front bearing of the secondary shaft; 8 — crankcase; 9 — synchronizer for 3rd and 4th gears; 10 — 3rd gear gear; 11 — 2nd gear gear; 12 — synchronizer of 1st and 2nd gears 13 — 1st gear; 16 - secondary shaft; 18 — washer; 19 — spacer ring; 21 - special screw; 22 — disc spring; 23 — intermediate shaft; 24 — reverse gear axis; 25 — reverse gear; 26 - fork; 27 — intermediate shaft and 3rd gear; 29 - cover
Rice. 3.9 Partially synchronized transmission:
1 - crankcase; 2 — intermediate shaft of the gearbox drive; 3 — intermediate shaft with bearing; 4 - nut; 5 — intermediate shaft; 6 — bearing cover; 7 — front cover; 8 - main shaft; 9 - special nut; 10 — front bearing of the secondary shaft; 11 — synchronizer clutch; 12 - secondary shaft; 13 - 3rd gear; 14 - 2nd gear; 15 - 1st gear; 16 — rear bearing of the secondary shaft; 17 — retaining rings; 18 — screw securing the rear bearing of the intermediate shaft; 19 — driven shaft bearing block; 20 — driven shaft axis block; 21 — driven shaft block; 22 — spacer; 23 — intermediate shaft of 2nd gear; 24 — intermediate shaft of 3rd gear; 25 — plug of the drain hole housing
Cars can be equipped with gearboxes with synchronizers only for III and IV (direct) gears (Fig. 3.9, hereinafter - partially synchronized gearbox) or with synchronizers for all forward gears (Fig. 3.10, hereinafter - synchronized gearbox).
Complete gearboxes are interchangeable, but the gearbox parts and shift mechanisms are not.
Maintenance
During operation, check the oil level and change it at the intervals specified in the lubrication chart.
In case of leakage, it is necessary to find the cause and replace damaged parts (seals, plugs, etc.).
Periodically check the fastening of the gearbox, as well as the fastening and adjustment of the gearbox control mechanism on vehicles of the UAZ-3741 family.
The tightening torque of the bolts and nuts securing the gearbox to the clutch housing and gearbox should be 39-55 Nm (4.0-5.6 kgfm).
The adjustment procedure is described in the “Repair” section. The gearboxes themselves are not adjustable.
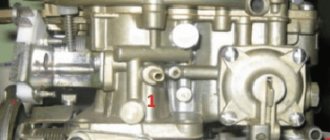
Assembling the input shaft
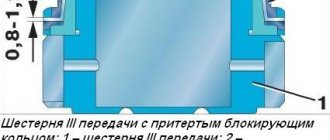
- Latch the blocking ring onto the shaft cone to a size of 0.8-1.25 mm, as shown in Fig. 107.
Rice. 107. Primary shaft with a ground locking ring: 1-primary shaft; 2-locking ring
- Install the oil deflector.
- Press the ball bearing onto the shaft until it stops at the end of the oil deflector so that the groove on the outer ring of the bearing is shifted away from the ring gear.
- Screw on the bearing mounting nut (left-hand thread) and lock the nut by centering it in the groove of the shaft.
- Install the thrust ring onto the ball bearing.
- Place grease in the shaft hole and insert the rollers (14 pieces).
- Insert the roller retaining ring. The assembled input shaft is shown in Fig. 108.
Rice. 108. Primary shaft assembly
UAZ transmission components
The newly designed UAZ-452 family vehicles have a manual transmission (four-speed). It allows you to easily switch inertial type gear synchronizers. The five-speed ADF gearbox is synchronized in all forward gears.
The UAZ can be equipped with a 5-speed DYMOS gearbox. This gearbox is distinguished by its reliability. Its average service life is 300,000 km. The filler plug is located in the middle of the box, the drain plug is located at the bottom. They can be unscrewed using a hex key. After draining the oil, you need to prepare a special container. Fill in new fluid to the level of the oil filler hole on the box. A dipstick is a good way to determine exactly where the fluid was poured. As an alternative to the probe, you can use a long fingernail. As a preventative measure, the oil level should be checked every 15,000 km.
Tools and materials
To work you will need:
- open-end wrenches from 10 to 22;
- bearing puller;
- screwdrivers (phillips and flat);
- platypuses (with curved noses and straight ones);
- copper pin;
- a piece of pipe as a handle for keys;
- chisel and core;
- hammer and mounting blade;
- small jars for collecting nuts and screws;
- socket wrenches from 10 to 36;
- lithol;
- red sealant;
- a set of gaskets and retaining rings for a car.
In order to properly repair the UAZ 452 gearbox on your own, you must strictly adhere to the sequence of actions described above. Difficulties in repairing other models of this brand can be caused by a different arrangement of the main parts of the machine, for example, rods. The oil change must be carried out in accordance with the technical requirements for this type of vehicle.
Repairing a UAZ 469 gearbox with your own hands is a feasible task for a person who wants to save money. Other owners of UAZ vehicles (for example, UAZ loaf) can take note of all of the above and repair the UAZ gearbox, taking into account some differences in the parts and arrangement of the rods.
Source
Causes of breakdowns
As a rule, the need to replace the main components of the transmission arises as they naturally wear out.
The main reason for oil leakage from the gearbox is the presence of an increased level of fuel in the system. It is necessary to use high-quality gearbox oil in the UAZ. If the fluid is not of proper quality, this may cause characteristic noises from the box. If the synchronizer or its parts are worn out, you will always notice difficulty shifting gears. You should also pay attention to the details of the switching mechanism. When gear teeth are deformed, spontaneous gear shifting is often observed.
Synchronizer assembly
- Select a set of couplings and synchronizer hubs with minimal clearances during free movement according to Fig. 93 or use kit 451D-1701116-11, selected by the manufacturer.
- Place three springs (Fig. 111), three crackers, three balls in the hub and install the shift clutch on the hub. Moreover, place the longer part of the hub towards the end of the coupling, which has a shaped chamfer (Fig. 112).
Rice. 111. Synchronizer assembly
Rice. 112. Synchronizer clutch with hub: 1-clutch; 2-hub; 3-cracker; 4-ball; 5-spring
The holes in the crackers are made in steps. Place the crackers on the side with the smaller diameter holes and on the side of the coupling.
It is possible to install solid crackers with protruding hemispheres that act as balls in synchronizers.
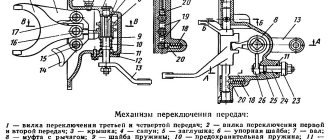
UAZ-452 gearbox, mechanism adjustment
The gear shift mechanism of the four-speed semi-synchronous gearbox of the UAZ-452 family is installed in the side cover of the gearbox. The shift forks are attached to the rods using a tapered screw that engages with a wire.
The fork moves when switching using rods that have a socket for a set screw and grooves for a lock and a locking device. The middle rod additionally has an intermediate pin for the locking device. When one of the gears engages, the rod moves and locks the adjacent rods with a pin.
Thus, each of the remaining rods is locked by a locking pin and cannot be moved from the neutral position until the previously moved rod returns to the neutral position. The same lock prevents two gears from being engaged at the same time.
The forks are locked in the neutral position and in the positions where the gears are engaged by balls. To move the forks, a lever coupling is used, mounted on the splines of the vertical shaft. The head of the clutch lever fits into the grooves of the fork. The coupling can move along the shaft in the axial direction. When the shaft rotates, the clutch rotates, and its lever moves one or the other fork.
At the same time, in the uppermost position, the clutch is connected to the first and second gear forks, in the middle position - to the third and fourth gear forks, and in the lowest position - to the rear wheel fork. The middle position of the clutch is fixed by the clutch stop in the washer against which the spring rests. To move the clutch to the lower position, additional force must be applied to compress the spring. The outer end of the shaft has grooves and threads for attaching the gear shift lever.
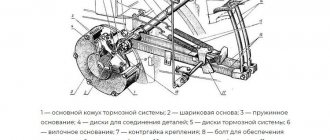
Gearbox slide: what it is, signs of wear, how to adjust it yourself
Not all car owners know the name of this or that part in their car. In this case, we are talking not only about the mechanisms “hidden” in the engine, but also about the devices with which they interact literally every day. One of these parts is the gear shift lever.
Note: The name "rocker" is not the official name for this mechanism, but it is generally accepted. In fact, this part is called the transmission control drive link.
Signs of gearbox wear
The driver must pay attention to possible malfunctions of vehicle components, including knowing the characteristic signs of wear on the gear shift gate, in order to take timely measures to replace it. Despite the fact that the mechanism is quite reliable, you should be aware of the following “symptoms” of its imminent breakdown: