Which can be an excellent toy for developing mechanics in children. So, we will make an excavator from syringes.
We will need: - 5 syringes per 20 cubic meters; — 5 syringes for 5 cubes; — plastic clamps; — nuts, washers and bolts with a diameter of 4 mm; - wooden rulers; — rail 30x10 cm; — drip system.
The first step is to make an arrow from a batten. Below we present the drawings and markings.
You need to make the second half of the arrow from two rulers. We connect the halves of the boom with a bolt, washers and a nut. We place a piece of lath between the rulers to give the arrow its shape.
Cut the ruler lengthwise and make two holes along the edges.
We also glue a piece of slats between the resulting pieces.
We also make an excavator tower from slats.
We connect two tower blanks to the boom.
A 2 cm thick board will serve as a frame, so we cut out a round blank on which the arrow will be attached.
We make grooves on the round blank according to the size of the tower blanks. The tower can also be connected using iron corners. If you have made cuts, you can additionally glue the tower with hot glue. We glue a piece of lath between the two elements of the tower so as not to pinch the arrow when tightening it.
We glue the cuttings of the ruler to give the required thickness.
The base can be made from a piece of board 3 cm thick. Drill a hole on the base and insert a bolt. Let's move on to making the ladle. The blanks are shown in the photo below.
We assemble the ladle with a glue gun.
We make a groove in the boom rail in which a small syringe can be attached. We fix the syringe with a plastic clamp.
We connect the boom to the bucket using a wire, which should connect the ruler of the bucket to the clamp. We connect the remaining moving places in the same way. According to the author, the places where the clamps are tightened must be wrapped with a thick layer of electrical tape so as not to bend the syringe. Also, do not tighten the clamps too tightly. The load on the syringe can be reduced by attaching a rubber band for banknotes.
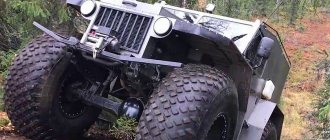
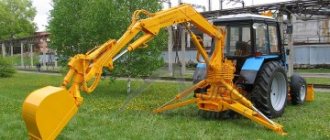
Frequent rental of earth-moving equipment is a costly procedure and does not provide convenience to the owner of the site. Another thing is your own compact car, with which you can save on rental services, consume a minimum of fuel and at the same time get all the functions of full-fledged models. It is not easy to create such a technique, but for a true master it is not impossible. How to make a mini excavator with your own hands? First you need to determine its parameters and type.
A properly assembled mini-excavator is in no way inferior to models created according to all the rules in the factory. It has some advantages for private use: minimal fuel consumption, easy transportation, adaptability to specific needs, low weight. You can work in any area, including warehouses and other enclosed spaces. Typically, such equipment is required at dachas, near country houses, used in digging holes and ditches, for shallow communications, etc.
There are different types of mini excavators
Types of homemade models:
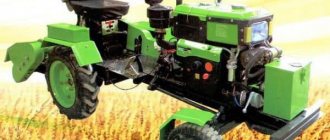
- An excavator made from a walk-behind tractor, based on an existing mini tractor or just a car. It uses attachments. Autonomous vehicles are assembled on tracked or wheeled vehicles, capable of moving around the site independently. Another option is a machine that can be moved using aids. If necessary, all attachments can be easily dismantled, and the used base can be used again for its intended purpose.
- Mini excavator from scratch. A labor-intensive option for the most experienced craftsmen. It is impossible for a beginner to cope with such a task; time and money will be wasted. You will need specific skills or qualified assistants, a good amount of technical knowledge.
- A simple budget solution is a trailed excavator on a T40 trailer with a frame and a wheel axle.
An autonomous engine, hydraulics and specific equipment are installed.
Preparatory stage: where to get the drawing
You need to choose a specific, clear and understandable diagram for assembling your earthmoving machine.
There should not be any difficulties with the choice. Can be used:
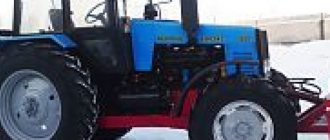
- Reduced to scale factory diagrams of large Belarus-type excavators.
- Ready-made drawings from the Internet, posted by folk craftsmen. Interesting working options can be found not only in RuNet, but also on foreign resources.
Having selected the optimal drawing, you need to draw up an estimate and roughly determine the costs of consumables and parts.
Constructive decisions
A homemade manual excavator is configured in the same way as factory car models. This technique contains the following nodes:
- A supporting frame mounted on tractor tracks or vehicle tracks.
- ICE for driving hydraulics.
- Rotating support part.
- Hydraulics.
- Ladle.
- Arrow.
Choosing a bucket for an excavator
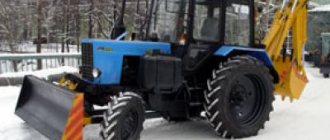
The optimal solution would be to install equipment on the T40 or create a similar trailer with your own hands to install a motor, tank, and wheelset on it. The stability of the machine will be ensured by additional shoe fastening: a pair of “shoes” will keep it from tipping over.
The motor can be an internal combustion engine with a power of 15 kW - a Japanese or even an inexpensive Chinese model.
Mini excavator components
The boom and hydraulic system can be purchased as a kit and simply installed on the base. Such a solution will eliminate many mistakes and search for spare parts. For the entire period of operation, you can forget about setting up the earthmoving machine. But such kits are expensive, and with the proper experience, home craftsmen prefer to make all the components with their own hands. Modernized components from old equipment can also be used.
Hydraulic system
In factory excavators, the hydraulic system consists of 4 parts:
- slewing support;
- arrow;
- ladle;
- control system.
When making an earthmoving machine with your own hands, you can resort to a simplified version. In this case, you will need a slewing ring and a boom. The column is mounted on a supporting structure, the role of which can be played by a walk-behind tractor. To make the units yourself, you need to have 4 hydraulic cylinders for moving the boom down and up, controlling the bucket, and turning. Old hydraulic cylinders from Soviet-made trucks will do.
For hydraulic drive it is convenient to use an inexpensive gear pump. This is an easy to use and repair, budget solution. Most often, craftsmen choose NSh-10, combining it with the R-16A distributor.
If necessary, increasing the power of the equipment is achieved by simultaneously installing 2 pumps with 2 distribution units.
Technology at work
How to make a ladle
The working part of the machine is a bucket. This part is subjected to maximum loads, which is why increased demands are placed on the quality of the material. The optimal solution is sheet steel 6-9 mm thick.
Separate blanks are calculated according to the drawings and cut from a steel sheet, and securely welded together. To strengthen the sides and bottom, additional steel plates are used. The efficiency and productivity of the bucket will increase if durable “fangs” are welded on the front. The “fingers” of tracked vehicles can be used for them.
At all times, tools and equipment that combined different functionality were quite popular. A similar trend also applies to equipment that is commonly used in one’s suburban area. On the market for relevant products you can find mini-tractors and walk-behind tractors. Each model has different attachments. All this allows you to carry out municipal and agricultural work. Manufacturers of attachments miss one important operation, which is required from time to time in the process of housekeeping. This includes all kinds of earthworks. It is quite difficult to find additional attachments for tractors and walk-behind tractors on the market that would help with excavation work. Of course, you can purchase a mini excavator, but it can cost upwards of $7,000. Making a mini-excavator with your own hands is quite simple; for this you will only need to stock up on a certain set of tools and materials. To manufacture the mentioned equipment based on an internal combustion engine or walk-behind tractor, it will be necessary to stock up on metalworking equipment, welding and
How to make an excavator
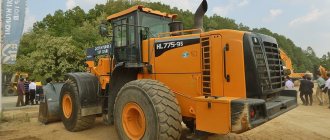
An excavator is a special equipment that performs complex operations. Excavators come with a rotary platform, with wheels or on tracks, based on different models of heavy machines and tractors.
Externally, an excavator differs from conventional machines in that it has an additional working part. Conventionally, the structure of an excavator can be divided into the following elements:
- A rotating platform that includes a counterweight, engine, driver's cabin and chassis elements.
- The working part, which consists of a boom, a handle and a bucket.
Required materials and tools
Paper modeling does not require the use of special tools. However, for ease of work, obtaining high-quality cuts and the strength of gluing parts, you need to select high-quality materials and accessories.
To work you will need:
- paper and cardboard;
- sharp scissors (large and small);
- construction or stationery knife;
- ruler;
- pencil;
- paper glue (PVA, stationery);
- materials for decoration: paints, felt-tip pens, pencils, pens, stickers, decorative glue with glitter.
Assembling a three-dimensional model with step-by-step photos
A hydraulic excavator model is a great idea for those who already have some experience in paper modeling to try their hand at. If desired, this model can be made with electric wheel drive or radio control.
To work, in addition to cardboard, you will need wooden skewers for the axles and syringes for hydraulics. The connecting element of the hydraulic system will be tubes from the medical system for droppers.
You also need to prepare the following tools:
- scissors;
- stationery knife;
- ruler;
- glue gun with silicone rod.
Assembly sequence:
- Draw the elements of the cabin on cardboard and glue it together.
- Transfer the elements shown in the following diagram.
- Cut out the pieces using a utility knife.
- Start assembling the model by strengthening the cabin on a rectangular cardboard base.
- Next you need to assemble a structure that will hold the bucket. To do this, glue rectangular elements with a rounded side to the base and cabin.
- Assemble the structure from the syringes as shown in the figure using a construction clamp and nut.
- Using a wooden skewer, secure the boom parts holding the bucket to the fastening elements located on the cabin.
- Secure the syringes from below by threading a skewer through the hole in the nuts. Cut off the sharp ends of the skewer using wire cutters.
- Strengthen the moving part with a wooden skewer to the bend of the bucket holder boom.
- Make an excavator bucket from cardboard and an aluminum can.
- Secure the bucket as follows: attach the upper fasteners to the ends of the boom, and attach the movable part 2 of the syringe to the lower central element.
- Assemble the hydraulic system by filling syringes with water. At the same time, in each pair one syringe should be empty and the other filled.
- Make wheels from cardboard. Glue the parts together and cover the end sides with black insulating tape.
- To assemble the wheels, you can use the structure from an old electric-controlled machine or make a cardboard box and attach the wheels to the axle.
- Glue the cabin and excavator structure to the chassis with wheels.
Origami with a simple diagram
The next master class shows how to make an excavator out of paper. The origami excavator is complicated by the presence of additional parts, such as the bucket and its supporting structure.
The originality of this craft lies in the fact that lined sheets are used to make it. Cutting into squares simplifies the manufacturing scheme. Therefore, it will be understandable even to a younger student.
To work you need to prepare:
- Sheets of colored paper.
- Ruler.
- Pencil.
- Scissors.
- Glue.
Assembly diagram:
- Draw sheets of paper as shown in the figure.
- From a pink sheet, cut a rectangle measuring 4 by 6 cells. Make cuts as indicated in the diagram and glue the parallelepiped.
- From a green square, cut two strips 8 squares long and make caterpillars out of them.
- From a 2 by 8 pink rectangle, assemble a cabin by bending it.
- Fold a part measuring 2 by 4 cells in half and glue it to the bottom of the cabin.
- From two identical green parts, 3 by 4 cells in size, assemble two elements of the bucket holder. Glue the structure and attach it to the excavator body.
- From the remaining pink part, by making cuts (as shown in the photo), form a bucket structure. Glue the element and trim off the excess paper.
- Glue the bucket to the holder.
A more complex origami model is described step by step in the following video:
Model from a sweep
A three-dimensional model of a tractor with a large bucket can be made from whatman paper or colored paper. To do this, you need to draw on paper or print ready-made templates and glue the structure.
Assembly sequence:
- Transfer the templates to paper. Cut blanks from sheets of black, gray and yellow. After assembly, the excavator parts can be painted. Creating shadows and using shades will help give the craft a realistic look.
- Cut out the cabin blank and make folds along the marked lines. Glue the structure.
- The base of the excavator body is made of two identical side blanks and a central part.
- Assemble a holder for the bucket from a yellow paper blank and install it in the front part of the bulldozer body.
- Glue the assembled bucket part to the front of the structure.
- Attach the cabin to the base. Glue the wheel and ladder blanks onto the sides of the machine body.
To glue paper structures, it is convenient to use strips of thin double-sided tape.
You can see how to make an excavator out of paper in the following video:
Applications for children
Application is the most accessible type of activity for young children. Children are always happy when the result of an activity meets their expectations. For children 2-3 years old, you can use prepared diagrams with cut out colored parts. Craft elements can be cut out of colored paper or painted.
Manufacturing sequence:
1. Print the template on a printer.
2. Prepare and cut out parts from colored paper.
3. Consistently stick the colored elements onto the base of the application.
When gluing this or that part, at the same time you need to tell the child what it is intended for. This will develop the baby’s imaginative thinking and expand his horizons.
4. Frame the resulting excavator model and hang it in the children's room.
Cutting templates
Images of finished crafts, an applique of an excavator with elements for cutting, diagrams for three-dimensional modeling - will help you create an idea for an original craft that can become an interior decoration or a themed gift.
An excavator model can be created using different techniques for working with paper and cardboard. This could be an origami craft, a scale model of a car, or a bright children's applique.
Work technology
If you need a trench, for example, for a foundation, then you can get by with a shovel, but carrying out such work involves spending a lot of time, but using an excavator you can complete such manipulations in just 30 minutes. In order to make a mini-excavator with your own hands, you will need to carry out three stages, the first of which is preparation, the second stage is manufacturing, and the final stage will involve the need for assembly.
Preparatory work
Initially, you will need to decide on the basis of what and by what technology the homemade excavator will be manufactured. If you have a mini-tractor or walk-behind tractor, it is best to make it with fastenings, so you will have to be guided by the methodology that is used to fix snow removal equipment. If you have an engine from an old car, then you can make a mini-excavator with your own hands by creating a tractor chassis adapted for excavation work.
Description and principle of operation of a mini excavator
Once the decision is made to build a machine with your own hands, you need to understand what type of mini-excavator is needed. There are two main types of mini excavators:
- autonomous (self-propelled);
- towed (used with other equipment: tractor, walk-behind tractor).
If the farm already has a walk-behind tractor or a mini-tractor, it is logical to assemble a trailed mini excavator with your own hands with an additional attachment point.
If you have experience in auto repair, an old car engine and free time, it is easier to create a self-contained unit with a chassis and equipment for excavation work. However, it should be remembered that the construction of a trailed unit is much simpler and simpler than the drawings of a self-propelled one, which has many more parts and components and is more labor-intensive to manufacture.
A mini excavator will help you cope with many jobs
Fundamentally, a mini excavator works exactly like any other. It is designed for a relatively small amount of work, as well as for work in cramped conditions. In particular, it is widely used:
- on city streets and highways without stopping traffic;
- in urban areas for laying pipes and cables;
- for installation of fences and road signs;
- in landscaping courtyards and arranging parks;
- in emergency services;
- for small-scale construction work (for example, laying foundations for country houses);
- at archaeological excavations;
- during reconstruction and demolition of buildings - especially compact models can even work inside the building on interfloor floors.
There are also models with radio control capabilities. They are used in emergency and emergencies, including during search and rescue operations, for clearing debris, for demolition of emergency buildings and other dangerous work in confined spaces.
Varieties
A mini excavator is considered a smaller copy of crawler excavators. Typically, this classification category includes machines weighing from 0.8 to 8 tons. The main differences are a short rotating platform and rubber (rather than metal) tracks, which allows them to be used on hard road surfaces (in yards, on sites, etc.).
There is no classification of mini-excavators as such. Available models vary in size, key features and price.
Mini-equipment also has limitations:
- low speed (2-5 km/h);
- low efficiency of the trencher and loading bucket;
- shallow digging depth;
- slight force on the edge of the bucket.
All this is a consequence of the small size of the mini-excavator, and is more than compensated by its advantages: compactness, mobility, and efficiency. For more serious work, you should choose more powerful models.
Let's start production
The frame will be based on a channel, which has a standard size of 8 or 10. The elements will be connected to each other by welding. A beam from a car trailer or a used car is attached to this system. In this case, the workpiece will need to be deprived of springs and leaf springs. An alternative solution is to use a homemade axle. When you make a mini-excavator with your own hands, the axle is installed on the wheels. At this point we can consider it ready. The entire volume of the channel, taking into account the manipulator and brackets, will require 12 meters of material.
Model selection
A properly assembled mini-excavator is in no way inferior to models created according to all the rules in the factory. It has some advantages for private use: minimal fuel consumption, easy transportation, adaptability to specific needs, low weight. You can work in any area, including warehouses and other enclosed spaces. Typically, such equipment is required at dachas, near country houses, used in digging holes and ditches, for shallow communications, etc.
There are different types of mini excavators
Types of homemade models:
- An excavator made from a walk-behind tractor, based on an existing mini tractor or just a car. It uses attachments. Autonomous vehicles are assembled on tracked or wheeled vehicles, capable of moving around the site independently. Another option is a machine that can be moved using aids. If necessary, all attachments can be easily dismantled, and the used base can be used again for its intended purpose.
- Mini excavator from scratch. A labor-intensive option for the most experienced craftsmen. It is impossible for a beginner to cope with such a task; time and money will be wasted. You will need specific skills or qualified assistants, a good amount of technical knowledge.
- A simple budget solution is a trailed excavator on a T40 trailer with a frame and a wheel axle.
An autonomous engine, hydraulics and specific equipment are installed.
Be sure to read: EO 4225a: technical specifications
Work methodology
If you make a mini-excavator with your own hands, you can easily draw up drawings of this equipment yourself or borrow from the article. It is recommended to make the manipulator two-knee, this will allow for a simpler design. Manufacturing is best done from welded channels that are joined together. As a result, you should get a rectangular profile to which brackets made of metal are fixed. Their thickness should be 10 millimeters. Other structural components include brackets, pins and movement mechanisms. During manufacturing you will need to use milling, drilling and turning tools. You can make some parts, such as the bucket, yourself or purchase them ready-made.
Supplying an excavator with hydraulic equipment
If you decide to make a homemade mini-excavator with your own hands, then it is important to think about hydraulic equipment; in this matter, the master will have a fairly wide choice. The heart of the hydraulic system is of the NSh-10 type. The NSh-32 and NSh-150 varieties are also popular. If we are talking about the latest model, then it is recommended to use it exclusively in a new form. The cylinders for the operation of the bucket and manipulator can be second-hand; hydraulic cylinders for raising the cab, which are borrowed from KAMAZ or MAZ, are excellent. If you are making homemade mini-excavators, you can purchase new cylinders based on the dimensions 63 x 40. You will have to pay about $100 per unit of such a product. For control, it is preferable to use a hydraulic distributor of the RGS 253-x or MRS 70.4 brand. These elements should have three or four sections. If you cannot find these add-ons that were already in use, you will need to prepare $150 to purchase them.
Manufacturing of additional parts
If you decide to make a trailed mini-excavator with your own hands, then individual parts of the boom can be made using square pipes with a side of 80 millimeters. You can use sheet metal for this, which should have a thickness ranging from 6 to 8 millimeters. Blanks are first cut out of it, bent, and then welded together. If you plan to make a ladle yourself, then you need to use metal of the above-mentioned thickness. In order to strengthen the structure, a belt will have to be welded onto it in the upper part. Among other things, the longitudinal ribs must be strengthened. In order to ensure efficient operation of the bucket, it must be equipped with fangs, which are made of high-quality steel. As a second option, fingers borrowed from tractor tracks are often used.
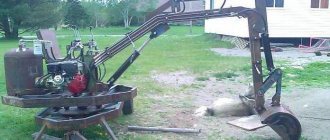
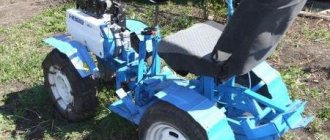
DIY toy excavator on hydraulic cylinders.
Made from slats painted with alkyd paint from a creativity kit. Medical syringes 10 ml (4 pcs.) and 5 ml (4 pcs.) were used as hydraulic cylinders. from IVs. Everything was purchased at the pharmacy. There are many options for making similar toys on the Internet and they are all useful for familiarization. The design is based on a lid from a wooden box. Wheels and oak slats are made from remnants of previously made crafts.
The toy's controls are made of ten-cc syringes mounted on four levers. The levers are painted in different colors, corresponding to the marks of the same color on the racks.
First, two control options were made. The first one is simpler (without levers that increase the force on the rod of the syringe cylinder). It would be difficult for a child to work.
The second option is with levers and 5 ml syringes. It was convenient to work with them, but there was no clear operation of the working hydraulic cylinders.
Turning in one direction is carried out by a hydraulic cylinder on the base.
The bucket is soldered from sheet metal and is controlled by a working cylinder to open and close.
The main vertical post is mounted on a rotating base and can also be raised and lowered.
The cylinders are hinged. Some syringes at the attachment point were wrapped with sealing tape (1 mm thick) adhesive on both sides and a tin hinge was installed on top. The remaining cylinders at the attachment point were wrapped with a nylon cord and glue with several threads. The outgoing part of the cords was not glued and, being flexible, worked like a hinge (Visible in photo 3).
Do you think that only a New Year’s card for a grandmother from Novy Urengoy can become a handmade object? Or a self-sewn bunny for your second cousin’s 2-year-old daughter? But what if we say that everything can be remade, well, except perhaps the wife with whom we lived and lived for 20 years. Yes, everything, even a mini-excavator with our own hands is not a problem today. Don't believe me? Read!
DIY wooden toy “Excavator”
Give your child this toy and a pile of small pebbles, and then watch them play for hours moving them around. This excavator uses some of the same parts as the previously published crane project (see "Crane Toy").
PROJECT OVERVIEW
- Overall dimensions with bucket at ground level, mm: 487x152x164 (length x width x height)
- Bucket capacity , cm3: about 60
- Boom radius , mm: 432
- Digging depth , mm: 210
- Motor power : child power
We started with the bucket then moved to the boom
1. From 19 mm material, cut out the bottom A and the back wall of the bucket B according to the dimensions indicated in the “List of Materials”. Glue both parts so that the direction of the fibers is the same (Fig. 1).
2. Make two copies of the bucket side template and set one of them aside. Cut another copy along the dotted lines around parts A and B and then glue it to the A/B . Cut out the inside of the bucket with a band saw (Photo A).
MASTER'S ADVICE. We cut the threaded rod - click, and you're done!
Relatively thin threaded rods (MZ-M5) can be quickly and accurately cut with wire stripping pliers. Screw the pin into a hole of the appropriate diameter and separate a piece of the required length. Then unscrew the pin from the hole and the tool will straighten the crumpled threads. These pliers sell at most hardware stores for about $20.
For this operation, install a blade 3 or 6 mm wide. Keep the cut close to the contour line, then sand to the line using a sanding drum.
Align the dotted lines of the template with the edges of the A/B bucket. Threaded rods will help align the side walls C.
3. Cut out blanks for the walls of bucket C and glue the remaining copy of the side template to one of them. Place the pieces together, lining up the edges, and drill holes in the locations indicated on the template. Read the DIY Tip and prepare two 70mm lengths of threaded rod. Screw a cap nut onto one end of each piece. Glue the walls to the A/B bucket and secure with clamps (photo B).
4. Make two copies of the boom side template and one copy of the console template. Using spray adhesive, attach the templates to the blanks, then cut and sand the D and E to shape. Using spray adhesive, attach a copy of the cabin template to a 38 mm thick piece and cut out the cabin F in the indicated shape. Drill holes according to the markings on the template, then chamfer the ribs. Sand the pieces with 150-grit sandpaper, then glue a wooden peg into the hole in one of the boom halves (Figure 1). Note. The peg can be glued to the arrow from either side.
5. Glue one copy of the console arm and two copies of the boom supports onto the 13mm thick piece. Cut out the console arm G and the boom support H along the contours. Then cut out two rods I according to the template. Remove the paper templates and sand the parts with 150-grit sandpaper. Prepare five lengths of boom threaded rod (Figure 1), then set bucket A/B/C , boom parts D, E, G, H, I, and cab F aside.
Let's focus on the turning part
1. Cut out the turntable J , the counterweight K and the walking bridge L . Cut out a blank for the engine casing M and glue a copy of the corresponding template to it. Drill holes in the housing, counterweight, and turntable (Figure 2), then mill fillets into the counterweight and housing. Glue the exhaust pipe into the opening of the casing and set the casing aside.
2. Glue the walking bridge L to the turntable J , aligning the parts at the top and front (Fig. 2). Then glue the boom support H to the turntable (photo C). Once the glue has dried, glue the second support in place (photo D ).
Accurately position the first support H using a ruler. Glue the piece in place, lining up the narrow end with the end of the turntable J.
Using the boom half E and a threaded rod, glue the second support H into place. The boom should move with little force.
the counterweight K to the turntable J close to the boom supports H , aligned in the center. To ensure that the counterweight and platform holes are aligned, insert a long bolt into them.
4. Connect the console D , boom halves E , console arm G and rod I using threaded rod pieces and cap nuts (Fig. 1). Attach this assembly to the boom supports H. the cabin F onto the turntable J without gluing it. This will allow you to remove the cabin to adjust the boom stroke.
We will make a massive chassis
1. Cut out the chassis of N dimensions specified. Mark the narrowings and centers of the holes on both sides (Fig. 3a). Drill a 10mm hole with a counterbore in the center (Figure 3). Then file down the narrowings and drill holes for the axles (photo E).
2. Glue two copies of the wheel spacer template to the 19mm piece. Cut out the wheel spacers O along the contour and drill holes. Glue the spacers to the N flush with the underside, aligned at the middle of the length (Fig. 3a).
Make an even row of holes in chassis N, pressing the piece against the drill table stop. Drill halfway down one side, flip the chassis over and complete the operation.
Align the top side of the wing Q with the bottom edge of the chamfer on the pivot support P and align the center marks.
3. Cut out the rotary support P and make chamfers on the upper ribs (Fig. 2).
Glue the part to the chassis, aligning it in the center, and secure with clamps. Once the glue has dried, drill through the hole in the chassis and drill a hole in the support.
4. Glue two copies of the wing template to the 13mm blank and cut the Q to shape and size. Glue the wings to the chassis (Fig. 3a, photo F ).
5. If necessary, grind the wheel axles so that they fit snugly into the holes in the chassis N and wheel spacers O. Shorten the 22mm axles by 3mm (Fig. 3). Make sure the wheels and axles match, but don't glue them in place yet.
Finishing and assembly
To eliminate play but ensure mobility of the components, screw a self-locking nut onto the connecting bolt. Nylon washer reduces friction.
1. Before you begin finishing, remove the wheels, axles and all hardware. Apply finishing coat. (We sprayed the polyurethane twice, lightly sanding the first layer after drying with a 320-gauge pad.) Once dry, reassemble the boom A/B/C, D, E, G, I , securing the parts together with threaded rods and caps. nuts. Attach the boom and cab to the turntable H/J/K/L .
2. Place a wheel and washer on each axle and glue the axles into the chassis holes. Make sure that no glue gets on the wheels and that they rotate freely (Fig. 3). When the glue has dried, bolt the chassis and the rotating part to the boom (photo G ). Then reattach the cover M (Fig. 2).
3. After fueling the engine with cookies and milk, show your child the new toy and let him try it out and enjoy the game.
You might be interested in:
Glass wallpaper for walls
Should you choose a stone or wooden house?…
Foundation with screw
LED lamps - installation features and...
Where to begin?
Of course, with visualization. So that problems associated with the further operation of a mini excavator created by yourself do not bury your time and work forever, you must approach its creation with a clear understanding of what and how to do. After all, having bought a lot of spare parts, having spent countless amounts of time and effort, it is unlikely that anyone will want to eventually realize that their “craft” turned out to be more expensive than a production copy, but at the same time less effective.
After weighing all the pros and cons, the first thing you need to arm yourself with is a drawing. You can either buy it on foreign websites, or spy on the Internet. If you search for the necessary information on foreign sites, remember that, for example, the American measurement system uses inches, not meters. Don't forget to convert some values to others!
Photo source: website
From general to specific
There are two most common methods for creating a mini excavator with your own hands: you can install attachments on a small tractor or build an autonomous homemade mini excavator that can move independently or with the help of other vehicles. The second option is more labor-intensive. You need to make your own frame, install at least the rear axle (can be used from an old car), and the engine. If you feel technically savvy, you can combine engine parts or use Chinese motors from different manufacturers. Just keep in mind that if you assemble parts from different machines, you will have to constantly adjust these parts and make modifications to them.
Photo source: website
Manufacturing recommendations
Detailed manufacturing tips can be found on forums and specialized websites. Typical difficulties of masters and ways to eliminate them are actively discussed there.
One of the easiest ways is to install homemade excavator equipment on an existing tractor. It can also be relatively easily made from components of a trailer, engine, tank, wheel axle from an old car, however, such advice is only relevant if the master has all these components at his disposal or is easy to find at dismantling sites and in auto repair shops.
To ensure stability, it is recommended to use additional fasteners during operation. To prevent the excavator from tipping over while digging, two supports are sufficient.
One horse, two horse
What about “horses”? The question is reasonable, and the answer to it lies in the purposes and in the work that you will carry out on a mini excavator made by yourself. The calculation of the forces on the hydraulic cylinders for raising and lowering the boom and turning the handle depends on what exactly you are digging, then the speed of movement of the links and the movement of the pistons in the cylinders is determined. Typically, a power of 8-13 horses is more than enough.
Finding the necessary equipment or spare parts has become even easier - leave it and they will call you back.
Hydraulics. Ours can do this too
In fact, American colleagues in the workshop prefer to install ready-made hydraulics. The option is not the cheapest, but requires the least labor. But our people are not looking for easy ways! Armed with theoretical knowledge, you can try to make hydraulics with your own hands. But we warn you: this process is quite complicated.
So, the hydraulic system of a full-fledged excavator consists of 4 sections (this is the minimum): a rotary platform, a bucket, a boom and a handle. As for the rotary platform, you can refuse it, since complex work, as a rule, is not performed on a homemade mini excavator. We install 4 hydraulic cylinders (this is quite enough to turn and raise the boom and handle, and control the bucket). Hydraulic cylinders from the MAZ or KAMAZ cab lifting mechanism are perfect.
Photo source: website
Excavator manufacturing procedure
To build a mini-excavator, you need to start by visualizing your model: general sketches and sketches, selecting the characteristics of all elements, components and parts. If you have technical knowledge, you can try to create an excavator design yourself. But it’s easier to use a ready-made idea, of which there are a lot on Internet forums and specialized sites. In general, the principle of manufacturing a mini-excavator of your own production is similar to industrial technology.
Before starting work, you need to select a drawing of an excavator
What needs to be done at the preliminary stage of work:
- First of all, you need to determine the type of equipment: trailed or self-propelled.
- Next, select the power. The answer lies in the purpose and intended work that the machine will do. Depending on the type of soil and its volume, the forces on the hydraulic cylinders are calculated to raise and lower the boom and rotate the handle. Usually 8-13 liters. With. more than enough for a “home” model.
- Hydraulics. It is easier to install ready-made prefabricated hydraulic systems, although they are not cheap. However, if you have the knowledge and materials, you can try to make hydraulics yourself. This is a complex, but fascinating process in its own way, which saves quite a significant amount.
- When installing a pump, the question arises: which one to choose, axial piston or gear? The first option is more expensive, but also more effective. It is possible to determine whether it will pay off only by comparing the cost with the expected amount of work. A gear pump is used more often, and not only because it costs significantly less than an axial drive one. The main advantage is that it has a simple design that rarely breaks down and in which any malfunction can be easily repaired.
- Based on the performance of the pump and hydraulics, the displacement of the fuel tank is selected.
- Working equipment. If a ready-made hydraulic system is installed, it is rational to supply a ready-made boom along with it, ordering it from the same manufacturer. You can also install a boom from an old wheel loader (if, of course, you have one). But it’s easier to make a boom from a square pipe with your own hands, and weld the bucket from sheet steel. It is simple, inexpensive and allows you to accurately adjust the equipment to the required parameters.
So, the preparation is complete, the characteristics of the future model have been thought out, and you can get to work. At the first stage of work, an estimate is drawn up. It includes:
- main components and assemblies;
- spare parts;
- equipment for manufacturing parts (for example, lathe, welding machine);
- tools.
All together will give the estimated cost of manufacturing an excavator. It is important to understand what you can do yourself, what is more profitable to order from a specialist or buy, and why it makes sense to buy equipment that can be used after the excavator is manufactured. If DIY still looks cost-effective, it's time to move on to the second part: drawing up detailed drawings. In order to create drawings yourself, you must have technical and calculation skills. It is important to draw every detail and make all the calculations. However, finding a ready-made drawing of a homemade excavator on the Internet is also not difficult.
Required tools and materials
When the drawings are ready, it’s time to order the missing tools and materials from the list. As a rule, the list of main parts includes:
- motor with starter and coil;
- hydraulic cylinders;
- hydraulic distributor;
- hydraulic pump;
- fingers;
- sheet steel and rolled metal.
Model of a homemade excavator
The tools you will need are a hammer drill, a compressor, hacksaws, a welding machine, wrenches, screwdrivers, etc.
Assembly order
Procedure:
- Weld a frame from pipes. The main load will occur at the reach, at the point where the boom is supported, so it makes sense to strengthen the internal walls in this place (for example, with two 10 mm plates).
- Collect the arrow. To do this, you will first need to establish the joints and hinges. This is a labor-intensive and very important stage. For fingers, you can take car kingpins with a diameter of 25 mm (for example, from a Gazelle). Bushings and spacer rings for hydraulic cylinders are selected for these fingers. If there are no suitable ones, you can order their production according to the specified dimensions marked on the drawing of the excavator boom.
- A complete excavator hydraulic system consists of four main elements: the rotary platform, bucket, boom and stick. In home-made models, turntables are usually abandoned: they are difficult to manufacture and are not needed for most “home” work. Therefore, it will be enough to install four hydraulic cylinders (for example, from the cab lifting mechanism of a MAZ or KAMAZ truck). Their power is quite enough to turn and lift the boom and arm and operate the bucket.
- Next, you can install the engine and pump bracket on the frame. They are connected by a coupling (can be used from old Zhiguli cars). The structure must first be centered and welded.
- Install a hydraulic tank - any container of a suitable size with an outlet to the pump at the bottom of the tank. The easiest way to get wheels is from a VAZ “classic” - they are often sold cheaply or even given away for free at tire shops. It is advisable to make the wheels adjustable so that there are two positions: transport and working.
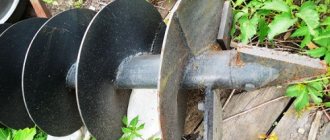
- The ladle is welded from sheet steel. Since it is the one that comes into contact with the work surface, the strongest possible metal should be used. It is recommended to further strengthen the top and bottom edges with steel plates. The simplest bucket is made of three parts: two side walls and a base. Everything is welded at right angles. The required bends are created by heating with a torch. At the last stage, the teeth are welded.
- The last step after everything is assembled is painting with durable paint to protect the metal from corrosion and give the excavator its individuality.
Bucket: the stronger the better
The bucket is the direct component of the machine that will come into contact with the working surface. In order for your DIY mini excavator to serve you (let’s not guess how long!) it is recommended to use durable metal. The minimum set is: 2 sides and a bottom. The bottom, which is used as a rectangular plate, is attached to the vertically installed sidewalls by welding. Already tacked to the sidewalls at one edge, it is heated by a burner and gradually bends along the contour of the sidewalls. Don't forget to use pot holders. It is recommended to additionally reinforce the upper edge and bottom with steel plates. After all this has been done, you can weld the teeth.
Photo source: website
Photo source: website And someone has already “cut” their teeth
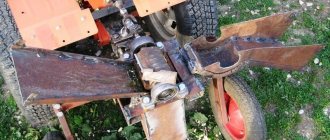
Step-by-step assembly of a children's excavator
Most connections are fixed using welding seams. You can make the base yourself from a profile if the old disk is missing. The assembly algorithm consists of the following points:
- We weld the bearing coaxially along the outer race onto the car disk, reinforcing it with metal gussets.
- We weld a vertical stand of approximately 0.5 m to the inner frame, and horizontally to it we weld a beam on which the chair and wings will be mounted. To reduce the load, we support the longer part of the console at an angle with an additional stand.
- We mount the levers. The right one is rigidly connected at 90 degrees to the beam to ensure lifting of the load. The left one has several sections to pull the bucket through.
- We cut a ladle from a sheet. It consists of side cheeks, a working sheet with teeth and a back side. We butt weld it.
- We are preparing a stand for the bucket with a height of 30 cm. To the central part of it we weld the ears for the hinge, which helps in raking, and to the upper end we weld the ears for the hinge, which is responsible for lifting the bucket.
- We bend the beams slightly, cutting them with a grinder in two places at a distance of 25 and 50 cm from the edge to bring their ends closer to the vertical stand of the bucket.
- We cut off the beam for raking so that in the farthest position the control lever is horizontal.
- We weld the hinge ears to the lever.
- We install plywood for the chair or a wooden plank at the operator’s seat.
We paint the product to protect it from corrosion, choosing bright colors. We mount it in a sandbox so that the range of action remains within the perimeter. The video shows a version of a home mini excavator from one of the masters.
Read new ideas on construction, finishing and homemade machines on our channel and on the VseStanki website. Subscribe and share ideas on social networks.