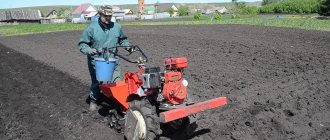
How to plow with a cultivator (motoblock) so that there are no traces left
Tilling the soil with a cultivator is carried out twice a year: in the spring, when crops are planted in the ground, and in the fall, when all work in the garden is completed.
It’s not difficult to master plowing using a walk-behind tractor. But even experienced farmers experience difficulties in operating equipment if they do not take into account a number of features.
The main mistake is choosing a unit for specific tasks. If you have a small garden, with an area of 5-6 acres, choose small-sized and lightweight devices. If the walk-behind tractor is heavy, use special cutters.
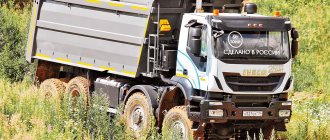
For a large plot of land with an area of 20-30 acres, a unit with a capacity of 10 horsepower or more is required. Such equipment weighs at least 100 kg. It comes with, or can be purchased separately, a stationary mounted plow.
Mini-equipment operates on a no-dump principle. The earth does not turn over, but is loosened to the required depth. This is necessary so that the fertile soil layer remains intact, otherwise you will not reap a good harvest.
Let's consider step by step whether it is necessary to rework the walk-behind tractor before proceeding directly to plowing.
Safety precautions when plowing soil
When operating a motor cultivator, you must follow simple safety precautions:
- You can start working after thoroughly reading the instructions;
- Operating the unit cannot be trusted to children or people who do not have initial skills in handling such equipment;
- There should be no other people or animals near the unit;
- Keep your feet and hands at a safe distance from rotating parts;
- You should plow in special clothing or closed shoes and trousers;
- It is not recommended to hold the forward and reverse handles at the same time; one should be lowered.
The Mole motor cultivator easily and quickly cultivates large areas. Simple recommendations will help you protect yourself from accidents and increase the life of your machine.
Using the Mole cultivator
Owners of vegetable gardens, small farms, and summer cottages who are planning to purchase a domestic motorized cultivator “Mole” (tested not only by time) are often interested in what attachments for this motor cultivator are sold on the domestic market.
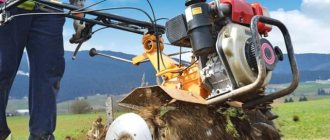
Motor cultivator Mole
Their interest is understandable and valid, because it is thanks to all kinds of trailed and mounted attachments that this unit becomes indispensable, one might say, a universal assistant on the site.
Using attachments on the “Mole” motor cultivator, you can perform the following agricultural work:
- Plowing the soil.
- Cutting soil for planting.
- Weeding plants from weeds.
- Hilling.
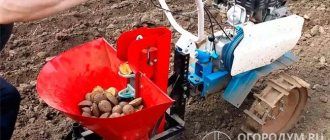
- Planting and harvesting potatoes.
- Using a pump to water a garden.
- Mowing the grass.
- Transportation of harvested crops and other cargo (bulk, piece, etc.) not exceeding a weight of 200 kg.
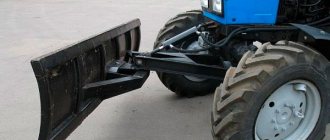
- Snow removal in winter.
Preparatory actions
Before starting work you must:
- Prepare the area. Clear it of stones and large branches that can seriously damage the cultivator. Also remove glass, as it can fly out from under the rotating elements; it can seriously injure you.
- Install the attachment required for the selected operation.
- Check the working condition of the cultivator (see below).
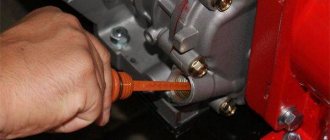
First of all, inspect the mounting of all moving parts and set the required handle height. Then use a special dipstick to check the engine oil level. The cultivator will work for a long time and smoothly if you use the fuel and oil recommended in the instructions and change the oil in a timely manner - every 25-50 hours of operation. Don't forget to clean the air filter.
After successful completion of the preparatory process, proceed to the next stage.
Motor cultivator
Is anyone plowing on Krot?
Questions can only be asked after registration.
Please login or register. Owners of the “Mole” motor-cultivator, is it possible to convert the “Mole” for plowing?
I tried once in eighty years to plow Mole with the plow that he bought with him. A very weak Mole. Do not want anymore. I gave the plow to my brother - he has the Neva. He has it lying around somewhere. Now I only work with a milling cutter.
I tried once in eighty years to plow Mole with the plow that he bought with him. A very weak Mole. Do not want anymore. I gave the plow to my brother - he has the Neva. He has it lying around somewhere. Now I only work with a milling cutter.
How is that weak? Is the motor dying? And yet, there are no speeds and he probably runs very fast?
The forum is not an expert commission. All opinions and advice are advisory in nature. Responsibility for repair decisions made lies entirely with the user. LEARN MATERIAL PART
[quote=phantom Weak how is it? Is the motor dying? And yet, there are no speeds and he probably runs very fast?[/quote] —- Metal lugs were sold for the wheels along with the plow, but there were no wheels with a mole themselves. Adapted from a row crop seeder, according to my HRC. The tread there is still smooth. The diameter of these wheels is 30 cm. The speed seemed normal, scratching the ground finely - what's the point of plowing? And I tried to drive the plow deeper - it was hard for the engine, it was dying. The chain in the gearbox then broke and had to be disassembled and reconnected. In general, I won’t rape him like that anymore. Yeah, I remembered the wheels from the KRN row-crop cultivator.
Owners of the moto-cultivator “Mole”, is it possible to convert the “Mole” for plowing? Lesha, you also plow on the MOLE
Well, of course it’s easier to give advice
Source
Preparing for work
- Before you start using the cultivator in the country, you should carefully evaluate the presence of all elements of the device and their performance, and also carry out a break-in. According to the operating instructions, the canopy responsible for plowing the soil is installed, the fasteners are checked and tightened, and the height of the handle is adjusted.
- Then the garden itself must be prepared - large stones and large branches are thrown out, as well as pieces of glass that can even injure a person if they fly out from below.
Men's corner | Topic author: Male
New rework of the Mole
Victor (Berne) Motorcycle gearbox for reverse.
Vitaliy (Oran) if you finish it, let me know, I’m also thinking of installing reverse from Murash
Victor (Berne) good
Nikolay (Ramaa) Ural or Dnieper box
Victor (Berne) Why?
Nikolay (Ramaa) 4 gear modes
Victor (Berne) I haven’t bet on him, he still has his relatives and a gearbox.
Vitaly (Oran) Victor rummage through my photos of the engine from Minsk to the mole
Victor (Berne) I just put the “Friendship” and “Ural” saws on it.
It's a pleasure to plow after your own engine. I installed the Tulitsevsky engine - it was a tractor, only without unlockers, the locking pins on the wheels tore, and then the gearbox shaft was torn off and sharpened from a gas kingpin. This was about 15 years ago. there was no internet back then and walk-behind tractors were rare
Vitaly (Oran) I got a mole from my grandfather, the engine didn’t last long, so 2 days of welding work and solving all the problems, blowing from an electric motor was done by powering from genes through diodes
Vitaly (Oran) disconnected the mass only from the body accordingly
Tags: How to properly operate a mole walk-behind tractor video
Owner reviews
Denis:
“The Mole cultivator was inherited, so to speak. I myself worked on it almost from childhood. Now I also have a mini tractor on my farm, but Mole is Mole. On the farm I work with a tractor, but on the estate near the house it’s more convenient to use a cultivator. In the garden, in the beds, in the greenhouse - I do everything with different attachments. Over the years of operation, I changed the engine and bought a new Sadko. The opener also had to be replaced; it was cracked. I made some improvements to the bracket. In general, the assistant is reliable.”
Tracked module
Such a canopy significantly increases the area of contact with the ground. Thanks to this, the throughput of the installation increases sharply, especially if work is carried out in winter.
Lugs
They are massive metal wheels with pronounced ribs.
They are designed for swelling the soil.
snow blower
In the cold season, Krot walk-behind tractors can be used to clear the area of snow. For this purpose, a snow blower is attached to them.
It comes in several types: auger snow thrower, blade or brush.
Planter
Using such a device can significantly facilitate sowing work.
The seeder attachment allows you to plant seeds and parts of vegetable tubers according to any given pattern, so that in just a few hours you can cultivate a fairly large area of land.
Potato digger
Another interesting device that digs up and turns over a layer of earth, pours it onto a grate or into a special bunker, subjects it to vibration, clearing the tubers from the soil, and “throws” the potatoes out.
Weights
They are used to ensure that the cultivator sinks into the soil as deeply as possible. These devices are put on the shaft and wheels.
Keep in mind that no matter what device you choose to add to your walk-behind tractor, you will in any case need a hitch, thanks to which the walk-behind cultivator can be mounted with absolutely any device.
The hitch can be adjustable or not. In the first case, you can set not only the horizontal lines, but also the angle of attack.
User manual
A motor cultivator can serve its owners faithfully for decades, but only with regular maintenance, which includes several stages.
Before starting work you must:
- check the strength of the installation fasteners: if they are loose, they should be tightened and tightened;
- make sure the tank is full of fuel: if there is little fuel, fill the tank completely;
- look at the oil volume in the crankcase.
Upon completion of work you need:
- clean the motor cultivator from dirt and dust;
- thoroughly rinse and dry the installation completely;
- lubricate all moving elements with grease;
- Place the cultivator in a place inaccessible to direct sunlight.
When using the Mole walk-behind tractor, a very important issue is the problem of using oil: not every composition is suitable here. The Mole requires three types of oils: for the engine gearbox, for the input gearbox, and also for the fuel mixture.
In the latter case, it is worth giving preference to M-12 in a ratio of 1 to 20 with fuel - this is the standard oil option that is used on all two-stroke engines. Keep in mind that the fuel mixture cannot be made directly in the tank - it is better to prepare it in advance in a separate tank. If this is not possible, then first use only 1/2 of the required amount of gasoline, then pour out the oil, mix everything and only then add all the remaining gasoline.
The gearbox of the walk-behind tractor will need to be filled with MG-8A , which is a hydraulic oil, and for the output gearbox you need to take the transmission compound TAD-17 .
As for manufacturers, there are no explicit requirements - you can focus on your own financial capabilities. Today you can find cheaper Russian-made products, as well as imported oils, but they will be more expensive.
Repair of cultivator Mole
To avoid private repair work, it is necessary to properly maintain the engine, fill with fuel and lubricant according to the instructions.
Modern models are sold under warranty; in case of the slightest malfunction, they are accepted for repairs free of charge during the warranty period.
The engine for the mole cultivator needs running-in. The fact is that the first minutes of work are the most important. During this period, the load on the engine elements is maximum. For each model, the instructions indicate the period or period for engine break-in. You need to give the parts time to grind in. Otherwise, repairs cannot be avoided.
If the time has come to “modernize” the mole, then they start by replacing the engine. The design of any model of gasoline cultivator is simple; replacement, repair or maintenance will not take much time. To do this, just follow the instructions and fulfill the conditions specified in it to replace the engine in the mole cultivator.
They are increasingly replacing the old engine with Chinese analogues, everything is clear and simple:
- Drain the oil.
- Disconnect the gas cable.
- The motor is dismantled by unscrewing the four lower nuts.
- Try on the new motor for proper mounting.
- If the mounting holes do not match, make new ones.
- Attach the engine.
- Set up the transmission belt for the mole cultivator and controls.
If there are changes in operation, it is advisable to adjust the device yourself. It is more convenient to set up and repair it yourself, because in a deserted area few people will agree to help with the repair of the cultivator during the planting or harvesting season.
Ignition of a gasoline mole cultivator from a candle. Very often this element requires preventive maintenance. So, to troubleshoot the problem you need to:
- Check the spark plugs and install new ones.
- Inspect the suppression resistance for malfunction.
- After completing steps No. 1 and 2, check the high-voltage wires.
- Next, inspect the fuel hose.
- Check the condition of the carburetor.
If the mole cultivator still does not start, but there is a spark, then the solution to the problem is in this video:
Of course, it is better to entrust more complex walk-behind tractor repairs to a professional. Modern models of cultivators are equipped with four-stroke engines to save fuel. Also, this type of motor is repaired much less often with proper care.
Gasoline models
All gasoline-powered Krot cultivators are divided into three groups:
- M (compact)
- MK (low power)
- DDE (powerful).
Mole M
In terms of size, the Krot M cultivator is considered the most compact option in the line of units for cultivating soil on a personal plot. Its transport wheel is located in front. The set includes milling knives. In modern versions, the Krot M is equipped with a Honda engine.
Its motor power is 5 hp. Operates in one forward gear. The working width is 36 cm, and the plowing depth is 12-25 cm. But its weight is 48 kg, which is considered a plus for a compact walk-behind tractor. With a small size, the extra weight helps avoid bouncing during tillage.
Model range MK
A series of low-power units that are in demand among consumers due to their affordable price and good functionality. In total there are 5 units:
| Model | 9-01 | 8-01 | 5-01 | 7A-02 | 1A-02 |
| Power, hp | 5.5 | 4 | 3.5 | 4 | 2.6 |
| power, kWt | 4.05 | 2.94 | 2.57 | 2.97 | 1.91 |
| Weight, kg | 53.2 | 48 | 50 | 50 | 48 |
| Working width, cm | 35-60 | 35-60 | 35-60 | 35-60 | 35-60 |
| Plowing depth, cm | 15-25 | 15-25 | 15-25 | 15-25 | 15-25 |
The advantage of this series is its unpretentiousness to fuel and increased service life. The most modern MK modification unit is considered to be model 9-01. It is powered by a Hammermann four-stroke petrol engine. Designed for processing an area of 0.04-0.1 hectares. Depending on additional equipment, performs all agricultural work related to land cultivation: digging, cultivating, forming beds, leveling, loosening, hilling, cutting the soil, weeding between rows.
The advantage of 9-01 is the wear resistance of the main parts. The shaft is made of stainless steel with increased anti-corrosion properties. Thanks to the unique shape of the cutters, this cultivator can handle even the most difficult soils. Another advantage of this model is the presence of reverse gear.
The weakest of the MK line is the cultivator with index 1A. There are two versions of it on the market: 01 and 02. The first is considered a “veteran”, while the second is more modern. It is valued for its modified clutch system, thanks to which it was possible to reduce the cost of starting the engine. The 1A-02 operates on a two-stroke engine with increased service life. It compares favorably with its predecessor. Thanks to the increased weight, the developer was able to increase the machine's maneuverability during primary tillage.
The developers did not add a second gear to this model, which had a positive effect on the functionality of the unit. The transmission of revolutions to the shaft takes a shortened path, thanks to which the overall operation of the equipment has become more confident.
Another advantage of the 1A-02 model is the improved ergonomics of the design. The angle of inclination of the handles allows you to hold the unit in a vertical position without additional power costs and even pass through areas overgrown with weeds. The device is completely covered with protective plates that prevent dirt and water from getting into the working mechanisms.
DDE
This series includes three models:
- DDE-1 with four-stroke Honda engine;
- DDE-2 with two-stroke Japanese engine and additional gear;
- V700ii with domestic engines.
DDE Series Specifications
| Model | DDE-1 | DDE-2 | V700ii |
| power, kWt | 4.78 | 4.78 | 4.78 |
| Tank volume, l | 3.6 | 3.6 | — |
| Working width, cm | 15-25 | 15-20 | 25 |
| Plowing depth, cm | 15-25 | 15-25 | 15-25 |
The V700ii package is considered the optimal choice in terms of price/quality. This unit runs on regular AI-92 gasoline. Completely unpretentious to use. Starts with a manual starter. One of its advantages is the chain gearbox. Otherwise, all DDE walk-behind tractors are similar to each other.
Proper preparation for work
Before starting to plow the garden, the operator must prepare the equipment.
To do this you will need:
- check the standard design of the motor-cultivator, inspect its fastenings and body, check the functionality of all moving mechanisms, as well as the pressure in the pneumatic wheels, if they are included in the package. In addition, it is important to check the air filter in a timely manner, since if it is severely clogged, it will not be able to clean the air. As a result, dust and even small insects will get into the fuel, which will block the fuel channels and impair the performance of the power unit;
- adjust the height of the cultivator handles in a way that is convenient for the user;
- fill the fuel tank with fresh fuel, and also check the presence and condition of lubricant in the transmission and gearbox;
- prepare the area before plowing: remove large stones, debris, and thick tall stems of weeds from it.
For more efficient plowing of areas with soft, loose soil or cultivation of an area with a lot of weeds, instead of standard pneumatic wheels, you will need to install lugs on the motor cultivator.
This is done in the following sequence:
- First you need to remove the wheels and hubs;
- Instead of the removed hubs, it is necessary to install analogues of greater length. They are connected to the factory shaft using special studs;
- After this, you need to install the lugs themselves on the motor-cultivator.
Correctly setting the plowing depth plays an important role in preparing the equipment. As a rule, it is 10–25 cm. Most often, experienced users cultivate their gardens to a minimum depth of 10 cm. Immediately after this, the area with a loose top layer of soil will need to be plowed again, setting the depth to 25 cm.
How to install and plow a mounted plow
The main working parts of the tool are a metal ploughshare and a blade. The ploughshare carries out plowing: it cuts the upper layers of soil and directs them to the dump. And the blade wraps the earth raised by the ploughshare, crumbles it and throws it into the furrow. Thanks to this process, deep loosening of the soil occurs, during which it is saturated with oxygen and gets rid of weeds.
The picture (diagram) shows what a plowshare plow looks like, designed for plowing with a cultivator or walk-behind tractor in the garden. Different models of plowing devices may have some differences among themselves, but mostly they are all designed this way.
Before you start plowing the ground with a cultivator or walk-behind tractor, assemble a removable plow. To do this, take two bolts and use them to attach the hitch to the rack of the mounted implement. The assembled unit must be attached to the cultivator bracket, lightly fixing it, and then adjusted according to the parameters:
- plowing depth;
- blade tilt angle;
- angle of inclination of the heel (field board).
To adjust to the required plowing depth, the motor-cultivator is rolled out onto stands 12-20 cm high and placed as level as possible: the field board should be in full contact with the ground surface, and the stand should be perpendicular to it. The mounted plow is adjusted to the required position at which it will plow, and then secured with an adjuster screw and a lock nut.
To adjust the angle of the blade, tilt the cultivator to the side. To do this, remove the stand from under the right wheel (or lug), leaving only under the left one. The nuts securing the hitch to the hitch are slightly loosened, the plow is slowly turned, giving it the optimal position for plowing.
Changing the angle of the heel (field board) is carried out by rotating the adjusting screw of the cultivator hitch. If it is necessary to increase the height of the heel lift relative to the plowshare, turn the screw clockwise and vice versa. When adjusting, be sure to ensure that the distance does not exceed 3 cm, otherwise the nose of the plow, when plowing in the garden, will begin to burrow deep into the ground and worsen the traction force of the cultivator, as well as a walk-behind tractor or a walk-behind tractor. After completing the adjustment, tighten all nuts well with a wrench. You can take a more detailed look at the process of setting up a plow for plowing with Salyut, Neva and other motor cultivators in the video.
After making the above settings, the plow is completely ready for use - you can try plowing in the garden. But before you start plowing thoroughly, especially virgin soil, you perform control plowing and evaluate whether the plow is adjusted correctly, what the depth of the furrow is and the quality of the soil dump. How to properly plow with a cultivator is well shown in the video using the Neva walk-behind tractor as an example. You can also watch a video about how the heavy Zirka walk-behind tractor behaves when plowing virgin soil. Pay attention to how the plow goes deep.
When the plow is adjusted correctly, the power unit moves evenly during plowing, without jerking, without burying the “nose” of the ploughshare deep into the surface. The furrows from under the moldboard are smooth and do not “overlap” each other during plowing. If the site has hard soil, then plowing is carried out in two passes. During the first plowing, the specified shallower depth is set, and during the second, a greater depth. In the same way you need to plow virgin soil. To cultivate small areas, they mainly use a cultivator and a plowing cutter. Medium-sized plots are also cultivated with a cultivator, but with the use of a huller or a light plow, and heavy and virgin lands are cultivated with the help of a powerful motor-cultivator, for example Neva, and a mounted plow. You can develop your own plow setting technique that is suitable for your walk-behind tractor. Attaching a plow to a walk-behind tractor is not difficult.
How to maintain garden equipment
Spare parts and attachments for the mole cultivator require maintenance. Garden equipment has instructions for proper storage and periodic maintenance. Per the instructions, perform the following steps:
- Clean the cylinder head from elements of earth and vegetation. The cylinder head is washed and dried.
- Remove carbon deposits that have formed in the engine cylinder.
- The carburetor and supply channels are washed with the fuel mixture.
- Clean the filter and muffler.
- When working for a long time, the Mole needs to repair or replace the crankcase. The crankcase should be replaced after partial disassembly of the gearbox.
- Remove the carbon deposits that have accumulated on the muffler. To do this, remove the bolts and washers. A napkin soaked in gasoline is enough, but it cleans thoroughly.
By systematically cleaning these equipment elements, you can realistically expect more than a dozen years of operation without major repairs.
Design
The design of this model is so primitive that some craftsmen are trying to assemble a Mole cultivator with their own hands. The frame consists of two half-frames bolted to the gearbox. At the rear of the walk-behind tractor there are tubular control handles and a platform for installing attachments. Engine and clutch speed controls are located on the handles.
Soil steel cutters are fixed on the output shafts of the gearbox. There are four of them in the basic versions, but there are options that work with six cutters. Their diameter is 320 mm, which allows you to cut through the ground to a depth of 25 cm. Considering the main purpose of this walk-behind tractor, this size is quite justified. The cultivator does an excellent job of plowing and removing small weeds.
The internal combustion engine is mounted on the frame of the Mole cultivator and connected to the input shaft of the gearbox via a V-belt transmission. The engine of the basic modifications of this agricultural machinery is the simplest - a single-cylinder two-stroke with an air cooling system. It is equipped with a dry air filter and a non-removable manual cable starter. “Mole” runs on gasoline or diesel. Engineers placed the fuel tank on top.
Improved versions are equipped with imported two- and four-stroke engines, which increases the endurance of the equipment when processing difficult soils. The model range includes devices with electric motors, which are in demand when processing closed greenhouses.
Regardless of the option, “Mole” is equipped with five oil seals that guarantee tight connections. This is one of the preventative measures for an engine that stops working if the seal is broken as a result of loosening.
How to operate a motor cultivator correctly
Motor cultivator
Initially, external conservation lubricant is removed from the unit and its devices. Use a rag soaked in gasoline to wipe metal-coated parts and then be sure to wipe them dry. Then the cultivators need to be “run in”. As with any mechanisms, the moving parts in them must “get used to”, the engine must warm up, and “get used” to the load. Start with light tasks, low speeds, only two cutters, gradually increasing the load. 5-10 hours of a gentle regime may be quite enough. Then you can resort to increasing the speed (motor speed) and adding the number of cutters.
Diesel options
Among the Krot cultivators there are also diesel models. They are based on a G170F engine, which provides increased traction and allows you to cultivate virgin lands. In addition to the reinforced frame, such walk-behind tractors received pneumatic wheels.
WG351
Of all the diesel variants of the Mole, this particular model is equipped with a reduced-power engine. In terms of technical characteristics, this is an average version of agricultural machinery for small farms.
| Power, hp | 6.0 |
| Engine volume, cm3 | 296 |
| Tank volume, l | 3.5 |
| Weight, kg | 138 |
| Working width, cm | 120 |
| Plowing depth, cm | 30 |
| Clutch | disks |
| Transmission | gear |
| Number of gears | 3 (2+1) |
| Wheels, inches | 10 |
WG352
The main difference from the WG351 model is the presence of an electric starter. In terms of technical characteristics, there is otherwise no significant difference: this unit also runs on a four-stroke diesel engine, its power remains 6.0 hp. The only negative is the narrowed cutters with a processing width of 110 cm. A plus is considered to be a reduction in the total weight by 18 kg.
WG353
The most powerful walk-behind tractor in the entire diesel line. Powered by a 4-stroke engine with an air cooling system.
| Power, hp | 9.0 |
| Engine volume, cm3 | 418 |
| Tank volume, l | 5.5 |
| Weight, kg | 145 |
| Working width, cm | 110 |
| Plowing depth, cm | 30 |
| Clutch | disks |
| Transmission | gear |
| Number of gears | 3 (2+1) |
| Wheels, inches | 10 |
Mole cultivators, regardless of their power, are considered one of the most reliable types of small agricultural equipment. Malfunctions that may arise during operation can be corrected independently, without the help of specialists. Most often, breakdowns are associated with the gearbox, which begins to make unnecessary noise when there is a lack of oil or when the components become loose. Motoblocks can work tirelessly for up to 10 years. With careful use of equipment and timely replacement of consumables, farmers manage to extend the life of the cultivator several times.