How the chainsaw ignition works and how it works
The design of a carburetor engine does not depend on the model of the tool. Therefore, we can talk about a standard chainsaw ignition system. It consists of the following elements:
- Magneto. Is an alternating current generator. Necessary to supply the spark plug with electric current. Externally, this part looks like a stationary winding of an inductor and a permanent magnet, which is fixed on the flywheel. The latter rotates simultaneously with the engine crankshaft.
- Spark plug.
- An electrical cable that connects the 2 previous elements.
- Buttons to turn off the device.
The chainsaw ignition circuit is simple. After the tool starts, a rotating magnetic field is formed due to the movement of the flywheel and crankshaft. It creates a moving force in the existing winding, which is transformed into voltage. This potential is enough to form a spark.
The only difference between different chainsaw models may be whether a contact or non-contact magneto is used. In the first case, one winding lead goes to the spark plug, and the second goes first to the shutdown button, and then through it to the ground. In the second case, the device contains a capacitor, which, when discharged, generates a current.
Common mistakes and solutions
Now let's look at the main disadvantages of magneto:
- Spark failure. There may be several reasons, as well as ways to solve them. This is oxidation or burnout of contacts, violation of gap adjustment, wear of the switch lever cushion, or a punctured capacitor element. Defective parts must be replaced and adjustable gaps must be adjusted. If there are problems with the contacts, they need to be replaced or cleaned.
- No spark. The cause may be a break in the transformer wiring, a short circuit to ground, or a break in the insulating layer on the high-voltage cable. If the problem is in the transformer, the assembly is replaced, if the circuit is short-circuited, it should be repaired, and if the cause is faulty insulation, the cable simply needs to be replaced.
- If the spark is too weak, it is most likely caused by a damaged capacitor, which will also need to be replaced.
Ignition faults
Most often, we think about repairs after the chainsaw stops starting, or visual signs of serious damage appear.
Signs of ignition malfunction:
- The chainsaw starts, but works unevenly (troits), often sneezes and shoots;
- The power of the chainsaw has noticeably dropped;
- When you sharply press the accelerator trigger, failures in engine operation are observed;
- The chainsaw does not start well when cold, it stalls violently until it warms up;
- Fuel consumption has increased significantly;
If such flaws appear in the operation of your chainsaw, then it’s time to diagnose, adjust, and possibly repair the ignition system.
Fault location determination:
First of all, it is necessary to inspect the spark plug; if a lot of carbon deposits have accumulated on it, then the cause of the malfunction is most likely related to the operation of the carburetor, piston group or fuel quality. If the spark plug visually appears to be in good working order, does not spark and is dry, make sure there is a spark.
- Unscrew the spark plug, put the ignition cable on it;
- Using insulated pliers, press the spark plug threads to the motor housing;
- Pull the starter handle sharply towards you and make sure there is a spark;
If there is no spark, replace the spark plug with a new one and test again. After making sure there is a spark, start the engine. But what to do if there is no spark even on a working spark plug? Let's continue the search:
We test the electrical cable for breaks and insufficient contact with the spark plug. We check the serviceability of the spring in the cap of the candle holder and the presence of contact with the armored cable;
To check the serviceability of electrical wiring, it is best to use a tester.
You can set the correct gap using a feeler gauge; they are not in short supply and are available for a small fee.
Diagnosing a fault with a multimeter
The malfunction of the ignition coil can also be determined using the so-called hardware method. However, for this you must have a multimeter with which diagnostics are carried out.
Step-by-step ignition diagnostics with a multimeter:
- We set the multimeter to a position where the arrow is at the 200 ohm mark.
- We study the instructions for the chainsaw. We find out the optimal resistance for the winding of the coil installed on our model (in most modern chainsaws this indicator ranges from 3-5 Ohms);
- We connect a multimeter to the primary winding of the coil and measure the resistance, if it is normal, we continue testing;
- We connect the multimeter to the secondary winding of the coil, compare the readings obtained with those indicated in the instruction manual;
- We connect the multimeter to the hole in the coil into which the wires are inserted. If the device produces normal readings, we come to the conclusion that the coil is working properly. If the measurement results are far from optimal, you will have to replace the assembly (coil) with a new one;
Video review of fault determination using a multimeter
Ignition adjustment
As we have already noted, you can adjust the ignition system both in the workshop and at home. To do this, you will need ordinary wrenches, a screwdriver and a 0.4 mm feeler gauge (you can make a feeler gauge yourself from scrap materials - regular copier paper, a plastic bottle, etc.).
Step-by-step adjustment of the chainsaw ignition:
- We diagnose the malfunction;
- Remove the protective cover;
- We remove the module with a candle holder and an electrical cable. We carry out a visual inspection of them and, if necessary, replace them with a new one;
- We install the ignition module, but do not tighten the fastening screws all the way;
- We determine the area with the magnet on the flywheel;
- We set the gap properly, in accordance with the parameters specified in the instruction manual;
- We tighten the module fastening screws until they stop, check the settings with a feeler gauge, and, if necessary, re-adjust;
- We install the protective cover and check for the presence of a spark on the spark plug;
- We screw in the spark plug and start the chainsaw;
You should also check whether the counterweight flywheel is catching on the module. If this happens, you may have a failed bearing or play in the shaft.
Magneto, or in search of a spark
Magneto is a magnetoelectric alternating current generator that creates electrical discharges between the electrodes of the spark plug to ignite the working mixture in the cylinders of internal combustion engines.
The operation of a magneto is based on the principle of electromagnetic induction.
The essence of induction is as follows: when a magnetic field is crossed by a closed conductor, an electric current arises in this conductor. When electric current passes through a conductor, a magnetic field is created around that conductor.
Magnetic field is the space around a magnet in which magnetic lines of force (or magnetic flux) pass. These lines are located denser between the poles of the magnet.
Alternating current can be excited in a conductor by rapidly changing the direction of the magnetic flux crossing it, for example, by turning a magnet around a wire coil. The operation of a magneto with a rotating magnet is based on this principle.
As the magnet rotates, the magnetic flux passing through the rod changes in magnitude and direction; As a result, an electric current arises in the winding, first in one direction and then in the other.
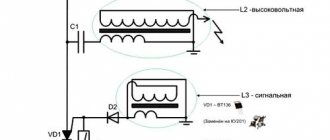
The capacitor serves to improve the operation of the magneto. With a capacitor, a strong spark is formed, without it, a weak spark is formed.
A capacitor is connected in parallel with the breaker contacts in order to reduce the sparking that occurs when the primary current is interrupted at the breaker contacts.
How does a magneto work?
When the magnet rotates, it excites a current in the primary winding, which is short-circuited by the contacts of the breaker.
When the current in the primary circuit reaches its maximum, the breaker contacts open. Because of this, the primary current is instantly interrupted. The magnetic field that was created by the primary current also disappears. This sudden change in the magnetic field excites a high voltage current in the secondary circuit, which can break the gap between the electrodes of the corresponding spark plug. Further rotation of the magneto rotor causes the formation of a new spark, etc.
How to check the technical condition of the magneto?
During everyday operation, the functionality of the magneto can be checked as follows: connect the high-voltage wire to the high-voltage terminal and hold the other end of the wire at a distance of 5-7 mm from the magneto body, sharply turn the rotor in the direction of rotation. In this case, a correctly assembled and adjusted magneto, when the rotor is sharply turned, should give a spark that ensures breakdown of the above gap. If there is no spark or it is weak, check the serviceability of the magneto and wire insulation.
SPECIFIC MALFUNCTIONS AND METHODS OF THEIR ELIMINATION
| Malfunctions | Probable Cause | Trouble-shooting |
| 1. Interruption of sparking | Contacts are oily or burnt | Clean the contacts with a chamois cloth soaked in clean gasoline or file the contacts if they are burnt |
| The gap between the contacts has not been adjusted | Adjust the gap | |
| The breaker lever cushion is worn out | Replace the breaker lever with a new one Adjust the gap | |
| The outline is out of adjustment | Adjust the gap | |
| Capacitor broken | Replace capacitor | |
| Magneto doesn't spark | Break in the primary or secondary circuit of the transformer | Replace transformer |
| Short to ground in primary circuit | Eliminate short circuit | |
| Breakdown of high-voltage wire insulation | Replace wire | |
| 3. Magneto gives a weak spark | Capacitor broken | Replace capacitor |
Disassembly and side magneto.
— remove the magneto from the engine; — clean it of dust and oil and disassemble it in the following order: — use a socket wrench to unscrew the nut securing the ignition timing automatic, remove it and remove the key from the groove; — move the latch aside, remove the breaker cover; — unscrew the four screws securing the cover, remove the cover; — remove the magneto rotor from the housing; — unscrew the transformer mounting pins and remove the transformer from the housing.
Reassemble the magneto in reverse order. To replace the breaker contacts, proceed as follows:
— move the latch aside, remove the breaker cover; — unscrew the screw securing the connecting conductor; — unscrew the screw securing the breaker plate to the magneto cover, remove the breaker plate; - Unscrew the screw securing the breaker spring; — remove the lock washer from the axis of the lever cushion, remove the lever with the cushion assembly from the axis; — unscrew the screw securing the contact post, remove the contact post from the axis.
Reassemble the breaker in the reverse order.
Luck with searching! But it’s easier to replace the magneto with a new one or send it to the service department (if there is a warranty, this can be done for free).
Basic malfunctions and their elimination
If you cannot start the saw the first time, there may be several reasons. Most often the problem is related to the spark plug:
- wear of the electrode or damage to the ceramic insulator;
- loose fit of the removable cap (if any);
- sparks flying along the ceramic winding, a sign of which is a brown residue on the outer shell;
- cracks in the spark plug cap (a saw with this problem will continue to work, but may cause pain to the user when touched).
If no problems were found with the spark plug, it is recommended to inspect the wires coming from the coil. They may be torn or have other mechanical damage. Wire breaks inside the insulation are possible, so sometimes these violations cannot be detected by visual inspection.
The cause of the breakdown may lie in the shutdown switches. It's easy to check them. To do this, you need to disconnect the wires from the module and then check the ignition. If a spark appears after switching off, the switch must be replaced.
see also
Comments 21
It’s normal for there to be so much dirt on the cylinder, how did you keep it cool? In general, the engine is not very good, weak and noisy, you need to install a Chinese one on it, but that will be a different matter)
We are made in the USSR. I borrowed a Chinese one from a neighbor as a replacement, I thought I wouldn’t be able to finish it - the cutters are small, everything bends and sag, I ate gasoline like an adult... We can’t beat the Chinese, we can’t)
I meant the Lifan 6 hp engine. It rushes at idle very confidently, judging by the reviews. And of course their cultivators themselves are so-so. I also have a mole with the original engine, only the piston on it died, it needs to be changed.
Adjusting the ignition: where to start?
If at one fine moment the chainsaw suddenly does not start and this is not the only such case, then adjusting the ignition of the chainsaw will be more useful than ever. It must be done in the following sequence:
Examine the spark plug for faults
Functional spark plugs are always dry. Having discovered that the spark plug is quite wet, you should turn your attention to the carburetor, malfunctions of which can lead to flooding of the spark plug part and prevent sparking. The presence of a darkish coating is a signal that there are problems in the cylinder-piston elements of the engine. If the previous check point did not give visible results, the next step is to check whether there is a spark
To do this, you need to move the cable coming from the spark plug towards the cylinder. When there is a small gap between these parts, a spark is sure to be released. If there is no spark, proceed to checking the voltage. Its absence can only mean one thing - the integrity of the wire has been compromised. If the high-voltage cable is in good condition, it is worth rechecking the ignition angle, because failure to comply with it may cause the spark to either “hurry”, appearing too early, or “lag”, not having time to ignite the fuel. After all, all leading experts emphasize that the adjusted gap between the flywheel and the ignition coil is the basis for the timely formation of a spark, and as a result, trouble-free engine starting and uninterrupted operation. Another option that needs to be taken into account, after checking and correcting all the previous points, is the spark plug itself, which could have worn out and require replacement with a new one. A benign spark from a new working spark plug looks like lightning. If it is dim, it is worth studying the quality of the spark in detail.
To do this, the high-voltage wire is connected directly to the spark plug. Next, the starter is started with jerky movements. Based on the results of observations, we can conclude whether the spark plug needs to be changed or not.
Neva walk-behind tractor engine
The main working unit of a walk-behind tractor is the engine. It is activated only by turning the key; if the Neva walk-behind tractor does not start, then there are several possible reasons.
No spark
In this case, it is necessary to check its functionality. Remove the spark plug from the engine and insert it into a special candle holder, and place the housing on the cylinder. Next, turn on the engine. If there is no spark, then you can replace the spark plug; if it does not appear, you should check the starting mechanism and ignition operation. Most often, it is the start button that fails; it can be replaced with a new one.
How to remove a candle correctly?
A special key is used to remove the spark plug. You must be careful, because the spark plug heats up during operation, so remove the spark plug before starting or after the walk-behind tractor engine has cooled down. We install a new one, and then check the clearance. It must be, but not big. The recommended lumen width is 0.5-0.6 mm.
Gasoline does not reach the engine
The second reason that the engine does not start is a problem in the supply of the fuel mixture. In this case, you should go through the complete gasoline delivery scheme. From the fuel tank to the carburetor.
- First check if there is fuel in the gas tank. It should not only be, but be 2-3 cm higher than the bottom, since the gas tank in the Neva walk-behind tractor is designed in such a way that fuel is taken at exactly this height.
- If there is fuel, you should check the operation of the gasoline intake valve. To do this, remove it from the hose and look, if gasoline flows out, then everything is fine, if not, you can clean the tap itself or replace it with a new one.
- Next, check the hose that connects the faucet to the carburetor. Remove it and try to blow it out. If air flows freely, it is functioning well. If not, clean it or replace it.
- And the last in this chain is the carburetor. Disassemble it and thoroughly wash all parts with 95 gasoline. Thanks to this, carbon deposits and impurities will be washed off. After completing the work, thoroughly blow all joints and joints with a compressor to minimize residual gasoline, which evaporates under air pressure. After this, put all the parts back together.
Diagnostics of the technical condition of the unit
As for diagnostics, it is carried out as follows:
- First you need to connect the high voltage cable to the voltage terminal.
- The second end of the cable should be kept at a distance of about 0.5-0.7 cm from the device body.
- In this position of the wire, it is necessary to sharply turn the rotor in the direction of rotation. If the magneto is adjusted, then as a result of turning the rotor, a spark should jump between the wire contact and the housing. If it is absent or too weak, barely noticeable, most likely the device needs to be checked for malfunctions and, if necessary, adjusted.
Adjustment features
Magneto adjustment is carried out if the unit cannot perform the functions assigned to it, while all elements of the mechanism are intact. The magneto is adjusted by measuring the gap between the contacts of the interrupter assembly, while the engine crankshaft should be turned by the flywheel. The shaft rotates until the contact divergence is greatest. Let's adjust the gap by loosening the bolt that secures the contact post and turning the post of holes, which is installed in the eccentric slot.
When the gap is adjusted, it is necessary to test the mechanism - this will determine the correctness of the process. If everything is done correctly, then sparking failures can be avoided.
Check the ignition coil on a chainsaw
If preliminary actions did not help in identifying the cause of the chainsaw malfunction, then it is necessary to check the ignition coil of the saw. Diagnostics is performed in several stages:
- Measure the coil resistance using a multimeter. To do this, you should know the optimal parameters, which are indicated in the operating instructions. However, due to the use of semiconductor elements in the system, if you try to “ring” the coil, the result will be an “Open Circuit” reading. This is fine. A sign of a malfunction is a positive test result. That is, if it was possible to determine the resistance of the coil using a special tool, then it is definitely faulty.
- Check for spark with a special device. This device should be installed in the open circuit located between the spark plug and the high-voltage terminal of the saw's ignition coil. The indicators will be visible on the display. This verification method is more often used in service centers, since the device required for this is expensive, and the costs will not be comparable to the benefits provided.
- Testing the coil using a spark plug, i.e. perform a homemade ignition. To do this, you need to unscrew it, and then attach the body to the cylinder. Now you need to pull the starter and watch for a spark. But this method only gives an approximate result, since the flywheel spins faster due to the unnatural position of the spark plug.
If none of these methods work, or if you need to check in the field, you can proceed as follows:
- Remove the cap from the candle, insert a nail without a head into the core at a distance of 6-7 mm from the cylinder. This must be done as carefully as possible so as not to damage the part.
- Perform the steps required to wind the tool. Now you need to look at the presence of a spark and its color. If there is no malfunction, the spark will be strong and the color will be bright blue.
This method can be used as a last resort and only if there are no electronic components, but it is important to follow the rules:
- Do not completely unscrew the spark plug, as this may cause the flywheel to rotate faster, which is not the correct engine operating mode;
- it must be located at a distance that corresponds to the compression model and dielectric properties of the fuel mixture, so this parameter can be found in the instructions (the value of 6-7 mm is average).
see also
Comments 21
It’s normal for there to be so much dirt on the cylinder, how did you keep it cool? In general, the engine is not very good, weak and noisy, you need to install a Chinese one on it, but that will be a different matter)
We are made in the USSR. I borrowed a Chinese one from a neighbor as a replacement, I thought I wouldn’t be able to finish it - the cutters are small, everything bends and sag, I ate gasoline like an adult... We can’t beat the Chinese, we can’t)
I meant the Lifan 6 hp engine. It rushes at idle very confidently, judging by the reviews. And of course their cultivators themselves are so-so. I also have a mole with the original engine, only the piston on it died, it needs to be changed.
I thought that I wouldn’t find a magneto, so many years have passed and there are plenty of them... Most likely there is a piston one too and it costs a penny.
What oil do you use to dilute gasoline?
While there was an M8, I diluted it with it, now for two-stroke engines - STIHL, I read that it was not very good, but there is no other way.
They gave me something in the store for 2-stroke engines - the engine doesn’t want to work for a long time! I used to pour anything - autol - diesel and it worked! Now the seals need to be changed!
I read about oil seals. If it’s necessary, then it’s necessary. What you like is that everything can be taken apart on your knee.))
Maybe it will be useful to someone. Although, it’s unlikely. Such equipment can’t be found now, only China is around)
Whoever needs it will take a look)))
That's for sure. I still have a boat motor left over from the old days - “Salute”. He also lost the spark about 10 years ago. Now I looked at the documentation, and there is the same magneto)) The capacitor, by the way, is working, the winding of the high-voltage coil turned out to be short-circuited. This is so true)
Here's how to even)) Resolder the capacitor and the boat motor can also work)))
The condenser is working, the coil has broken.) I don’t know what the boat has yet.
Let's hope then that one of the two will work out)
Must! If it does not work out. I’ll install a new one, the path is already trodden))
Chainsaw magneto friendship?
Magneto from "Mole". But, most likely, it went and goes into many two-stroke engines.
Visually, the Ural chainsaw magneto is very similar. If possible, write down the markings, and I’ll compare them with my chainsaw magneto, maybe they’re identical.
How to set the ignition on a chainsaw?
As is the case with the constant need to independently adjust the carburetor, a chainsaw used in a private household or on a forest floor must be amenable to timely adjustment of the built-in standard ignition. The essence of this procedure is to set the gap originally provided between the flywheel of the power unit and the standard ignition coil. The size of this gap may initially be different - it all depends on the purpose, as well as the design features of the saw. The average distance is considered to be no less than 0.2 and no more than 0.4 mm. If the correct clearance is not correct, the basic ignition system will not be able to generate the spark required to promptly ignite the fuel mixture in a timely manner.
The operator can adjust the ignition on the chainsaw directly in this order:
- First, you need to slightly loosen the plastic bolts designed to secure the standard ignition element;
- Next, the magnets provided on the flywheel will need to be connected to the factory coil;
- Then you need to install a homemade or previously purchased template between the base high-voltage coil and the built-in engine flywheel. After this, the coil fixing bolts will need to be tightened in the opposite direction;
- Next, the operator must carefully remove the template.
- Finally, you will need to spin the built-in flywheel. At the same time, you need to make sure that when rotating the element does not touch the coil and other parts of the chainsaw.
If for some reason adjusting the ignition of the chainsaw has led to constant contact of the flywheel, then it is necessary to inspect the antennae that fix it in its normal place. If they are deformed, the fasteners will need to be replaced.
What to do if there is no spark on the walk-behind tractor?
The causes of ignition system malfunctions in most cases are related to spark plugs.
Often the spark plug becomes oversaturated from too much engine oil. Once on the part, it prevents a spark from occurring. When the spark disappears, you need to act as follows:
- The spark plug is unscrewed with a special key. The element is turned and carefully removed; the sealing ring must also be unscrewed;
- If the spark plug is dry, this indicates that fuel is not supplied to the engine cylinder;
- If the spark plug is too wet, this indicates too much engine oil. The spark plug is wiped and the cylinder is dried. For this purpose, the starter cable is tensioned;
- If there is hard carbon deposits on the spark plugs, you can use gasoline and coarse sandpaper to clean it.
Such manipulations can be performed on a diesel walk-behind tractor and on gasoline models. It is important to carry out all actions as carefully as possible without damaging the part.
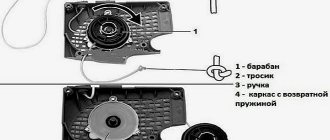
Starter device
Often, chainsaw manufacturers equip their units with starters that work on almost the same principle, namely: in a groove in the saw body there is a handle through which the cord is passed. When the handle is suddenly lifted, the cord is also pulled out, which engages the ratchet drum. Thus, a drum with spokes, which is located on the shaft, is activated. At this time, the crankshaft makes several revolutions, leading to compression of the fuel mixture, which at this moment is between the cylinder head and the piston. When the handle is lowered, on the contrary, the ratchet and the pins lose their contact, which leads to the shaft stopping.
As the power of the chainsaw increases, the amount of fuel mixture increases, which must ignite when the chainsaw is started. In this case, to start the engine, it is necessary to increase the number of pulls on the starter cord. To speed up the return of the drum mechanism, manufacturers use a special steel starter return spring, which has excellent elasticity.
If the spring breaks, you must: remove the mechanism cage, pull out the spring, fixing its upper part with your finger and slightly pulling the starter handle to the side
Then, wind the new part, while avoiding kinks and twisting of the new spring element, then carefully fix the clip
Engine system malfunctions during startup
If, when checking the spark plugs, they turn out to be wet, i.e. fuel flows normally, but the engine does not start, the problem may be the following:
- Ignition system failure:
- Air leaks through carburetor seals, spark plugs, plug and cylinder heads, as well as carburetor and engine cylinder connections.
If depressurization of connections is detected, it is necessary to tighten the mounting bolts, tighten the spark plugs and check the integrity of the gaskets between the spark plug heads and the cylinders.
- Incomplete closing of the carburetor air damper.
To eliminate this problem, it is necessary to ensure free movement of the damper by monitoring the quality of the drive. If jams are detected, they must be eliminated.
Compression failure and carburetor problems
It happens that the launch is carried out, but the process is significantly difficult. At the same time, the engine of the walk-behind tractor is extremely unstable and cannot develop sufficient power for normal operation.
The reason for this may be loss of compression, which can be identified by:
- carbon deposits on the working surfaces of valves, as well as cylinder block seats;
- intake valve deformation;
- wear of piston rings.
In order to restore compression, you must:
- Check the technical condition of the engine gas distribution mechanism, clean the parts contaminated with carbon deposits, and if there are defects, replace them.
- Check the condition of the piston rings and replace faulty components.
If during engine operation black smoke comes out of the muffler, and excess oil is detected on the electrodes of the spark plugs or they themselves are covered with soot, this means that:
To resolve this issue you should:
- adjust the carburetor;
- replace a leaky valve;
- replace worn piston rings;
- Clean or replace the faulty air filter.
If, when the engine is running, light smoke comes out of the muffler, and the electrodes of the spark plugs are dry and covered with a white coating, this means that a lean fuel mixture is entering the carburetor. This problem is eliminated by adjusting the carburetor.
The procedure for checking and adjusting the correct operation of the engine
The most vulnerable element of a carburetor engine is the spark plug. It also allows us to judge the probable causes of malfunction of individual components of a gasoline engine. The following procedure is recommended.
- Remove the spark plug and inspect it. A dry spark plug with a slight brown tint to the electrodes can be considered serviceable.
- If traces of fuel are found on the spark plug, you should check the operation of the carburetor, which releases an excess amount of gasoline into the cylinder by filling it. The presence of dark deposits indicates probable changes in the geometry of the cylinder or piston.
- If the appearance of the spark plug does not reveal any deviations from the norm, check the functionality of the electrical circuit. First, the high-voltage cable that supplies voltage to the spark plug is brought with a small gap to the cylinder and the starter cord is set in motion. In this case, a breakdown spark should occur. Its absence may indicate a cable malfunction. In this case, it is checked with a tester and replaced with a serviceable one if it is found to be broken or damaged insulation.
- If the high-voltage cable is in good condition, you should check the ignition coil and the wire going to the shutdown button. If a visual inspection does not reveal obvious damage, you need to ring the ignition coil, comparing the tester readings with the characteristics specified in the chainsaw operating instructions. If a malfunction is detected, you will have to replace the entire unit with a similar one.
Chainsaw ignition coil
When installing a new electrical module on the engine, the magneto clearance should be adjusted. The optimal distance between the flywheel and the ignition coil is 0.2-0.4 mm for most chainsaws.
Gap between magneto and flywheel
With such a small gap, it will not be possible to use the available measuring tool for direct measurement. In practice, for the Husqvarna saw, a template is used in the form of a spacer, cut from a thin and flexible sheet material of the required thickness. It is clamped in the space between the flywheel and the coil when installing it, and then pulled out.
To avoid the need to adjust the ignition, operate the tool carefully, avoiding impacts. In particular, this applies to chainsaws with electronic chips in the ignition system, as they are very sensitive to mechanical damage.
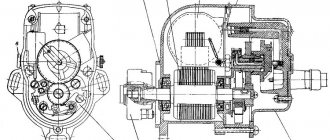
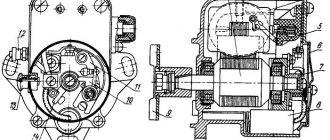
Installing magneto T-170 on the starting engine
Disconnect the spark plug wire and remove the spark plug from the first cylinder (closest to the magneto). Determine the compression stroke in this cylinder; Rotate the engine crankshaft using the starting handle, covering the spark plug hole with your finger until compression is felt in the cylinder. Continuing to rotate the crankshaft, align mark B (Fig. 115) “Clamp” on the flywheel rim with mark A (mark) on the clutch housing hatch.
On the magneto, unscrew the two screws 9 (see Fig. 113) and remove the screen together with the distributor cover 14. Install the driver 1 (Fig. 116) in the position corresponding to the moment of spark formation on the first electrode (the driver is turned to the left towards the number “1”, stamped on the screen cover).
In this case, slot B on the starting accelerator housing, in which the end of the spring is fixed, should be on the left side, when looking at the magneto mounting flange, and the axis of cams 2 of the starting accelerator should pass beyond the vertical axis of the magneto at an angle K equal to 5.10° direction of rotation (in the direction of arrow C). In this position, install the magneto with a flange gasket on the bracket studs, inserting the cams of the starting accelerator into the grooves of the magneto drive shaft, and secure, without tightening, with nuts. Then, without changing the position of the flywheel (the “Clamp” mark is aligned with the mark on the hatch of the clutch housing) and turning the magneto body in one direction or another along the grooves in the flange, set the breaker contacts 25 and 26 (see Fig. 113) to the beginning of opening , then finally secure the magneto. The beginning of contact opening corresponds to the coincidence of the mark on the cam with the arrow of the distributor plate.
The moment the opening begins is precisely determined by an electrical device, in the circuit of which the movable 25 and fixed 26 contacts of the magneto breaker are connected in series. Replace the fixed contact with ground.
A break in the electrical circuit of the device will indicate the moment the contacts begin to open. The control light in the device circuit will go out.
If such a device is not available, determine the moment when the opening begins using a piece of tissue paper inserted between the contacts.
When the contacts open, the tissue paper is freely removed.
After setting the ignition timing and securing the magneto housing to the flange with nuts, install and secure the screen assembly with the distributor cap to the magneto.
Insert the wires into the distributor sockets.
The ends of the wires must be cut straight, and the wire cores must not protrude from the rubber insulation. Insert the ends of the wires into the output channel so that the needle enters the middle of the wire and the end of the wire touches the bottom all the way. Otherwise, a spark may break through to ground. Secure the inserted wires with clamp nuts.
Connect the wires coming from the distributor to the engine spark plugs: the wire from terminal “1” (see Fig. 116) of the distributor to the spark plug of the first cylinder (closest to the magneto), and the wire from terminal “2” to the spark plug of the second cylinder. The numbers are stamped on the magneto screen cover.
The gap between the spark plug electrodes is 0.6. Adjust 0.7 mm by bending the side electrode.
Make sure that the massaging device for the additional output is in good working order: the contact (cap) of the output should be pressed by a spring to the magneto cover. It is not allowed to operate a magneto with an additional terminal that is not massed, as this will cause failure of the magneto.
Connect to the remote terminal 29 (see Fig. 113) of the magneto ignition switch off the wire going to the VK-403 switch (see Fig. 211) of the locking mechanism, gearbox, and the wire going to the ignition switch button on the instrument panel.
Warning
After installing the magneto, make sure that the gearbox locking system is in good working order: when moving the range and reverse lever (right gearbox lever) out of the neutral position, the VK-403 switch should close the remote terminal of the magneto to ground, and the magneto should not produce a spark between the electrodes of the spark plugs starting motor.
How to set the ignition on a chainsaw?
As is the case with the constant need to independently adjust the carburetor, a chainsaw used in a private household or on a forest floor must be amenable to timely adjustment of the built-in standard ignition. The essence of this procedure is to set the gap originally provided between the flywheel of the power unit and the standard ignition coil. The size of this gap may initially be different - it all depends on the purpose, as well as the design features of the saw. The average distance is considered to be no less than 0.2 and no more than 0.4 mm. If the correct clearance is not correct, the basic ignition system will not be able to generate the spark required to promptly ignite the fuel mixture in a timely manner.
In order to initially correctly set the appropriate gap between the flywheel and the ignition coil on a chainsaw, its owner will need a special plate template. However, buying it for one-time use is not always profitable. In some cases, the template can be replaced with a homemade one. To make it, the operator will need a smooth plastic bottle, from the side of which a thin strip must be cut. In this case, there should be no embossing on the homemade template.
The operator can adjust the ignition on the chainsaw directly in this order:
- First, you need to slightly loosen the plastic bolts designed to secure the standard ignition element;
- Next, the magnets provided on the flywheel will need to be connected to the factory coil;
- Then you need to install a homemade or previously purchased template between the base high-voltage coil and the built-in engine flywheel. After this, the coil fixing bolts will need to be tightened in the opposite direction;
- Next, the operator must carefully remove the template.
- Finally, you will need to spin the built-in flywheel. At the same time, you need to make sure that when rotating the element does not touch the coil and other parts of the chainsaw.
If for some reason adjusting the ignition of the chainsaw has led to constant contact of the flywheel, then it is necessary to inspect the antennae that secure it in its normal place. If they are deformed, the fasteners will need to be replaced.
This is interesting: Chainsaws Solo (Solo): models, their characteristics, features
Why does the Cascade walk-behind tractor have no spark?
Auto mechanic, specializes in agricultural equipment
If there is no spark, then the entire electronic ignition circuit of the Cascade walk-behind tractor should be checked. The walk-behind tractor itself is one of those equipment options that require ignition adjustment. Why there is no spark on the walk-behind tractor may depend on various factors. For this reason, you will need to configure the entire ignition system step by step.
How to check a chainsaw magneto
The magneto, spool, module is the ignition coil. It may have absolutely nothing to do with tool failures, and the reason may be hidden only in a gap or something else. But in some cases it is precisely this that becomes a factor in the violation.
To check the woman itself, you should, as in the case described above, use the method of excluding components from the chain. Or in other words:
- visually assess the condition of the bobbin body for cracks and other visible defects;
- check the cleanliness of current communications of various components and elements;
- diagnose the insulation and serviceability of armored wiring, reliability of fastenings, absence of rust, etc.;
- visually assess the condition of the spark device cap;
- checking the serviceability of the spark plug;
- diagnostics of the circuit breaker, which is especially important for Chinese-made chainsaws.
Again, as in the case described above, certain items are excluded from this chain, thereby identifying the cause of the problem.
The woman herself is examined in this way.
- The resistance of the magneto is measured. However, this option is not always applicable, since you first need to know the resistance parameters. In addition, to form the required explosive pulse, it is necessary to separate the indicators of various semiconductor elements. A sign of a problem, as a rule, is the ringing of the circuit through the explosive wire and the negative wire. It should show either an “open circuit” or high resistance.
- The check can be done this way - use a device that checks for the presence of a spark. It is installed in the open circuit between the BB wire and the spark plugs. The disadvantage of this method is that the device is very expensive and is mostly used in serious repair services.
- The “old-fashioned” method of testing, which will allow you to save on an expensive device. Use at your own risk when there are no other options. The method of checking is to remove the cap from the candle and insert a nail into it. The candle is reinserted. The nail should be located at a distance of 6-7 mm from the cylinder. The chainsaw starts. The spark is examined: it should be bright blue, if not, then this is a sign of a problem with the woman.
The “old-fashioned” method of checking a woman has many disadvantages. First of all, this concerns electrical components in the system, which can easily deteriorate. The distance between the cylinder and the nail may vary depending on different models of the tool.
As for setting up the magneto, it comes down to examining the groove on the flywheel. The OZ of most current saw models does not need to be adjusted. But its exposure can only be determined by the angle between the mark after the groove on the flywheel and the magnets installed, again, on the flywheel.
Correctly and accurately setting the gap between the magneto and the flywheel is what is most important.
You should know that the head on chainsaw systems is installed in the fan fuselage near the flywheel. The coil, in contact with the magnetic field of the flywheel, produces energy for the spark.
Replacing the coil itself will be much more difficult, since the installation location is too inconvenient. The installation of the new reel should be carried out so that the base of the reel is at a distance of 1-1.5 mm above the flywheel magnets.
In some cases, it is recommended to also check the crankshaft bearing for play.
- Absolutely legal (Article 12.2);
- Hides from photo and video recording;
- Suitable for all cars;
- Works through the cigarette lighter connector;
- Does not cause interference to radios and cell phones.
How to convert a magneto from left rotation to right rotation?
Single cylinder magneto left
to change
to - remove the cam and turn it the other way around. Only then you need to set the outline correctly, I think it’s 10 degrees there (exactly what’s written in the smart book).
Interesting materials:
Why is there high blood pressure in the morning? Why does the face get bigger with age? Why does the shape of the nose change with age? Why is one side of the moon visible from the earth? Why is sugar bad for men? Why does a female praying mantis eat her male? Why does the female praying mantis eat? Why do female praying mantises bite off their heads? Why do female praying mantises eat males? Why do planes take off and land against the wind?
Chainsaw ignition systems
Not too many years ago, the ignition systems used in professional saws were cam driven. They were heavy, complex, expensive and prone to all sorts of problems - especially on rainy days. Even when the saw "had a spark," it was often difficult to start. Some saws barely produced enough power to produce a flash at rpm. And constant jerking of the starter handle was the norm.
Today's systems are small, lightweight, and rugged. Compared to earlier ignition systems, they are almost trouble-free. A modern reel is professional and almost always lasts the entire service life of the chainsaw. While changes to ignition systems have been major, operational problems can sometimes occur. Often these problems are easy to fix yourself and do not require a trip to the repair shop for expensive repairs.
What to pay attention to when starting the engine is difficult?
When ignition problems arise, one of the first points for inspection is the spark plug.
Look for damage to the ceramic insulator or signs of wear on the electrode. If the candle has a removable cap, make sure it fits snugly
Next, look at the wires leading from the coil to see if there is a break or damage to the insulation. Motor vibration can cause wires to rub against each other or another component. When friction occurs, even the most durable insulation suffers.
A switch wire that has been rubbed long enough can cause the same effect as the switch when the saw is turned off. In other words, close the coil control wire.
Other problems arise when wires run between parts of the saw's anti-vibration system. Constant bending and stretching can eventually lead to their destruction. Sometimes these breaks are not obvious because they occur within the insulation. A break is sometimes difficult to find because the wire may look perfect on the outside.
The spark plug wire should also be checked. Sometimes the spark plug cap can cause problems. A visible sign of trouble is a brown or burnt residue on the outer ceramic of the spark plug. This is a sign that the spark is traveling along the outer ceramic winding of the spark plug. At this time, the saw can work, but the operation will be unstable and currents will flow.
Check the spark plug cap for integrity and cracks. If the spark plug wire cap is damaged, the saw may still operate, but may give the operator an unpleasant painful shock if he approaches it. In the photo above, keep an eye on the wire and cap. There is also a failure of the transistor, which is embedded in the cap, on some models of saws.
In the saw's ignition system, the shutdown switches often fail; they can be checked. Disconnect the switch wires from the module and check the ignition. Sometimes a switch causes it to be permanently "off." If you have spark after tripping the breaker, replace it and test the saw.
The sheath on this wire is worn, showing wear at the moving parts. All wires are susceptible to damage from vibration and should be checked from time to time.
Constantly check the wires, they should not be tight or broken, and the wires should not come into close contact with vibrating parts.
Motoblock structure, engine diagram
The design of the carburetor of the Cascade walk-behind tractor is shown in Figure 2.
- The engine should warm up;
- The throttle position is then changed using the adjusting screw;
- After this, the idle speed is reduced to a minimum, the operator must achieve a uniform engine sound;
- In addition, the maximum and minimum engine speed are adjusted three to four times until the sound is smooth and stable at the selected damper position.
Ignition of the Cascade walk-behind tractor
Sometimes the problem with starting and operating a walk-behind tractor lies in the ignition itself. The ignition of the Cascade walk-behind tractor is adjusted depending on the type of engine. Instructions are given for each engine, so it is necessary to study it in detail.
- The engine starting mechanism - the starter - is designed to unwind the crankshaft.
- The electronic ignition system ensures continuous spark generation at the spark plug.
READ What kind of oil is poured into the walk-behind tractor
Basic recommendations for regulating / operating the ignition of a cascade walk-behind tractor:
- Use these types of spark plugs BP6ES, BPR6ES (NGK) or NHSPLDF to avoid soot formation;
- Carry out spark arrester maintenance every 100 operating hours (removing soot on the strainer);
- The idle speed for the Cascade walk-behind tractor engines is 1700 (-150) rpm.
Motoblock gearbox Cascade
The gearbox is mechanical, chain. The clutch and gearbox are the main components of the transmission and are often located in a special unit.
The output shaft of the reinforced transmission is located on large diameter bearings, which are resistant to mechanical damage and the negative effects of various vibrations.
Figure 3. Diagram of a cascade gearbox
Gaskets (cuffs) of the Cascade walk-behind tractor
Seals provide sealing of the engine, protect against engine oil leakage and are installed in special places in the rotating parts of the engine. The oil seal is installed on the shaft, and the working edge is close to the working surface of the shaft. The oil seal can be replaced yourself.
The replacement process is very simple:
- The knives are removed from the shaft and cleaned of dirt and dust, then the cover mounting bolts are removed, and the cover itself is removed.
- The worn oil seal is then removed, replaced with a new one, and sealant is applied to the connector.
- Dimensions of "Cascade" gaskets: 42/28/7 (30 mm shaft).
- Gearbox bearing of the Cascade walk-behind tractor, size 941/20 (262014 mm).
- The clutch of the Cascade walk-behind tractor is dry type. The clutch mechanism works by tensioning V-belts.
Cascade walk-behind belts - tension, dimensions, tension rollers
The cascade device has two types of belts: forward and backward. Type of front belts: A-1180 or A-1213 according to GOST 1284; Reversible belt type: A-1400. The "A" value is 13 mm. Diameter of tension rollers: outer - 92 mm, inner - 12 mm.
Source
Today, more and more people are using tractors on their sites. This is not surprising, because with the help of this technology you can do absolutely everything: plow the land, plant and harvest potatoes, transport goods and even remove snow. However, like any other car, walk-behind tractors sometimes break down and need repairs.
In this article we will look at the ignition system of a walk-behind tractor, types of breakdowns, methods for eliminating them, as well as the process of ignition control. And if the cause of the malfunction is discovered, eliminating it will not be difficult.
Instructions for disassembling and assembling magneto
To repair the magneto, it must be dismantled and disassembled; to do this, follow these steps:
- First, the device is removed from the power unit.
- The assembly must be thoroughly cleaned of dust, as well as traces of motor fluid, if any. The magneto will be dirty, so it needs to be cleaned. Do not allow dirt to get on the internal elements when disassembling the device.
- The next stage will be analysis. Using a socket wrench, you need to unscrew the nut that secures the ignition timing device. Dismantle this element, and then remove the key from the groove.
- Then move the latch slightly to the side, after which you can remove the cover of the interrupter assembly. To remove it, you need to unscrew four more bolts that secure it.
- Once the cover is removed, the rotor can be removed from the housing itself.
- The final step will be to unscrew the pins that secure the transformer assembly. Having done this, the transformer can be removed from the housing. Thus, you have access to the constituent elements of the magneto. Now the mechanism is being repaired with the replacement of all failed components. For further assembly and installation of the magneto, all the steps described above will need to be repeated in reverse order.
Magneto, or in search of a spark
Magneto is a magnetoelectric alternating current generator that creates electrical discharges between the electrodes of the spark plug to ignite the working mixture in the cylinders of internal combustion engines.
The operation of a magneto is based on the principle of electromagnetic induction.
The essence of induction is as follows: when a magnetic field is crossed by a closed conductor, an electric current arises in this conductor. When electric current passes through a conductor, a magnetic field is created around that conductor.
Magnetic field is the space around a magnet in which magnetic lines of force (or magnetic flux) pass. These lines are located denser between the poles of the magnet.
Alternating current can be excited in a conductor by rapidly changing the direction of the magnetic flux crossing it, for example, by turning a magnet around a wire coil. The operation of a magneto with a rotating magnet is based on this principle.
As the magnet rotates, the magnetic flux passing through the rod changes in magnitude and direction; As a result, an electric current arises in the winding, first in one direction and then in the other.
The capacitor serves to improve the operation of the magneto. With a capacitor, a strong spark is formed, without it, a weak spark is formed.
A capacitor is connected in parallel with the breaker contacts in order to reduce the sparking that occurs when the primary current is interrupted at the breaker contacts.
How does a magneto work?
When the magnet rotates, it excites a current in the primary winding, which is short-circuited by the contacts of the breaker.
When the current in the primary circuit reaches its maximum, the breaker contacts open. Because of this, the primary current is instantly interrupted. The magnetic field that was created by the primary current also disappears. This sudden change in the magnetic field excites a high voltage current in the secondary circuit, which can break the gap between the electrodes of the corresponding spark plug. Further rotation of the magneto rotor causes the formation of a new spark, etc.
How to check the technical condition of the magneto?
During everyday operation, the functionality of the magneto can be checked as follows: connect the high-voltage wire to the high-voltage terminal and hold the other end of the wire at a distance of 5-7 mm from the magneto body, sharply turn the rotor in the direction of rotation. In this case, a correctly assembled and adjusted magneto, when the rotor is sharply turned, should give a spark that ensures breakdown of the above gap. If there is no spark or it is weak, check the serviceability of the magneto and wire insulation.
SPECIFIC MALFUNCTIONS AND METHODS OF THEIR ELIMINATION
| Malfunctions | Probable Cause | Trouble-shooting |
| 1. Interruption of sparking | Contacts are oily or burnt | Clean the contacts with a chamois cloth soaked in clean gasoline or file the contacts if they are burnt |
| The gap between the contacts has not been adjusted | Adjust the gap | |
| The breaker lever cushion is worn out | Replace the breaker lever with a new one Adjust the gap | |
| The outline is out of adjustment | Adjust the gap | |
| Capacitor broken | Replace capacitor | |
| Magneto doesn't spark | Break in the primary or secondary circuit of the transformer | Replace transformer |
| Short to ground in primary circuit | Eliminate short circuit | |
| Breakdown of high-voltage wire insulation | Replace wire | |
| 3. Magneto gives a weak spark | Capacitor broken | Replace capacitor |
Disassembly and side magneto.
– remove the magneto from the engine; – clean it of dust and oil and disassemble it in the following order: – use a socket wrench to unscrew the nut securing the ignition timing automatic, remove it and remove the key from the groove; – move the latch aside, remove the breaker cover; – unscrew the four screws securing the cover, remove the cover; – remove the magneto rotor from the housing; – unscrew the transformer mounting pins and remove the transformer from the housing.
Reassemble the magneto in reverse order.
To replace the breaker contacts, proceed as follows:
– move the latch aside, remove the breaker cover; – unscrew the screw securing the connecting conductor; – unscrew the screw securing the breaker plate to the magneto cover, remove the breaker plate; – unscrew the screw securing the breaker spring; – remove the lock washer from the lever cushion axis, remove the lever with the cushion assembly from the axis; – unscrew the screw securing the contact post, remove the contact post from the axis.
Reassemble the breaker in the reverse order.
Luck with searching! But it’s easier to replace the magneto with a new one or send it to the service department (if there is a warranty, this can be done for free).
Other common engine starting problems
What to do if the walk-behind tractor engine operates intermittently and does not develop the required power? There may be several reasons for this behavior:
- Air filter clogged.
Air does not enter the carburetor, which means the fuel does not burn well - the filter will have to be cleaned or replaced.
- Muffler clogged.
Residues of fuel, as well as the products of its combustion, form a thick coating on the internal walls of the muffler, which must be removed.
- Carburetor clogged.
In this case, the assembly will have to be removed, disassembled and all its components properly cleaned. After this, the carburetor must be assembled and adjusted correctly.
- Wear of the cylinder-piston group.
Temperature and high loads take their toll, and even the strongest metal wears out and deforms over time. Such parts should be replaced immediately, otherwise you may pay for it with irreparable damage to the engine itself.
- Broken ratchet housing or ratchet
The presence of this problem is indicated by the absence of crankshaft movement when starting the engine. To replace the clutch housing and ratchet, you will have to completely disassemble the starting unit.
- Loosening the screws securing the starter housing to the engine housing.
If the starter cord does not return to its original position, the starter needs to be adjusted. To do this, the screws are loosened, and the position of the knot is set by hand so as to ensure normal return of the cord.
- Broken starter spring.
A fairly common reason for the starter cord not returning is the failure of the starter spring - it will have to be replaced.
Competent maintenance of its main units and components significantly increases the service life of any equipment. Efficiency of replacement of worn-out spare parts is also of great importance. Therefore, if the slightest failures or malfunctions occur, they should be addressed immediately - in the end, this will prevent much more serious and expensive problems.