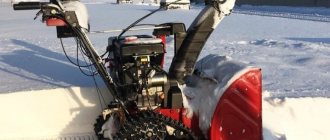
A snow blower is a type of equipment that becomes very popular in winter. Summer residents and owners of private housing construction especially need it. To ensure that your equipment does not fail during heavy snowfalls, it must be prepared for winter in advance. Preparation consists of a preventive inspection of the unit to identify possible malfunctions. If they are found, then in most cases, repairing the snow blower yourself is quite possible. Below we will discuss typical malfunctions of a snow blower and methods for eliminating them yourself. But first you should familiarize yourself with the internal structure of the equipment.
Construction of snow removal machines
To learn how a snow blower works, you must first understand what it consists of. The main elements are several parts.
An engine that has a 4-stroke motor. These engines are pre-adapted to winter frosts with a temperature of -31 degrees. In most cases, motors from famous companies such as Briggs & Stratton, Tecumseh are in demand.
If there is no air filter in the snow blower, then this is a characteristic sign of a winter engine, since the filter can become clogged with snow, freeze and turn into a plug. The snow blower must not be used all year round, as the device can be damaged not only by winter dust, but also by regular dust. A sleeved motor is considered repairable; it is installed on professional snowplows.
The gasoline model has a manual starter with a cord. Low-power machines have a manual start, while more powerful ones have an electric starter. The electric starter itself has two types - powered from a household electrical network and from an on-board battery. The first option can be started by connecting the motor to a power outlet and pressing the button. To start a cold engine, you will need an electric starter.
Snowplows can be self-propelled or non-self-propelled. Snowplows are often equipped with a manual transmission. Some models have CVT and hydrostatic transmissions with different numbers of speeds. Snow blowers have 5 gears in the front and one gear in the rear.
The edge of the screws can be of two shapes: serrated and smooth.
The 2-stage snow blower has a strong, powerful auger. Its function is to crush stuck together lumps of snow; and it can also push snow to the center of the bucket, where the snow discharge to the impeller is located. The impeller itself will not be able to crush the snow. Its task is to set the speed for incoming snow. The snow is thrown aside.
In single-stage types, the augers may touch the ground during rotation, so they are made of metal or rubber plastic. Thanks to the rubber-plastic material, the auger will easily withstand collisions with pebbles; will not be able to break or become deformed. And a screw made of metal may break in this case.
The tires are branded with an X and V tread pattern. These tires have good grip.
The outlet chute can have two options: metal and plastic. Metal has virtually no vibration. It is more durable and accurate for throwing snow. But a plastic gutter prevents snow from sticking to the device, costs much less and will not rust.
The gearbox can transmit torque from the shaft to the augers. Support skis provide good glide. They hold the front of the device. They can be adjusted in height by setting the degree of snow removal. There are double-sided skis that can simply be turned over when worn. The scoring knife, which is located at the bottom of the bucket, should not touch the ground.
Snow blower chassis come with wheels or tracks. Wheels move without turning on the engine. The tracks are more resistant to ice and slopes. The frame may include circular cross-section tubes. There are brands with rectangular tubes, they can ensure the strength of the device.
Snow blowers also have the necessary lights, which are charged using an on-board generator. All snow blowers have a control program with which you can adjust the engine speed, turn on or off the gear and wheel drive, you can adjust the height, direct the snow discharge, and so on.
To set the direction, you need to rotate the outlet chute. Ordinary models have a handle for this purpose. You can often find a worm gear. To make a turn, you need to twist a special handle.
It is very rare to find snow blowers that have an electrically driven directional control design. Professional machines have levers that are located on the panel. Using such a lever, you can change the height without interrupting the movement.
How to disassemble a snow blower with your own hands
Regardless of the reliability and quality of the snow blower, its owner should carefully study the design and be able to repair the unit.
This will help save a lot of time and money.
Moreover, the owner will always know that he installed a really high-quality part, and he was not deceived during the service.
How to repair snow blowers and what breaks most often
Each owner should be able to independently repair a snow blower, because most often this equipment is used in country cottages or houses where it is not always possible to get to a service center.
The power of such a device is just enough to remove snow from the area near the house, without having to practice with a shovel every day.
Before you start repairing a snow blower, it is worth studying its structure and understanding the most common types of breakdowns that you can fix yourself. After all, many need professional intervention.
Construction of snow blowers
Equipment may vary in technical characteristics, type of engines and movement.
However, every snow blower has a few parts that are similar to other machines. This allows us to identify a standard set of main constituent elements, including:
- Power unit. A snow blower can have an electric or gasoline engine. The first is distinguished by its efficiency, and the second has high power.
- Ladle. The bucket contains a screw shaft, which acts as the main mechanism for removing snow. The width of the bucket affects the width of the strip the snow blower can process at one time.
- Screw mechanism. This unit contains a metal shaft on which there are screw parts located with screws closer to the center of the shaft. They are the ones who shovel the snow closer to the middle, and there the shovel pushes it into a specialized chute.
- Outlet chute. Made in the form of a pipe that throws snow at a stated distance. It can be made of metal or plastic.
- Chassis. Most often, the equipment has wheels, but there are machines on tracks.
- Handle with other controls. The clutch is located just near the operator, there is also a switch that directs the chute and other buttons with levers that help control the unit.
- Rotary mechanism. Some models have an impeller that further crushes the snow before sending it into the discharge chute.
Of course, this is not the entire list of components of a snow blower. Some models are equipped with additional elements, but these are not particularly important when considering the overall concept.
The most common breakdowns
Any breakdown is the result of improper operation of the equipment by its owner, so any spare part or component can break.
Common snow blower problems
Each of the breakdowns of a snow blower is a direct result of the owner’s improper handling of the unit.
As a rule, this is due to the lack of desire on the part of the owners to carefully study the operating instructions for the machine. Less often, the cause of the breakdown lies in the manufacturing defects of the snow blower elements. Be that as it may, there are a number of typical breakdowns characteristic of each unit, regardless of its design and manufacturer. These include:
- Shear Bolt Breakage – Snow blowers are designed with soft metal screws. They play the role of fastenings for screw elements. The main task of shear bolts is to protect the engine, rotor mechanism and other machine parts from mechanical damage. When the unit hits an obstacle, the shaft stops and the screws themselves are cut off. Shear bolts are consumables, so it is better to always have several of these fasteners in reserve. Experts do not recommend screwing in regular bolts instead, as this will lead to complete breakdown of the snow blower;
- Malfunction of belts - they are also consumables, which is why the owner of a snow blower should always have at least one belt in reserve. During operation of the unit, the belt wears out quickly, which leads to its breakage. As a result of this, the engine of the unit does not start;
- Friction disc failure - this element is responsible for the movement of the entire wheelbase of the unit. During its rotation, it transmits the force of the motor to the wheels through gears. With a sharp increase in loads, the friction ring may break, causing the unit to lose its ability to move.
As a result of the above breakdowns, the snow blower does not start or does so with very great effort. Fortunately, fixing each of these problems is quite simple with your own hands. To do this, you will need to study the design of the unit, described in the instruction manual, and also know the correct procedure for repairs.
Friction disc for a snow blower - making the part yourself
Buying a new friction disc for a snow blower will not entail significant financial costs. However, many craftsmen make friction discs from improvised materials. It should be noted right away that the homemade part must be perfectly flat, which can only be achieved after prolonged work with a file. The procedure for making a friction disc is as follows:
- First, find a workpiece made of aluminum or any other soft metal - such a product will be easier to process;
- Cut a circle along the outer contour of the old friction ring from a metal blank. It will not be possible to do this perfectly evenly with the help of a grinder, so all irregularities will have to be processed with a file;
- The most difficult step in making a friction ring for a snow blower is making a straight hole inside the disc. You can use a drill for this. Drill several small holes in the center of the workpiece with a thin drill, which should be located next to each other. Carefully cut off the jumpers that remain between the holes using a chisel. This way, the excess parts of the disk will fall off, and you will be left with a ring with a lot of jagged burrs that will need to be removed with a file.
After making a snow blower disc, you will need to put a rubber seal on its edges. Find a ring that has the appropriate diameter and pull it onto the finished product. To ensure that the seal sits firmly on the disk, use “liquid nails” glue.
Installation and testing of a homemade friction disc is carried out in the same order as in the case of a factory disc. After practicing making disks, you can continue to install homemade parts on your snow blower, saving a good amount of money.
Types of gearboxes in snowblowers
The torque of the snow removal unit created by the motor is transmitted to the working parts using a power take-off shaft and a V-belt drive. A gearbox located near the machine engine is attached to the shaft via a screw mechanism. In this case, snow removal equipment can be equipped with two types of gearboxes:
- Serviceable gearboxes - mechanisms of this type require periodic disassembly for partial or complete maintenance. Such elements have a longer service life; their components are made of bronze, due to which the gear of the snow blower gearbox is much less susceptible to wear;
- Maintenance-free gearboxes - such units do not require maintenance, but at the same time they cannot be repaired. In case of any malfunction, the mechanism must be removed and thrown away, and a new part installed in its place.
Gearboxes of the second type are equipped with cheaper models of snowplows - units made in China and Korea. Mechanisms of the first type are used in equipment of European, Japanese and American brands.
How the snow blower works
When making repairs yourself, it is important to understand the operating principle of a snow blower (another name for a snow blower), which consists of the following sequence of operations:
- After starting the unit, the internal combustion engine built into it rotates the rod with blades, or rather the auger.
- When the unit moves, the auger mechanism “rakes in” the snow and delivers it to a hopper with a powerful impeller placed there.
- With its help, the snow mass is thrown away from the route of movement.
Please note: Some snow blowers are equipped with additional devices that make the operation of cleaning equipment much easier.
Before you repair a battery-powered snow blower with your own hands, you should carefully familiarize yourself with the most common breakdowns of this simple mechanism.
Instructions
Over time, everything breaks down. Any technique has a limit of strength and does not work forever. As for the Patriot, Champion, Honda, and Foreman snow blowers, some of their components are specially prepared so that breakdowns of special simple parts occur in them.
Shear bolts
Thanks to this, you can keep all important parts intact. This part, the shear bolts, is the second consumable of the snow blower, after gasoline.
The shear bolts are made in such a way that they come off on their own in the event of excessive load on the auger. In this case, the gearbox will remain intact, and the bolts just need to be replaced. But you won’t learn to buy them all the time for reasons of economy.
Shear bolts
The cost of the kit, although not very large, becomes very noticeable when the consumption is high. Therefore, you should seriously think about how to make shear bolts for a snow blower with your own hands.
To do this, you need to take bolts of the required diameter, be sure to note that the diameter of the bolt is the same along the entire length, this is important, and simply transfer the dimensions of the original shear bolt to the workpiece. Next you just need to make grooves in those places where they are on the original bolts
In principle, not a difficult operation, but useful for the wallet
In principle, not a difficult operation, but useful for the wallet.
Caterpillars
As for the tracks for snow blowers MTD, Huter, Kraftsman, Stig, much more tools and consumables will be required. But the result will still be beyond praise. One simple option is to make tracks from an old tire.
Its main advantage is that the result is a closed circuit, which means durable and reliable.
It is also quite simple to make - you need to cut off the edge from an old tire of the required size. A knife dipped in soapy water or a jigsaw with a fine-toothed attachment is suitable for this. After the jigsaw, it is best to process the edges to achieve greater smoothness to avoid tears.
If necessary, you can completely solder it. The only drawback of this design is the fixed size of the future caterpillar. But if necessary, you can make a larger cut if you need a narrow track, or tie two together if you need a wider one.
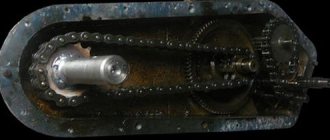
Gearbox
As for the gearbox, everything is simple - its service life is the longest of all moving parts. The gearbox transmits the driving moment from the engine to the auger and is located on the axis of the auger.
In fact, several gears, with regular lubrication, will not cause any special problems, especially since the total time of use of the snow blower does not exceed several tens of hours.
This video shows the assembly of a snow blower gearbox.
Friction disc
Another part that often breaks is the friction ring. Too much force on the wheels leads to the fact that the wheel-friction disc pair slips, which causes the friction ring to wear out and then break.
As a result, the friction wheel, made of steel, leaves deep grooves in the aluminum friction disc. But these are not the only problems. In the process, the belts wear out and the clutches completely fail.
And due to the fact that it is practically impossible to make such a ring at home, it is better to carefully monitor the progress of the snow blower and not try to skid on it.
The video shows how to replace the friction disc.
Chains
Snowblower chains, it's just a parade of diversity. Here you can see absolutely all types of them, especially if it is made by yourself. Absolutely everything is suitable for connecting the motor and auger. Homemade installations often use bicycle chains along with bicycle sprockets.
But this option is only suitable for low-power units. As for wheel protection, it can also be replaced with improvised means. It is enough to have a piece of chain at your disposal, and, at best, a welding machine.
But if it is not there, you can get by with simply riveting it with a hammer. The only condition for making the correct chain for a wheel is that it should not be too small and too loose. And the best option is the shape of a ladder.
True, it is possible to make something similar at home, but such a product will be far from having the functionality of a factory part. Here, cheapness is very inferior to quality.
Snow blower won't start
If the snow blower does not start, then first of all you should make sure that there is fuel and its quality: the engine will not start if it has been in the tank for about 3 months. It is necessary to drain the old gasoline, add fresh gasoline, pump it into the carburetor (if required according to the instructions) and try to start the engine. Usually changing the fuel gives a positive result.
Problems with starting the engine may occur in the following situations.
- The oil sensor blocks the engine from starting. You need to make sure there is enough oil in the engine crankcase using a special dipstick. If everything is fine with the oil level, you can try disconnecting the sensor. If the engine starts after the sensor is disconnected, it should be replaced.
- After pressing the start button, the starter stays put. In this case, you need to check the battery, since at low temperatures the battery charge is quickly lost. The battery must be charged in a warm room, then installed in the unit and started the engine with the starter. Also, the starter may not start if it breaks down. Checking this is quite simple: try starting the engine using manual start. If the engine starts, repair or replacement of the starter assembly is necessary.
- It is difficult for the starter to rotate the engine crankshaft. This can be heard by the characteristic low sound. It is difficult to turn the crankshaft, usually due to the oil in the engine thickening in the cold. It is necessary to place the unit in a warm garage for a while until the engine warms up to room temperature, and after that the snow blower is rolled out onto the street and the internal combustion engine is started.
Important! Never try to warm up an engine with a blowtorch. In most cases, this leads to a fuel explosion and fire. In addition, there are many plastic parts attached to the engine, which can become deformed when exposed to high temperatures.
If the internal combustion engine does not start either with a manual starter or with an electric one, or it stalls after starting, then there may be 2 “culprits” for the breakdown: the ignition module or the carburetor.
Problems with spark plug and ignition
To ensure that the spark plug is not starting the engine, it should be removed from the cylinder. Examine her electrodes. If they are covered with carbon deposits or filled with fuel, then clean them thoroughly, dry them well and set the correct gap - it should be 0.75 mm.
Next, follow these steps. Place the cap on the spark plug and touch it (the metal nut) to the cylinder body of the internal combustion engine. Pull the handle of the manual starter of the device. In this case, a spark should appear between the electrodes of the spark plug. If a spark does not appear, it is weak or deviates towards the insulator, the spark plug should be replaced with a new one.
If after replacing the spark plug there is still no spark, then you should look for the cause in the ignition system (coil, magneto, etc.). Most often, adjusting the ignition solves the problem.
- Remove the cover covering the magneto.
- Remove the screws holding the ignition module.
- Take a small piece of paper from a regular A4 printing sheet. Fold the paper 4 times.
- Insert a strip of paper under the ignition module as shown in the following photo.
- Press the coil against the magneto and tighten the fasteners. At this point, the ignition adjustment of the snow blower engine can be considered complete.
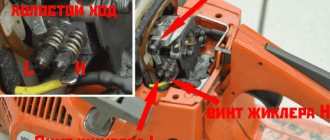
Adjustment of valves
If the snow blower has difficulty starting, or after starting the engine you hear that the speed is floating, then first of all you should check the air filter. If it is clogged, it needs to be washed and dried well.
The next reason for floating speed is unadjusted internal combustion engine valves. The valves are adjusted in this order.
- Remove the spark plug.
- Remove the cover covering the valve block.
- When you remove the cover, you will see the valve rocker arms.
- Next, you will need to find the dead center of the piston, that is, its uppermost position. This is done using a screwdriver inserted into the hole where the candle was placed. By turning the engine shaft by the pulley, achieve a position so that the piston is in the upper position. In this case, the valve rocker arms should dangle freely.
- First, the intake valve is adjusted, the one on the right. There should be a gap of 0.1 mm between it and the rocker arm. To set the gap you need to use a special feeler gauge.
Normally, if you insert the dipstick into the gap, it should not move too freely, but it should not be pressed too tightly. First, unscrew the lock nut (the smaller one) on the rocker arm on the right, then loosen the larger nut. - Insert the feeler gauge under the rocker arm and lightly tighten the nut. Check the clamping force by moving the fixture slightly.
- Once the required clamping force has been established, tighten the locknut.
- The exhaust valve is adjusted in the same way. You just need a probe with a thickness of 0.15 mm.
- After adjusting the valves, close the cover of this unit and start the engine.
Carburetor problems
Another culprit for your snowblower not starting could be a faulty carburetor. The reason why the snow blower stalls may be due to clogged carburetor fuel passages, especially if the engine stalls when the choke is closed.
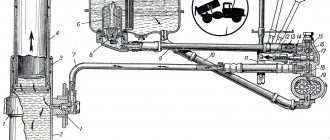
If you look at the carburetor of a snow blower, it may seem that it is quite complicated. But actually it is not. The following illustration shows a model of carburetor that is often found on snowblowers.
Snow blower carburetor design:
- float chamber;
- float with needle valve;
- mixing chamber;
- diffuser;
- throttle valve;
- spray;
- fuel valves;
- air valve;
- jet.
Snow blower gear lubrication
Stable operation of the unit depends on many factors, the main one of which is high-quality lubrication. The oil used to service the snow blower mechanism must have the following properties:
- frost resistance - since the snow blower is used at extremely low temperatures, the lubricant for its gearbox must retain its structure under constant exposure to frost;
- high fluidity - the oil must quickly penetrate into the smallest grooves and holes, thereby ensuring continuous lubrication of rubbing parts;
- viscosity - the working fluid must be thick enough to cover the working parts of the unit with a durable, homogeneous oily film.
Replacing used lubricant in a mechanism that has lost its properties is quite simple.
To do this you need to act in this order:
- First you need to remove the screws and remove the casing;
- After this, the operator will need to unscrew the bolts located directly behind the “snail”;
- Then you need to carefully remove the factory auger belt installed on the factory pulley;
- Next, you need to unscrew the bolts one by one, which firmly secure the shaft of the built-in auger;
- After this, you need to carefully turn the “snail”, and also remove the auger and the impeller installed on it;
- Then you will need to unscrew the standard shear bolts and completely disassemble the mechanism shaft;
- In the end, the operator will have to completely disassemble the built-in gearbox itself.
https://youtube.com/watch?v=ptYGBLcnVA4
After this, you will need to thoroughly rinse the mechanism parts. The operator can then reassemble the factory snow blower gearbox and apply new lubricant.
Dismantling and lubrication of snow removal equipment gearbox
Before lubricating the gears and other elements of the gearbox, you need to completely disassemble the mechanism. Today you can hear a lot of advice on how to remove the gearbox on a snow blower. All of them can be described in the following algorithm:
- First of all, it is necessary to dismantle the belt protection casing and the auger drive cable;
- Next you need to unscrew the bolts that are located behind the “snail”;
- After this, you will need to remove the auger belt from the pulley;
- Next, you need to unscrew the bolts holding the auger shaft;
- After this, you will need to turn the “snail” and pull out the auger along with the impeller;
- Next you need to remove the shear bolts and disassemble the shaft;
- Finally, you will need to disassemble the gearbox itself.
Many beginners do not know how to properly disassemble the gearbox itself. To do this, you must proceed in the following order:
- First you need to clamp one of the shaft parts with a vice;
- After this, you will need to unscrew the 6 bolts securing both parts of the gearbox together;
- Next, you need to take a hammer and lightly tap on the gearbox housing.
The disassembled gearbox must be dipped in gasoline to completely wash off the remaining old lubricant.
Lubricant for the snow blower gearbox is applied according to a certain algorithm:
- First, you need to clean the gearbox and fitting from any remaining old oil;
- Next, you need to unscrew the fitting and use a syringe to add the amount of lubricant required for the job;
- After this, the fitting must be screwed back in and the mechanism must be assembled in the reverse order.
Most snow blower manufacturers warn customers in advance that there is insufficient lubricant inside the gearbox. In such cases, oil must be added after the first ten hours of operation of the snow blower.
Friction ring repair
The friction ring is a transmission part that allows the snow blower wheels to move.
The ring is installed on the clutch wheel.
During normal operation of the snow blower, in compliance with all rules for switching gears, the friction ring is subject to very slow wear. But if the rules are violated, this element quickly wears out and fails.
The reasons for wear of the rubber clutch ring may be as follows.
- When the unit is operating, the user changes gears without stopping the device. In this case, the rubber seal experiences heavy loads and wears out. When the ring wears out, the metal ring also deforms, after which the snow blower stops moving.
- Rapid wear of the ring and the appearance of deep grooves on it causes careless operation of the unit. That is, the operator allows the wheels to slip, for example, on inclines, on difficult sections of the road or in large snowdrifts.
- Also, the clutch wears out due to banal corrosion of the ring as a result of dampness. If after work you do not take preventive measures to remove snow residues from this block, the ring rusts, crumbles, and the clutch ceases to perform its functions.
When the clutch wears out, the unit begins to move jerkily or stops completely. Problems also arise when switching the speed of movement of the unit and when switching the direction of movement (forward and backward).
Do-it-yourself friction disc repair is carried out as follows.
- drain the gasoline from the tank;
- set the unit to the technical position. maintenance as shown in the following figure;
- remove the wheels from the unit;
- remove the crankcase cover by unscrewing 4 or 6 bolts (depending on the model of the device);
- remove the chassis;
- remove the right and left flanges (see figure below) - these are covers covering the bearings;
- Move the hex shaft to the left and remove the friction disc from it.
If not only the ring, but also the wheel itself is worn out, then a complete replacement of the clutch will be required . To replace the rubber ring, unscrew the 4 bolts, remove the worn part and insert a new one into the disk, then tighten the fasteners again.
Reassembling the entire friction unit and the snow blower as a whole is carried out in the reverse order.
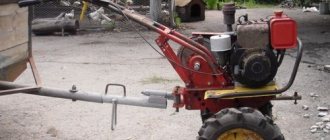
Attachments for walk-behind tractor: homemade snow removal bucket and auger
The photo below shows a version of a homemade Cuznetzov snow blower, made in the form of an attachment to a walk-behind tractor.
The portal user already has a factory-made snow blower, so his thought process when creating a homemade product is interesting.
A commercial snow blower handles regular snow well. I will throw my homemade product into the “battle” of removing heavy wet or trampled snow, icy crust, which can only be broken with a shovel.
So, a homemade snow blower is intended for heavy work, for which it would be a pity to “kill” the branded unit. This determined its design:
- Open type screw made of thick metal.
- Powerful motor, gearbox and transmission.
- Big wheels.
The last two points are best answered by the drive of a snow blower - a walk-behind tractor. All that remains is to make the auger and select parts for the gearbox. The work was divided into stages:
- Making a bucket and auger.
The ladle is made from an old metal barrel.
- Bucket after painting.
- The gearbox is taken from an old Ural motorcycle.
Turning work was also required.
A snow blower made by hand from scrap metal in assembled form. For comparison: next to the homemade product there is a factory (blue) snow blower.
After testing the snow blower, I can say that it takes any snow: stale, with ice, with debris, wet. Among the disadvantages: 1. The further you drive into the snowdrift, the higher the snow blower tries to climb onto it. This is due to high screw speeds and low torque. In dense, heavy snow, the auger choke and the engine of the walk-behind tractor loses speed. 2. When clearing frozen crust for the first time, I tore the right auger. The second time I bent the impeller and cut off 7 bolts. I fixed everything quickly. A factory snow blower would not be able to work in such conditions, if these were not flagship powerful models of equipment.
Conclusion: an open auger is an advantage when working on frozen snow. A motorcycle gearbox is not the best option, but it can withstand loads that would kill the gearbox of a regular snow blower one or two times.
Subsequently, Cuznetzov installed wheels with developed lugs on the walk-behind tractor and, without a shovel, made paths in the snowdrifts with a snow blower.
The user also plans to remake the bucket and remove the gearbox from it. Increase the rotor speed to throw snow further. Reduce the speed of the auger and make it and the shaft even stronger, so as not to have to straighten the metal after working on old snow.
Additional Tips for Repairing Snow Blower Problems
As mentioned earlier, the most important reason for possible breakdowns is improper operation of the device. The same can be said for storing your snow blower. Many people believe that all storage consists of putting the unit in a dry place until it is needed again.
This approach is fundamentally wrong, which leads to numerous problems in the future.
Change of oil
In general, proper conservation will look like this:
- After the end of winter, i.e. After finishing the actual operation of the snow blower, it is necessary to drain the oil and fuel from it.
- Wipe the entire body dry with a cloth, and then put it in a dry place.
- Before winter, you need to re-preserve it, i.e. add new oil, check belt tension, check spark plugs, etc.
An important issue will be the choice of oil that you are going to use. The optimal solution would be to use seasonal oil that has a lower viscosity. At the same time, you don’t need to look at the brand that produces the oil.
First of all, you need to choose oil based on the model of the engine being used. In principle, the operating instructions indicate exactly what kind of oil is recommended to use for a specific model of snow blower, so this is another reason to still look at the instructions.
Equipment care - how to extend the life of snow blowers?
In order not to have to think for a long time about how to start the snow blower engine and why it constantly stalls, you should adhere to a number of preventive measures that will help extend the life of your household equipment. So, a very important rule is the correct preparation of the unit for storage in the spring and summer. The car owner is required to:
- Drain any remaining fuel and oil from the snow blower's engine and gearbox before storing it. Without doing this, the lubricants will dry out, as a result of which the walls of the oil and fuel tank may crack;
- Wipe all parts of the snowblower body dry with a rag. This will help protect the paintwork of the unit from corrosion;
- Immediately before starting the engine before winter operation, you need to reactivate the unit. To do this, you need to fill the appropriate containers with new fuel and oils. This procedure also includes a mandatory check of the spark plugs, drive belt tension and condition of the starter belt.
An important factor is the quality of the oil used. It is best to use a seasonal lubricant that does not have a high viscosity. Such a composition will be evenly distributed between important parts and mechanisms, and will retain its characteristics for a long time.
Repair of snow removal equipment - methods of repairing units
In various models of snow blowers, other breakdowns may occur that are associated with the design features of these snow blowers. For example, Craftsman snow blower repairs often focus on repairing chute problems. In this case, the first thing to do is to make sure that the safety bolts and the worm gear are intact. To do this, you will need to dismantle and disassemble the unit gearbox. This is done in the following order:
- To begin, disconnect the bucket from the unit frame;
- Next, carefully pull out the gearbox;
- Then remove and check the “worm” that is located on the shaft. Most often it is cut off from the mechanism;
- To fix the problem, buy a new “worm” and install it in place of the old part.
One of the most common problems with Patriot snowblowers is the engine not starting. In such cases, experts advise immediately checking the engine compression. If this indicator is within 6–8 atmospheres, then the problem can be eliminated by replacing the old starter cord. To do this you need to act in this order:
- Remove the protective panels and unscrew the return mechanism;
- Cut the old cord and untie its knot inside the starter box;
- Turn the mechanism 7 full turns counterclockwise and secure it with a screwdriver;
- Insert the new cord and tie it into a tight knot in the place where the old cord was secured;
- Release the return mechanism and it will rewind the cord itself.
If this does not help, then you will have to buy a new engine for the snow blower.
Owners of Profi brand snowplows often have to figure out why their unit does not move forward. The reason for this may be hidden in the machine's gearbox. To quickly resolve the malfunction, it is necessary to disassemble the assembly and replace the damaged gear inside it.
Owners of Energoprom brand snow blowers often do not know what to do with excessive vibration of equipment motors. First of all, you will need to check the reliability of the support frames and engine mounts of the unit. Often it is quite enough to simply tighten the mounting bolts further, and the problem will immediately disappear.
Causes of malfunctions and repairs
Many experts advise choosing snow blowers that use a serviceable gearbox. Of course, it requires some handling, but it will last much longer than a maintenance-free gearbox.
However, this issue also has a second side - such gearboxes tend to break at the most inopportune moment. Using the example of Patriot, Tselina, Champion and Profi snow blowers, let's look at what gearbox failures can happen, as well as methods for eliminating them.
Repair
Possible problems:
- There are sharp knocking noises in the gearbox of a Champion snow blower - the most likely cause of this problem is damage to the worm turns or bearings. The way out of the situation would be to adjust or replace the bearings, as well as purchase a new worm pair.
- If you observe that the Patriot snow blower gearbox is overheating, then several factors may be causing this phenomenon. In particular, the issue may be due to insufficient lubrication or wear of the bearings.
- In the first case, you simply need to add the required amount of lubricant, and in the second, adjust the bearings or replace them with new ones.
- If the gearbox of a Profi snow blower vibrates very strongly, then the likely cause may be misalignment of the shafts and the engine of the unit. Thus, do-it-yourself repair of the Profi snow blower gearbox is carried out by eliminating this misalignment.
Profi gearbox
- If grease leaks from the Tselina snow blower gearbox, the likely cause may be a clogged drain hole in the vent. To correct this situation, you need to rinse the vent plug in kerosene and then wipe it dry.
- Another common cause is wear of the gear included in the gearbox design. This is understandable, because it is made mainly of bronze, so during long-term use, its edges can simply wear off.
- The only way out of this situation is to completely replace the gear with a new one.
In most cases, snowplow gearboxes can be repaired without requiring replacement. Of course, you may need to purchase individual gearbox components - oil seal, gear, etc. However, this is not such a big expense as in the case of purchasing the entire gearbox.
By the way, the cost of components may vary. For example, a 24 tooth snow blower auger gear will cost about 3 thousand rubles. By the way, gears of different types of gearboxes may have a different number of edges - basically, these are 20 teeth and 24 teeth, depending on the model of the snowblower.
For more information about gearbox repair, watch the video:
Do-it-yourself snowblower: check these 7 points before the season
PREPARE THE SNOW BLOWER FOR WINTER
Is it possible to simply roll the snow blower out of the garage and start cleaning if it has been sitting idle for half a year? Of course not. To ensure your winter helper continues to serve you year after year, prepare it for the job. Carrying out maintenance is not difficult; to do this, you need to understand which parts and assemblies require attention, what to do with them and what the order of work is.
Based on the recommendations of a service technician for repairing snow removal equipment, we have compiled a list of 7 points
, when checked, you are 99% likely to extend the working life of the snow blower and it will not cause trouble in the new snowy season.
These points can be completed independently, without contacting service, with a minimum set of tools and consumables.
Inspect the snow blower
Carefully inspect the housing, bucket and shaft, make sure there are no defects or cracks, and that there is no debris or foreign objects in the auger. Check and tighten bolted connections if necessary. Pay attention to the places where the cables are attached and how the terminals are connected. Check the wheels for damage and tire pressure.
Change the engine oil
It is recommended to change the engine oil of your snow blower once a season. The oil level is checked by markings on the oil dipstick or determined along the edge of the oil filler neck, depending on the engine model. After making sure that there is oil in the engine, you need to start it, since the replacement is carried out on a warm engine.
Start the snow blower engine and let it run at idle speed for 5-10 minutes. Drain the old oil by unscrewing the corresponding drain bolts and wait until it drains. Provide a container for used oil.
Check the required volume, brand and viscosity of oil in the instructions for the snow blower or in the official service center.
Update fuel
It is necessary to drain the fuel during summer storage, or use stabilizers and additives, such as LIQUI-MOLY, so that the fuel does not lose its properties and then damage the fuel system.
But, if there is still gasoline left in the snow blower from last year, it must be drained and fresh refilled.
In the operating instructions, the manufacturer indicates the required octane number of fuel, but, as a rule, in Russia sellers and service specialists recommend AI-92 gasoline.
Check the spark plugs
Remove the spark plug using a spark plug wrench. There should be no carbon deposits or traces of fuel on the spark plug electrodes. Clean the electrodes thoroughly, and if they are very worn, it is better not to waste time and replace the spark plugs with new ones.
Check the tension belts
Two common snow blower problems—the auger won't turn or the machine won't move—are caused by faulty tension belts. These two belts - auger and drive - need to be inspected and periodically tightened.
To do this, remove the protective cover and inspect the belts themselves: longitudinal cracks, thinning or hairiness can greatly affect the operation of the snowblower. If tensioning is required, tighten the special tension bolt. The belt should be tensioned, but rotate freely and not fall off the pulley.
Do not allow lubricants, technical fluids or gasoline to come into contact with the belt.
Check shear bolts
The shear bolt prevents the auger from breaking if it hits a solid obstacle.
If, while clearing snow, you come across a stone or curb, the shear bolt breaks - “cut off”, and the transmission of torque to the gearbox and gears of the snow blower stops.
An insufficiently tightened shear bolt does not secure the auger properly; it “plays”, which leads to wear and breakage of the hinge joints in the structure.
We would highlight maintenance of the auger gearbox as a separate item—checking the lubrication. There are many recommendations for maintenance, but often, the gearboxes of snowplows are not dismountable and cannot be serviced outside of a service center. Therefore, we do not recommend disassembling the machine’s gearbox yourself at home, and lubricating it only if this is stated in the operating instructions, and if it has special “grease nipples” or an oil filler hole with a bolt or nut. For information about the type, brand and amount of lubricant, look in the manual.
Adjust the cleaning height
Use special slides on the outside of the machine casing. To clean uneven areas, the casing is raised above ground level, while to clean a flat surface, the casing is lowered as close to the ground as possible. It is also important that the sled is raised equally on both sides.
Your snow blower is now ready to go.