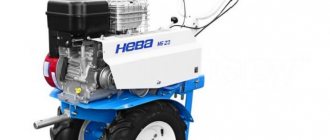
Snow removal is carried out using appropriate attachments. Snowplows based on MTZ tractors are one of the most common types of special equipment for road cleaning in Russia. These machines can successfully work both on the roadway and in villages and villages, clearing unpaved roads from ice and snowdrifts.
Almost any tractor of the Belarus family can be equipped with a snow blower, with the exception of energy-intensive machines, which are simply impractical to use for these tasks due to high power - and therefore fuel consumption. A blade, knife or brush can even be mounted on a walk-behind tractor.
We’ll talk further in the article about what kinds of attachments there are for clearing snow at MTZ, how to choose them for a specific tractor model, or even make them yourself using ready-made drawings.
Construction of a snow blower
A rotary snow blower is designed quite simply.
The unit consists of a “snail” - a round body. There is a sleeve on top for throwing out snow. Guide vanes are welded in front of the body. Inside the snow blower, the rotor rotates at high speeds. It consists of an impeller mounted on a shaft with bearings. The mechanism is driven by the engine. When the snow blower's rotor begins to rotate, the impeller blades begin to pick up snow, grind it inside the snail, and then throw it out through the sleeve several meters to the side. A homemade rotary snow thrower can be made in two varieties :
- With permanently installed motor. In this case, the snow blower functions as a full-fledged machine.
- As a carport for other equipment. A motor is not installed on such rotary homemade products. The snow blower is suspended from a mini-tractor or walk-behind tractor. The drive is carried out through a chain or belt drive.
Rotary snow blowers also differ in engine type:
In electric models, the rotor operates almost silently. They do not require consumables and are easier to maintain. The cable constantly dragging behind the snow blower can be considered an inconvenience. Instead, they prefer a battery-powered model, but the operating time of such a unit is very limited. All electric snow blowers, unfortunately, are low-power. They are almost always used in private yards and dachas to clear paths from loose, fresh snow that has fallen.
Gasoline rotary models are an order of magnitude more powerful than electric snow blowers. Their only drawback is more complex engine maintenance, the presence of exhaust gases and regular fuel and lubricant refueling. However, a gasoline snow blower is not tied to an electrical connection. The engine power makes it possible to produce large rotor mechanisms. This rotary device has an increased working width and can cope not only with thick snow cover, but also with snowdrifts.
Based on the type of movement, rotary snow blowers are divided into:
Non-self-propelled .
Such units move by being pushed by the operator. This category usually includes electric snow blowers, but there are also low-power gasoline options among them. The equipment needs to be pushed slightly. Thanks to the impeller's capture of the snow cover, the snow blower will spontaneously move forward slowly. Self-propelled mechanisms most often operate from a gasoline engine. The snow blower travels independently on wheels. The operator only sets his course.
A rotary snow removal attachment can also be classified as a self-propelled equipment, although it does not even have a stationary drive. But you don’t have to push it with your hands. The hitch will move along with a mini-tractor or walk-behind tractor.
The need for drawings of rotary snow blowers
To properly assemble snow removal equipment, you will need drawings.
On the Internet there are many options for device diagrams of the simplest rotary snow removal equipment. Not every scheme is suitable for each type of unit. For example, for owners of a mini-tractor - and this is a very powerful piece of equipment - it is irrational to hook up a rotary hitch. Most often, a combined mechanism is produced for this type of equipment. The hitch consists of a rotor and auger. This snow blower is capable of handling large snow drifts.
In a combined snow blower, snow is processed in two stages. The auger grinds the captured cover, and the rotor mixes the loose mass with air, after which it throws it out through the sleeve under strong pressure.
A combined type snow blower will cope with compacted and wet snow, as well as icy crust. To obtain greater productivity, a serrated edge is made on the screw disc knives. It crushes ice according to the principle of a saw into small grains .
Where is it used?
The scope of application of this type of self-propelled equipment is very extensive; in particular, bulldozers are often used:
- For layer-by-layer digging, cutting or leveling soil, rocks, as well as some bulk materials.
- For preparing construction sites by cutting off the top layer of soil.
- As a press for flexible parts.
- For moving soil, rocks, bulk materials, various debris, etc.
- For the construction of embankments, the development of small canals, and the cleaning of gentle slopes.
- For backfilling trenches and leveling soils.
- For stacking and moving various materials (mostly bulk materials), etc.
Handmade rotary machine manufacturing
The process of self-production of a rotary snow blower can be divided into the following actions:
- frame installation;
- creation of a rotary mechanism;
- welding the body - snails.
If the snow clearing mechanism is not attached to other equipment, then the technician will need to perform one more action - install the engine.
When setting the size of a rotary snow blower, it is optimal to adhere to such parameters so that the snow removal width is within 48-50 cm. The configuration of the snow blower, subject to such conditions, will be both uncluttered and productive. With this snow clearer you can quickly clear the area adjacent to the house, paths and garden yard for passage.
Step-by-step assembly of the unit
The frame for the snow blower is the base.
All working parts are attached to it. In general terms, the frame of a snow blower is a rectangular unit welded from a profile and angles. It is impossible to give clear directions for its production, since everything will depend on the spare parts used. Let's assume that the engine can be taken from a cultivator, chainsaw, or an electric motor. For each individual unit, you will need to individually invent a mount.
Installing the Snow Blower Frame
If the rotary snow blower is used as a hitch on a walk-behind tractor, then the motor will not be installed. Therefore, the frame needs to be made shorter so that there is enough space to attach only the rotor with the volute.
When designing a mounted snow blower, it is necessary to weld a bracket onto its frame to ensure coupling with the walk-behind tractor.
If the rotor mechanism is self-propelled, then a wheel pair fastening block must be provided on the frame. It is best to put a non-self-propelled snowplow on skis. To do this, you need to weld the mounting frames from the bottom, and fix the wooden runners on them.
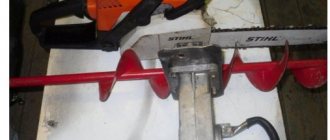
Handmade rotor production and installation
The most difficult part of a snow blower is undoubtedly the rotor.
The main requirement is for the impeller. It can contain from 2 to 5 blades. However, that’s not the point. Their number depends on subjective tastes. The most important thing is to make sure that each of the blades has the same weight. Otherwise, an imbalance will occur and the device will wobble. You won't be able to work with such a machine. When an unbalanced impeller rotates, the unit will jump in place due to irresistible vibration. Therefore, the smart thing to do is the one who will not spare money to order parts for a snow removal rotor in a special workshop that has lathes.
If it is not possible to order the manufacture of a rotor, all work will have to be carried out on your own. But then the matter will definitely not be possible without the guidance of pre-selected drawings and calculations.
Making your own “snail”
The configuration of the rotary snow blower case is somewhat similar to a snail, which is why it was given this name. To produce it, you will need a piece of pipe of the required diameter with a length of 15-20 cm. One side of it is tightly welded with a metal sheet. This will give you the back wall of the cochlea. It is to this that you will need to attach the rotor bearing hub. In front, on the sides of the ring, 2 guide vanes are welded.
A hole is cut at the top of the ring and a pipe for the sleeve is welded there. The first part of the snail is covered by one third so that the snow is discharged through the sleeve and does not fly in front of the rotor. It is preferable to make the plug on heels and removable. Such a system will make it possible to quickly get to the impeller.
Now we fix the rotor inside the cochlea. To do this, drill a hole for the shaft in the middle of the back wall of the snail. Place the rotor in its place, while pressing the bearing hub tightly against the casing. The flange lugs indicate the location of the mounting holes. The rotor is removed from the casing, holes are drilled, then the mechanism is installed in place and the hub is tightened to the rear wall of the volute using bolts.
So, inside the casing there was a protruding rotor shaft. The impeller is placed on it and carefully tightened with nuts. On the outside there is a protruding second end of the shaft and a hub with bearings. A belt drive pulley is mounted on the shaft. If a chain drive is preferred over a belt drive, a sprocket from a moped is strengthened instead of a pulley. The rotor is ready.
Now the resulting mechanism is installed on the frame, and then they begin to assemble the snow blower based on the preferences of the model. In other words, I connect the hitch to the walk-behind tractor or install a motor and set up a drive.
The unconditional advantage of a home-made rotary is the reality of producing a snow blower with the required working width, as well as significant savings in money.
How to make your own dump
To create your own front plow for snow removal, you will need :
- steel barrel (200 liters);
- steel corner with a shelf size of 10–15 millimeters;
- steel corner or square measuring 30 millimeters;
- corner or square with a cross section of 50 millimeters;
- 2 any hinges for a breaking frame;
- 3 small double-sided hydraulic cylinders;
- 2-3 any hinges (you can use garage hinges by drilling holes in them and inserting grease fittings);
- fitting;
- hoses;
- control panel and (if necessary) hydraulic pump;
- conveyor belt 20 millimeters thick;
- bolts and nuts of different sizes;
- riveter and rivets.
Place the barrel and measure its circumference.
Divide the resulting value by 3, this will be the height of the blade.
Mark the barrel with three vertical lines at equal distances.
Cut the barrel into three equal parts.
Then cut off the cover from each element on both sides and use pliers to bend all the edges at a distance of 3-5 mm to make them safe.
From a corner of 10–15 millimeters make amplifiers whose shape corresponds to the trimmings of the barrel. To do this, cut one of the sides of the corner in 1 centimeter increments. Carefully bend the cut corner so that it takes the shape of a barrel. Then weld the cuts.
If the width of one barrel trim is not enough for a dump, then make it from several. In this case, adjacent sheets should overlap at a distance of 20–25 cm so that they can be strengthened with reinforcements.
Place the amplifiers like this:
- 2 at the edges;
- the rest are at a distance of 20–25 centimeters from each other.
Connect the amplifiers to the barrel scraps with rivets, the pitch between the rivets is 3–5 centimeters. Cut a piece of conveyor belt 5 centimeters wide and use bolts to attach it to the bottom of the blade.
Do not use rivets because they will not hold the tape in place effectively.
At a distance of 5 centimeters from the bottom of the blade, weld a 50 mm square or corner along the entire structure and cut off another similar corner. This will be a rotary joint that changes the angle of the blade.
Install hinges between them.
If you use door hinges with grease fittings , then place them so that they need to be pulled in different directions to separate them.
Weld the same corner or square on top.
Then weld an extension to it - a piece of the same corner 30–40 centimeters long, installed perpendicularly.
Weld braces that will strengthen the extension cord. Then install a hydraulic cylinder between the lower and upper (located after the hinges) corner. It will adjust the tilt of the device .
Make a system for lifting and turning the device in different directions using:
- swivel joints;
- corners of different sizes;
- hydraulic cylinders.
Attach the entire structure to the car frame. Do not attach the blade to the bumper , a strong load will tear it off and damage your creation.
Connect to hydraulic cylinders:
Then route the hoses into the cabin and install the control panel there.
It can be removed from any decommissioned equipment equipped with various hydraulic devices.
Connect the hydraulics to the truck's hydraulic pump or connect a separate hydraulic pump to the PTO.
It is not advisable to connect the hydraulic pump directly to the engine using a belt or chain drive . In this case, you will not be able to disable it if necessary.
- the entire homemade structure is assembled correctly ;
- is mixed up or loose anywhere .
Check the condition of the entire hydraulic system, first when switched off, then when:
- running engine;
- connected hydraulic pump.
If there are no leaks anywhere, check the operation of the control panel.
After making sure that everything is working correctly, test the snow removal unit in real conditions by clearing some area of snow.
MTZ tractor attachments for snow removal
The Belarus tractor, being an indispensable piece of equipment in the municipal sector, is widely used in the maintenance of roads, settlements, industrial and other areas. The versatility of the tractor makes it possible to attach various special equipment, thereby ensuring maximum loading of the machine and its efficient use. The use of MTZ with a set of mounted equipment significantly reduces the cost of work performed and eliminates the need to have and maintain a huge fleet of special machines. To perform work in winter, including clearing snow drifts and snow removal, for the MTZ tractor, there is a number of mounted equipment.
Snow removal complex SU 2.1 OPM – “Clean City”
A modified version of the snow blower, the snow clearing unit SU 2.1 OPM, differs from the basic version by the presence of a universal transformable chute for discarding and loading the removed snow.
Used to clear city streets and highways from drifts, the complex can load snow onto trucks and trailers with a side height of up to 3.4 meters. In this case, changing the configuration of the snow-throwing pipe is made from the operator’s cabin of the base tractor while the machine is moving and takes no more than 10 seconds.
Snow removal equipment at MTZ 82
The main equipment for clearing roads and areas of snow, aggregated with the Belarus tractor, are blades and mounted harvesting machines driven by the PTO and hydraulic pressure of the tractor. According to the method of aggregation, the equipment can be hung on the front and rear linkages. Models of this equipment are widely represented by many manufacturers and have different designs, technical characteristics and price-quality ratio.
Snow blowers for MTZ 82
Rotary auger snow clearers for MTZ are a mechanism consisting of a snow receiver body with an installed auger, a rotor and snow guide, a drive mechanism, and a hinged device. The snow receiver performs the function of a shovel blade that rakes up snow. The auger, by rotating in turns, delivers the snow mass to the center of the snow receiver body. The rotor captures the snow mass and creates inertia with its rotation, throwing the snow through the snow chute. The flow of snow from the cleaner is directed over the side of the road or into a nearby truck removing snow. In the design of the harvesting machine, the direction of the flow of snow ejection can be adjusted manually by fixing the corresponding fastenings for the position of the snow line or controlled automatically, remotely from the tractor cabin by the hydraulic distributor of the aggregated machine.
Technical characteristics of rotary auger snow blowers mounted on the front and rear linkages MTZ 80 (82)
| № | Characteristics | SShR-2.0P | FRS-200M | FRS-2.0P | SRN-200 | SRK-2.0 |
| 1 | Working width | 2 m | 2 m | 2m | 2 m | 2.05m |
| 2 | Performance | 80 t/h | 200 t/h | Up to 250 t/h | 150 t/h | 100 t/h |
| 3 | Working speed | 0.6-4.5 km/h | 0.75 km/h | 0.6-4.5 km/h | 0.75km/h | 0.5 km/h |
| 4 | Height of snow removed | 0.5 m | Up to 0.92 m | 1.15m | 1m | 0.92m |
| 5 | Release range | 5-20m | 20m | 5-25m | 20-25 m | 15-20m |
| 6 | Loading height | — | 3.1 (3.6) m | — | Up to 3m | 3.1m |
| 7 | Number of screws | 1 | 2 | 1 | 1 | 2 |
Snow cleaners with a rotor-mill.
The working body of the mounted snow removal machine “rotor-mill” ensures the collection and ejection of snow through a snow guide. The rotor cutter combines the functions of an auger and a rotor at the same time. The use of this rotating element in the design ensures effective selection, crushing and creation of inertia for the ejection of snow mass through the snow chute. Such designs of the working body are used in modern developments of cleaners, which are characterized by high productivity up to 800 tons per hour and the ability to remove packed and compacted snow with a high density of 0.6 tons/m3.
The advantages of snow blowers of the SU 2.1OP, SU 2.1 OM, SU 2.1 OMP brands include:
- no need to equip the tractor with a creeper
- high cleaning speed
- control of the position of the snow chute of the machine from the tractor cabin
- possibility of loading snow mass into a vehicle
- Front placement of the snow blower ensures maneuverability of the unit and comfortable operation of the driver
The SU 2.1 snowplow is equipped with a paired working element “rotor-cutter” and two hydraulically controlled snow pipes. The design of the machine allows the snow chutes to rotate 180°, which makes it possible to throw snow mass on the left and right sides in the direction of travel of the tractor. Hydraulically controlled visors regulate the snow throw range from 2 to 25 meters.
The SU 2.1OMP snowplow is a deep modernization of the SU 2.1OP and SU 2.1OM models. The design of the cleaner is a body with a hinged device with an installed rotor cutter and a left-hand raking blade. The SU 2.1 OMP machine is distinguished by a quickly transforming snow chute with a large rotation angle of up to 220° and a loading height of 3.5 meters.
Technical characteristics of snow blowers with a rotor-mill mounted on the front linkage MTZ 80 (82)
| № | Characteristics | SU 2.1 OPM | SU 2.1 OP | SU 2.1 | SU 2.1OM |
| 1 | Working width | 2.1 m | 2.1m | 2.1m | 2.1m |
| 2 | Height of snow removed | 1m | 1m | 1m | 1m |
| 3 | Snow throw range | 1-25 m | 2-25m | 1-25m | 1-25m |
| 4 | Performance | 500 t/h | 500 t/h | 600t/h | 500t/h |
| 5 | Loading height | from 2.9 to 3.5 m | from 2.9 to 3.5 m | — | from 2.9 to 3.5 m |
| 6 | Working speed | 1.9-18.4 km/h | 1.9-18.4 km/h | 1.9-7kmh | 1.9-18.4 km/h |
| 7 | Snow pipeline rotation angle | 220° | 180° | 200° |
Rotary snow blower for MTZ 82
Rotary and mounted snow removal machines are equipped with a fan rotor, the operation of which combines two functions simultaneously: picking up and throwing out snow. Rotary blowers are especially effective when clearing loose, high, low-density snow drifts. The machine's V-shaped raking blade supplies snow to a rotor located in the center of the structure. The active organ of the machine, by its rotation, captures the mass and directs it along the snow pipeline in the specified direction. The machine is driven from the PTO of the MTZ 80(82) tractor.
Technical characteristics of the EM-800 rotary snow blower mounted on the MTZ 80 (82) front linkage
| № | Characteristics | EM-800 |
| 1 | Working width | 2.3 m |
| 2 | Performance | 250t/h |
| 3 | Working speed | 0.5 km/h |
| 4 | Height of snow removed | Up to 1m |
| 5 | Release range | 15 to 40 m |
| 6 | Loading height | 3.1m |
| 7 | Number of rotors | 1 |
Snow plows
Snow clearing
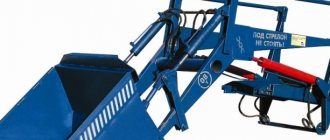
Shovel blades differ from standard blades for soil leveling in that they have a wide working grip in height and width and a lightweight design material. The lower edge of the blade is equipped with a flexible bumper for soft contact with the road surface. The working plane of the blade is placed at an angle to facilitate the movement of snow to the right side in the direction of travel. The angle of attack of the blade can be adjusted manually or remotely using an additional hydraulic cylinder in the design.
Snow plow CO 2.5 with hydraulic rotation 60º
The CO 2.5 snow plow, made of steel profile, is an effective snow removal equipment used for clearing snow from roads, sidewalks, courtyards and other hard-surfaced areas without throwing it away.
The main advantage of the snow blower is the productivity-increasing ability to rotate the working part of the blade to the right and left by 30º using the tractor’s hydraulic system.
The rotation of the blade, which is aggregated with the most popular tractor in the post-Soviet countries, MTZ-80, is carried out from the cab of the machine using two hydraulic cylinders that give movement to 60 mm rods.
Thanks to its compatibility with the universal attachment mechanisms of MTZ tractors, the snow blower, designed for use with snow-throwing units, can, if necessary, quickly and effortlessly be replaced with other snow removal devices, in particular, snow blowers of the SU model range.
The snow removal complex, equipped with a snow blower of the SU-2.1 series and a CO 2.5 blade, clears snow from a road surface up to 4 meters wide in one pass.
The blade, reinforced with a metal pipe that gives additional rigidity to the structure, has a geometry similar to the shapes of the best foreign models of high-speed snow blowers, and can be placed both in the front and rear of the tractor.
Thanks to the steel and rubber-reinforced knives installed in the lower part of the working surface of the unit, the blade does an excellent job of removing compacted snow and ice, and can also be used for moving and leveling soil and bulk materials.
| Technical parameters of the CO 2.5 blade | |
| Aggregated tractors | MTZ-80 and 82 |
| Frontal working width (m) | 2,500 |
| Operating speed of the complex (km per hour) | 20 |
| Transport speed (km per hour) | 30 |
Preparing the MTZ tractor for snow removal
Coupling the MTZ 82(80) tractor with snow removal machines involves the use of additional equipment to drive the active parts of the mounted equipment, ensure the operating speed of the unit and attach the equipment.
If it is necessary to transfer torque from the rear PTO to the front linkage, an additional set of equipment is used, consisting of a gearbox, cardan shafts, intermediate supports and a number of fastening parts. To ensure speeds below 1.9 km/h, a speed reducer is used, which is attached to the left hatch of the tractor gearbox housing. The equipment of the NU-2 front linkage with the SA-1 automatic coupler ensures comfortable hanging and reliable fastening of the equipment in front of the tractor. Using high-pressure hydraulic hoses equipped with breakaway couplings, provide a convenient connection of the tractor’s hydraulic system to the hydraulic units of mounted snow removal equipment.
Rotary auger snow blower ShRK 2.0
The snow removal complex ShRK 2.0 is a snow removal device, aggregated with tractors of traction class 1.4 and higher, designed to work in conditions of high frosts, up to 40 degrees.
The main direction of use of the unit is clearing snow from streets, sidewalks, courtyards and industrial areas, laying roads through snow drifts and discarding embankments formed after the work of dump mechanisms.
Pre-crushed by two rows of parallel auger cutters driven by a mechanical power take-off device of the base tractor, the snow undergoes additional treatment with compressed air before entering the chute and is then thrown by the unit at a distance of up to 20 meters.
The efficiency of the snow blower is ensured by the fastening mechanisms installed on it, which allow you to quickly remove the unit or change it to other equipment.
The snow removal complex can be used to load snow mass onto vehicles with a maximum cargo side height of up to 3.1 meters.
| Technical parameters of the Snow removal complex ShRK 2.0 | |
| Aggregated tractors | MTZ-80, 82 and 92P |
| Maximum transport speed (km per hour) | 20 |
| Dimensions taking into account the dimensions of the base machine (LxWxH in meters) | 5.6x1.990x3.680 |
| The weight of snow removed per hour with a density of 0.5 tons/cubic. meter (tons) | 200 |
| Distance of throwing the snow mass to the left (m) | 15 |
| Snow throw distance to the right (m) | 20 |
| Maximum height of cleared snow drift (m) | 0,92 |
| Maximum density of the removed snow mass (t/cub. m.) | 0,6 |
| Rotor speed (rpm) | 900 |
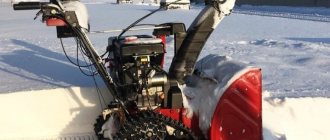
Do-it-yourself snow rotor and rotary snow blower - homemade for snow removal
Hand tools are gradually fading into the background in the matter of cleaning piled up snowdrifts. The fact is that modern technical thought offers special units and devices that can significantly improve not only the cleaning efficiency, but also reduce the energy consumption of the entire process. We are talking about snow blowers for household use , which are produced in various configurations and technical equipment (see how to choose). These devices cost quite a lot of money, but making a snow blower yourself at home using handy tools is quite simple. As practice shows, improvised means make quite good home-made devices, practically in no way inferior to purchased analogues. In the article we will talk about how to make a rotary snow blower with your own hands?
Choice
According to their design, gasoline snow blowers can be of several types :
- screw type;
- rotary;
- mixed type.
For making at home, the best option is considered to be a rotary snow blower . There are several reasons for this:
- More efficient snow removal, because the unit uses not only the auger itself, but also a rotor (rotary snow blowers are also called “auger-rotary”).
- Sufficiently high mobility and excellent performance.
- Rotary snow blowers are quite powerful, which makes it possible to use them even in the snowiest areas and territories.
A snow blower of this type is capable of pushing snow over a fairly long distance - up to 12 meters , depending on the engine used.
For more information about rotary snow blowers, watch the videos below:
Using an electric motor may be more advisable (see about electric snow blowers), when the area to be cleared is not very large, then you can ask the question - how to make an electric rotary snow blower yourself, using an air-cooled electric motor and handy tools?
But many years of experience show that the choice should be made on internal combustion engines, which, although more demanding to operate, can perform a much larger volume of work over a larger area.
And the absence of a cord, which significantly limits the working space, adds arguments in favor of a gasoline engine.
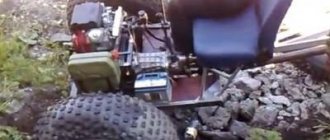
If you have various auxiliary equipment, then the question of finding a suitable engine disappears altogether. For example, you can make a rotary snow blower for a walk-behind tractor with your own hands, the drawings of which are quite widely distributed on the Internet.
The walk-behind tractor, in this case, acts as a working motor that moves the entire structure.
Principle of operation
A homemade rotary snow blower, made with your own hands, is a metal case that contains two rotating elements - an auger and a rotor mechanism . The auger mechanism is hidden in a special bucket, the width of which determines the area of the captured strip of snow. The snow removal attachment on the walk-behind tractor is quite easy to install.
After the snow cover is captured by the auger, it is transferred further to the rotary mechanism, which processes it. After this, the snow falls into the outlet chute, from where it is pushed out to a certain distance.
If you are making a rotary snow blower for a tractor, then, as in the case of a walk-behind tractor, you do not need to worry about installing the engine . In addition, the installation of wheels or tracks is also unnecessary, because the driving force will be the tractor itself.
The only thing is that you can install small skids at the bottom of the bucket to make the movement of the snow blower smoother on the snow surface.
Bulldozers can be used for transporting goods and for laying piles and pipes. Example: T130 bulldozer.
The T170 bulldozer can be operated with various equipment: bulldozer or ripper.
And the B10M is a special machine with a ripping-bulldozer complex that can operate in any climatic conditions.
Specifications
Description of auger snow blower:
- The design of the device is a metal box with a pipe.
- An auger is installed in the front part, designed to suck and grind snow.
- The rotor operates on the principle of a centrifugal pump.
- Snow is thrown out of the auger through a guide device. Spreader range – from 5 to 20 m.
- Processes a strip 20 m wide in one pass.
- Operating speed up to 5 km/h.
- Capacity 80 t/hour.
We suggest ordering additional attachments that are ideally compatible with the MTZ-82. Thanks to the tools presented in the catalog, you can complete the machine for all-season work.
Necessary materials
To make a homemade snow blower yourself, you need not only basic knowledge in welding and turning, but also some tools, which are quite difficult to do without .
Here is a list of what we will need:
- Keys of various diameters.
- Bolts and nuts (it is better to collect all available ones to make it easier to navigate in the future).
- Electric drill.
- Bulgarian.
- Screwdrivers of all types and sizes that are in stock.
- Pliers, vices and pliers.
- A regular hammer and file.
- Various chains.
- Welding machine.
As we can see, you will have to use almost the entire arsenal that most men have. It’s better to prepare everything in advance so that you don’t have to look for the right tool or screwdriver of the required size later.
Regarding materials, we will need a metal profile pipe with a cross section of 20 by 40 mm . A profile corner with the same parameters is also suitable for the frame base.
Owner reviews
Alexey, 48 years old:
I’ve been working at MTZ-82 since 2009; in winter you can’t do without a snow blower; in our tractor brigade, in this case, we have a blade that, without any bells and whistles, helps our fellow villagers out of a snow blockade. Over the years, the plow has never failed, there have been no breakdowns, everything is simple and effective: you go in one direction, then back - the passage is free.
Advantages: durability, simplicity, efficiency.
Disadvantages: none.
Instructions
It’s worth mentioning right away that to make a homemade snow blower you will have to do a little work on a lathe , adjusting the metal parts you have to the desired size.
If you don’t have one, then you can go with the drawings to the nearest turning workshop, where they will make the necessary parts for you at a very reasonable price.
Now you can start making a snow blower. This process can be divided into several stages:
- Making a screw.
- Manufacturing of a rotary mechanism.
- Installation of the casing (bucket).
- Manufacturing of the housing frame.
Making a screw
The basis of any auger is a metal shaft on which snow-grabbing elements are located . For the shaft, you can use a regular metal pipe with two journals at the ends. For gripping elements, 8 steel half-discs are suitable.
Their thickness must be at least 2 mm. Screw elements are made from them , which are subsequently welded to a metal shaft.
As a material for the rotating elements, you can use a conveyor belt having a thickness of 1 cm. We will need about 2 meters of such material. Four rings are cut from this tape, the diameter of which must be at least 28 cm.
In order for the desired auger to rotate, you need to use bearings No. 205 of a closed type so that the snow cover does not get into them.
How to make a rotary mechanism for a device
To manufacture the rotor, a metal sheet with a thickness of no more than 3 mm (2.5 mm is possible) is used . We will also need an electric jigsaw with an attachment for cutting metal, as well as a regular compass. If you don’t have a jigsaw, then you can use a grinder with an appropriate attachment for metal.
We take a sheet on which, using a compass, we draw a circle of the required diameter (in this case, this diameter will be about 3-3.2 cm). Next, cut out this circle with a grinder. Everything must be done extremely carefully, because the performance of the future snow blower will depend on your efforts.
The next step is to install the unit in the center, which will secure the rotor mechanism to the hub. You can simply weld the axle , or make a hole in the center of the required diameter for the bolt.
It is important to understand that homemade analogues are unlikely to differ from factory accuracy, so it is worth using more powerful bearings that can withstand rotor runout.
Next, you need to weld the blades that will rake snow to the resulting circle. You need at least four such blades with the same distance from each other. They are also made of metal.
Making a snow blower body with your own hands
The frame of the case is made of a metal corner measuring 5x5 cm . It is necessary to weld other corners measuring 2.5×2.5 cm to the transverse corners. The entire structure should be secured with M8 bolts.
Completing the assembly of the electric snow blower
Our snow blower is almost ready. Now we need to put together all the components that we made before.
A shaft with screw elements must be mounted on the rotor . This mechanism is attached to the housing frame using a clamping ring and several bolts. The rotor itself is attached to the frame using a special bracket.
A regular sewer pipe can be used as an outlet chute if there are no other options. For example, if we make a rotary snow blower for the MTZ tractor with our own hands, then we need to use components welded from a metal sheet.
But for a manual snow blower, a plastic pipe is quite suitable .
Forums that can help
We have prepared links to several different forums where they discuss the independent production of mounted snow blowers for various equipment:
- Here is a description of a homemade blade for a small Chinese truck. By slightly increasing the size, it can be adapted to ZIL130, GAZ53 or KAMAZ4326.
- Here they tell you how to make an auger snow blower for a mini tractor. By increasing the size and installing a hydraulic motor, it can be used with any truck.
- Here, the owner of the car, Oka, describes making his own blade. By increasing the size and modifying the mount, it can be installed on a larger vehicle, for example, UAZ 469 or GAZ 66.
- Here they describe the experience of manufacturing a blade from a steel pipe for the MTZ tractor.
Information from these forums will help you understand the complexity of making your own snow removal units.
There you will also find:
various homemade products designed to deal with snow.
Useful tips and warnings for operating a homemade rotary snow blower
The main problem with all snow blowers, whether home-made or store-bought, is the ingress of foreign objects into the running engine. To avoid this, you can use special safety bolts in the structure.
In addition, it would be advisable to use closed type bearings , which will prevent snow from getting inside the housing.
To make a homemade snow blower, you need to use lightweight materials. That is why it is recommended to use not very thick sheets of metal for the frame, otherwise the whole structure will turn out to be very bulky.
Of course, it will be very reliable and durable, but it will be very difficult to control, especially if you remove large amounts of snow.
Of course, it would be optimal to combine a homemade snow blower with a walk-behind tractor , but this device is not available on all farms. A Viking motor cultivator is perfect as a basic unit.
Conclusion
The use of homemade mounted snow removal devices where there are no conflicts with:
- traffic police officers;
- insurance companies,
seriously reduces the cost of dealing with snow.
After all, the cost of these devices, assembled from what was removed from decommissioned equipment or found at metal collection points, is tens of times lower than that of units sold in stores.
And high-quality homemade attachments are in no way inferior to those that can be bought in a store at:
In this video you can see how a Niva works with a snow blade: