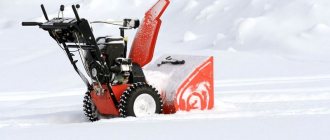
Long frosty winters with heavy and long snowfalls and rare thaws are characteristic of almost the entire territory of our country. The total height of snow that fell during the winter in most areas reaches two or more meters. Snowstorms, blizzards, and just the usual heavy snowfall, which is not uncommon, but quite common, can paralyze economic activity, cause disruptions in transport communications, lead to significant material losses and even casualties. The market of our country offers products from a large number of world-famous manufacturers of snow removal equipment. But among them, separately, I would like to highlight the German brand Huter.
This brand sells not only snow removal equipment, but also gardening equipment, electric generators and other high-tech devices to help farmers, gardeners, public utilities, etc.
HUTER snow removal equipment is represented by a large line of snow blower models suitable for different purposes and operating conditions.
The most common breakdowns
In general, quite a lot of spare parts and components can break in a snowblower (see here).
As experts note, the breakdown itself occurs as a result of improper operation of the unit by the person himself. It’s not for nothing that many user manuals explicitly state that before starting work, carefully read the instructions for the unit. But the buyer very rarely adheres to this rule. First they use the equipment, then it breaks, and then the person looks at the instructions.
By the way, there is quite useful information there, in particular, how to fill the oil, how to start it, which levers to press, etc.
There are several main breakdowns in a snow blower:
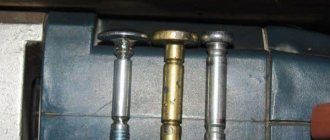
- One of the most common problems is the breakage of keys, i.e. shear bolts. They consist of soft metal, with the help of which the screw elements are attached. If the unit runs into any obstacle, these bolts are cut off and the shaft itself stops.
- The keys themselves are simply a necessary consumable that every snow blower owner should have, as they say, “in reserve.” Some seek to replace them with regular bolts, thus wanting to save on purchasing shear bolts.
- Instead, the result of such actions is the complete failure of the snow blower, resulting in replacement with a new unit. In general, shear bolts perform a safety role, i.e. protect more important components - the engine and rotor mechanism.
- In second place is belt failure. Experts advise purchasing a spare drive belt directly along with the purchase of the snow blower itself. The fact is that during operation it wears out significantly, which inevitably leads to its breakage.
- At the same time, we are talking not only about the belt going to the wheelbase, but also about the drive belt of the auger mechanism, because they are both very vulnerable.
- The next most popular problem is the problem with the friction disc. This is the component that drives the wheelbase. The friction wheel, which is pressed against the disk, when rotating, transmits movement to the wheels of the snow blower through gears.
- Increased load on the wheelbase can lead to failure of the friction ring, as a result of which the steel friction wheel will damage the soft structure of the friction disk made of aluminum.
In principle, most of these breakdowns result in the snow blower simply not starting. Therefore, repairs or replacement of components must be carried out as quickly as possible.
Trolleys for gas points are only suitable for transporting cylinders.
Hairpin carts are needed for transporting utensils in catering establishments, as well as for organizing self-service.
Gasoline generator does not start or starts and immediately stalls
Possible reasons:
- Serious mechanical damage - defects in the crankcase, broken connecting rod.
- No spark. The spark in the gas generator disappears due to a failure of the sensor relay, operation of the oil level relay when its level is too low, or wiring faults.
- Fuel supply failure due to malfunction of fuel system elements - carburetor, filter, fuel pump.
- Long interruptions in operation, which have a detrimental effect on the fuel system.
Gasoline is leaking from the oil sump in the gas generator.
The cause of this problem is a malfunction of the carburetor due to severe wear or dirt in it.
There is a spark, but the gas generator does not start
If there is a spark, but the power station does not start, or starts and stalls, or operates with the throttle closed, this means that the carburetor is clogged.
The engine starts, but the generator does not produce current
The reasons for this may be: malfunction of diodes, electrical wiring, failure of individual modules. In inverter models, the inverter board most often fails. If current is generated, but it is too weak, then the reasons for this may be: insufficient engine speed or failure of electronic components.
Why does the gas generator run jerkily?
The most common causes of this malfunction are: a faulty high-voltage wire, a dirty carburetor, problems with the spark plug. The nature of the malfunction can be determined by carbon deposits on the spark plug electrodes. Dry black carbon deposits indicate that the carburetor is faulty and/or the air filter is dirty. Dense black carbon deposits appear when the piston rings are worn significantly. The appearance of white soot is a consequence of working on a lean combustible mixture, while red and red-green soot is a consequence of using low-quality fuel.
Snow blower auger does not turn or turns slowly
Problems with auger rotation can be caused by several reasons: cutting off the protective bolts, insufficient tension or breakage of the auger drive cable, or breakage of the auger gearbox.
Replacing shear bolts
The fact that the snow blower does not spin can be caused not only by a broken auger belt, but also by shear bolts. The latter are made of soft metal and serve to fasten the auger.
If the rotating auger encounters any obstacle, such as a curb or a rock, the bolts are sheared, the auger stops, and you notice that it does not throw out snow while the engine is running. Thus, shear bolts perform a protective function and prevent damage to the gearbox, as well as the auger itself.
Replacing shear bolts if the auger does not rotate is quite simple. It is necessary to align the hole on the auger with the hole on the shaft and insert a bolt into it, then secure it with a nut or spring clip, as shown in the following photo.
Replacing the auger drive cable
Sometimes a loose auger cable causes the snow blower to not throw out snow well. This occurs because the pressure roller with the cable connected to it does not press the drive belt with insufficient force. Sometimes this cable breaks, causing the snow blower to stop working. In this case, the auger drive cable will need to be replaced. First, the cable is removed from the handle of the unit, and then disconnected from the pressure roller.
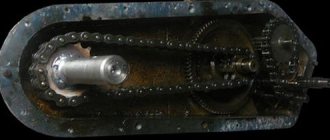
Repair of auger gearbox
Repair of the auger, or rather its gearbox, which is responsible for transmitting rotational motion to the auger shaft, is required when the latter’s shaft does not rotate or its movements occur jerkily. The gearbox usually fails due to natural wear of the gears.
Sometimes gear teeth can break if the user installs regular (metal) bolts on the auger shaft instead of trimming bolts. In this case, when the moving screw hits a solid obstacle, the bolts are not sheared, and the entire load falls on the gears of the gearbox, causing them to fail.
In the following photos you can see what new and worn gears look like.
To remove the gearbox, you will need to disconnect the entire snowblower mechanism from the engine. How to remove the auger was described above. Next, you should disassemble the auger to get to the gearbox mounted on the shaft.
The gearbox housing consists of two halves that are bolted together. Once the bolts are removed, the housing will separate and you will see a regular toothed gear and a worm gear mounted on the shaft.
Most often, the teeth on a regular gear break, so it should be removed from the shaft and replaced with a new one.
Advice! Before twisting the two halves of the housing together, generously apply graphite grease to all gears of the gearbox.
After lubrication, twist the gearbox and reassemble the entire snow removal mechanism in reverse order.
Features of the manual method
When starting the recoil starter, the user also needs to comply with a number of requirements:
- before starting, the operator must check the oil level, only after this the auger and wheel locking levers are lowered;
- the lever responsible for supplying fuel is moved to the open position;
- as in the previous case, the cap from the electrical wire is securely fastened;
- the throttle valve must be closed, so check the position of the lever responsible for its position;
- the starting switch is switched to the “On” position;
- Fuel pumping is done manually, to do this, press the corresponding button several times, after which the starter cable is pulled towards you until resistance becomes noticeable, now you can sharply pull it to get the engine to work;
- the throttle valve opens.
And in this case, the motor must warm up before the user begins to operate the equipment. If the specified requirements are not met, additional stress will be placed on the engine, which will negatively affect future performance.
Preparing equipment for work
Immediately after purchase, the device must be prepared for use. This happens in several stages:
- instructions are studied;
- an external inspection of the product is carried out;
- the oil is checked and gasoline is added;
- immediate launch is underway.
There is no particular point in talking about the need and importance of studying the instructions. This is an obvious measure that many people like to neglect
In order for the equipment to serve for a long time, it is still recommended to study the manual from the manufacturer. Among other things, it will provide information on suitable oil and gasoline, as well as safety measures during operation.
External inspection of the product
allows you to assess the condition of the equipment and detect obvious damage. First of all, this concerns wires and cables: they all must be intact and not kinked. In addition, it would not be superfluous to check the strength of all bolts and nuts. If somewhere something is not tightened tightly enough, then it should be corrected.
The next stage is the assembly of equipment
In some cases, individual components can be removed and during assembly it is important to act according to the instructions, since otherwise serious damage may occur even at the first start-up
Next, you need to fill the gearbox with oil. In some cases this happens at the factory. To check, you need to open the drain hole. If nothing is leaking, then you need to make sure that it is not clogged, and then fill it with fresh oil. It must have certain properties and be suitable for this type of equipment
It is very important that the oil is suitable for low temperature applications
Advice! If there was oil in the gearbox from the factory, then it needs to be drained and then filled with new oil. It is not recommended to use existing oil.
After checking the gearbox, you can move on to the auger. Here you should check all the bolts on the side bearings, as well as those that secure the auger shaft. If there are no slots in them, then they are not shear. In this case, the bolts need to be changed, otherwise if solid objects get in, the entire auger will be damaged. The screw itself must be removed - this is necessary to lubricate the shaft and bearings
oil This will not only reduce friction and extend the life of these elements, but also increase the snow throw range due to smoother rotation of the auger.
Why doesn't the car start if the battery is charged?
Experienced motorists are well aware that many car malfunctions appear at the moment when an attempt is made to start the engine. Regardless of what kind of engine you have, gasoline or diesel, carburetor or injection, atmospheric or turbocharged, it happens that it simply refuses to start. In many cases, this is accompanied by the fact that the starter simply does not turn. If this is exactly what happens, then the reason is found quite simply, since in 99% of cases it is that either the battery is dead, or the starter itself, as they say, “decided to live a long time.”
How to properly start an electric starter?
The electric starter is a small button located on the control panel of the snow blower. Its advantage is that the user does not need to perform additional actions to activate the motor - you just need to press start.
The process looks like this:
- at the very beginning, the user must put the fuel lever in the desired position, that is, open the fuel supply valve;
- on the upper half of the spark plug there is a cap from the electrical wire, which must be fixed in a stationary state;
- the lever responsible for the position of the throttle valve is moved to the closed position, that is, it must be moved all the way to the right;
- now the position of the trigger lever changes from closed to open;
- to manually pump fuel, the user must press the pump several times;
- now you can press the starter button, but do not release it immediately, but hold it until the engine starts (holding time is about ten seconds, no more is required, and if nothing happens, wait a minute and start again);
- After the engine begins to run stably, the throttle lever is moved to the open position.
Allow the engine to warm up slightly before cleaning the area. On average, this takes from five to seven minutes.
Equipment care - how to extend the life of snow blowers?
In order not to have to think for a long time about how to start the snow blower engine and why it constantly stalls, you should adhere to a number of preventive measures that will help extend the life of your household equipment. So, a very important rule is the correct preparation of the unit for storage in the spring and summer. The car owner is required to:
- Drain any remaining fuel and oil from the snow blower's engine and gearbox before storing it. Without doing this, the lubricants will dry out, as a result of which the walls of the oil and fuel tank may crack;
- Wipe all parts of the snowblower body dry with a rag. This will help protect the paintwork of the unit from corrosion;
- Immediately before starting the engine before winter operation, you need to reactivate the unit. To do this, you need to fill the appropriate containers with new fuel and oils. This procedure also includes a mandatory check of the spark plugs, drive belt tension and condition of the starter belt.
An important factor is the quality of the oil used. It is best to use a seasonal lubricant that does not have a high viscosity. Such a composition will be evenly distributed between important parts and mechanisms, and will retain its characteristics for a long time.
Snow blowers are specially designed so that they can operate stably at low ambient temperatures. Such equipment rarely has breakdowns, but most of them are associated with incorrect starting, when it turns out that the unit does not run in cold weather.
How to start a snow blower - procedure for equipment with electric and manual starter
Most breakdowns of snow removal equipment are associated with its improper use. Snow blowers especially often fail as a result of improper starting. A number of important mechanisms responsible for the smooth start-up of the engine and other machine components suffer from this.
To prevent premature breakdown of equipment, you need to turn it on correctly. If the snow blower is equipped only with an electric starter, then it must be started in the following order:
- First, you will need to move the snow blower fuel valve lever to the “On” or “On” position;
- Then you need to firmly fix the cap from the high-voltage wire on the top of the spark plug;
- After this, you will need to move the throttle lever to the “Closed” or “Choke” position. To do this, you need to move it all the way to the right;
- Next, you will need to move the starting switch lever to the “On” or “Enabled” position. After this, you need to press the pump several times to manually pump up the fuel;
- Then you need to press the starter button located on the snow blower body and hold it until the engine starts. It is not recommended to hold your finger on the button for more than 10 seconds. If the engine does not start, it is better to wait a few minutes and press the starter button again;
- Once the snow blower engine starts, you will need to move the throttle lever to the “Run” or “Open” position. After this, you need to give the engine some time to warm up. After 5–7 minutes you can start removing snow.
To start a snow blower with a manual starter, you should follow this algorithm:
- First of all, you need to check the amount of engine oil. Then you need to move the auger and wheel locking levers to the fully lowered position;
- Then you will need to move the fuel supply lever to the “On” or “Enabled” position;
- Next, you need to firmly secure the cap of the high-voltage wire to the spark plug;
- After this, the throttle lever must be moved to the “Closed” or Choke position;
- The start switch will need to be moved to the “On” or “On” position;
- Then you need to press the manual fuel pump button 3-5 times and slowly pull the starter cable towards you until resistance is felt. After this, you need to pull out the cable with a sharp jerk so that the snow blower engine starts;
- After this, you will need to move the throttle lever to the “On” or “Open” position and give the engine time to warm up.
Friction ring repair
The friction ring is a transmission part that allows the snow blower wheels to move.
The ring is installed on the clutch wheel.
During normal operation of the snow blower, in compliance with all rules for switching gears, the friction ring is subject to very slow wear. But if the rules are violated, this element quickly wears out and fails.
The reasons for wear of the rubber clutch ring may be as follows.
When the unit is operating, the user changes gears without stopping the device. In this case, the rubber seal experiences heavy loads and wears out. When the ring wears out, the metal ring also deforms, after which the snow blower stops moving. Rapid wear of the ring and the appearance of deep grooves on it causes careless operation of the unit. That is, the operator allows the wheels to slip, for example, on inclines, on difficult sections of the road or in large snowdrifts. Also, the clutch wears out due to banal corrosion of the ring as a result of dampness. If after work you do not take preventive measures to remove snow residues from this block, the ring rusts, crumbles, and the clutch ceases to perform its functions.
When the clutch wears out, the unit begins to move jerkily or stops completely. Problems also arise when switching the speed of movement of the unit and when switching the direction of movement (forward and backward).
Do-it-yourself friction disc repair is carried out as follows.
- drain the gasoline from the tank; set the unit to the technical position. maintenance as shown in the following figure;
- remove the wheels from the unit; remove the crankcase cover by unscrewing 4 or 6 bolts (depending on the model of the device); remove the chassis; remove the right and left flanges (see figure below) - these are covers covering the bearings;
- Move the hex shaft to the left and remove the friction disc from it.
If not only the ring, but also the wheel itself is worn out, then a complete replacement of the clutch will be required. To replace the rubber ring, unscrew the 4 bolts, remove the worn part and insert a new one into the disk, then tighten the fasteners again.
Reassembling the entire friction unit and the snow blower as a whole is carried out in the reverse order.
The main reasons why a gas generator does not work or works intermittently
This power equipment requires a professional approach to maintenance and repair. Only employees of service centers equipped with modern diagnostic equipment and repair tools will be able to quickly identify the problem, eliminate it and carry out maintenance. The most common problems are those listed below.
Tips for proper use of a snow blower
In order to extend the life of the snow blower and reduce the likelihood of various malfunctions, you should adhere to certain rules for caring for this type of equipment.
Before winter sets in, you should check all the mounting screws on your snow blower and tighten them if necessary. You should also check the tension of the belts and the serviceability of all moving parts of the unit. After turning the device over, check the integrity of the scraper shaft, whose task is to scrape snow from the ground. If this part is worn out and is not replaced in time, then in the future this will cause damage to the auger body. Monitor the oil level in the engine crankcase. For these purposes, there is a special probe on the crankcase body. The more often you check the oil level, the less likely it is for engine failure. On average, the oil will be used up after 25 hours of operating the snow blower. After finishing snow removal, do not immediately turn off the engine of the unit. It is necessary to let the device run idle with the auger rotating. This will allow the moving parts of the snow blower to clear away any remaining snow and ice. It is also recommended to pour warm water over the unit components covered with snow or ice, then wipe and dry them. If moisture has entered the mechanisms of the unit, it can be removed using kerosene in the form of a spray (sold in cylinders). After cleaning, the snow blower should be stored in a warm garage or other area. Check and clean the spark plug at least once a season. If necessary, replace the part with a new one. Also, once a season you need to lubricate all bearings, gearbox and eccentrics. For lubrication you can use LITOL-24. Before sending the snow blower for long-term storage, it is necessary to: remove accumulated dirt on all parts of the unit; remove all moisture from all components of the device; drain all gasoline from the tank and lubricate all its working elements; remove the battery (if it is provided for in the design of the unit) and store it separately from the device.
As for electric snow blowers, they are cared for in the same way as gasoline units, with the exception of the rules for servicing the internal combustion engine.
Published in for the dacha
"How to make a garden shredder for grass and branches with your own hands from a washing machine, trimmer, grinder. How to make a mini tractor with your own hands at home: drawings with dimensions, assembly diagram"
Different types of snow blowers
There are three main designs:
1. The two-stage design of the snow blower is the most productive and includes an auger and an ejection impeller. These snow blowers are capable of cleaning large areas. An additional impeller helps throw snow up to a distance of 20 m. Such snow blowers are equipped with both wheel and track drives. The power of such devices varies from 5 to 12 horsepower. These snowblowers are the most common, as they have the power to clear large areas and heavy, loose snow. Such snow blowers are equipped with electric starters powered by 220 volts, but making starting in cold weather much easier.
2. A single-stage design, it has only an auger - a drill, which simultaneously scoops up snow and throws it through the chute. These snow blowers are not designed for use on gravel surfaces and are used primarily for clearing sidewalks.
3. Electric snow blowers have an electric motor and are powered by mains power. In our opinion, such snow blowers are extremely inconvenient and impractical for removing snow. Constant contact of an electrical appliance with water (snow), the need for a 220 network and low power are absolutely incompatible with mechanized snow removal.
Snow blower problems usually begin as a result of neglecting the basic maintenance requirements of the machine. As with any other garden equipment, such as: garden tractors, lawn mowers, or gas generators. The oil in your snow blower needs to be changed regularly. Fuel filters also need to be replaced and fuel stabilizers are also added to keep it fresh and functional.
Here are some steps you can take to fix the engine starting problem and prepare your friend for a real snowstorm.
Step 1 - Throttle Position
Check the throttle valve and its position. When you start a cold engine, make sure the throttle is in the cold start position. The throttle position depends on whether the engine is hot or cold: it should be closed for a cold engine and open for a hot one.
Step 2 - Check the carburetor
Make sure the engine is getting fuel. If the fuel valve is off, simply turn it on. If this is not a problem, then the carburetor sump is most likely clogged. While the snow blower is idle, which is 7-10 months in central Russia, adhesive deposits often develop in the carburetor. In the future, this problem can be avoided by adding a stabilizer to the snow blower's gas tank before storing it for the summer. After adding the stabilizer, start the engine so that the new mixture passes through the entire fuel system. Cleaning the carburetor and going to a workshop is a more complicated procedure than adding stabilizer.
If the snow blower does not start, you can spray a little gasoline into the combustion chamber; if the engine starts and stalls, you need to clean the carburetor.
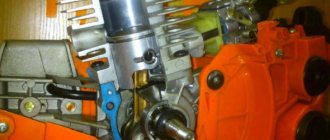
Step 3 - Inspect the spark plugs
Make sure the spark plug is fully tightened. Also, remove the spark plug and check for dirt. The spark plug may need to be cleaned of carbon deposits. Set the correct gap with the electrode. If possible, it is better to put a new candle.
Step 4 - fuel quality
If you start a snow blower for the first time this season, it is better to replace the fuel with new one. Use only high-quality gasoline from certified gas stations.
Step 5 - for some snow blowers
Some snow blower models have an oil sensor. Sometimes it crashes, try turning it off.
Maintenance and repair of snow blowers of any complexity. 8(499) 390-93-49. Workshop "South-East".
Modern snow blowers are fairly reliable equipment that can withstand increased loads for quite a long time. However, they often succumb to improper operation, strong mechanical shocks and simple wear of components, which leads to the breakdown of important working units. The first thing to do in this case is to find the cause of the malfunction and try to fix it yourself.
Replacing drive belts in a snow blower
Snow blower drive belts are designed to transmit rotational motion from the drive shaft to the driven shafts.
There are 2 types of belts installed in snowblowers. The first belt connects the unit’s auger shaft with the drive shaft, and the second transmits rotational motion to the wheels.
Therefore, if the snow blower does not move forward, or its auger does not rotate, then you need to check the belts and, if necessary, replace them. To install the belt on your snow blower, follow these steps:
Disconnect the chute from the snow blower. Remove the protective cover covering the belt pulleys.
Disconnect the screw mechanism from the engine of the device by unscrewing several bolts.
Next, you need to put a new belt on the snow blower pulley, that is, on the pulley of the auger mechanism. The size of the belt should be the same as that of the broken one.
Pull the auger mechanism (you may need the help of another person) to the engine and put the belt on the drive shaft pulley so that on one side it falls under the pressure roller with the spring attached to it. The roller serves to tension the belt. When you screw the auger mechanism to the engine, replacing the auger belt will be completely completed.
In cases where the unit refuses to move, there may be 2 reasons: wear of the friction ring and rupture of the wheel drive belt. If everything is in order with the clutch, then to fix the breakdown, all that remains is to change the drive belt.
Replacing the wheel drive belt is done in the same way as replacing the auger belt. Only after disconnecting the auger mechanism should you remove the cover hiding the wheel drive pulley (indicated by the arrow).
Why the snow blower won't start: causes of breakdown and repair options
When purchasing a snow blower powered by an electric or gasoline power source, each user expects the machine to operate for a long time. But in this world, nothing is perfect, including Chinese equipment purchased for clearing snow from the local area; it breaks down. Of course, you can go to a service center, but the cost of local repairs can sometimes be comparable to purchasing a new car. Depending on the price of specific components. Based on this situation, some people decide to repair their walk-behind tractor themselves. This material is intended for those who want to know what problems snow blowers can have. We will tell you when repairing snow removal equipment yourself is justified, and what to do if the engine does not start for some reason.
Design Features
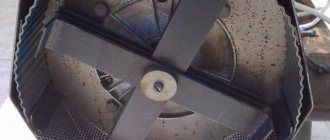
The design of all snow blowers, regardless of the engine and type of movement, is similar. In addition to the engine, which can be electric or gasoline, there is a bucket. This is a device within which the auger shaft is fixed (if the machine is equipped with an auger). How wide the bucket is determines how much area the snow blower can cover in one pass. An auger is a metal shaft plus screws attached to it. They are attached in the direction of the center of the shaft, as they must rake snow.
The outlet pipe looks like a pipe; it throws snow mass at a distance of three meters. The pipe can be made of metal or plastic. As for the chassis, the snow blower can be on wheels or on tracks. An important part of the snow blower is the rotor, located inside, which crushes the snow and directs it to be discharged towards the outlet pipe.
What can break?
The most common reason why your snowblower won't move forward is because the keys are broken. The so-called shear bolts are made of soft metal specifically so that if a foreign element gets into the screw mechanism, the motor does not burn out from overvoltage. Thus, the snow blower engine will be saved thanks to consumables - keys. You should always have them in stock. Then you won’t have to think about how to start the snow removal device at the right time
It is important to note that if you do not want to have a more serious breakdown of your blower and have to take it to a snow blower service, then you should not replace the soft keys with harder bolts. They will not be able to act as fuses and protect the rotor mechanism with the engine.
In second place in terms of the frequency of breakdowns are belts. Professionals who repair snow blowers recommend purchasing several drive belts at once, as a mandatory addition when purchasing the machine itself. Belts are vulnerable to most snowblowers. Both the one that goes to the wheelbase and the one that works with the auger mechanism. They wear out during operation and tear. If your car stalls as a result of such a malfunction, you just need to change the belt.
The wheelbase moves as a result of the action of the friction disc. This is a whole system that involves gears and a friction wheel. The point is that if you overload the wheelbase of the car, the friction ring will be damaged. As a result, it will damage the soft aluminum friction disc. Sometimes the car will not start because the starter needs to be repaired. This process is simple, since you just need to replace the old cord with a new one.
Subtleties of repair
Let's consider the process of independent repair actions using the Craftsman snow blower as an example. If the starter has failed and needs to be replaced, then first the old cord is cut off. The knot inside the starter is untied, after which the entire mechanism must be rotated for seven full revolutions against the sun. A screwdriver should be inserted between the ribs of the mechanism to prevent it from starting to move back. Next, you need to insert the new cord into the hole intended for it and tie it tightly. Then carefully remove the screwdriver, without releasing the cord, but holding it. The cord will be wound onto the reel itself, using the return movement of the starter mechanism.
Snow blowers can sometimes experience abnormal vibration. Then you should make sure that everything is in order with the engine mount. Most likely, they need additional tension. Sometimes there are also problems with the gearbox. This means that the gear located inside the mechanism will need to be replaced. This gear can wear out, causing problems and leaving you unsure how to start your snow blower.
Characteristics
It is strictly forbidden to use the Hooter snow blower for purposes other than its intended purpose.
- It is always necessary to control the direction of snow emission. There should be no living creatures or fragile objects in its path. There are many reviews on the forums regarding failures in this case;
- If it is necessary to carry out work on an inclined surface, it is recommended to carry out cleaning from the bottom up, otherwise the owner may lose control of the snow removal equipment;
- The gasoline engine must be refueled before use. If refueling is necessary, first stop the Hooter snow thrower and turn off the engine. It is prohibited to carry out this work while moving;
- Before cleaning, check the tightness of all bolts;
- After finishing using the snow blower, it is necessary to clean its pulley and reflector from any buildup.
The entire range of Huter snow blowers has a similar design, but each of them differs in its technical characteristics.
There are two levers on the Huter SGC 4800 steering bar. On the left side of the operator is the auger drive lever, and on the right side is the self-propelled wheel drive lever.
The gearbox has 7 positions: 5 for driving forward and two for driving backward. However, on the forums they say that the speed of movement back is not enough.
The Huter SGC 4800 snow blower has a headlight that allows you to work even at dusk.
After purchasing the Huter SGC 4800 snow blower, you must study the operating instructions. It is included in the basic kit upon delivery.
The operating instructions describe in detail the technical characteristics, maintenance and all the nuances of working with this equipment and ways to solve possible problems. If there is none, then the information can be found on the forums, or downloaded from the link.
If you are the first owner of a Huter SGC 4800, then it is recommended to break it in a little. This is done to ensure that the engine and screw mechanism parts fit into the required grooves, get used to each other, and the equipment operates at maximum technical specifications. After all, small errors are possible in the factory assembly of snow removal equipment.
Running in involves using snow removal equipment in a gentle manner. It is advisable to do this in the summer before snow falls. Just roll the Hooter on the ground. If snow has already fallen, then before running in, let the engine idle for 5-10 minutes, and then slowly and at minimum speed, start cleaning.
After completing the break-in of the Huter SGC 4800 snow blower, it is recommended to change the engine oil.
It is important to change the oil in the snow blower engine on time. According to the operating instructions, this should be done every 25 hours of machine operation. After this interval, mechanical impurities and other harmful particles form in the oil, which can not only clog the oil system, but also lead to more harmful problems.
The following video review shows how oil is drained from the engine.
Huter SGC 4800 is easy to maintain.
The Huter SGC 4800 gasoline engine operates with AI-92 or AI-95 fuel. Do not use old or dirty gasoline.
If you do not plan to carry out work within 1 month, then you need to drain the oil and gasoline from the device, remove any remaining snow and ice, lubricate the spark plugs with engine oil and remove the caps from them, and then cover and place in a place protected from precipitation.
One of the main spare parts in a Huter snow blower is the gearbox. It drives the auger and self-propelled wheels. In order for the gearbox to work correctly, it is necessary to tension the belts on the gearbox. If they are weakened, then movement will be impossible. If it is too tight, then when receiving loads there is a high risk of breaking the drive belt from the gearbox.
The following video review shows how easy it is to adjust the snow ejection:
If any malfunctions occur, the manufacturer of huter sgc 4800 recommends contacting a service center rather than doing repairs yourself. However, often the solution to the problem can lie on the surface and take several minutes.
- Check the drive engagement cable
- Check the condition of the snow blower wheels
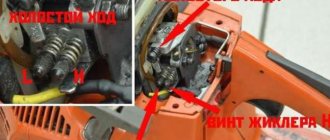
If the engine runs rough
To do this, you need to adjust the position of the fuel and air supply bolts. If little fuel enters the carburetor, the machine will not operate at full power; if there is too much fuel, the snow thrower will work in quick bursts, since a large amount of energy will be released when burned in the engine.
In this case, it is necessary to securely fix the high-voltage wire on the spark plug.
It is necessary to drain the old fuel, clean the filters and fill with new gasoline of good quality.
If possible, clean the filter; if this is impossible, or it is faulty, then repair is impossible and it should be replaced.
This is not a malfunction, it is rather a nuance of operation that arises during operation. Because the snow may melt a little and stick to the walls of the gutter. Therefore, it should be cleaned periodically. To do this, turn off the engine and remove the cable from the spark plug in order to prevent accidental starting of the engine. Indeed, in this case, serious harm to the health of the owner can be caused. If the snow is loose, then remove it with a brush; if it is stuck, then use a shovel.
In this case, it is necessary to check its condition and, if necessary, tighten it.
- Loose fasteners
Often, when a solid object gets into the auger, it can become deformed. Therefore, it is recommended to always adjust the adjustment shoes. If deformation has already occurred, then further repair of the auger is impossible, then you should contact a service center for repairs.
Below are reviews from the forums from Huter SGC 4800 owners.
“On the plus side, it can be noted that the device has high performance, and the snow is thrown far, especially in the wind. It is simple to operate. The price-quality ratio is at a high level. The gutter is easily adjustable. The gasoline engine is capable of operating even in deep snow (does not stall).
The height of the control bar is not adjustable, and is designed for a person of average height, and with my 205 cm, I have to work in a hunched position, and my back often gets stiff.”
“Snow falls a lot and in abundance in our winters. I live in the suburbs and have no one to rely on but myself, and I no longer have the strength to shovel the snowdrifts by hand. That's why I bought a Huter 4800. It does its job perfectly. I mainly use the car in the evening because I have to go to work during the day. In this case, a headlight helps a lot. The machine even removes sticky snowdrifts. The neighbor down the street has a smaller snow blower and it is slipping. And my rush is like a tank. 100% satisfied with the purchase"
An electric generator with a gasoline engine is power equipment designed for autonomous power supply to objects that are located far from the centralized power supply network or during power outages. A gasoline power plant is most often used as a backup and emergency power source. The main components of a gas generator are an engine and an electricity generator.
Repair
Different models of snow blowers may experience quite different breakdowns of some components and working units. This is due mainly to the individual design of individual machines, as well as to some design aspects.
At the same time, the repair methods will be almost identical to those for other models of snow blowers. Let's look at a few specific examples of home renovations.
Craftsman
If your Craftsman snow blower has an exhaust chute that is not working properly, i.e. does not throw the snow mass out, then you need to do several manipulations. To begin with, we check whether the safety bolts located to the left and right of the gearbox have been cut off (see here).
If the problem is not with them, then the entire repair process will boil down to the following:
- We disconnect the bucket from the frame structure of the snow blower.
- We take out the gearbox.
- Next you need to open it and check the worm located on the shaft. Most often, the problem lies precisely in it - it is cut off from the shaft.
- The repair will consist of purchasing a new worm pair, which needs to be installed on the shaft.
What to do if the Patriot device does not work well
Quite often a situation arises when the engine of a snow blower simply does not start. To fix this problem you need:
- It is necessary to check the engine compression using a compression gauge. The optimal value is from 6 to 9 atmospheres. If it is normal, then move on to the next step.
- The problem may also be in the starter. Repairing the starter itself consists mainly of replacing the cord with a new one. The design of the starter provides a return mechanism, as well as a hole where the cord is threaded.
- First you need to cut off the old cord and untie the cord knot inside the starter that holds it in place.
- Rotate the mechanism counterclockwise, making 7 full turns. We insert a screwdriver between the ribs to block the return movement of the mechanism.
- Next, we stick a new cord into the corresponding hole; at its end you need to tie a fairly tight knot.
- Next, simply remove the screwdriver while holding the cord. The return mechanism itself will wind the cord onto the reel.
Patriot
Analysis of Energoprom
If during operation you notice that the Energoprom snow blower produces abnormal vibration, then you need to check the engine mounting. Most likely, this is the problem, and you just need to tighten these fasteners better.
Model range of Huter snow blowers accepted for repair
We repair the following models of Hooter snow blowers:
- Models of gasoline snowblowers and snow blowers Huter
repair of gas snow blower Huter SGC 3000 - Huter SGC 4000 petrol snow blower repair
- Huter SGC 4100 petrol snow blower repair
- Huter SGC 4800 petrol snow blower repair
- Huter SGC 6000 petrol snow blower repair
- Huter SGC 8100 petrol snow blower repair
- Huter SGC 8100C petrol snow blower repair
- repair of electric snow blower Huter SGC 1000E