How to make a cutter for a mini tractor with your own hands
A cutter for a mini tractor has several types and a specific purpose, which will be discussed further. The mini tractor has long been firmly established in the lives of farmers as one of the indispensable assistants when cultivating the soil on their plots and on larger areas. Despite the considerable cost of such equipment, it is invariably in great demand, if only for the reason that it easily copes with all the tasks assigned. In addition, additional equipment can be attached to each tractor, which significantly expands the scope of application of the equipment.
Types of milling cutters for soil treatment
Despite their versatility, all commercially available cutters for tractors are divided among themselves according to their purpose.
According to this factor, equipment can be of the following types:
- cutters for continuous processing of the soil - these include garden, swamp and field devices used for uprooting stumps and plowing the soil before planting forest crops;
- specialized cutters designed for digging and cleaning trenches;
- inter-row cutters - these tools are used for plowing soil between rows during the period of active growth of crops:
- combined rototillers - these devices include milling-seeding and milling-row-crop complexes.
All of the listed types of cutters show the highest productivity in certain areas of operation. Their designs are designed to withstand the highest loads in the most difficult weather conditions.
What is the purpose of a mini tractor cutter?
One of the most popular and popular mounted units is the tiller. Today we will learn how to make a cutter on MTZ with our own hands. Including a milling cutter for a mini tractor from the Minsk Tractor Plant - MTZ 82.
A tractor cutter is a tool that can perform many different functions aimed at cultivating soil on different plots of land. The considered homemade rototiller for a mini tractor is recommended for use when working in areas where there are no large root systems of trees and large stones. The mini-tractor cutter is divided into 2 main types.
A tillage cutter for a mini tractor, equipped with saber-shaped knives, is the most common type of this attachment. The shape of the blades allows the equipment to easily cope with a large flow of tasks without the threat of harm to the health of the tractor driver. If such a tiller on a mini tractor hits a stone, the blades simply lift it and continue to work. For the manufacture of such equipment, very high quality steel is used. The cutter is dismountable, the unit can be assembled within a minute.
“Crow’s feet” is also a popular type of cutter for a Belarus mini-tractor. It is used when necessary to remove weeds from the soil and when working in virgin lands. The equipment has a significant drawback - low strength, the cutter requires repair work and special care.
Among the functions of the rototiller for the tractor are the following:
- effective weed control and reducing their growth to zero;
- good loosening of the soil;
- an established process of mixing soil with fertilizers.
Operating principle and types of cultivators with a cutter
The increased interest in implements with a rotary cutter is due to the opportunity to obtain high quality soil treatment in one pass of the working body of the unit. Cultivators of this type are especially popular when cultivating small plots of land for planting vegetables. The machine operates by dynamically loosening the soil by rotating an active body equipped with ripper knives.
Rotary cutter device
The supporting structure is a rectangular frame made of metal beams with a three-point attachment for the rear linkage of the tractor. Vertical posts are attached to the left and right sides of the frame, in the lower supports of which the active organ rotates on bearings. The cutter itself is a tubular shaft with knives pivotally attached to it. The cultivator is driven by an independent tractor PTO. The rotational moment on the cutter is distributed by the gearbox included in the cultivator through chain or gear drives. The rear bumper bar as part of the structure allows you to increase the degree of crumbling of soil clods. Its position regulates the degree of soil grinding. To prevent mechanism breakdowns when unacceptable loads occur, a safety clutch is installed in the drive structure. The depth adjustment is carried out by setting the level of the support wheels or shoes. For good penetration, some models are equipped with one or two powerful pointed arms, attached with their racks to the front beam of the cultivator frame.
Gear side transmission of tiller
Chain drive of tiller
Advantages of the cutter
The active rotating cutter of the cultivator, together with ideal loosening, ensures surface leveling, effective moisture retention in the soil, and crushing of the root system of weeds and crop residues of the previous crop.
- Processing with a milling cutter frees you from multi-operational preparation of areas for planting or sowing, that is, one pass replaces continuous cultivation and harrowing.
- Such complex processing reduces the time for soil preparation, which allows sowing or planting in a short agricultural time frame.
- In some cases, on well-groomed areas, with light physical composition of the soil, spring tillage with a milling cutter frees you from pre-autumn plowing.
- When processing, the cutter does an excellent job of incorporating organic fertilizers pre-distributed on the surface of the treated area.
Types of cultivators with a cutter
In addition to the design differences in the method of driving the device, the design of the cutter and the shape of the knives are fundamental, determining the nature of the processing with the fulfillment of agrotechnical requirements and the ability to work in special conditions.
According to the nature of soil cultivation, active organs are divided into:
- Vertical cutters - loosening with straight knives occurs in a vertical plane without turning the soil
- Horizontal cutters - soil is crushed using curved knives (L-shaped) with partial rotation
- Combined cutters with knives of various shapes that perform loosening, partial soil mixing, chopping weeds and crop residues
According to their purpose, cutters are divided into:
- Lightweight general-purpose working tools for continuous cultivation of plowed areas in preparation for sowing or planting with a processing depth of up to 15 cm,
- Heavy cutters designed for basic and pre-sowing tillage, for plowing turfy areas and virgin soil to a depth of up to 30 cm
- Mills for preparing for planting certain types of crops with the ability to install bed formers and hillers
- Cultivators with rotary cutters are capable of, in addition to loosening the soil, crushing roots and tall crop residues
- Cultivators with a cutter for continuous cultivation of rocky soils in mountainous areas
- Equipment with cutters for inter-row loosening of row crops
How to make a rotary cutter with your own hands
Attachments for a mini tractor, including a rototiller for MTZ, cost a lot of money, which can significantly hit the pocket of an ordinary farmer. Homemade products come to the aid of craftsmen - a homemade milling cutter for a tractor, with the proper skill, can be made in the shortest possible time and is in no way inferior in quality to factory models. A homemade milling cutter for a minitractor will save a significant part of the tractor driver’s budget, however, before you start constructing the unit, you should think about whether you have the required amount of free time and minimal skills in this path. First of all, you need to familiarize yourself with the design of the cutter.
A homemade rotary cutter at MTZ should be made of five main elements:
- Main shaft.
- Gearbox.
- Cutting elements attached to the shaft.
- Protective cover.
- Support frame with wheels.
The specifics of the functioning of a rototiller are quite simple. The main wheels of the equipment transmit the rotation impulse to the main shaft when the mini tractor moves. The knives with which the unit's shaft is equipped begin to rotate, thereby lifting the top layer of soil and turning it over. In principle, the whole technique is similar to digging up an area with a shovel, with the only exception that with the help of a hand-made cutter at MTZ, this can be done much more efficiently and quickly.
To make a cutter for a mini tractor with your own hands, you must first acquire the necessary equipment, such as:
- wrenches of different sizes;
- drill;
- Bulgarian;
- welding machine.
You will also need fastening tools - bolts and nuts. Before assembly, you need to carefully study the drawings, which can be found in large quantities on the Internet. After all the equipment has been prepared and the drawings have been studied, you can proceed to assembling the apparatus.
The attachment assembly process begins with the manufacture of the support frame. For it you will need channels, you can also use a pipe with a diameter of 4 cm. The element is cut into 4 equal parts, which will subsequently be welded together. The width must be selected in accordance with the power of the mini tractor’s power plant.
You need to take care of installing the wheels in advance, since they help regulate the depth of immersion of the attachment into the soil.
The shaft is fixed to the frame. The role of the shaft can be played by a pipe with a diameter of at least 5 cm. Fastening is carried out using bushings and bearings.
One of the key points is making knives from metal plates. The number of cutting elements must correspond to the width of the shaft. The knives are secured to the shaft using bolts and other fasteners.
Now we can assume that the homemade milling cutter for the tractor is ready. You just need to treat all the working elements of the system with grease and run it in to understand whether you have assembled everything correctly.
And if you decide to buy a ready-made rototiller, be sure to read the instructions for use before you go out to work. Proper operation and care of the equipment will allow you to not think about repairing such expensive equipment for a long time.
Soil milling machine and crow's feet cutters for walk-behind tractor
A soil tiller for a walk-behind tractor is used to destroy weeds, intensively crumble soil, mix soil layers, level the field surface and wrap fertilizers. Milling cutters are used especially effectively when heavy, waterlogged soils are processed, silty layers are developed, hummocks are cut off, and meadows and pastures are improved.
Soil mill for walk-behind tractor
A tiller for a walk-behind tractor is used during the pre-sowing period in the spring, after moldboard cultivation. It is not recommended to use cutters on light soils to avoid spattering.
Externally, rototillers look like bent knives or sabers, which are attached to a shaft in a certain order. The shaft rotation speed reaches 200 rpm. It is hung on the back of the walk-behind tractor. The operation of the rototiller depends on the power take-off shaft. The cutter gives better results when the speed of movement increases.
Diagram and device of a cutter for a walk-behind tractor
Thanks to their saber-shaped shape, cutters for walk-behind tractors are safe to use. If the walk-behind tractor hits a root or stone, the cutters lift it like a car wheel, while continuing processing. If the cutters are straight, then they can catch on an obstacle and overturn the walk-behind tractor. The consequence may be the operator losing his balance and possibly falling onto the cutters.
The knives are attached to plates, which are welded to the shafts at various angles. Thanks to this, the cutters enter the soil smoothly, one at a time. This has a positive effect on the transmission of the walk-behind tractor.
Carbon steel is used to make knives. If you have access to a forge, using a spring, you can make such knives.
For the manufacture of other parts, the following steel grades are used: St-25, St-20, St-10, which are easy to weld.
Soil milling machines with crow's feet for walk-behind tractors
To give greater strength to the cutters, they are made of steel, all-welded and non-separable. These cutters are called crow's foot cutters for walk-behind tractors. They are successfully and effectively used when working with hard soil. They are installed on almost any motor-cultivator or walk-behind tractor.
The main thing is that the axle diameter is correct. Houndstooth cutters are ideally used when there is hard soil to plow it “under potatoes.” They are also used for prevention against garden pests (wireworms or Colorado potato beetles) or for quickly plowing the garden.
Crow's feet cutters are divided into 3 and 4 rows. If the axis diameter is 25 mm, 3-row cutters are used for motor cultivators Texas, Krot, Caiman, Neva, and 4-row cutters are used for walk-behind tractors Farmer, Salyut, Favorit. If the axis diameter is 30 mm, 4-row cutters are used for walk-behind tractors Cascade, Pubert, Master Yard, Neva.
Do-it-yourself active cutter for a walk-behind tractor
Typically, an active cutter for a walk-behind tractor is sold complete with the walk-behind tractor. But sometimes you need to get the job done using specialized cutters that are not sold anywhere. In this case, you need to make cutters for the walk-behind tractor yourself.
In this case, you can go two ways: make the cutter yourself or order production from a master. The first option is quite labor-intensive. But a little time and money will be spent on manufacturing the cutter, as well as the cost of materials.
The second option has a number of advantages: the master has all the necessary tools and materials, and as a result the cutter will be more practical.
First you need to think about the functionality and design of the cutter. To do this, you should familiarize yourself with the analogues. To achieve maximum functionality and safety, all design details must be taken into account.
If the cutter design contains figured or pobedite elements, their production is ordered in the workshop. And other elements are bought in the store or those that are available are used.
After all the parts are made, it is necessary to assemble a normally working cutter, which not everyone can do. Assembly must proceed strictly according to the drawings, without any deviations in the design. Otherwise, the cutter will constantly move to the side, which will greatly complicate the work.
Soil cultivating mill on MTZ-50/82
Questions can only be asked after registration. Please login or register.
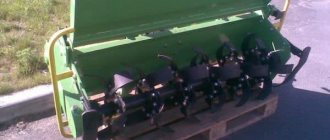
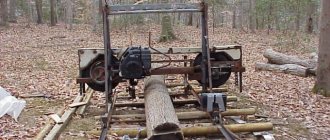
To plow my garden, I came up with the idea of inventing a milling cutter using MTZ. I started collecting the necessary spare parts for it, machined 6 flanges for attaching the legs, welded them to a pipe with a diameter of 159 mm. I got a gearbox, it had an outlet on one side, machined the shaft and made it on 2 sides. one chain has a large load, I made a frame from a 60x80mm square, installed a gearbox, welded a square in front on which I installed the paws from the cultivator so that they loosen the ground.. I covered the chains with casings, inside the 159 pipe there is a 55mm shaft, under self-centering bearings 1211, on the upper shafts drive from a 1210 gearbox. A visor (casing) was made at the back, the legs were made of 10mm metal, forged in a forge and bent at 90 degrees (right and left)..
Hello Sergey, how did you choose the gearbox, what is the working width and how much solarium per 1 g
hello gearbox exactly I don’t know if the corn chopper clings to the MTZ working width 2 m 10 cm plows at 2nd speed we plow vegetable gardens consumption per 1 hectare I don’t know
The cutter is clear. But if only there were photos for clarity, so that it would be more visible. For creativity. thanks for more photos.
Hello, are you interested in the ratio of tractor consumption under the cut and under the plow? and processing speed in relation to the plow
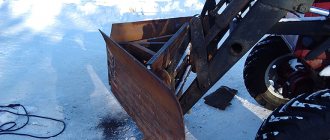
I’ll post the pictures clearer only in the spring, the cutter outside in the snow on the MTZ 50 engine D 240, the fuel consumption is lower due to the grip, the speed is less than 2nd if with a 4th plow, as I wrote to you, I have tines installed from a cultivator that loosen the ground without them I plowed on 1st year of production 2002
Hello, are you interested in the ratio of tractor consumption under the cut and under the plow? and processing speed in relation to the plow
The speed is not much higher with a plow, but a cutter is a cutter, no other plow can compare.
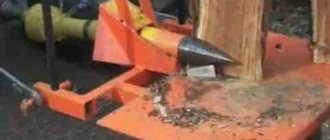
I got this cutter
Yes, it’s a good cutter, but it’s too good for clay or black soil, and if, like ours, the soil is with stone, then even the central gearbox of the factory is torn apart, and I don’t cook for knives
https://fermer.ru/forum/samodelnaya-selskokhozyaistvennaya-tekhnika/1589. foreman come here, I saw that you were interested in the cutter and posted something that might be needed.
sorry, wrote the previous entry in the wrong place
Well, for a stone you need something harder
hi Gena, what is the working width of my double-row chains for 2 seasons and scrap metal I have 6 rows of legs of 6 pieces each the tractor does not slip a lot of legs I have 4 pieces and it is made more compact stones if they get in, it cuts off the bolt securing the legs by 12 mm the lower shaft or pipe did not break on which the legs I had were 45 mm, 2 years later I broke them after the invention, I adapted them to 55 mm, last year I also broke them, that’s the load
hi Gena, what is the working width of my double-row chains for 2 seasons and scrap metal I have 6 rows of legs of 6 pieces each the tractor does not slip a lot of legs I have 4 pieces and it is made more compact stones if they get in, it cuts off the bolt securing the legs by 12 mm the lower shaft or pipe did not break on which the legs I had were 45 mm, 2 years later I broke them after the invention, I adapted them to 55 mm, last year I also broke them, that’s the load
Do-it-yourself rotary cutter: a cutter for a minitractor, homemade for tillage - drawings
Means of small-scale mechanization have long been part of the everyday life of rural residents. The use of tractors and mini tractors is observed everywhere, despite the relatively high price for such units.
This is understandable, because manually performing a certain type of work is quite difficult, which leads to the use of various special equipment.
But the presence of the same mini tractor does not mean that you will be able to handle absolutely all types of agricultural work. Here you cannot do without the use of additional attachments, which significantly expand the scope of application of mini tractors.
One of such equipment is a soil tiller for a mini tractor, designed for loosening and mixing land holdings.
Varieties
The tillage cutter can be of several types: field, swamp, row-crop and garden. The latter is common when processing forest belts, removing weeds and loosening. Field species are needed to care for lands intended for planting rice and vegetable crops, which are characterized by a heavy, waterlogged structure. Swamp options are useful both in the treatment of meadows and pastures, and drained swampy soil. Row-crop units mill the soil between rows of seedlings and cereal crops.
Device
A mini tractor cutter is a fairly simple device that includes several working units. Here is their list:
- support frame with wheels;
- main shaft;
- cutting elements that are located on the shaft;
- gearbox;
- protective casing.
However, the apparent simplicity is quite deceptive, because this equipment is very efficient and multifunctional. In particular, such a device can replace a harrow, plow and cultivator in one.
The very principle of its operation is as follows. When the minitractor moves, the drive wheels of the cutter transmit torque to the shaft with the cutting elements. These knives lift the top layer of soil and then turn it over. The principle is the same as when manually digging a garden using a shovel, but better and more efficient.
The force itself, which ensures the start of the movement of the shaft with knives, is transmitted from the main engine to the rototiller gearbox through the power take-off shaft. The gearbox itself transmits torque to the main shaft on which the cutting parts of the cutter are located.
Using the gearbox, you can also change the speed of rotation of the shaft, increasing or decreasing it.
The support wheels, in this case, perform a regulatory role, adjusting the depth of penetration of the cutting elements into the soil. Using the frame, aggregation is carried out with the hitch of the mini tractor located behind it.
The role of the casing is also quite clear - it prevents the working components of the device from getting dust and dirt on them.
Tillage cutter: design and technical requirements
Reliable milling technology must meet certain standards. It must be reliable and easy to operate, multifunctional, efficient, and economical. All these qualities are due to its design.
Design features of the tiller
The tillage cutter meets all the requirements for equipment intended for tillage.
The main design elements include:
- metal frame with a coupling device (for connecting to a tractor);
- a shaft with cutting knives (they can be of different shapes - sickle-shaped, rotary, chisel-shaped);
- drive (through it, rotation is transmitted to the working parts from the base device);
- fencing (performs a protective function).
The design is easy to maintain, durable and functional.
Technical requirements for tillers
General technical requirements are set out in interstate standards GOST-28516-90:
- Plowing depth should be up to 12 cm in plowed fields and up to 18 cm in unplowed fields.
- The degree of weed crushing should be at least 95 percent.
- The degree of soil loosening/crushing is at least 85 percent.
- The unevenness of tillage is no more than 15 percent.
- The use of cutters on terrain with a slope of no more than 8° in fields and no more than 12° in orchards and vineyards.
- Ease and simplicity of the tractor coupling mechanism (quick coupling or semi-automatic device).
- The dimensions of the clutch mechanism must comply with GOST 25942.
- The design of the cutters should allow adjustment of the rotation speed.
- Knives and fasteners must be made of materials established by GOST, have an anti-corrosion coating and comply with a certain strength class.
- Welds must be of high quality and free from flaws.
- There should be no lubricant leakage in connections and seals.
- Availability of drive and transmission protection equipment.
Compliance of the equipment with these requirements guarantees its reliable and safe operation. When purchasing equipment, you need to be very careful about this issue.
Description
This type of attachment is quite common in the domestic agricultural market. Mostly, these are Russian and Belarusian units made in accordance with domestic quality standards.
FR-00010
I would like to start the description of the model range with FR-00010, manufactured at the Minsk Tractor Plant. It is clear that it is intended for MTZ mini tractors, but can also be mounted on other models that have a similar system for connecting attachments, for example Uralets, Kubota, Bulat 120, Yanmar, Belarus 132n, Scout.
This device can be used not only on light soils, but also on fairly heavy soil areas. It is allowed to use this cutter on slopes whose inclination does not exceed ten degrees.
- digging depth – up to 120 mm;
- width of the processed strip – from 440 to 610 mm;
- unit length – 65.5 cm;
- unit width – 68 cm;
- unit height – 47.5 cm;
- total weight – 47 kg;
- productivity on light soil – 0.18 hectares per hour;
- productivity on heavy soil – 0.12 hectares per hour;
- maximum speed – 3 km/h.
This cutter for a minitractor, the price of which will be about 24 thousand rubles, is intended for preliminary preparation of a land plot for its further use.
For more information about the operation of the FR-00010 cutter, watch the video:
FNM-1 is also produced in Belarus, like the previous model. It is used on a wide variety of soil types, but use on excessively inclined surfaces (up to ten degrees) is not allowed.
- digging depth – up to 80 mm;
- width of the processed strip – from 440 to 600 mm;
- unit length – 66 cm;
- unit width – 74 cm;
- unit height – 45 cm;
- total weight – 50 kg;
- productivity on light soil – 0.198 hectares per hour;
- productivity on heavy soil – 0.132 hectares per hour;
- maximum speed – 3 km/h.
This model will cost about 17 thousand rubles, depending on the pricing policy of individual online stores.
1 GQN-125
1 GQN-125 is a fairly powerful model, so it has certain requirements for a mini tractor, or rather, for its power. Nominally, it should be from 24 to 30 hp. It can be used on a wide variety of land areas, from light to heavy soils.
- digging depth – up to 200 mm;
- width of the processed strip – up to 1250 mm;
- unit length – 90 cm;
- unit width – 100 cm;
- unit height – 135 cm;
- total weight – 220 kg;
- maximum speed – 4 km/h.
The cost of this cutter is about 32 thousand rubles. In addition, this is not the only representative of this line. In addition to this, there are quite a lot of models that differ from each other in the width of the strip they process. In this case, the serial number will be identical to the given width.
How to do it yourself
Of course, buying a ready-made cutter is the simplest and most understandable action, which fully justifies itself. However, many people ask the question - how to make a cutter for a mini tractor with your own hands? The reason for this interest is, as always, the price of the finished device.
To simplify the process of planting potatoes in agriculture, they came up with such a convenient device as a potato planter. By clicking on the link, you will get acquainted with the potato planter for the walk-behind tractor.
The walk-behind tractor will help loosen the soil faster and more efficiently than by hand, which means achieving a wonderful harvest with minimal effort. The Viking walk-behind tractor is the best assistant for the economic farmer.
Modern grain crushers are quite compact and energy-intensive, they are easy to use and delight their owners. Here is all the useful information about a household grain crusher.
The starting price starts at 12 thousand rubles for a soil tiller, which prompts people to think like this.
Replacement
The issue of replacing a rotary cutter with a new one directly follows from the principle of connecting a rotary cutter to a mini tractor. Let's consider the algorithm of actions in this case:
- It is necessary to remove the casing from the power take-off shaft.
- Next, we attach the power take-off shaft of the minitractor and the cutter shaft to the transmission transmission shaft. Make sure that the axle pin is securely fastened.
- It is necessary to move the mini tractor closer to the cutter. Next, raise the lower connecting links higher.
- Next, you need to insert the clamp plug into the appropriate connector. We connect the two connecting links located below to each other using a locking pin.
- We do the same procedure with the upper links, also connecting them with a locking pin.
The process of disassembling and replacing with a new tiller will be completely identical, you just need to start in the reverse order.
Additional Tips and Warnings
To increase the service life of the cutter, you need to follow certain recommendations approved by the manufacturer.
Due to the fact that the design of different models of cutters is almost identical, these same tips will be common to everyone. There are several main points to note:
- Before each use, check that all fastening connections are secure. Adjust them if necessary.
- You need to check the oil level in the gearbox - if it is enough, then you need to add it to the optimal level.
- A newly purchased cutter must undergo preliminary preparation, which consists of a kind of running-in for a couple of hours. After this, you can begin full-time work.
- Please read the instructions carefully to ensure you install the cutter blades correctly.
- After each use, you need to clean the cutter from dirt, dust and vegetation residues.
- If you do not plan to use the device for an extended period of time, you should remove the swivel coupling from it. In this case, it is best to lubricate the knives with oil.
By the way, if you have any kind of breakdown, then purchasing spare parts for a milling cutter for a mini tractor will not be difficult. There are quite a lot of specialized stores on the Internet that supply not only ready-made units, but also components for them.
Considering that the load on the working elements of the device is quite strong, the likelihood of such breakdowns is quite high. The cutting elements of the shaft may fail, which will lead to the replacement of knives with new ones.
In addition, bearings and gears may need to be replaced, so you need to prepare yourself for unplanned purchases in advance.
Features of blade installation
For different purposes and tasks, most modifications of soil cutters provide different options for installing and fastening blades. Depending on where the bends of the knife blades will be directed from the center of rotation, you can adapt the cutter for:
Inter-row tiller for hilling
- combing;
- hilling;
- loosening;
- alignment;
- soil plowing.
In addition to the usual curved blades of knives, upon special order, the cutter can be equipped with sickle-shaped blades, which can be used to process even very hard layers of earth.
Precautions when working with a cutter
- You can start working with the equipment only after reading the instructions.
- Do not start working with the cutter if the blade bolts are not secured.
- You must not leave the cab while the cutter is on.
- The angle of installation of the hinges should not exceed 13 degrees.
- Considering that almost any technical data sheet contains a line in fine print stating that the technical characteristics of products may change without prior notice, it is worth considering from the manufacturer or seller the maximum of the parts and details you need.
Do-it-yourself rotary cutter: a cutter for a minitractor, homemade for tillage - drawings
Means of small-scale mechanization have long been part of the everyday life of rural residents. The use of tractors and mini tractors is observed everywhere, despite the relatively high price for such units.
This is understandable, because manually performing a certain type of work is quite difficult, which leads to the use of various special equipment.
But the presence of the same mini tractor does not mean that you will be able to handle absolutely all types of agricultural work. Here you cannot do without the use of additional attachments, which significantly expand the scope of application of mini tractors.
One of such equipment is a soil tiller for a mini tractor, designed for loosening and mixing land holdings.
We purchase a Chinese rotary cutter for the tractor
Almost always, a positive decision to buy a 1GN-180 rototiller is made on the basis of its low price, and additional incentives when choosing are:
— normal quality of this attachment;
— general unpretentiousness;
— ease of maintenance of the entire mechanism;
Indeed, these benefits actually exist and have been tested in our fields.
However, it is still worth paying attention to important technical aspects, making sure that the rototiller is factory-made in China, and comparing the differences between Chinese rotary cutters and European, Japanese and domestic manufacturers!
1) Equipped with a long driveshaft in a “case”;
2) Splined connection to the PTO of Chinese mini tractors;
3) The dimensions of the tiller knives are smaller in length/thickness;
4) Shipped disassembled;
5) The gearbox of the 1GN-180 cutter has no lateral displacement;
Of course, we know how to adapt such a soil tiller with T-40 tractors or MTZ-82.
Device
A mini tractor cutter is a fairly simple device that includes several working units. Here is their list:
- support frame with wheels;
- main shaft;
- cutting elements that are located on the shaft;
- gearbox;
- protective casing.
However, the apparent simplicity is quite deceptive, because this equipment is very efficient and multifunctional. In particular, such a device can replace a harrow, plow and cultivator in one.
The very principle of its operation is as follows. When the minitractor moves, the drive wheels of the cutter transmit torque to the shaft with the cutting elements. These knives lift the top layer of soil and then turn it over. The principle is the same as when manually digging a garden using a shovel, but better and more efficient.
The force itself, which ensures the start of the movement of the shaft with knives, is transmitted from the main engine to the rototiller gearbox through the power take-off shaft. The gearbox itself transmits torque to the main shaft on which the cutting parts of the cutter are located.
Using the gearbox, you can also change the speed of rotation of the shaft, increasing or decreasing it.
The support wheels, in this case, perform a regulatory role, adjusting the depth of penetration of the cutting elements into the soil. Using the frame, aggregation is carried out with the hitch of the mini tractor located behind it.
The role of the casing is also quite clear - it prevents the working components of the device from getting dust and dirt on them.
Design Basics
With the advent of new technologies for tillage, the options for additional attachments for mini-tractors are increasing.
The leader in soil tillage accessories is the blade attachment, an ideal option with many possibilities. A mini-tractor with a rotary cutter is ideal for cultivating soil in greenhouses.
The soil cutter imitates manual digging with a shovel. Special “shovels” are installed on a shaft that constantly rotates, which, using a drive, plunge into the soil, lift it and transfer it. Most often, the width of the nozzle does not exceed 100–165 cm, and the working grip of these tools is 81–140 cm.
Additional equipment with a milling attachment can process virgin soil, hill up, form beds, and weed out
The most important purpose of any attachment with a milling cutter is to loosen the soil; such a tool is a special shaft with knives of different sizes
How to make a milling cutter for a mini tractor
Since the cost of a cutter is always sky-high, you can try to design an attachment with your own hands, especially since there is plenty of material on this topic on the Internet today, you can look at photo instructions, or you can pick up a video.
The cutter device consists of many blades, which can be made of steel sheet with a thickness of at least 12 mm, because the soil is most often heterogeneous. All components and connections must be installed with maximum rigidity, so special parts are needed. For example, the PK-1.6 pick-up stacker can be used as a gearbox. It is better to make the design of the cutter non-separable, but integral, so you can achieve strength in the nozzle.
The optimal speed for such a cutter should not exceed 4 km per hour. And the depth of surface treatment is usually regulated by skis. Knives can be made from KAMAZ springs; they will have to be turned on a machine. The cut knives must be installed on special connections. A homemade cutter made in this way will always operate at low speeds and will not turn the soil into dust. If you shave the right material for the design of your rototiller, then the blades for the minitractor rotary cutter will serve you for a long time and will not become dull.
Description
This type of attachment is quite common in the domestic agricultural market. Mostly, these are Russian and Belarusian units made in accordance with domestic quality standards.
FR-00010
I would like to start the description of the model range with FR-00010, manufactured at the Minsk Tractor Plant. It is clear that it is intended for MTZ mini tractors, but can also be mounted on other models that have a similar system for connecting attachments, for example Uralets, Kubota, Bulat 120, Yanmar, Belarus 132n, Scout.
This device can be used not only on light soils, but also on fairly heavy soil areas. It is allowed to use this cutter on slopes whose inclination does not exceed ten degrees.
- digging depth – up to 120 mm;
- width of the processed strip – from 440 to 610 mm;
- unit length – 65.5 cm;
- unit width – 68 cm;
- unit height – 47.5 cm;
- total weight – 47 kg;
- productivity on light soil – 0.18 hectares per hour;
- productivity on heavy soil – 0.12 hectares per hour;
- maximum speed – 3 km/h.
How to do it yourself
Of course, buying a ready-made cutter is the simplest and most understandable action, which fully justifies itself. However, many people ask the question - how to make a cutter for a mini tractor with your own hands? The reason for this interest is, as always, the price of the finished device.
To simplify the process of planting potatoes in agriculture, they came up with such a convenient device as a potato planter. By clicking on the link, you will get acquainted with the potato planter for the walk-behind tractor.
The walk-behind tractor will help loosen the soil faster and more efficiently than by hand, which means achieving a wonderful harvest with minimal effort. The Viking walk-behind tractor is the best assistant for the economic farmer.
Modern grain crushers are quite compact and energy-intensive, they are easy to use and delight their owners. Here is all the useful information about a household grain crusher.
The starting price starts at 12 thousand rubles for a soil tiller, which prompts people to think like this.
In principle, this idea is quite easy to implement, because the device of the cutter is not so complicated. To do this we need a fairly standard set of tools:
- Bulgarian;
- welding machine;
- electric drill;
- bolts and nuts;
- spanners.
Once you have made sure that you have everything you need, you can begin preliminary preparations. A do-it-yourself cutter for a mini tractor, the drawings of which are presented below, is a fairly standard design, so there is no need to reinvent the wheel by inventing something new.
You just need to follow the technical advice and parameters necessary to assemble a quality device.
So, let's look at the detailed algorithm of our actions:
It all starts, naturally, with the manufacture of the device’s support frame. For these purposes, we will need a metal pipe with a diameter of about 4 cm, or channels.
- We cut the existing material into four parts, which must then be welded to each other. Remember that the width of the frame will directly depend on the power of the engine used in the mini tractor. Therefore, if it is not powerful enough, it is better not to make a very large structure.
- It is necessary to provide for the installation of wheels in advance, with the help of which the depth of immersion of the shaft knives will be adjusted.
- Next, you need to attach the main shaft, which will rotate, to the frame. As a shaft, you can use an ordinary metal pipe, the diameter of which should be at least 5 cm.
- The cutter shaft is connected through a PK-1.6 gearbox, which is aggregated with the power take-off shaft installed on the mini tractor. The main shaft is fastened to the frame using bushings with support type bearings.
- Knives for a mini tractor cutter are made of metal plates, the thickness of which should be about 1.2 cm. Depending on the width of the shaft, the number of cutting elements will also be different. For example, if the width of the shaft is at least 120 cm, then four knives can be installed on it.
- Moreover, each knife consists of three cutting elements, the ends of which are slightly bent. These elements are fastened to the shaft using bolts and other fasteners.
- Basically, your homemade cutter for a mini tractor is assembled with your own hands. As a finishing touch, you need to lubricate all parts that will be subject to friction with grease.
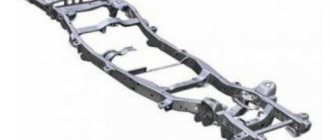
How to make a homemade milling cutter from a bridge
The bridge from any passenger car is used as a basis.
All unnecessary elements that will not be used in the cutter are cut off from the bridge. The bridge is installed on a metal frame, which is manually welded from metal pipes or channels; the frame should be located on two wheels so that the bridge is at a height of 30-70 centimeters from the ground surface.
To secure the milling shaft, it is necessary to make homemade metal jaws from iron; the thickness of the metal used is from 8 to 12 millimeters.
To make the cutter shaft, a thick-walled pipe is taken, its diameter is about 50-60 millimeters. Several segments, from 5 to 10 pieces, are welded to the milling shaft, onto the ends of which knives, for example, “crow’s feet,” are welded.
On the shaft and on the bridge, 2 sprockets are installed on both sides, the number of teeth of which ranges from 18 to 28, two chains are put on the sprockets on both sides of the bridge and the shaft, the pitch of the chain must correspond to the pitch of the teeth on the sprockets.
The cutter shaft is fixed to the bridge using a metal plate about 10 mm thick. A protective metal casing is placed over the sprockets with chains. The chains must be coated with grease.
Replacement
The issue of replacing a rotary cutter with a new one directly follows from the principle of connecting a rotary cutter to a mini tractor. Let's consider the algorithm of actions in this case:
- It is necessary to remove the casing from the power take-off shaft.
- Next, we attach the power take-off shaft of the minitractor and the cutter shaft to the transmission transmission shaft. Make sure that the axle pin is securely fastened.
- It is necessary to move the mini tractor closer to the cutter. Next, raise the lower connecting links higher.
- Next, you need to insert the clamp plug into the appropriate connector. We connect the two connecting links located below to each other using a locking pin.
- We do the same procedure with the upper links, also connecting them with a locking pin.
The process of disassembling and replacing with a new tiller will be completely identical, you just need to start in the reverse order.
Additional Tips and Warnings
To increase the service life of the cutter, you need to follow certain recommendations approved by the manufacturer.
Due to the fact that the design of different models of cutters is almost identical, these same tips will be common to everyone. There are several main points to note:
- Before each use, check that all fastening connections are secure. Adjust them if necessary.
- You need to check the oil level in the gearbox - if it is enough, then you need to add it to the optimal level.
- A newly purchased cutter must undergo preliminary preparation, which consists of a kind of running-in for a couple of hours. After this, you can begin full-time work.
- Please read the instructions carefully to ensure you install the cutter blades correctly.
- After each use, you need to clean the cutter from dirt, dust and vegetation residues.
- If you do not plan to use the device for an extended period of time, you should remove the swivel coupling from it. In this case, it is best to lubricate the knives with oil.
By the way, if you have any kind of breakdown, then purchasing spare parts for a milling cutter for a mini tractor will not be difficult. There are quite a lot of specialized stores on the Internet that supply not only ready-made units, but also components for them.
Considering that the load on the working elements of the device is quite strong, the likelihood of such breakdowns is quite high. The cutting elements of the shaft may fail, which will lead to the replacement of knives with new ones.
In addition, bearings and gears may need to be replaced, so you need to prepare yourself for unplanned purchases in advance.