Technical support in the farm of a modern farmer certainly includes means for cultivating the land. For this purpose, cultivators and walk-behind tractors are used, which, depending on the model, can perform the tasks of loosening, leveling, cutting weeds and other operations. Since the design of the working body is technically elementary, it will not be difficult for a skilled home craftsman to make such a device with his own hands. As a rule, homemade cultivators are not inferior in efficiency to their factory counterparts, but it is important to calculate how to install them on a walk-behind tractor or walk-behind tractor. However, today manual models are also common, the operation of which does not require connection to other equipment.
How to make a flat cutter
Many people are looking for a cultivator for weeding. You can make such a weeding machine yourself. A profile pipe made of metal or steel is used as the basis for the frame. This base must be made of 2 parts. You need to weld at an angle of 30 degrees. A wheel fork made of a steel pipe or plate 3 millimeters thick is welded to the frame. The wheel itself can either be made independently or purchased. The steering wheel must be made of 2 steel pipes fixed to the frame.
The horizontal part of the frame is an adapter for the cutting attachment. Then you need to install a knife, which is made of steel tape 2-3 millimeters thick. Then the knives are sharpened. The sharpening angle can be changed or adjustable knives can be installed. If there is an old bicycle on the farm, then all the spare parts can be taken from it. Due to the large diameter of the bicycle wheel, the ride becomes very easy when working. The knife is made in the form of an inverted letter “P”, or T-shape. It should be noted that a T-shaped knife must be used very carefully between rows, as there is a possibility of spoiling the harvest.
A special subtype of the flat cutter is the design with forks. This device has several knives that are attached to a fork. It is made of steel rods, and they, in turn, are curved in a special way.
For such a device you also need to make handmade knives with your own hands. Drawings of these devices can be found in various thematic forums and blogs.
The design has a fairly easy movement. A similar device can be used by both a fragile girl and a small child. Loosening occurs at the highest level, but weed roots are practically not cut off. To do this, you need to choose what is more important: high-quality loosening or removing pests from the soil.
Making a motor cultivator with your own hands
How to make a lightweight motorized cultivator for your dacha with your own hands? The indispensability of equipment of this type in large summer cottages is obvious. They not only allow you to quickly dig up a vegetable garden, but also, with some improvements, are capable of hilling tuberous plants, as well as removing weeds from the surface of virgin soil. In fact, there is nothing complicated about making a mini walk-behind tractor with your own hands.
You just need to have certain materials and tools on your farm to assemble it. Otherwise, the process can take us no more than 2 days, and this takes into account welding work and processing of the finished cultivator with paints and varnishes.
This must be done so that during the use of mini walk-behind tractors, their main elements are not exposed to corrosion. As for the necessary materials, to create such a homemade product we will need the following sample parts:
- a cultivating nozzle made of steel rods bent in an arc, welded to a metal corner;
- frame and wheels from an old bicycle;
- iron or nylon tubes for making walk-behind tractor control handles.
Now you can proceed to the installation process. First, we cut off the rear part of the bicycle with a grinder or a hacksaw, leaving only the front fork with the wheel.
We weld a cultivating attachment for walk-behind tractors to this fork so that it is located behind the wheel and sits firmly on the ground. This must be done so that during work, pressing the device, you can hill up the soil normally.
Then you will need to put tubular extensions on the steering crossbars, which, if necessary, can be slightly bent for ease of control. To achieve the tightest connection, they should be welded along the contour using electrode welding, after which the product will be ready for use.
In addition to this model of a light cultivator, there is another option - gear-type walk-behind tractors. They are well suited for processing virgin soil, since their design is equipped with disks with pointed spikes that rotate on the axis of this mechanism. They can also be made from scrap materials, and such mini-cultivators will not take up much space on the farm. In order to assemble such a device, you will need the following parts:
- a steel axle with bearings on which rotating mechanisms will be installed;
- five metal discs with pointed teeth;
- two side pins necessary for installing bearings and attaching the fixing part of the control handle to them.
The assembly algorithm will not take much time. In order for all the disks on such walk-behind tractors to rotate evenly during movement, through holes must be drilled in their sidewalls to install a steel rod with a diameter of 8-10 mm.
Now they are put on the axle, a rod is inserted into the side holes, after which the bearing, trunnions and brackets are installed, which are clamped with nuts. A control handle is installed on the brackets and is also secured with nuts.
More complex technical devices require special tools and materials, but in the end you will have an indispensable assistant when processing virgin soil on your plot of land.
The main stages of creating a cultivator and the importance of their strict adherence
How to assemble a cultivator on a walk-behind tractor with your own hands? This task is quite simple for those who have the skills to work with similar devices and understand their design. To further simplify the work, there is a certain structure that involves breaking down the entire process into certain stages, different in their purpose and functional execution. These subsections look like this and best characterize the entire procedure for creating a device:
- drawing up a plan for the future device;
- collecting the necessary tools;
- assembly of the device.
A homemade cultivator, assembled in accordance with these criteria, will have the best qualities and will become an indispensable assistant both in your summer cottage and in your own garden.
At the same time, a device created by yourself will be convenient and practical, since during its assembly all parameters and design features should be carried out based on one’s own anthropometric data, in addition, based on one’s own preferences and desires.
Creeper
The traction of the wheels of a tillage machine with the soil can be enhanced if you use lugs or a creeper for a walk-behind tractor. The creeper is one of the mounted devices. It makes it possible to reduce the speed of the agricultural unit and increase traction force along with torque. An analogue of a gearbox operates using a chain and sprockets on the shafts. If desired, this device can be made by hand. Parts are used from other equipment.
Each considered converter has its own disadvantages. To reduce their number to a minimum, you should try to make the device yourself. A homemade item can be of higher quality and easier to use than a purchased item.
How to make a cultivator from a chainsaw for a summer residence
If you know how to handle tools, and also have some understanding of the principle of operation of chainsaws, you can assemble such a device. It will take you a maximum of one day.
These walk-behind tractors can easily loosen clay soil, remove weeds from the area, and hill up beds. Moreover, due to the fact that the number of revolutions of the chainsaw engine is quite high, the power of the device will allow you to do everything quickly.
Cultivators of this type can be quite heavy, which is achieved due to the weight of the frame frame made of metal corners or pipes assembled into a single structure by welding. In the absence of welding, it is recommended to use bolted connections, as this will allow for quick and reliable installation, and the frame itself will be collapsible and convenient for storage.
To make it, you will need the following parts: a motor from a chainsaw and a chain for it, a starter, a muffler with a gas tank, wheels. So, let's look at the installation process in more detail.
Using a manual welding machine and angles, we make the main frame of the device. It will have a rectangular shape with two transverse rigidities that make the frame reliable.
On the back of the finished frame we weld a plate with prepared fasteners for installing the engine.
The engine is installed below the level of the fuel tank. The fuel container must be fixed on a welded bracket 15 cm above the main frame.
Now we proceed to install the intermediate shaft on vertical supports in the front part of the structure. To ensure that the running shaft bearings can be securely fastened, these supports are fixed on longitudinal angles.
Chains are put on the engine gearbox, the lower part of which is lowered to the intermediate and running shafts, where they are secured to the sprockets of the transmission mechanism.
The start button must be installed on the handles, which are welded to the frame at the bottom.
Motoblock from a motorcycle
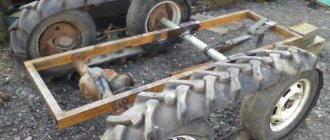
Here we will consider the option of assembling a walk-behind tractor from the Soviet motorcycle IZH Planet 5. First of all, we dismantle the engine. To optimize its operation, the cooling system will have to be slightly altered - make it active rather than passive.
Easier starting is possible if you increase the thrust. To do this, replace the valve with a reed valve. Since the speed may be too high, it would not be superfluous to install a speed booster.
You can weld the frame of the future walk-behind tractor yourself, but if you have a working frame from a motorcycle, then simply upgrade it. It is necessary to cut off the front wheel fork and all excess. Then weld a mount at the back of the frame to install the hitch.
A particularly important component is the gearbox. The gearbox from the Ant motorcycle is well suited for these purposes. All that remains is to install the axle on the frame and secure the wheels. The wheels can be anything, but it is better to use those from a Lada car, as they have high cross-country ability.
About the device of the walk-behind tractor
Next, you will find out which walk-behind tractor is better to choose. To make it clearer what the principle of homemade walk-behind tractor manufacturing and its additional components is, you need to consider in detail the structure of the walk-behind tractor as a means of small-scale mechanization. So, this unit includes several main working units:
- The main driving force, i.e. engine.
- Transmission.
- Chassis.
- Basic controls.
Engine
The main driving force in the design of walk-behind tractors is a standard internal combustion engine. Depending on the type and brand of walk-behind tractor, for example Cayman Vario, Patriot Ural, Texas, Foreman, Crosser, Viking, Forza, the engine used may be different:
- Gasoline 4-stroke engine. This engine is used for units belonging to the light and medium class of devices.
- Diesel 4-stroke engine. Motors of this kind are used on heavy and powerful walk-behind tractors designed to work on the most difficult surface areas.
Video: The best diesel walk-behind tractor
For more information about the operation of a diesel walk-behind tractor, watch the video:
- The system responsible for supplying fuel. Consists of a fuel tank, carburetor, air filter and fuel hose.
- A lubrication system that carries out the process of lubricating those parts that rub against each other.
- A starter that spins the crankshaft.
- A cooling system that removes heat from the engine cylinder block using air flow.
- An ignition system that produces a spark at the spark plug.
- A gas distribution system that ensures the flow of the air-fuel mixture into the engine cylinder and is also responsible for the exit of exhaust gases.
The important thing is that the engine is sold with all the main operating systems, which greatly facilitates the process of making a homemade walk-behind tractor. https://www.youtube.com/embed/Z9zkPkypDO0
Transmission
The main function of the transmission is to transmit torque from the engine to the wheelbase, as well as regulate speeds and change the movement of the unit. Its design includes several working units: gearbox, clutch, gearbox and differential (not available in all models).
Transmission can be of several types:
- Gear.
- Belt.
- Chain.
- Combined.
Basically, the classic type of gear transmission is used on heavy walk-behind tractors, and it consists of bevel and cylindrical gears.
Other types of transmission are used in light and medium types of walk-behind tractors. At the same time, regardless of the type of transmission, the design contains a PTO - a power take-off shaft, which transmits torque to the working units of the unit.
As for the clutch, it can be different:
- In the form of a V-belt transmission. The essence of the process is the clutch lever, which tightens or loosens the belt, thereby transmitting or stopping the transmission of torque from the motor to the gearbox.
- Single or multi-disc dry or wet clutch.
- Conical coupling.
Most high-quality walk-behind tractors Sadko, Don, Huter, Profi, Plowman, Champion, Carver use the second type of clutch, which is the most reliable.
Chassis
The chassis includes not only the wheelbase itself, but also the frame structure to which these wheels are attached, and where the main working units of the walk-behind tractor are located.
Today, there are two types of wheels - pneumatic and metal with lugs.
Basic controls
The walk-behind tractor control is located on the handle of the unit, responsible for changing the speed and direction of movement of the device. The controls include:
- Levers, steering wheel and gear shifters.
- Clutch control.
- Engine stop lever or button.
- Gas supply, etc.
The design of the walk-behind tractor does not have a seat for a person (as in the Salyut walk-behind tractor), so the control itself is carried out by a person with his own hands.
Types of replacement equipment
Depending on the tasks being solved when cultivating the soil, cultivators are equipped with various tools. The most common of them:
- Paws. There are:
- chisel-shaped - allow you to loosen soil up to 15 cm deep;
- lancet flat-cutters (flat cutters) - destroy weeds and also work the soil to 4-6 cm, allowing you not to raise the wet bottom layer to the surface;
- lancet universal - intended for inter-row or continuous cultivation of the land (working up to 14 cm). Such paws perfectly crush the soil, cut off weeds, and partially lift wet layers of soil to the surface;
- single-sided flat-cutters (weeders, razors) - cope well with weeds.
Cultivator shares: a - flat-cutting lancet, b - universal, c - rigid loosening, d - spring loosening
feeding knives - loosen row spacings, embed fertilizers into the soil (up to 16 cm);
needle discs - destroy the earth crust, destroy weeds (processing up to 4 cm, soil shift by 1-2 cm);
- furrow cutters - intended for creating furrows for irrigation (up to 20cm);
- hillers - cut ridges (up to 25 cm), destroy weeds between the rows, and also cover weeds, the depth of treatment with hillers is up to 16 cm.
All replacement equipment is attached to racks, which can be connected to the frame in different ways.
And this article talks about making a potato digger with your own hands.
Choice for rotary cultivator
When choosing a cutter for a cultivator, you should take into account how the knives mounted on the shaft were assembled. For example, models can be curved in one direction or in different directions. Options with one direction are convenient because in this way it is possible to prevent damage to plants during the loosening process. However, such modifications have a smaller working width of the cultivated soil.
To cultivate fallow lands covered with dense vegetation, you need reliable cutters. The working bodies of such cutters are plate knives mounted on rotating shafts.
Vertical cutters with four rotors, as well as lateral displacement and hydraulic drive, are good for cultivating tree trunks in conditions with small row spacing. In addition to the fact that they are relevant for removing weeds with a shallow working depth, they are good for inter-row cultivation without creating furrows with lateral displacement.
To choose the right option, you need to take into account the type of cultivator itself. In addition, you need to choose a product taking into account the upcoming work and technical characteristics. However, in any case, the device should be immersed in the ground smoothly
It's also important to do this slowly, as rushing can cause the knives to break.
What is needed and how can it be changed
In fact, putting a motor cultivator on wheels is not at all difficult:
First, you need to carefully measure the fit dimensions of the output shaft, paying special attention to its shape (cylinder or hexagon), outer diameter and distance to the hole for the cotter pin. Then you need to visit the nearest gardening store or look online to order hubs (differential amplifiers) that match the dimensions of the cultivator shaft. At the same time, you can purchase wheels (the smaller the diameter, the better) for your future walk-behind tractor. By the way, wheels with hubs and drawbar are often sold in a single set, which is very convenient. We screw the purchased wheels to the hubs; We remove the cutters from the motor-cultivator shaft; We install the wheels on the gearbox shaft. Experts do not advise upgrading low-power cultivators weighing up to 45 kilograms and equipped with a worm gear in this way, since this modification can lead to serious damage. In addition, when converting a motor-cultivator into a walk-behind tractor, you should not use old car wheels (too heavy weight and size)
Experts do not recommend upgrading low-power cultivators weighing up to 45 kilograms and equipped with a worm gear in this way, since this modification can lead to serious damage. In addition, when converting a motor-cultivator into a walk-behind tractor, you should not use old car wheels (too much weight and size).
At the same time, it is worth understanding that a cultivator on wheels, the modification of which will require at least three thousand rubles, may be a walk-behind tractor, but not quite a full-fledged one. Of course, such equipment will be able to move independently, but serious problems can arise with the use of attachments if the cultivator’s motor is weak (less than 6 hp) and the reduction gear is of a worm type, rather than a gear, belt or chain type.
Therefore, the next stage of converting the cultivator into a walk-behind tractor should be replacing (if necessary) the gearbox. The cost of this part in stores is comparable to the price of a new cultivator. However, you can try to make a simple gearbox with two opposite shafts at home, if the owner of the cultivator has the skills of a good mechanic/designer and has:
- measuring instruments (ruler, caliper);
- spare parts and consumables (bearings, gears, belts or chains, pulleys, shafts, gaskets, seals, pipe for bearings, bolts, etc.);
- welding machine;
- drill and drill bits of different diameters;
- “grinder” or hacksaw for metal;
- set of screwdrivers and vice.
If all this is available, then you can start manufacturing the gearbox:
- We draw or search on the Internet for a suitable sketch and calculate the gear ratio, taking as a basis the number of engine idle speeds plus 10%.
- We cut a metal sheet with a thickness of at least 5 mm to obtain a blank for the lid and body of the future part.
- We cut the pipe and, using welding, install the seats for the bearings.
- We assemble the body and protect it with paint and varnish.
- We install bearings.
- We produce and process shafts from round steel bars.
- We install shafts with the simultaneous installation of sprockets or pulleys, chains or belts.
- We make a gasket between the body and the cover, and also insulate the shafts using seals.
- Fill the housing with lubricant (oil) and install the cover.
- We place the homemade gearbox on the cultivator frame and connect it to the engine via the output shaft.
- We adjust the operation of the gearbox with the engine turned on, but without any special loads, so that the parts can be worn in.
A homemade gearbox will greatly expand the capabilities of the cultivator, which can work with almost any attachment.
DIY small hand cultivator
This type of homemade tool is affectionately called “baby” by summer residents.
It is suitable for small areas, including greenhouses. Extremely light and easy to use. It looks like a massager on a handle, only instead of small spikes there are sharp wedges.
Hand cultivator Baby
For production you will need:
- long handle with a diameter of 24 mm. length corresponding to the height of the farmer or purchased cuttings;
- solid wooden axle;
- 5 durable heavy discs with a diameter of about 150 mm. with holes in the middle and sharp spikes along the edges. You can cut them out of metal yourself.
Installation steps:
- Discs are mounted and secured onto a metal pin.
- A pin with sharp disks is attached to a solid wooden or metal axle.
- The structure is put on and firmly screwed to the handle or handle.
Cultivator "Kid"
Pros of the tool:
- convenient to use in open ground and in greenhouses;
- If desired, it can be equipped with a motor.
Minus:
captures a depth of about 20 cm. Considering the statement of microbiologists that deep loosening of the soil kills aerobic and anaerobic microorganisms, this minus can be considered a plus.
Cultivator from an electric meat grinder
In this case, the power unit is borrowed from the meat grinder, but otherwise the concept remains the same. The frame from which homemade cultivators for a tractor or walk-behind tractor are made can also become the basis for autonomous equipment. A special feature of this design is the ability to quickly break soil layers into large clods. If operation is expected at low speed, then the processing will be delicate and will provide a loose cover.
It is necessary to weld two corners to the crankcase of the gearbox removed from the meat grinder. Two pipes are also installed on them, the ends of which must first be bent - in the future they will become handles. The wheel axles are also attached to the base using corners. You should not choose excessively large wheels, as they will cause unnecessary trouble during the processing process. But small ones are also undesirable, as they sink into the soil. Accordingly, the best option is medium wheels with a diameter of 20 cm. A shaft should be machined from mounting scrap. Using a sledgehammer or a large hammer, it is necessary to break off the nozzle of the meat grinder, which will allow you to remove the bushing, which will take the shaft with the lug screw into the structure.
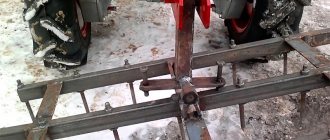
Homemade cultivator for tractor.
Hi all. I propose to discuss the topic of the cultivator board for the YuMZ, T-25, T-40, MTZ tractors)) one of these days I’ll work on mine, I’ll upload photos of it, it’s homemade))) Post a photo, we’ll improve it to finish)) Live and learn. P
I agree, good topic. Moreover, cultivators have enough weak points for improvement or alteration.
Hello, here is a photo of a cultivator for the T-25, width 1.9 by 8 paws. Files: img_16451.jpg img_16461.jpg img_16441.jpg
Probably no one else has cultivators!
I have a question: do the legs have to be spring-loaded? How are the wheels adjusted? Is it possible to set a standard depth? And which one? My first experience was not successful; I spent half a day digging the cultivator out of the garden bed!
Useful tips
Before you start manufacturing a device or modifying it, you need to decide why it is needed. For example, units for removing weeds and simply loosening beds can be very different. For greenhouses, you should choose lightweight models with manual control only. If the areas being processed are quite large, then you should opt for options that run on fuel or electricity.
The stages of manufacturing a cultivator are important, but do not forget about the operating rules of this unit. The most important thing is to keep the driving mechanism in working order.
When the cultivator will not be used for a month or more, it must be stored. To do this, you need to remove fuel from it, clean the engine surface and all other elements. It is not advisable to clean parts of the device using strong water pressure. Metal parts must be lubricated with oil to avoid unwanted corrosion. The unit must be stored in a dry and dust-free room.
To learn how to make a cultivator with your own hands, see the following video.
What do you need for work?
To make various devices for soil treatment at home, you need to prepare special materials for this. First of all, you need to take care of getting steel. The more different pipes, sheets or metal rods you have, the better. You can’t do without a set of tools, but they are present in any garage, so you don’t have to bother finding them.
A welding machine is one of the most important tools for working with metal products. With it, you can connect different parts made of metal in just a few seconds. Of course, in most cases you can do without a welding machine by connecting the parts using self-tapping screws. But the quality of such connections cannot be compared with the quality of welds.
DIY cultivator: drawing up a diagram and list of necessary equipment
How to make a cultivator with your own hands? The first stage, which requires detailed study and study, is drawing up a schematic diagram of the future device and describing all stages of its assembly. To implement this part of the construction, it is necessary to draw up detailed drawings of the device, which must indicate all the dimensions and relationships of the structural elements.
This can be done either with the help of special computer programs, which allow you to clearly display the visual model, in addition, set all the necessary parameters for it, or use the traditional method. It consists of drawing drawings of all parts on graph paper, on which it is also necessary to indicate all other parameters and aspect ratios. Each of these options is able to fully convey all the necessary information that is required in order to quickly and easily create a homemade cultivator on a walk-behind tractor.
After carrying out the work aimed at creating a visual image of the future device, we proceed to collecting the necessary tools. The list of equipment that will be needed to carry out the work looks quite impressive and requires full compliance. Otherwise, the lack of any tool is fraught with delays in work and the impossibility of completing one or another unit of the device
Therefore, it is extremely important to prepare in advance all the necessary tools and parts, which will not only significantly save time, but also carry out the entire sequence of work most efficiently. As for the list of necessary equipment itself, it looks like this and in the best possible way emphasizes all the different plans of the work and their importance
So, a homemade cultivator and its creation requires the following tools:
- welding machine;
- drill;
- a set of keys;
- sledgehammer;
- Bulgarian;
- metal scissors;
- roulette;
- Screwdriver Set;
- hammer;
- pencil.
The above tools will allow you to create a device with optimal characteristics and do it in the shortest possible time. A separate point needs to be said about the methods of fastening the parts together. Today there are only two of them. Metal bolts and welding - both of these methods of fixing metal parts are absolutely reliable. However, it is better to assemble a homemade cultivator on a walk-behind tractor using bolts, since due to the constant vibration that will accompany the operation of the device, the welds can quickly become unusable. The most critical parts of the structure should be secured with bolts, while auxiliary parts of the system may well be connected by welding.
The operating principle of the cultivator and its main advantages
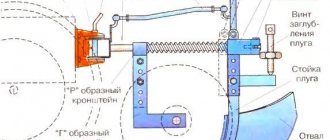
Each of us has at least once seen a cultivator that is attached to a tractor and allows for better cultivation of fields. The design of the cultivator has remained virtually unchanged since its creation. If we compare it with any other device, it consists of several small plows connected to each other.
This structure of this device allows you to process only the top layer of soil, which is the most fertile. As a result, areas exposed to the cultivator become the most convenient and are characterized by optimal yield qualities. This fact is due to the fact that the top layer of earth, consisting entirely of black soil, does not mix with other soil types and retains its qualities.
Thus, the practicality and efficiency of the cultivator served as an impetus for its wide popularity. It has become popular among both farmers and amateur gardeners. The list of actions that can be performed using this device is truly amazing, since it forms almost a complete agricultural cycle. This list of cultivator functionality looks like this:
- soil plowing;
- weed control;
- loosening the soil;
- landscape leveling;
- application of mineral fertilizers.
The use of such a device can replace many garden tools and other household equipment. However, not everyone can use the services of a tractor or purchase this unit for personal use. In such conditions, some remain supporters of traditional methods of tillage, while others try to design a cultivator on their own. It should be taken into account that making a homemade cultivator on a walk-behind tractor is not so difficult. The only difficulty that may arise when implementing such a solution is the concept of the operating principle of the device and the availability of practical skills to work with it. These are the key qualities that make it possible to create the most functional and practical device, capable of fully treating the area and saving the energy of its owner.
Another interesting article: Rakes for tractors and walk-behind tractors
Option #4: a production meat grinder to help us
All of the above equipment is quite simple. But in your own workshop you can make a homemade electric cultivator. This once again proves that the possibilities of home craftsmen are almost limitless. To implement this idea, you will need an old industrial meat grinder. On its basis, an effective electric gardener’s assistant will be built.
An electric cultivator can be made on the basis of a meat grinder for industrial purposes: you get a fairly powerful unit that will last for several years
Everything is not as difficult as it seems if you have a welding machine and a master who knows how to use it for its intended purpose. Two corners should be attached to the gear housing. Bent pipes are welded to the corners, which will be used as handles. Another piece of pipe is welded between the resulting handles - a spacer, which gives the structure the required strength.
The main structural part is the shaft. It will have to be turned out of ordinary scrap. The connection is carried out as in the original: in a slot. The meat grinder attachment is chipped off with a sledgehammer, after which a bushing with thick walls made of cast iron remains. A blank machined from scrap is placed into it, to which lugs in the form of a screw are welded. They are cut from car springs. Other lug material options were used, but these proved to be unviable.
The lugs are located at an angle of 120 degrees. They need to be screwed out as they rotate, then it will be easier for them to enter the ground, and the cultivator itself will be easier to control. The engine of the device is connected according to the “triangle” circuit, the start is capacitor. For ease of operation, the engine switch is installed on the cultivator handle. The device will last a long time if, before starting work, you lubricate the mating of the homemade shaft in the cast iron bushing with any used oil.
Take a good look at what the lugs should be and how they should be positioned: the efficiency of the device and its durability depend on this
How to sharpen a homemade cutter correctly?
Manufacturers of motorized cultivators sell equipment with already sharpened standard cutters. However, what should a person who has made cutters for an existing cultivator do on their own? In this case, you will need to sharpen the cutting knives of the device yourself.
To sharpen the equipment, you will need a grinder equipped with a diamond wheel with a diameter of 12.5 cm. Otherwise, you can use a sharpening machine, but it will be difficult to use due to the dimensions and direction of bending of the knives. If the manufactured cutters are equipped with small-sized knives, then you can use fine-grained sandpaper to quickly sharpen them.
It is necessary to sharpen the knives of a homemade cutter for a cultivator strictly at an angle of 45 °. In this case, it is necessary to independently determine the side that goes deeper into the soil. There is no need to remove too much metal from the knife; 1-2 sharpenings per season are sufficient. In some cases, the frequency of sharpening the cutter knives may vary - it all depends on the intensity of use and the type of soil being processed.
If you work intensively with the cultivator in wet weather, you will need to monitor the condition of the cutters. To prevent the formation of corrosion, they should be treated with a special anti-corrosion compound, which can be found in almost any auto parts store.
It is also very important to try to prevent the cutter from getting on stones and other hard objects - this will help extend the service life and reduce the need to sharpen the cutting knives of the device
Popular models
The modern market offers a large number of cultivators that can be mounted with MTZ tractors. Among them there are both models of Russian and Belarusian production, as well as guns from well-known European and American manufacturers. Below are some popular samples, reviews of which are most common. KPS-4
The model is an indispensable assistant for high-speed steam treatment; it allows for pre-sowing soil preparation without crushing plant residues. The gun is of the lancet type and can be operated at speeds of up to 12 km/h. The productivity of the device is 4.5 ha/h, the working surface working width reaches 4 m. The model is equipped with knives with a width of 20, 27 and 30 cm, capable of cutting into the soil to a depth of 12 cm.
The implement can be mounted with MTZ level 1.4 tractors. It is available in both mounted and trailed versions. The weight of the structure is 950 kg. The transfer to the transport position is carried out hydraulically. The ground clearance is 25 cm, the recommended speed on public highways is 20 km/h.
The cultivator up to the walk-behind tractor is self-propelled. What is a walk-behind tractor
A walk-behind tractor, or motor-cultivator, is a self-propelled two-wheeled unit that is equipped with an internal combustion engine.
The device moves freely forward, and the summer resident walks behind it, holding handles with various components and controls. Many available models have multiple forward and reverse gears. In order for the operation of such an invention to be as productive as possible, it is equipped with additional tools, including a plow, which allows plowing and cultivating the land. The average weight of a walk-behind tractor reaches 100 kg, and the engine power often exceeds 8 horsepower. Due to such features, such a tool can become indispensable for plowing a garden area.
You should pay attention to the fact that all walk-behind tractors are equipped with a special drive for attachments, which allows you to transfer part of the engine power to a suspended mower. Basically, such a universal mechanism allows you to cope with various agricultural work, including:
- plowing the land;
- cultivation;
- transportation of the crop (in this case, you need to get a small trailer);
- cutting the grass.
Modernization of a homemade design
The Arkhipov walk-behind tractor is extremely popular among a wide audience of summer residents and gardeners due to its versatility. Very often it is used as a plow or cultivator. To expand the functionality, it is enough to replace the removable parts for the plow with parts with removed moldboards for the cultivator. As it moves around the garden, the device will deepen furrows into the ground, placing potato tubers there. To plow the planting material, it is enough to equip the unit with dumps and walk again between the planted rows.
Hilling up of sprouted plants occurs in a similar way. The agricultural walk-behind tractor is characterized by excellent productivity and ease of use, even for purposes such as harvesting. To change the working width, it is enough to use different blades. In addition, the unit is capable of collecting missed potatoes and remaining tops in the presence of a rake or harrow.
The universal design is indispensable not only for work in the agricultural sector. It can also be used for snow removal in winter. Such a faithful assistant will be a good tool when clearing paths and garden areas from leaves or debris. It is enough to equip it with a roller with a round brush and an additional star, which will allow you to clear sidewalks.
Every self-respecting summer resident sooner or later comes to the question of buying or manufacturing a motor cultivator. Such a unit is a truly valuable find for people involved in organic farming. With its help, you can cultivate both small gardens and large areas of 30 acres.
Despite its compact dimensions, such a miniature “truck” is not inferior in productivity to some tractors. The powerful engine is capable of processing the heaviest soil, and ease of use allows you to operate it even in the absence of specific experience. In addition, making such a device is much easier than it might seem at first glance.
It is enough to pay attention to the existing instructions and use the recommendations of professionals
Types of cultivators
This equipment is available in different models:
- disk
- paws
- rotary
- milling
Almost all cultivators work on the same principle: the mechanical part is started, which sets the device in motion, loosening the soil.
Its classification depends on the purpose of the equipment: differences in size, engine power, operation, scope of work. Considering these criteria, they are:
- light
- moderate severity
- heavy.
For relatively small areas with soft soil, light equipment is suitable, usually flower beds and greenhouses. Medium-weight equipment is designed for clay soil. Heavy equipment is universal, it is suitable for any type of soil.
Cultivators differ in the way they function:
- hand cultivators;
- with electric drive;
- on gasoline.
We will focus on manual cultivators, which you can make yourself to save money.
A number of advantages of manual designs:
- They are economical and do not require refueling.
- Several devices are replaced: a shovel, a hoe, a rake.
- They take up little space.
- Help distribute the load across all muscles.
Making a manual cultivator with your own hands
The simplest option is the Tornado cultivator
The simplest cultivator in its design, the Tornado, is a bit like a corkscrew on a vertical handle ending in a horizontal handle.
"Tornado" - a manual cultivator for tilling light soil
It is easy to make yourself, using ordinary pitchforks. First buy a plastic attachment for the handle of a shovel at a hardware store in the form of a handle - they are used on both forks and shovels for ease of work. Since the handle of the original Tornado is a long horizontal tube, our handle also needs to be modified.
To do this, we use a piece of plastic pipe about half a meter long and with a diameter slightly larger than the thickness of the plastic shovel attachment we purchased. Carefully cut the pipe lengthwise, then turn the edges of the cut to the sides and put it on the purchased nozzle. It is advisable to tape the pipe to the handle of the nozzle so that it does not fidget during operation and does not move from its original position. As a result, our horizontal cultivator handle will protrude to a length of approximately 25 cm in both directions.
Making a handle for a manual cultivator Tornado
Now you can do the fun part and bend the fork teeth into a corkscrew shape. To do this, we will use an ordinary hammer, the blows of which will bend the metal teeth in any direction. It is necessary to check the result with a photograph of the original model of such a cultivator and carefully repeat all the bends of the teeth on it
Variant of a cultivator made from bicycle parts
Another manual cultivator offered to your attention has a more complex device and one might even say that it is partly mechanized. To make it we need a frame and a wheel from any old bicycle.
Hand cultivator made from bicycle parts
We attach a cultivator head to the bicycle frame, which can be a ready-made head from a cultivator or a hand-made structure from sharpened steel rods. If you have a cultivator head, you can use a small plow.
A comfortable handle for reliable control of the cultivator is made from sections of steel or aluminum pipes. For the crossbar, take a small piece of pipe with a diameter of 2-2.5 cm. All parts of the cultivator are assembled together with bolts, the nuts on which are tightened as much as possible so that the entire structure is rigid.
A medium-diameter wheel is bolted to the frame using special wing nuts or regular locknuts. With this homemade cultivator you can easily destroy weeds by weeding the space between the rows of plants.
The final stage of creating the device is assembling the cultivator
How to assemble an interrow cultivator?
The arrangement of all parts and their connection to each other is the final stage of creating a device, since its functionality largely depends on the accuracy and correctness of these procedures.
What can we say, many garden cultivators and walk-behind tractors assembled by hand do not have the best parameters. In most cases, the fault in such a situation is not the quality of the selected materials, although this criterion is also very important, but the incorrect assembly of the device. Therefore, every detail, little detail and step must be clearly verified, since this is the only way to achieve the desired result and obtain a device that is optimal in terms of its characteristics.
Another interesting article: How to make a planter for a walk-behind tractor with your own hands
The principle of connecting parts is quite simple and consists of fastening them to a frame onto which several movable sections are sequentially fixed. It is they who will serve as plows and form our inter-row cultivator. In this case, the frame is fixed to the walk-behind tractor using bolts, and all other crossbars and corner elements are welded to it. Absolutely any metal structures can act as the plows themselves, which are fixed into the grooves of the movable carts. Their main criterion is their pointed shape and relatively small dimensions. The moving elements themselves are fixed to the frame using bolts, which allow you to adjust the distance of the plows from each other and guarantee their reliable fixation.
Making a hand cultivator with your own hands
Creating hand cultivators is even easier than others. A standard set of parts and tools for manufacturing includes: a metal pipe, a bicycle frame and wheel, metal blanks and steel strips, an angle grinder, a drill, and a cultivator head.
Sequencing:
- A cultivator head is attached to the bicycle frame. The crossbar and handles are formed from pipes and connected to the frame with bolts.
- Lock nuts are taken and with their help the wheel is attached to the frame (it is better if it is medium in size).
- The mechanism is ready, but the attachment on such a device can be changed for a plow and other equipment, which makes it multifunctional.
Device
Lightweight hand cultivators are in greatest demand among farmers and summer residents. As a rule, they weigh about 20 kilograms, are small in size and have high productivity. The cultivator is capable of loosening the soil, removing weeds, and thinning out plants. It is even used to apply fertilizers. This unique device simplifies not only planting, but also the process of caring for plants.
The work of cultivators largely depends on what cutters come with it, because they are the ones who perform loosening and a number of other operations. Among the working attachments for hand-held models, the following are quite often used:
- for loosening the earth;
- for cutting;
- for hilling;
- for making furrows for sowing;
- for breaking a strong earthen crust (special needle disk);
- for feeding plants (with dispensers).
When it is clear which cultivator is needed for certain tasks, you can choose what parts it will consist of. Drawings of a homemade device can help with this. The main part of the cultivator is the engine, which can be electric or internal combustion. It is best to give preference to reliable and durable installations. If necessary, you need to provide a cooling system, since it is not always built-in.
The gearbox is responsible for controlling engine torque. This part reduces the speed and also facilitates the operation of the power take-off shaft. As for the frame and portal for attachments, they can be made from what is at hand. Even the simplest two-wheeled wheelbarrow will do for this. The main thing is to think about the diagram in advance in order to have a good idea of how and where the individual elements will be placed.
Comfort and adjustability are important parameters for a control lever. It should not only be comfortable, but also adjustable.
Disc harrow for cultivation
A disc harrow can be constructed from a battery formed by 8 discs that are spherical in shape. According to the type of work, it will be a homemade cultivator for a walk-behind tractor, the width between the cutting elements of which will be 15 cm. The harrow interacts with the frame according to the hinged principle. The length of the base can reach 130-140 cm, and the width - 65 cm. In this case, corners with a section of 45 x 45 cm are used for the frame. The depth of penetration into the soil is up to 10 cm, and the approximate working width is 120 cm. The advantages of such a harrow It’s also worth mentioning the ability to adjust the angle – up to 17 degrees.
How to make a hand cultivator
The main part of this model of a homemade cultivator is five steel discs-pancakes, which are put on an axle and can be rotated on it. Three of the five disks contain sharp L-shaped teeth, which are working bodies for loosening the soil. At the ends of the axle there are trunnions with bearings, to which steel brackets are attached, connected to a wooden handle.
Tine plower diagram:
- 1 — discs-pancakes,
- 2 - L-shaped teeth,
- 3 - axle, 4 - axle,
- 5 - steel bracket,
- 6 - handle
The pancake discs and axle are either machined independently. or an order is placed for their production on a lathe. Five holes are drilled in the outer surfaces and in the side faces of the three disks to secure teeth from a steel bar with a diameter of 10 mm.
Discs with teeth are put on the axle, then we install axles with bearings and washers. Rolling over the soil, the cultivator discs stick their teeth into the ground and loosen its top layer. The sharp teeth cut the roots of weeds, crush the soil and promote its aeration.
Disc rotary cultivator
With a homemade rotary cultivator you can harrow, break up large pieces of soil and level the surface of the area. The diagram of this model is shown below in the figure and is called a disk cultivator.
Homemade disc cultivator:
- 1-disk,
- 2 - axis.
- 3 - bushing,
- 4 — large bracket,
- 5 — small bracket,
- 6 - rod,
- 7 - pipe,
- 8 - handle
The working body of the disk cultivator is hemispherical convex disks welded to bushings. Two hemispherical disks are placed on two axles, the ends of which are secured in brackets with cotter pins. Pipe 7 with a crossbar into which handles 8 are screwed passes through a special ledge welded to a large bracket 4. The end of a rod 250 mm long and 24x2 mm in diameter with a blind threaded hole is welded to the small bracket 5 with a blind threaded hole into which a rod with a diameter of 16 mm is screwed, the upper end of which ( with lambs) protrudes above the crossbar. Steel disks 1 must have a hemispherical shape, and it is not easy to make them with this shape from ordinary 4mm thick steel plates. You need to hit the bowls hard with a hammer to “knock” the bowls out of the blanks.
The wings at the end of the rod allow you to adjust the angular position of the hemispherical disks. When the wings rotate clockwise, the rod and rod move upward, lifting up the small bracket and the inner ends of the axles, as a result of which the angular position of the disks will change.
Creation of a rotary modification
By creating such a modification, you can easily loosen the top soil layer, level the surface and remove massive parts of soil from the garden.
This version contains: disc, axial side, bushing, two brackets (large and small), rod, handle and pipe.
Stages of creative work:
- The working mechanism here is disks. They are welded to the plane of the bushings. The bushings themselves are threaded onto the axial part. Cotter pins are used to mount the axle to the main part.
- A handle is attached to the plane of the pipe. With its help you can control the cultivator.
The creation of this modification is complicated by the deformation of the disks. It works because the extreme sides of the steel pieces are forgotten
It is important that the central side is shaped like a bowl
If you use special nuts in this model, you will be able to adjust the discs during operation.