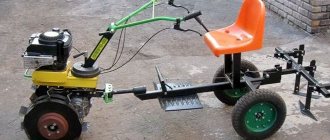
The presence of a walk-behind tractor in a personal household will no longer surprise anyone. This very valuable unit allows for the cultivation and plowing of land plots of varying lengths.
However, if you use additional attachments, you can significantly expand the potential range of work of your walk-behind tractor.
It is not surprising that having spent a certain amount of money on purchasing a walk-behind tractor, many want to make additional equipment with their own hands, thus wanting to save on their purchase.
Of course, no one is talking about making an exact copy of the equipment that is sold in specialized stores, but the principle of operation and general design features will be the same.
Most people in our country use their own gardens to plant potatoes, which are no less popular in our country than in Belarus. Therefore, the requirements for the walk-behind tractor must be appropriate - it must plow the ground for planting , and also help plant and care for potato bushes.
By courting we mean hilling, which is why potato hillers have become very popular, the methods of making which we will talk about.
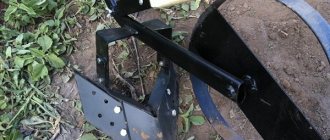
Lister model
This homemade hiller for a walk-behind tractor is interesting because it is easy to make in a rigid, non-sliding version. Here is a photo of such a hiller:
Lister hiller
In order to do this, you need little time and material. Cut a blank from 2 mm steel according to the drawing, a certain configuration. Let's sharpen the future bottom edge. Let's bend it in the middle. How to bend? Through a fixed pipe. Complete the fold by punching the leading edge with a hammer. Then we spread the wings of the hiller. We fix the width between the wings with a steel cross member welded between them at the back. We punch through the bottom of the product so that the wings turn out to be ploughshare-like. From the inside in front of the hiller, we weld a stand with several holes drilled so that you can adjust the depth (higher, lower) of the hiller’s immersion in the soil. We bolt the rod going to the walk-behind tractor to the stand. We attach the bar to the walk-behind tractor.
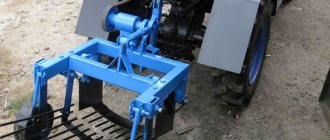
The same list model, made in a sliding version:
Sliding lister hiller
The hiller lies bottom up, so its structure is visible. Apparently, the hiller is factory-made. You can do exactly the same thing manually. Instead of a cross member tightly connecting the wings, three connection elements are used here: in the middle, welded in front, a rod with holes; two cross members from the wings, overlapping onto the middle rod. The connection point is secured with a bolt and nut. The diagonal cross members are attached to the fenders using a welded eye, so the cross members can be moved. By moving the bolt closer or further along the rod, you can adjust the width of the wings. Everything else with a sliding lister hiller is done in the same way as with a non-sliding one. Of course, a sliding one is better. It turns out that you can adjust not only the depth, but also the width of the hilling.
Preparing for work
The effectiveness of attachments to a walk-behind tractor directly depends on their correct operation. There is nothing complicated in using them, but there are a number of points that are useful to familiarize yourself with before hilling or performing other work using the device.
Settings
Setting up a hiller on a walk-behind tractor, as well as all the operating features of this device, are described in detail in any manual for summer residents, and it is not difficult for even a beginner to master them. However, there are always nuances that cannot be foreseen on paper. First of all, individual tuning is necessary because each individual case has its own set of factors, soil characteristics, weather, design and sharpening quality of the working parts of the device, and so on.
The technical characteristics of the unit itself also play an important role. Therefore, before the first trip to the garden beds, it makes sense to test the device on virgin soil with the same soil characteristics. By making such test passes, it is possible to feel the peculiarities of the “behavior” of the equipment, work out the angle of inclination, adjust the depth and speed of movement.
Use special attachments on the walk-behind tractor for hilling potatoes
Adjustment
The adjusted device ensures, first of all, the accuracy of its direction relative to the strip. Before setting up the disc hiller, you need to position the unit parallel to the furrows with the desired angle of inclination and width of the bed. Pre-verified operating parameters will ensure its effectiveness.
The angle of inclination is adjusted using a special screw device that tilts the device relative to the unit. The angle also determines the depth of plowing. In addition, additional adjustments are made using the holes in the hiller mounts. If an adjustable attachment is used, the furrow width must be set at this stage.
The lower parts of the discs move apart to a distance of 40 to 70 cm, depending on the width of the given row. In addition, when adjusting the width, you must also pay attention to the angle of inclination - the adjustable parts must be absolutely symmetrical. Next, the unit is installed on the site so that the furrow runs exactly between the discs. The passage is carried out along the row spacing without touching the plants.
Installation
Now let’s figure out how to install the hiller on a walk-behind tractor. First of all, the hiller with the frame is mounted: the stand of the device is inserted into the lock and secured with two bolts. A hitch is attached to the assembled device (the same as for the plow). The resulting structure is connected to the walk-behind tractor. The angle of inclination of the hitch in the direction of travel is adjusted using the hitch screw.
Instructions
I would like to start by considering the process of manufacturing a disk hiller, because this type of device is the most in demand today.
By installing disc sizes of different diameters, you can hill up potato bushes of various lengths.
Disc hiller
Many people ask the question - how to make a hiller for a walk-behind tractor with your own hands? At home, this is quite possible if you follow certain recommendations. So, let’s describe the manufacturing process step by step (for example, let’s take a disk hiller for the Neva walk-behind tractor):
- For manufacturing, we will need cutters from an old seeder, or sheets of metal 2 mm thick. They are secured using bearings with seals.
- They need to be placed at an angle to each other. The distance between the lower parts of the disks should correspond to the track width of the walk-behind tractor. They are connected by welding or using ordinary bolts.
- Here you need to follow a strict recommendation - the disks must be symmetrical to each other. Otherwise, the walk-behind tractor with the hiller will drift to the side, which will significantly complicate the entire work process.
- In addition to the discs themselves, the design of the hiller includes screw lanyards, a T-type leash and stands. Lanyards, in this case, perform the adjusting function of rotating the disks along the vertical axis.
- A do-it-yourself hiller for a walk-behind tractor, the drawings and photos of which you see below, must be made in strict accordance with the dimensions. Of course, there will be improvisation, but for the first assembly experience it is best to use other people's work.
- Depending on the capabilities, you can make a fixed or adjustable working width. The second method is more convenient, because you can change the inter-disk distance by simply rearranging the racks.
- To aggregate the hiller with a walk-behind tractor, you need to use a hitch bracket that does not have a beam. The hiller's leash is attached to the hitch using a stopper, connected with bolts and washers. The stopper itself is inserted inside the square pipe and then tightened.
The disk hiller for the Salyut walk-behind tractor is made using the same method, because the design itself and the method of connection to the walk-behind tractor are completely identical to the Neva.
Active hiller
To make such a hiller, we will need exactly the same list of materials and tools that we used in the manufacture of the disk hiller:
- welding machine;
- sheet iron;
- Bulgarian;
- fastening connections.
Using similar tools, you can make an active hiller for the MTZ, Plowman, Champion, Carver, Husqvarna, Lifan walk-behind tractor. The manufacturing principle is in many ways similar to the disk version:
- The axles also need to be adjusted to the parameters of the walk-behind tractor, and the parts themselves are welded using a welding machine.
- As previously reported, this type of hiller places certain demands on the walk-behind tractor. It must have two forward gears, as well as a PTO - power take-off shaft. Many sellers of walk-behind tractors, when they say that a walk-behind tractor has two gears, mean one rear and one forward.
- So you need to clarify this point when purchasing.
- It would be advisable to manufacture several bushings with brackets, as well as additional metal blades.
Double row hiller
The double-row hiller is the same lister type of hiller, but in double volume. Let's look at the whole process step by step:
- For work we need a sheet of metal about 3 mm thick. It is necessary to weld the base of the hiller from this material.
- A 4 mm steel strip can be used as a bracket. The field board is made of a steel sheet 5 mm thick.
- The hiller stand takes on the main load during operation. Therefore, you need to make sure that it is the most stable and reliable in comparison with other parts of the hiller.
- The wings of the hiller can be made from a sheet of steel 2 mm thick. They need to be bent a little using a pipe of the required diameter.
In principle, this is where the process of making a two-row hiller ends. You can also make an adjustable system of hiller wings, which are attached to the base using hinge technology. At the tail of the structure there are rods that regulate the angle of the wings.
Otherwise, the manufacturing principle is completely identical to that of the fixed list version.
https://youtube.com/watch?v=fSGR4FlZuFY
Necessary materials
Before we begin to analyze one or another method of making a hiller ourselves, we need to list a minimum list of what we will definitely need during the work.
KamAZ 65115 belongs to one of the oldest series of this plant, production of which began back in 1998. Here are all its technical characteristics.
One of these oldest companies is Vogele, which produces a wide range of asphalt pavers models. Vogele asphalt pavers stand for German quality and commitment to progress.
The T 70 tractor on wheels is the brainchild of the Chisinau Tractor Plant. By clicking on the link you will get acquainted with all the information on this tractor.
Of course, no one is forcing us to retrain as a blacksmith in order to forge all the necessary parts using the ancient method that was used several decades ago. But we still need a basic list of welding and plumbing equipment:
- Welding machine (it is preferable that this machine is intended for arc welding).
- Grinder with a set of different discs and attachments.
- Electric drill with a set of reliable drill bits.
- Electric emery.
- A gas burner, which is necessary to heat the metal during hardening.
- Vise or workbench.
- Various files and other consumables (bolts and other fasteners).
This list relates directly to the tools we need. In addition, you will need the material itself from which self-assembly will be made, but we will talk about this in more detail in the process of describing methods for making hillers.
Hiller as agricultural machinery
A hiller can be called a unit that is designed for hilling potatoes, as well as other crops that require such treatment during cultivation. It differs from other types of equipment similar in application in the following:
- Unlike a cultivator, a hiller must spread the earth to the sides, forming ridges. This is not necessary for a cultivator, although row-crop cultivators can be used for hilling.
- Unlike a plow, a hiller is usually lighter. In addition, the hiller is used only on previously plowed soil and is not intended for working on virgin soil.
- Unlike the hoe, the purpose of the hiller is not only to loosen the soil, but also to roll it to the side, forming the ridge of the bed.
The advantages of using a hiller are:
- Reduced labor and time costs. It is easier to walk along the row with a hiller once than to cover each bush separately with a hoe or hoe.
- Increased yield on dense soils. On sand and sandy loam you can do without hilling, but in gardens with dense clay soil this is a necessary element.
The disadvantages include the following:
- Price. Even a simple manual hiller will cost a gardener no less than 3 – 3.5 thousand rubles.
- When making it yourself, the work is difficult.
The need to carefully control the movement of the working tool (especially if the hiller is located behind the operator - attached to a walk-behind tractor or pulled manually by the front handle). If the plow or discs slide to the side, they can damage the sprouts.
The number of models of hillers on the market is extremely large: this unit is in demand, and it can be manufactured at any enterprise that has machines for working with metal. As an example, we can name the following models, which can be found in gardening stores and in manufacturers’ catalogs:
- "Friendship". Lister-type manual hiller for two workers. Weight is about 17 kg. Produced in Cheboksary, it costs about 4,000 rubles at the end of 2022.
- "Type 2". Disc sliding hiller for walk-behind tractors such as “Neva”, “Tselina MB” and similar. Requires a hitch, which must be purchased separately. Cost about 3200 rubles (excluding hitch).
- "Neva ON-2". Single-row lister hiller, can also be used for cultivation. Used as an attachment for Neva walk-behind tractors and other models of the same class. The price without a hitch is about 1000 rubles per element.
- "Motor Sich ON-2". Double-row plow hiller made in Ukraine with adjustable grip and plowshare adjustment. Can also be used for cutting furrows. The price in Russia at the end of 2018 is about 6,000 rubles.
Let's look at the features of each of them.
They have a fixed soil width and are used on very light motor cultivators with a power of up to 4 horsepower. Capable of cultivating beds measuring 25-30 centimeters in width, they are equipped with two side wings and a thin stand. The stand protects the equipment from overloads and mechanical damage.
This tool can only be used on dry soils, since adhered soil will interfere with the operation of moving structural elements. There are lister devices with adjustable tillage width. They are installed on motorcycles with higher power – from 4 horsepower. Such units can be safely used on wet soil.
Propeller
The principle of operation is the activity of the propeller parts. Under their influence, the soil is first dug up and weeds are removed, and only then the beds are loosened. These modifications are mainly practiced for motor cultivators with front-wheel drive and two speeds. This is due to the fact that at second speed the power increases to 180 rpm.
Double (2-row)
It cuts two furrows before planting crops, and is also used for hilling and loosening the soil. Includes a frame on which 2 hillers are fixed. When cultivating land, it significantly saves time, since it has two working elements. Mounted on a walk-behind tractor using a hitch. Due to the fact that such a device requires a lot of resistance to operate, it is used in conjunction with lugs.
Read more: Cherry does not bloom or bear fruit, what to do, how to force it
Rotary active
Instead of wheels, this implement is equipped with rotors with screw-type teeth. Demonstrates high performance when creating, loosening and hilling potatoes. Suitable for use with 3-speed units (two forward and one reverse). In the first gear, the implement hills up the plantings, and in the second gear it also removes the soil from the space between the rows of plantings.
Single row
The most common type. Suitable for use with light soil types. Cutting ditches is carried out after completion of the preparatory loosening of the soil using a cultivator.
Making your own hiller
Instructions will help you make a hiller with your own hands, as well as clear sketches of parts with the required dimensions. They are fairly simple designs. Any subtleties and features can always be seen in the photo or video of the manufacturing process. This will allow you to install all components correctly and quickly, so as not to have to redo the work later.
Required tools and materials
For work, you should prepare a number of tools: metalworking (vise, hammer, chisel, wrenches), electric (grinder, electric drill with a set of drills, welding machine), marking (tape measure, caliper). You also need to stock up on consumables: abrasive wheels, welding electrodes. Markings are applied with chalk, pencil or felt-tip pen. It is convenient to use a text proofreader in the form of a ballpoint pen for these purposes. It is easy to apply, and due to the formation of a thin line, cutting accuracy increases.
If almost every craftsman has the required minimum working tool (or you can ask your friends for it), then the situation with the necessary materials is more complicated. Depending on the design adopted, a different assortment of metal and its quantity will be required. The master does not always have such an assortment at hand. You'll have to buy it. However, a store or warehouse may refuse to sell such a small quantity. In this case, you need to look for alternative sources in production, repair shops or scrap metal collection points. For production you will need:
- sheet with a thickness of at least 3 mm;
- strip 40 x 4, 50 x 5 mm;
- profile pipe 15 x 15, 30 x 15 mm;
- fasteners (bolts, washers, nuts).
How to make a potato planter with your own hands: drawings Potatoes are loved by many gardeners, so they are often planted on plots of land. It is used as...
Preparatory activities
Initially, you should prepare drawings of all the parts and transfer them to thick paper on a scale of 1: 1. Then cut out cardboard patterns and place them on the metal surface so that as few scraps as possible remain. The grinder is used to make blanks. To do this, use an abrasive wheel to outline a contour to a depth of up to one millimeter, and then perform a full cutting. Bend parts in a vice or suitable mandrels. Mark the holes using a caliper and drill with a hand-held electric drill or on a machine.
For your information! To facilitate bending, parts are preheated with a blowtorch, gas torch or oven.
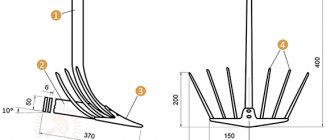
Making a lister-type hiller
The main part of this type of tillage tool is the ploughshare. This is a hiller plow for a walk-behind tractor that cuts into the ground. The construction of the structure must begin with it. To increase strength, it is advisable to harden the plowshare. However, this imposes a limitation on the list of materials for its manufacture. Low alloy carbon steels should be used. They lend themselves well to hardening and cutting. The plowshare is attached to the front using a bolted or welded connection. In the latter case, hardening is carried out after assembly.
The front part is made of steel sheet 3 mm thick. Bend it in two planes. To give the part smooth bends and transitions, it is preheated to 900 °C. The lower part should mate with the plowshare without gaps or distortions. To fit the parts, they are bent or trimmed. The front part is mated to the dumps on both sides. At the same time, the smoothness of shapes and transitions is controlled. The sole is made from a steel strip 5 cm wide and 5 mm thick. The bracket is cut out of a profile pipe with a cross-section of 30 x 15 mm.
Disc hiller
You can make your own attachments for a walk-behind tractor from an old gas cylinder. In this case, the top and bottom are cut out. The edges of the workpieces are processed with a grinder or sharpening machine. A hole is drilled in the center for fastening to the rack. The latter is made of steel pipe with a diameter of 26 mm. The traverse on which the racks are mounted is made of a metal profile with a cross-section of 40 x 40 x 3 mm. The coupling to the walk-behind tractor of a homemade disc hiller is made from thick-walled rolled steel.
Assembly
All parts are assembled into a single whole on a flat surface. To prevent displacement, clamps or clamps are used. Bolted connections are pre-twisted. Welded joints are cleaned of rust, scale or old paint. Gradually connect the elements and fix them with spot tacks. When the structure becomes rigid, check its compliance with the drawing, as well as the smooth movement of moving parts. After this, the final welding is performed.
Kinds
There are several types of tractor hillers on the modern market.
Lister equipment for a mini-tractor is considered the simplest model. Work with the ground is carried out thanks to the presence of a pair of connected and slightly spread wings. The thin stand prevents overloading when the moving device is immersed in the soil
It is important to mention that the lister hiller does not have the ability to adjust the grip, that is, the width of the rows must correspond to the equipment, and not the canopy adapt to the existing beds. The working width of the device is always fixed and ranges from twenty-five to thirty centimeters
This gap is sometimes not enough to process large areas, which, of course, is a disadvantage of this variety. A model with a variable working width is considered more convenient for use, which indicates the possibility of adjusting the space being processed.
- The disc hiller is considered a universal device, very convenient to use. Such equipment allows you to cultivate the land not only during planting, but also when the potatoes are actively developing. Models made of alloy steel and equipped with special rolling bearings instead of sliding bushings are considered to be the most reliable. The large diameter and thickness of the discs are also important.
- The next type of hillers is called propeller-type devices. As you can guess from the name, soil hilling in this case occurs with the help of propellers. These parts rotate, crush clods of earth, and then transport them from the space between the rows to the beds themselves. As a rule, propeller-type hillers are mounted on moving vehicles with two forward gears. This condition is necessary so that in second gear, the power of which reaches 180 rpm, in addition to loosening, the earth is also thrown over.
A two-row hiller allows you to simultaneously cut furrows for further planting of crops and immediately hill up the soil. When using the canopy, the soil between the rows is loosened and transferred to the bottom of the planted plants. Such a device, as a rule, makes it possible to adjust the working width by spreading the blades, as well as to keep them at the required depth. The double-body hiller allows you to process two rows, which sets it apart from other representatives of the model range. The width of the blade wings varies in this case from 250 to 430 millimeters.
It is worth mentioning that many craftsmen make such attachments on their own from available materials, fortunately the Internet contains a large number of suitable drawings and instructions. The role of discs is usually played by lids from old pans without an enamel coating. The diameter of the circles in these cases varies from forty to fifty centimeters, and the edges of the lids must be sharpened and, if necessary, slightly bent. A circuit is assembled from pipes and bushings, onto which the discs are then attached. The frame itself also has to be equipped with wheels for movement.
Homemade attachments for walk-behind tractors
For medium and high power walk-behind tractors today, suppliers and manufacturers offer a huge amount of attachments and accessories that provide mechanization of many operations. However, despite such attractive offers and ready-made options for supplying kits, many owners prefer to make attachments for the walk-behind tractor with their own hands. And the reason is not that homemade ones are cheaper. Not at all, if we take the cost of materials, then this is absolutely not true. The problem lies elsewhere. Do-it-yourself tools for a walk-behind tractor are, for the most part, tools that are universally selected according to their quality parameters and meet the needs of a specific person.
This approach to the formation of a fleet of agricultural machinery makes it possible to take into account in the process of designing and assembling equipment all possible features of both the site and the owner himself.
The equipment being developed for the unit is conventionally divided into equipment:
- universal purpose;
- highly specialized focus;
- auxiliary equipment and devices to simplify the control of the walk-behind tractor.
Universal tools include, first of all, adapters and various types of trailers, which make the walk-behind tractor a universal transport platform both for transporting goods and as a convenient vehicle. Some models of walk-behind tractors are capable of reaching speeds of up to 25 km per hour. Although the comfort of a mini tractor is still far away here, you no longer have to walk.
On this topic:
BACK
FORWARD
1 of 3
Highly specialized types of equipment are most often designed to perform only 1 or a maximum of 2 operations. However, these are the tools that are most in demand in terms of consumer qualities for high-quality soil cultivation, performing operations to care for crops, harvesting feed, and even used in construction. In part, it should be noted that among special-purpose homemade products, relatively simple types of tools predominate - plows, cutters, hillers. This is something that can be done from scrap materials and using the simplest power tools. But more complex elements are manufactured using units from other equipment.
And, of course, what makes it easier to control is a counterweight on the walk-behind tractor, wheel weights and anti-slip chains - all this allows you to work with the unit all year round.
Hilling devices made from improvised means
It should be noted that a homemade hiller can be made without investing in the purchase of iron. This will make it possible to reduce the cost of the gun to a minimum. It is acceptable to use an iron product of suitable dimensions as the starting material. For example, an unnecessary lid from an old saucepan.
The main thing, when using a similar approach to business, is to remember the drawings and the required disk diameter. It can be no less than 400 millimeters. This is explained by the nuances of soil cultivation, taking into account the area of potato roots, planting depth and clearance. Basically, the maximum planting depth is 60-80 millimeters, the length of the roots is up to 200 millimeters. The cover is sharpened on all edges, slightly transformed by bending and mounted on the walk-behind tractor.
Read more:
- How to make potato hillers for a walk-behind tractor with your own hands
- Do-it-yourself queen cell for rabbits, drawings with dimensions
- Compound feed for rabbits: composition and do-it-yourself recipe, which one is better to choose and the daily amount of feed
- DIY vertical beds for cucumbers
How to mount a hilling implement on a walk-behind tractor?
Installing a hilling implement on a motorized cultivator requires proper adjustment of the tilt of the field board and the depth of immersion, which must be less than that of a plow. Before you start using the hiller, you need to do the following.
- Mount the coupling device and wheels on the motorcycle, then add a hiller.
- The walk-behind tractor is installed on an equal plane, and the hilling implement is lowered to the ground and fixed to the coupling device.
- When installing equipment, make sure that the stand of the agricultural implement is in a vertical position. This will ensure the required tilt of the field board is adjusted.
- Then the equipment lands or is slightly immersed in the soil so that it is below the supporting plane of the lugs.
It is necessary to do a test hilling and see: if the equipment is buried in the soil, move the stand forward, raising the toe slightly. When leaving the ground, the stand is retracted back by lowering the toe
The main thing is to take into account the width between the rows, adjusting the existing structural elements
Tracked modules
A module or attachment with tracks allows you to make a heavier and more powerful structure out of a walk-behind tractor.
The tracked attachment recommended for the Cascade should have approximately the following overall dimensions: length 95 cm, width 22 cm, height 40 cm. The average weight of such a module is 50 kg.
The attachment for the “Cascade” is also suitable for the “Neva” or “Oka” walk-behind tractor.
CULTIVATING THE LAND WITH A MOTOR-BLOCK
Before planting potatoes with a walk-behind tractor, the soil must be cultivated so that it is loose and soft. Previously, it was dug up with a shovel, which took a lot of time and effort. Now, having attached cutters to the equipment instead of wheels, we cultivate it quickly and efficiently.
We use a Neva-MB2 walk-behind tractor, a reliable and unpretentious piece of equipment that has been serving us well for several years. With its help we carry out all garden work. Cultivation is carried out at 2nd speed. We start work from the edge of the site. Having reached its end, we cultivate 2 meters of land perpendicular to the furrows; this will be the place to turn around. On the other side of the site we do the same.
Now we cultivate the area along the beds.
The cutters leave small depressions in the soil. In order for the garden to be processed efficiently, when driving in the opposite direction, you need to use one cutter to follow the trail left by the other cutter. Then the land will be cultivated to the depth of a spade, which is optimal for planting potatoes. There are times when someone asks mercenaries to plow the garden with a cultivator, but in order to do it faster, they do not put the cutter in the furrow left by another cutter. This reduces the depth of cultivation and makes it difficult to plant potatoes in such a garden.
Some summer residents cultivate their garden in a circle, starting from the edge, reaching in a spiral to the center of the plot. The disadvantage of this method is that the soil must then be leveled with a rake, which also requires some effort.
When you cultivate the area along the beds, the plowing turns out to be even; you need to use a rake to level the ground only in the places where the equipment turns.
Manufacturing
Step-by-step instructions for making a disk hiller with your own hands:
To ensure universal use of the attachment, it is recommended to pay special attention to the setting functions. The height is adjusted using a special telescopic device, which is placed in the center
A smaller tube should be placed in a pipe with a larger diameter, which will allow the device to be adjusted to the growth of the farmer. To control the angle of attack of the hiller, use the tilt of the bed. Angle adjustment is made possible by changing the angle difference between the vertical post and the front link. The bed must be set in motion by attaching the front link to the post in its central part using a hinge. Adjustment is carried out through a screw tarlap. Using a welding inverter, the rear posts and two disks are attached to the vertical stand. The next step is to install the front linkage using a hinge and a bolt. The end result should be a U-shaped rear link up to 50 cm wide. The length of the handle is from 20 cm. A vertical tube should be welded in the center of the fork. It is its end that will serve as the element through which the entire structure will be installed in the vertical rod. To adjust the height of the rack, holes are made in the upper part; such openings are also drilled in the vertical fork. If discs with a flat surface were chosen for the device, it is recommended to bend them with a hammer and clean the edges. The device for processing potato plantings is ready. An important point: the dimensions of the disk hiller for a walk-behind tractor will depend on the type of self-propelled equipment used.
Variety of choices
A walk-behind tractor or cultivator will help make planting and caring for potatoes easier. When working in the garden or vegetable garden, they are considered indispensable assistants. An integral part of the walk-behind tractor is the plow. It can be revolving and disk. An additional accessory to the technique is a hiller, which can be of several types. https://www.youtube.com/watch?v=IwXYxv73vvc
It will not be possible to immediately determine which hiller is better. The choice of hillers is influenced by many factors, including soil characteristics, the size of the land plot, and the financial part of the issue plays not the least role. Therefore, in order to make the right choice, you need to get acquainted with the description of the most common hillers for walk-behind tractors:
- Hillers that do not require independent adjustment of the width between the metal wings. The furrow for all crops will be the same distance, which is not very convenient. These types of structures are convenient to use for a motor cultivator weighing no more than 30 kg. In addition, the device’s stands are thin and not suitable for cultivating hard soil.
- Equipment that involves changing the width between the wings, so the distance between the furrows can be made different. You can also use two units at the same time on one hitch. It is recommended to install it on a walk-behind tractor weighing more than 30 kg.
- The most popular type is the single-row hiller. The device is designed to work with light soil pre-treated with a cultivator. If a single-row plow is used, the lugs are installed close to each other. This is necessary because hilling is carried out one row at a time. There is a more modern two-row hiller for a walk-behind tractor.
- Another device for hilling vegetables is the Dutch hiller. It allows you to adjust the wings not only horizontally, but also vertically.
- The active hiller (rotary) of the propeller version is easy to use. It has a completely different operating principle. The rotary hiller has rotors with parallel teeth instead of wheels. The device can be installed on a walk-behind tractor and cultivator with two forward gears. Propellers mounted on the crossbar are convenient for crushing and loosening the soil, removing weeds with roots and hilling plants.
- The best, judging by the reviews of owners of walk-behind tractors with an additional device, is considered to be a disk hiller for a walk-behind tractor. It consists of a T-shaped leader, screw adjusters, two stands and two disks. The working elements do not look like wings, but like disks. You can change not only the width, but also the angle of inclination. The result is ridges on the treated area of the required height and width.
Description of the potato variety Zhuravinka, cultivation and yieldRead
Before you start working on your plot of land, you need to know about the settings of the selected attachment. Improper use or installation of equipment may result in crop loss and other adverse results.
The preparatory stage is to cultivate the desired area, it is better to loosen the soil. At the same time, you can apply organic or mineral fertilizers. The looser the soil, the easier it will be to make furrows.
Before planting potatoes with a walk-behind tractor, you need to set marks at a distance of about 65 cm. Then, using a walk-behind tractor with a hiller, make furrows and lay out the planting material. After this, the wheels are changed to rubberized ones, and the wings of the potato hiller to the walk-behind tractor are set to the maximum width. The walk-behind tractor is installed between the rows and the plow is driven along the furrow, covering the planted potatoes.
How to assemble a hiller without resorting to the services of specialists
Any hiller must be multifunctional, so it is necessary to pay attention to the adaptability of its regulation. Height adjustment is carried out using a telescopic device in the central part
To do this, a tube with a smaller cross-section is inserted into this tube, which goes into the rear rod. This approach allows, when cultivating the land, to adapt the hiller to the individual parameters of human growth.
The attack angle is controlled by tilting the central post, in relation to its placement to the horizon of the ground. This effect is achieved by changing the angular difference between the vertical frame and the front link.
How to make a manual potato hiller on your own so that the tool frame is movable? To do this, the front link is attached to the central pillar with a hinge, and the adjustment itself is carried out with the participation of a lanyard. This allows you to change the angle of inclination gradually, depending on the type of soil you have to work on and the parameters of the leading person. In the absence of a lanyard, the angle is adjusted by moving the plate to the required position and fixing it with bolts in the required grooves.
The vertical frame tube is bent at a distance of 40 cm from the end, the bending angle is 15 degrees.
The rear link and the blades themselves are then welded to this rack, and the front link is secured using a hinge mechanism and a long bolt. The rear link looks like a large letter “P”, the width of which is 50 cm. The length of the handles is at least 20 cm. A vertical tube is welded in the center of the fork, its length is 30 cm, and with this end the structure is inserted into the cavity of the vertical link.
To be able to adjust the height of the rack, holes are drilled at its upper end, and do the same with the vertical fork. The front link must be the same width as the rear link. However, the length of the front linkage handles must correspond to the owner’s parameters, so that he can easily fit between the handrails and comfortably grasp them.
To make disc blades, two identical plates are cut from a steel sheet. They are given a semicircular shape, similar to the disks of a classic agricultural plow. Both halves of the plow are fixed on a vertical stand. The weld seam must be smooth and without chips. All welded parts must be ground with a grinder, and the edges of the cutting discs must be sharpened. The cutting part will take on the main resistance of the soil when cultivating the plot. You should not buy ready-made discs, since such metal can only be sharpened with the help of special and expensive equipment.
What to make a manual hiller from - video
Buy new or make it yourself?
Many owners of Cascade walk-behind tractors ask this question. On the one hand, factory set-top boxes are more reliable, of higher quality and with a guarantee. However, on the other hand, they are quite expensive.
Almost all attachments can be made independently. To do this, on various forums there are a large number of different drawings and assembly diagrams, following which you can do everything yourself.
It is necessary to understand that here you bear all responsibility for the quality and further use of the console.
What are they good for?
This type of equipment is endowed with a number of positive qualities.
- Ideally combined with a walk-behind tractor. If the disc hilling device is operated in a lower gear of the unit, then its power increases significantly, thereby increasing the productivity of soil digging.
- Convenient operation. During the process of cultivation or digging with this device, you do not need to put in a lot of effort. He moves forward on his own, without the need to help him or push him from behind.
- Multifunctional design. The hiller can be used to loosen the soil both before planting potatoes and after it during active growth for extraordinary cultivation.
Disc equipment for hilling is as important as a winch and a plow. Using it, you can easily prepare beds for planting vegetation, and also use it for planting planting material, in particular potatoes.
Operating principle
The device is attached to the motor vehicle on the bracket of the coupling device (hitch), which does not have a bed. This is accomplished by means of a locking component - two screws and a flat washer. More comfortable and high-quality work is performed at the first reduced speed. This will make it possible to increase traction by reducing the forward speed.
The principle of operation of a disc implement for hilling is simple: the discs, when moving, grab the ground and form a roller during the hilling process, covering the vegetation with soil. The movement of the discs makes it possible to further crush the soil and loosen it.
The disk device for hilling has some advantages over its relatives: it builds ridges higher and more level, it is simpler and more interesting to operate, and energy costs are significantly lower. It is easier for an employee with such a device to work.
Of course, not everything is so wonderful. You always have to pay for convenience. And the cost of the disc hiller is proof of this. The cost of using a comfortable and easy-to-use disk device is approximately 3–4 times higher than other types.
The cost of agricultural implements depends on the following characteristics:
- thickness and transverse size of the disks;
- material of manufacture: ordinary metal or alloy steel;
- use of roller bearings or sliding bushings in the structure;
- setting device.
When purchasing a disc implement for hilling, all these points must be taken into account.
Taking into account that this equipment is not cheap, a natural question arises as to whether it is possible to make a homemade disk device for hilling a walk-behind tractor
Hiller models
Lister type hiller
Consists of two attached, branched and fixed wings. Due to the fact that the wings are stationary, it is impossible to set the size of the working width by adjusting the device to the dimensions of the row spacing. It is for this reason that when working with this hiller, you have to adjust the row spacing itself to the size of the hiller, and not vice versa.
Basically, all manufacturers produce models with a working width of 25-30 cm. This is not very convenient, because the technology for growing and planting potatoes has dimensions of width between rows of 60 cm.
This design has special racks with a thin structure that prevent overloading of the walk-behind tractor while loosening the hiller in deep layers of hard soil.
There are devices whose design has a streamlined appearance. This is the most convenient because such models can be adjusted to any row spacing size.
With variable working width
However, they have one very unpleasant drawback - they are very difficult to work with. This is due to the fact that when loosening, the wings of the device push the soil in different directions, a small amount of which is poured back into the furrow.
As a result, your arms and back begin to get tired, and most of the engine power is wasted. But still, despite these shortcomings, these models are popular and are in great demand among many landowners.
Disc variety
goes well with the walk-behind tractor. If the disc hiller is used at a reduced speed of the walk-behind tractor, the power of the tool becomes even greater. Due to this, the efficiency of digging up the soil increases and also has a beneficial effect on the working process of the tool;
convenient use. When loosening or digging with this device you do not need to exert much force. He moves forward on his own and there is no need to put additional emphasis behind him;
universal purpose. This tool can be used to loosen the soil, both before planting potatoes (read this article about how to make a manual hiller for potatoes), and after planting during active cultivation for additional loosening.
If you choose from the models offered in stores, it is best to choose hillers made of alloy metal, the design of which has rolling bearings, a large diameter and thickness of the disk elements.
Additional Tips and Warnings
After completing the self-assembly of the hiller, the most important thing is to test it in the garden. Successful production does not yet guarantee high-quality work, because it depends on a combination of many factors - weather conditions, soil conditions, correct sharpening of the hiller elements, etc.
Before you start hilling, you need to walk through a regular piece of land. During the work, you will feel the correct operation of the hiller and will be able to adjust the optimal depths and angles of entry into the soil.
The second important point is the speed with which you will carry out the hilling process. A correctly selected pace of work can be no less useful in work than the presence of a hiller itself, because at high speeds the unit will simply scatter the earth in different directions without hilling.