Work on a plot of land, be it loosening, digging or hilling, takes a lot of time and effort. Therefore, many gardeners, in order to facilitate the work of cultivating the land, purchase auxiliary special equipment - walk-behind tractors. Using this universal unit, you can perform a whole range of diverse work, starting with cleaning the site and cultivating the land, and ending with transporting the harvested crop and any cargo. But it is impossible to weed, hill up or simply remove snow and construction waste without attachments - an adapter. A specially equipped cart with a seat, which turns a walk-behind tractor into a mini-tractor, is quite expensive in stores. Making an adapter for a walk-behind tractor with your own hands is a completely feasible task, which can be completed by an owner with a technical creative streak.
What adapter designs are there?
With the help of this attachment you can significantly simplify the use of a walk-behind tractor. After all, it acts as a transitional link connecting the unit itself with other functional elements: attachments for planting and hilling potatoes, flat cutters, a plow... By installing the equipment, you can automate gardening work as much as possible. For example, when using special equipment with attachments, you can increase the operating speed from 5 to 10 km/h.
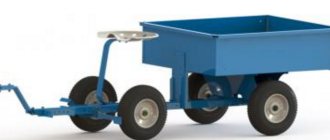
There are several types of adapters. In general, the design is a trolley attached to the rear of the walk-behind tractor, equipped with a comfortable seat
Some models are equipped with a lifting lever, which greatly simplifies the control of the mechanism and the movement of the unit itself around the site. Other adapters, in addition to performing agricultural work, can also be used for transporting goods. They are equipped with a special body. Depending on the functional value, the adapters can have short or long drawbars. Models with short drawbars are designed to work with light walk-behind tractors, and those with long drawbars are designed to work with heavier units.
How to choose a walk-behind tractor for your garden, read here:
There are also models on sale with a telescopic drawbar, as well as those in which the track width can be adjusted.
The adapters are fixed to the walk-behind tractor using a single, enlarged hitch, which consists of two parts: the first part is necessary for connecting the equipment to the unit. And the second acts as an adjustable adapter between the equipment itself and its lifting mechanism. To increase the number of implements used simultaneously, the adapters are equipped with a double universal hitch.
General information about the tractor
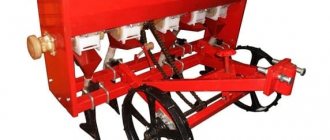
The walk-behind tractor can be used separately, as well as connected to a wide variety of additional equipment, such as:
- cultivator;
- harrow;
- mower.
Such devices can significantly increase the possible range of work that a walk-behind tractor can handle. In addition to this, you can use a mini-tractor as a means of transportation if you prepare a special block adapter for it in advance.
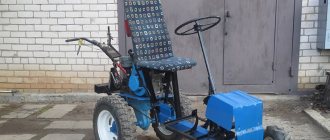
This device makes it possible to sit quite comfortably on the seat with which it is equipped, and then perform exactly the same work, but with an incomparably greater degree of comfort. For example, in specialized stores you can purchase an additional unit with steering control for the Neva walk-behind tractor, or you can make it yourself. Fortunately, there are plenty of drawing materials on the Internet, which greatly simplifies the assembly process.
Assembly of a simple design
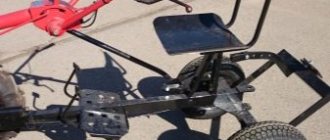
A simple adapter model consists of a metal frame. It is made from a pipe with a rectangular cross-section 1.7 meters long. At one end of the pipe, a 0.5 meter long pipe is welded perpendicularly, which will serve as the basis for attaching the stands for the adapter wheels. The height of the racks themselves from the wheel axis to the top point is 0.3 meters.
To make the structure, you can use wheels removed from a garden cart. They can be installed on bushings, which are quite simple to do on a regular lathe. Bearings of the appropriate size are put on the finished bushings
After this, the braces must be attached by welding to the central pipe and adapter wheel bushings. The length of the products depends on the angle of their inclination relative to the structure. The square frame of the adapter can also be made to any size. In our case, this is a frame of 0.4x0.4 meters. To equip attachments, channel No. 10, 0.4 meters long, is welded to the rear end of the frame. The assembly and connection of the side pipes of the structure is carried out using bolts.
A lever for adjustment is also welded to the frame. It has three “elbows” 20, 30 and 50 cm long. To increase the applied force, the adjustment lever is equipped with an additional lever 75 cm long. The coupling unit of the structure can be purchased at the store or made independently. Regardless of whether it is a production coupling or a self-made one, special attention should be paid to its reliability. The service life of the attachment depends on its quality.
The seat is placed on a metal support, which is welded to the central pipe. The adapter is ready for use.
Recent Entries
Lilac perennials that are beautiful, compact and do not crowd out other plants Why when buying seedlings you should not take the sellers’ word for it and how to determine the age of the plant using 3 signs Tomato seedlings have turned purple or whitish: why the color has changed and how to save the plants
How to make your own all-wheel drive adapter for the Neva walk-behind tractor
Of course, purchasing a ready-made adapter for the Neva walk-behind tractor is the simplest and best way out of the situation.
However, they cost quite a lot, so not every summer resident or farmer can afford to purchase them. It is not surprising that many people ask the question - how to make an adapter for the Neva walk-behind tractor? There are quite a lot of recommendations on the network regarding the manufacture of adapters, as well as many drawings that allow you to see this device in more detail. Using them, it is quite possible to make such a unit at home, using the bare minimum of materials and tools.
What you need to make a homemade adapter
To make a homemade adapter we will need:
- pair of wheels;
- steel angles, iron sheets and pipes;
- driver's seat;
- welding machine;
- fastening connections, etc.
A do-it-yourself adapter for the Neva walk-behind tractor, drawings of which will be presented later, can be made using this minimal list. Before proceeding directly to the manufacture of the device, you need to draw its diagram.
It should provide for the degree of load of different parts of the frame, as well as the overall dimensions of the device. You can do this yourself, or you can use the drawings of those who have already successfully assembled a homemade adapter.
Let's move on to manufacturing the structure. Let's divide all the work into several main steps:
- We will need a square metal profile, the length of which should be approximately 1800 mm. Across this profile you need to weld such a piece, but of a smaller size - about 600 mm. The wheel stands will be attached to this piece of profile.
- The height of the racks should be about 300 mm.
- Next you need to weld the braces. They are welded to the main frame, as well as to the wheel hubs. The angle of their location relative to the frame can be made at any angle at your discretion.
- Additionally, we weld a beam to the metal profile. This is needed to strengthen the frame.
- The frame structure for the attachments is welded from channel number 10. It is connected to the wheel axle with a piece of square pipe, and the seams are welded.
- Next, we weld a control lever with three bends to the frame. Accordingly, these are 350, 550 and 200 mm. We attach to this lever another one measuring 800 mm, which will regulate the force. The levers are connected to each other with ordinary bolts.
- We weld a piece of pipe approximately 300 mm long to the main frame - this will be our seat stand. At the top we also weld two pieces of pipe perpendicular to this stand. This is necessary so that the seat is more stable and does not come off during operation.
- The seat can be taken ready-made, or made from a piece of plywood, then covered with foam rubber or other soft material. The seat is attached to transverse pieces of pipe welded to the stand under the seat, as well as to the stand itself. We use regular bolts as fasteners.
- At the front you need to weld the coupling mechanism to the walk-behind tractor.
As we can see, the work is quite simple, but you will need skill in working with a welding machine, because... There is no other method of connecting all the components.
You can complicate the design a little by making a homemade adapter for the Neva walk-behind tractor, which will have steering control. For this we need:
- iron sheets;
- steel pipes and angles;
- seat;
- a pair of wheels;
- welding machine.
In this case, the adapter frame must be well articulated with the walk-behind tractor so that the structure does not move to the sides. As a steering wheel, you can take a ready-made one from old Soviet cars (for example, from a VAZ).
Arrangement of a multifunctional model
To manufacture a multifunctional device, you need to prepare:
- Steel pipes and angles;
- Sheet steel;
- Two wheels;
- Comfortable seating;
- Welding machine and set of tools.
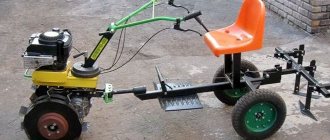
This adapter is a multifunctional model. It can be used for basic agricultural work and transporting goods over uneven terrain over short distances. The structure can be equipped with agricultural implements such as a plow, harrow, hiller, and potato digger. During the winter months, you can attach a snow scraper to the adapter for clearing snow.
The main elements of the equipment are: frame and coupling devices, as well as wheelset and seats
The process of producing an adapter at home takes place in several stages.
And this is an idea! How to upgrade a walk-behind tractor into a snow blower: https://diz-cafe.com/tech/kak-peredelat-motoblok-v-snegouborshhik.html
Stage #1 – drawing up a kinematic diagram
To ensure the balance of the structure and prevent additional overloads at the design stage, it is necessary to draw up a kinematic diagram. You can make it yourself or use a ready-made version.
This circuit is designed for the manufacture of an adapter designed to work on the Neva walk-behind tractor.
Stage #2 - production of main parts
When making and assembling a frame, it is important to provide for the arrangement of a fork with a bushing. It is necessary to ensure free rotation of the trailer.
The frame of the structure is made of metal pipes and angles
The body of the structure is made of steel sheet. The height of its sides is made no less than 30 cm.
When making stands for the adapter wheels, you can use the diagram below.
The simplest option for manufacturing a coupling assembly is a 15 cm long pin, which is stuck into the hole in the drawbar of a U-shaped walk-behind tractor. The disadvantage of this option is rapid wear: under the influence of a freely rotating trailer, the holes for the hitch quickly break. To reduce wear, it is advisable to lengthen the U-shaped chain.
Steering devices
Such devices make it possible to rebuild the walk-behind tractor into a full-fledged mini-tractor; the only difference, as already mentioned, is the preservation of the power of the engine used in the unit. It is attached to the walk-behind tractor using a hitch, which is placed in front of the adapter. This block is perfect for motor engines such as Sadko, Don, Plowman, Forza, Huter, Champion, Profi.
In particular, such an adapter includes: steering; pair of wheels; clutch; brake and gas pedal; driver's seat; frame structure.
Behind such an adapter there is a special lifting mechanism, to which it is possible to connect additional trailed and mounted equipment.
As for the steering adapter specifically for the Neva walk-behind tractor, the cost of which, as a rule, is approximately 45 thousand rubles, it has the following technical characteristics:
- wheel track - 60 cm;
- total weight - 105 kg;
- ground clearance - 35 cm;
- speed indicators are about 15 km/h.
How to assemble
You should do either the front or rear version, it all depends on the model of the walk-behind tractor. If there is no difference, choose the second type, since it is much easier to make. Follow simple instructions, it is advisable to look at photos of finished products in advance, and clearly understand what the result of the work should look like.
Rear-mounted design
It is called a trolley because it is placed on a standard tow hitch. Even before starting work, make a drawing with all dimensions, or find a ready-made one, there are many options, there is plenty to choose from. It’s good to understand and, if necessary, make adjustments to accurately fit the product to your equipment. Carry out the work like this:
Cut the pipe or corner, clean the ends to be welded. Place the pieces on a flat surface, check the geometry using a square and measuring the diagonals. Weld the main part of the frame. First, grab, then double-check the position again, and only after that make continuous seams along the entire length of the joints. Clean off metal deposits with a grinding machine. Weld the hitch to the shank, select the position exactly, and take all dimensions on the walk-behind tractor. It is more convenient to work with an assistant, since it is difficult to position the parts and control their position yourself. Secure the floor and pedals or levers. All parts must be accurately adjusted, aligned and checked to see if they move normally. Install the seat. First select the correct position, then either weld or bolt the slides. In this case, drill holes in the required places and use fasteners with washers. Reinforce the floor at the bolt locations with additional stiffeners. Put on the wheels. The work here depends on the type of attachment to the frame.
The easiest way is to make separate modules from a square profile and a hub, which are inserted inside the pipe and secured. Pay attention to the alignment of the hitch at the rear. It would be best if it could be adjusted in height
Make a mounting plate with holes; it will allow you to mount the unit higher or lower; this is the simplest solution.
When assembling a system with a movable joint, the connecting unit must be rigid and rotate only in the horizontal plane. It is easier to buy a ready-made hinge, since it is difficult to accurately adjust this part of the structure at home.
After assembly, check whether the hitch is attached to the walk-behind tractor normally and whether it is convenient to operate. It is better to find all the shortcomings at this stage and eliminate them immediately. Then clean off all pockets of corrosion on the metal, if any, paint the surface in 2-3 layers for reliability.
Front version
The front adapter for the Neva walk-behind tractor with steering can be purchased ready-made. It is also suitable for other models of equipment - Oka, Cascade, Beam, Tselina. But it will cost from 23,000 rubles, so it makes sense to make it yourself, using finished products as a sample. The drawings are easy to find, which is also good. Carry out the work like this:
Consider the location of all controls. Most often, problems arise with this. The easiest way is to use levers or pedals, plan their location in advance, and eliminate any problems. Weld the supporting frame
Pay attention to the place where it is connected to the walk-behind tractor; it should be further strengthened. Use a corner or pipe with a safety margin so that the elements do not deform under load. The easiest way is to use a ready-made steering column and rack
Buy any small option at a dismantling shop, then you won’t have to invent anything. Install the wheels with hubs and adjust the steering mechanism in place. Weld the floor, set the seat and all controls. Check each unit during installation to make sure that it works as it should and that no problems will arise after assembly. A ready-made adapter with a steering wheel for the Neva walk-behind tractor, assembled with your own hands, must be tested after assembly. Pay attention to the steering mechanism and ease of control. Paint all unprotected metal surfaces, first clean the steel from corrosion.
Such options are good because during operation a standard walk-behind tractor coupling is used and a power take-off shaft is available for active units. You can additionally install headlights to move or work even in the dark; to do this, make two brackets for fastening in the front part of the frame and conduct wiring.
Assembling an adapter for a walk-behind tractor is easy if you have a detailed drawing with dimensions, all the necessary materials and tools. It is best to weld the frame for reliability; the remaining parts can be fastened with bolts, then you can quickly assemble or disassemble. Paint the metal, otherwise it will start to rust.
Recommendations for use
Regardless of the type of assembled and connected product, you need to start working with it by taking into account safety regulations. Before starting the engine, you need to conduct a visual inspection of the equipment to eliminate visible damage and malfunctions. Do not add fuel to the fuel tank while the engine is running.
If you hear an unusual noise when you turn it on, you need to stop the engine and identify the cause of the problem.
Do not use gasoline of inappropriate brands or fuel mixed with oil and other impurities. Before each start, you need to check the oil level, since this is often the reason the engine stops.
In order to extend the service life of motorcycles, a new product must be run-in. It will contribute to the trouble-free functioning of the walk-behind tractor.
During this process, the working surfaces of the parts are usually worked out. The duration of running-in, as a rule, varies for products of different brands and modifications. In some varieties it can be up to 20 hours or more. At this time, you should not load the equipment to the maximum extent.
See also: Glasperlene sterilizer for manicure instruments: reviews, instructions, how to use, price
One recommendation is to change the oil after the first five hours of operation. As for warming up the engine, this should be done at medium speeds without load for about three minutes.
Based on the modification of the walk-behind tractor, for the first hours of its operation it is necessary to operate the unit in first gear (with the gas lever in the middle position). It is important to try to avoid not only maximum, but also minimum speed . At the end of using the equipment, you need to check the tightness of the threaded connections.
As for the cultivated soil, it is better to cultivate simple soil in the first hours. In addition, you need to take into account that rolling in is not done on rocky and clay soil.
Before work, you need to inspect the area and remove stones and large debris. In general, when working with motorized equipment, you need to constantly monitor its cleanliness and check the fastening strength of the accessible elements of the adapter and walk-behind tractor, including attachments.
Don't forget to tighten any loose fasteners. You also need to remember about timely maintenance.
Tools and materials
To make an adapter for a walk-behind tractor with your own hands, you need to prepare everything you need in advance. Pick up the leftovers that are in the pantry; there are no requirements for them, except for one thing: reliability. All parts must be able to withstand the high loads encountered during operation. The main list looks like this:
- Welding machine. If you don’t have one, rent one for a day, it’s cheaper than buying one. It’s even easier to prepare everything in advance and invite a welder for an hour, he will connect all the parts according to the drawing.
- Bulgarian. With its help, metal is cut and polished. Don’t forget to buy several cutting discs and at least one sanding disc.
- Electric drill with a set of metal drills of different diameters.
- Measuring tools: tape measure, square, pencil, level for checking the plane.
- Profiled pipe for frame assembly. The size is selected according to the location, the main thing is that the frame is strong.
- They have wheels and accessories. Use a metal rod of suitable diameter for the axis; you can make separate modules for each disk. You will need bearings, select them according to the diameter of the mounting hole.
- Hitch. The easiest way is to buy a ready-made one, since the unit is difficult to make and is cheap. Then you won’t have to adjust anything, the work will speed up almost twice.
- A seat from any equipment, a steel sheet for the supporting part, pedals, a brake handle. Select components according to the drawing.
If you have a diagram with dimensions on hand, then when you buy a profiled pipe, they can even cut it as needed. It is possible to use corners instead, but they are not as convenient to work with, and the appearance will not be as attractive. Don’t forget about the anti-corrosion coating for the frame; the easiest way is to buy a “3 in 1” composition, then you won’t have to apply a primer.
Advice! If the structure will be placed at the rear, you need two hitches so that you can hook the equipment to the adapter.
Trailed trolleys for Oka walk-behind tractor
The trailed trolley is a drawbar on which are attached:
- pair of wheels;
- trailer (body);
- seat;
- coupling mechanism.
A trailer is used to transport various cargoes (bulk, piece goods, etc.). Trailers can be either manually unloaded or equipped with a dump truck function. Load capacity can vary from 200 to 1500 kg. For the Oka walk-behind tractor, the most acceptable option is trailed trolleys with a load capacity of up to 500 kg.
Let's take a closer look at some models of factory-made trailers:
- PMG 300-1.
- TM-360.
- TM-500.
Factory trailer PMG 300-1
This is a single-axle device with a lifting capacity of up to 350 kg. The manufacturer of this trailed equipment is the Kaluga plant “KaDvi”, which also produces Oka walk-behind tractors.
Factory trailer PMG 300-1
Characteristics of the PMG-300-1 trailer:
| Body size: | 1200 mm/920 mm/1050 mm. |
| Weight: | 95 kg. |
| Dimensions: | 2800 mm/1300 mm/1050 mm. |
| Transport gauge: | 1178 mm. |
| Load capacity: | 250-300 kg. |