It is natural for a person to ennoble the place in which he spends the lion's share of his time. City residents resort to the services of designers, or they themselves try to change something in their home, buy new furniture, wallpaper, so that when they come home after a hard day, they can mentally rest and relax in a favorable environment. Residents of their own houses located outside the city have completely different concerns and requirements. It is necessary to promptly mow shrubs, grass, various dead wood, and carefully monitor the condition of the plot and garden. It is clear that this requires slightly different means of achieving comfort. And here a new brainchild of engineering comes to the fore - mowers.
About the manufacturer Stihl
The history of this German brand begins in 1926. At the initial stages of its development, the company was engaged in the production and sale of various components for washing and steam machines. It all started, like many companies, with small production and a narrow focus, which made it possible to focus on the quality of the products produced.
In the early 30s, the first STIHL chainsaw was released, distinguished by its convenience and functionality even in those days. The company is developing at a rapid pace, constantly introducing new tools, which gives it the opportunity to enter the international market. And already in 1931, the first regular deliveries of products to Russia were organized.
Calm device
To date, the company has expanded its activities in more than 160 countries around the world, opening new centers and production branches in Switzerland, China and many other countries. This is understandable, because the company’s assortment is impressive: motor drills, gasoline sprayers, mowers, gasoline trimmers, chainsaws and much more. I would like to note that Shtil chainsaws are very popular due to their functionality and reasonable price.
Why you need to put a knife on a trimmer
A trimmer with a blade mounted on it is most convenient to use for more comfortable mowing of tall and coarse grass in the countryside. The fishing line on a brush cutter cannot cope in such cases. The thin one breaks very quickly. Using thick 2..3 mm cord or homemade rods with cables causes the vegetation to be wound onto the spool. This increases the load on the engine. As a result, the piston group and other moving parts of the unit wear out very quickly.
If you mow weeds with an electric trimmer without a knife, using fishing line alone, even a thick one with a shaped cross-section, will not solve the problem. There is always a risk of overheating the electric motor and damaging the flexible shaft. And it's all about the high torque of the electric motor. The grass wound around the spindle creates strong resistance to the shaft, reminiscent of a speedometer cable, which cannot withstand and gets twisted.
In order to protect equipment from premature wear, manufacturers have provided the possibility of installing special knives on trimmers. The design and shape of the existing cutting elements make it possible to easily cope not only with coarsened and overgrown grass, but also to successfully deal with young bushes.
Features and best models
The mower deserves special mention, notable for its versatility, reliability and ease of operation. The company's specialists have developed many types of braids, with different characteristics and applications.
For example, the range of lawn mowers is designed for mowing grass over large spaces . For this purpose, a self-propelled wheeled system was developed, with the help of which it became possible to care for a large area without spending a lot of time and effort. A brush cutter is perfect for decorating shrubs, giving them some artistic image and texture. And if you need a lawn mower for tall grass and uneven areas, then follow this link and get complete information on selecting this type of equipment.
If you need a more subtle approach to grass cleaning, for example, around flower beds or between trees, then a gasoline trimmer, designed for accuracy and precision, will do the job perfectly. The company's specialists took into account all the nuances and possible difficulties when working with scythes, so they equipped them with nylon strings, which prevent mechanical damage to trees.
A special AutoCut trimmer head is also used, which ensures the normal functionality of the gas trimmer string knives. This article will tell you about the prices for gasoline manual lawn mowers and trimmers, and it will also help you make the right purchase, which you will not regret.
There are two types of these mowers: amateur and professional models, designed to solve problems of a certain complexity. The first category includes models FS 38, FS 45, FS 55, etc. The features and differences of these tools are the motor power (from 0.9 to 1.2 hp depending on the configuration) and tank volume (approximately 0. 34 l).
Professional trimmers include Stihl FS 130 and FS 250. Let's look at the characteristics and properties using the example of several mowers, in particular FS 38, FS 70 and FS 130.
Watch the features of the device in the video.
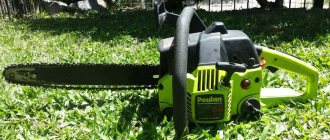
Petrol lawn mower FS 38
The model is distinguished primarily by its simplicity and compactness, which is quite enough for proper care of the local area. The main control keys are located on the handle of the device, which greatly facilitates and speeds up work.
The price for the Stihl FS 38 mower is about $130.
Characteristics:
- engine power – 0.9 hp;
- engine capacity – 27.2 cm3;
- tank volume – 0.33 l;
- engine type – two-stroke;
- bar – straight;
- handle – D-shaped;
- equipment - 2-tooth grass trimmer blade, protective glasses, belt;
- weight – 4.1 kg.
Stihl FS 38
This model is one of the most popular on the market! You will learn about all the units that are included in the rating of the best gas mowers here.
Price mower Shtil FS 70
It is a more advanced model, characterized by higher power and multitasking . An anti-vibration system is provided to significantly reduce the impact of a running engine on the handle.
The new generation engine reduces fuel consumption. The cost of this model varies, but the average price is about $300.
Characteristics of FS 70:
- engine power – 1.2 hp;
- engine volume – 27.2 cm3;
- tank volume – 0.34 l;
- engine type – two-stroke;
- bar – straight;
- handle – T-shaped;
- complete set - belt, reel with fishing line;
- line diameter – 2.4 mm;
- weight – 5.4 kg.
Model FS 70
FS 130
The model is a professional model, so the goals set for him will be a little higher. It is designed for mowing coarse grass, cleaning tough bushes and young trees.
It features the latest high-power engine that does not emit large amounts of harmful emissions.
The price for the Stihl FS 130 mower is about $400.
Characteristics:
- engine power – 1.9 hp;
- engine volume – 36.3 cm3;
- tank volume – 0.53 l;
- bar – straight;
- handle – T-shaped;
- equipment - shoulder strap, two-blade knife;
- line diameter – 2.4 mm;
- weight – 5.9 kg.
The range of prices for these models does not indicate any difference in quality; first of all, each Shtil mower is designed for a specific type of work.
It is clear that there is no point in purchasing a more expensive and powerful model if you have a small plot or front lawn. Simpler models will cope with this task perfectly, but the word “simplicity” is not used here in a derogatory manner. More powerful mowers are designed to handle larger areas with overgrown and dense surfaces, hence the price difference. If you are confused by such a variety of tools, then do not be upset, but feel free to click here and we will tell you how to choose a lawn mower for your dacha.
Characteristics of the model in the video.
However, no matter what model you choose, you must follow certain operating rules recommended by the manufacturer in order to avoid possible breakdowns.
The coil is worn out from long use.
- Come on, think, designer’s brain! What are the options? — I asked myself this morning.
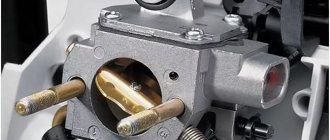
The first repair project is to solder a new extension cap made of nylon or plastic.
He took a strip of sheet metal, clamped it into a yew and heated it with the flame of a gas burner. Then they simultaneously applied the trimmer head part and a thick plastic washer on both sides. After 2 seconds, I pressed them together and let them cool. NOT soldered... It turned out to be some tricky American plastic. It is NOT compatible with our polyethylene, polystyrene, polycarbonate.
DIY trimmer repair Stihl FS 38
He retreated to his previous position and carefully examined the pressure mechanism again. Found a gap large enough for a second repair project.
READ How to Adjust the Carburetor on a Stihl 180 Chainsaw
Here is an old wind instrument I cut off a piece of brass tube 25 mm long with an internal diameter of 27 mm. Using sandpaper and a file, we cleaned the ends.
Then, using a light hammer, he pressed the tube onto the plastic housing of the pressure mechanism bushing.
I cut a cork 10 mm long with an outer diameter of 27 mm from a birch stick. and also pressed it into the brass tube from above, all the way to the bushing.
To secure the structure, I used a sharp core to hammer the tube in a circle around the plastic and press the edge onto a wooden plug with a hammer.
To hold the original boot in the bobbin, it was necessary to clamp it into the lathe chuck and use a cutter to make a groove for the retaining ring 1 mm deep and 2 mm wide.
I bent the same retaining ring onto a piece of water pipe from a bicycle spoke and bit off the excess in place.
After some simple repair work, I installed the head on the trimmer, put on the boot, threaded the fishing line and went out into the garden to test it. Everything is working! Properly! I pressed the updated ledge and the line lengthened. After mowing, the boot remained in place. Are the spline surfaces clogged with grass and soil?
The successful solution was re-implemented over the next hour on the second worn-out wear head. Now I have a spare!
If you look carefully at the attached drawings, you can guess how to machine a combined “tube plus plug” prosthesis from a bronze blank.
Repair of brush cutters "Stihl FS-38"
Or even with a protective boot cap. Then a groove with a retaining ring will NOT be needed.
He took a strip of sheet metal, pressed it in and heated it with the flame of a gas torch. He then used both sides of the hedge trimmer head and a thick plastic washer on both sides. After 2 seconds, he squeezed them and let them cool. I didn't solder. It was some kind of clever American plastic. It is not compatible with our polyethylene, polystyrene, polycarbonate.
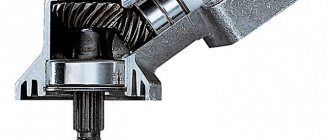
Gearbox Trimmer, 26mm, 7 teeth
Gas trimmer-gear, 28mm, 9 teeth, Sturm!
Recommendations for use
It is necessary to take temporary breaks from work. This is necessary to ensure that the device’s engine does not overheat and fail prematurely. For amateur models, a break is provided every 20 minutes for the same amount of time. For professional mowers, work must be interrupted every 50 minutes, in which case the downtime should be at least 10 minutes.
You need to monitor the condition of the fuel tank. If you do not plan to use the mower for a certain period of time, it is better to drain the remaining fuel from the tank compartment. This will help avoid damage to engine parts.
Terms of use
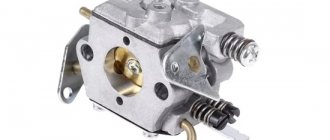
How to fix problems in the ignition system of the Steel 38 trimmer
In these models, the ignition modules mainly break down. This seems to depend on the distance from the ignition module to the cylinder not being far enough. Therefore, this module often overheats, and then it finally breaks down.
Since this part breaks too often, the manufacturer has set a fairly low price for the modules.
To replace the module, disassemble the housing. All terminals are removed from it, all screws are unscrewed. The landing site is freed from the module and terminal.
Now it's time to install the new part, tighten the screws a little. Take care of the gap, which should be in the middle of the ignition module and flywheel. Insert cardboard inside the magnets in the flywheel and the module, and press the screws as far as possible onto the cylinder.
To secure the ignition module, use a detachable thread lock. His color is blue.
Advice: use the services of well-known and trusted manufacturers of spare parts. This will help avoid problems in the future.
Problems and solutions - DIY repairs
But what to do if suddenly it was not possible to avoid a breakdown of the mechanism? We won’t go into the reasons for this, but it would be useful to consider possible problems that may arise with the mower, as well as methods for eliminating them on your own.
The engine does not start. If you encounter this problem, then you first need to assess the amount of fuel in the fuel tank; maybe there is no problem as such, but you just need to add fuel and continue working. By the way, the fuel used deserves special attention, because the service life and quality of operation of the lawn mower depend on its quality. Experts recommend AI-92 gasoline, no lower.
Stiga robotic lawn mowers are an innovation in the agricultural industry that have managed to win the hearts of many farmers and summer residents.
A homemade circular sawmill is easy and simple, thanks to the detailed instructions that you will find on this site.
If you asked yourself the question: “How to choose a professional saw without having experience working with this tool?”, then here you go //machinspec.com/lesozagotovitelnaya/benzopila/kak-vybrat.html.
Another likely cause of unstable engine operation may be a dirty fuel filter. You should carefully inspect it and clean it if necessary. If the filter cannot be repaired yourself, you should replace it with a new one.
Do not forget about the air filter, clogging of which can also lead to failure of the tool. In order to avoid this, the part is removed and washed in water with detergents, or in gasoline if there is no access to a water supply.
Lawn mower Stihl
Then the filter must be thoroughly rinsed and dried, carefully monitoring the integrity of the structure. Before installing the part into the mower, it is necessary to lubricate it with a small amount of oil. However, if you don’t want to bother with cleaning the unit, then we suggest that you familiarize yourself with a lawn mower with a mulching function, because it will not only cut the lawn, but also prepare further fertilizer.
The spark plug can also affect engine performance. It is necessary to unscrew it and check the condition, if necessary, replace it with a new one.
If after all the manipulations done, the engine still does not start, then you can resort to the advice of experienced craftsmen who have used them in practice.
It is necessary to adjust the speed using the carburetor screw. The mower is placed in such a way that the fuel hits the bottom of the carburetor. To do this, place the tool so that there is an air filter on top.
Next, you need to remove it and pour some fuel into the carburetor, then install all the parts in place. The engine should start.
You can pull the starter handle while closing the carburetor choke. Next, open it and pull the starter a couple more times. This is a fairly universal method, proven over the years.
These tips are not a panacea, but they are quite effective and useful.
The mower stalls immediately after starting. The main cause of this problem is incorrect carburetor adjustment. It is quite simple to determine this problem - strong vibration will be felt when the mower is operating. You can fix the problem yourself by looking at the instructions, which describe the problem and solutions in detail.
Particular attention should be paid to the fuel channel; it is often the reason that the tool stalls. Check it regularly and clean it from dirt.
Characteristics of the lawnmower
Various small parts, such as a cable or fuel pickup hose, can affect the stable operation of the tool. Therefore, you need to monitor their condition, check for cracks and small punctures.
More complex reasons for lawn mower failure
If the step-by-step troubleshooting algorithm did NOT produce results, and your scythe still does not start or stalls, it is worth inspecting the carburetor and the engine itself. A clogged carburetor can be one of the reasons for unstable operation of the tool. There are three main problems here:
- Clogged channels or jets. All this is cleaned with special washes or blown with a powerful jet of compressed air from a compressor. DO NOT use needles or wire as the bores may be damaged;
- Worn carburetor gasket. The solution is to replace the failed gasket
- Violation of tightness. To check this indicator, you can use a regular household tonometer, replacing it with a suitable pressure gauge. Keep an eye on the readings: if they do not change, everything is fine, but if the pressure starts to drop, it means that some part of the carburetor is faulty. You'll have to find it and replace it with a new one.
If everything is in order with the carburetor, then the gasoline trimmer may NOT start due to wear on the piston group. If chips, scratches or burrs are found on the piston or cylinder, they should be replaced. Piston rings must be checked. A slight LUF of the piston when the connecting rod swings indicates that it is time to change the rings. This procedure is best left to the service center specialists.
Diagnostics of lawn mower filters
Another reason why a gasoline spit stalls may be the air filter. To eliminate this, try removing the filter and starting the trimmer without it. If it works, then you will have to change the air filter to a new one, or at least blow out and thoroughly clean the old one.
A gasoline trimmer may not start due to contamination of the fuel filter. This is the next stage of our algorithm. Here we check the condition of the filter element and, if necessary, replace it with a new one. When replacing, try NOT to leave the suction pipe completely without a filter; this is prohibited by any operating instructions. Haste can result in repair of the engine piston group.
We diagnose the spark plug and spark plug channel
If the quality of the fuel mixture is NOT in doubt, and the lawn mower stalls when starting, then a flooded spark plug may be the cause. Here, a regular spark plug wrench (surely every motorist has one) and a spare spark plug are suitable for repairs.
- We unscrew the candle and wipe it;
- Dry it thoroughly (do not heat it)
- Excess fuel in the chamber Drain through the spark plug hole and dry it;
- We clean the old candle from carbon deposits using needle files or a lady’s nail file;
- We set the gap with a distance of 1 mm (you can check it with any coin)
- We return everything to its place and try to start the trimmer.
It takes at least 30-40 minutes to dry the canal. Otherwise, there is a risk of re-filling a new spark plug.
If the spark plug is working, the socket where it is located is completely dry, and the lawn mower does NOT want to start, lubricate the threaded connection with gasoline. It should be slightly moist. No matter how wonderful a spark a candle produces, there is simply nothing to light up in a dry chamber.
If the trimmer engine still does not start, a reason such as lack of spark due to poor contact between the spark plugs and the high-voltage wire should be ruled out. If the connection is good, but there is still no spark, most likely your ignition unit has failed. Here you will NOT be able to do without a specialist, because the part is not repaired, but sold as a single unit.
Bottom line
Many may be put off by the relatively high prices of Shtil products, but if you think about it, what is more important - reliability and good results or savings that come at the expense of quality? But, if you set out to save money, then we offer you the option of a do-it-yourself lawn mower; by assembling the device with your own efforts, you will know all the nuances and structure of the tool.
Of course, you can choose cheaper Chinese analogues, but then no one will be able to vouch for the result of the final work and for the service life, which can be very short for such models. So it is more profitable to purchase a mower once from a reputable company, which Shtil certainly is, and enjoy stable operation over many years of operation.
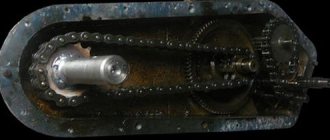
Preparing for replacement
For clarity, the mowing head (spool) was removed from the brush cutter. There is no need to remove the fishing line to replace it; everything is done locally. It does NOT take a lot of time.
We disassemble the trimmer spool - it is held on by latches. Remove the cover by pressing the latches. If you do this with your hands, there is not enough effort, then use a screwdriver.
The spool consists of the following:
- Housing with spring
- Cover with locking latches
- Reel with button
The operating principle is as follows. By pressing the button, the reel presses on the spring and comes out of the fixing grooves in the spool cover. By holding the reel in this state, you can twist it, thereby adjusting the length of the fishing line. When the button is released, the housing spring returns the coil to its original fixed state.
There are several holes on the bottom of the reel for different diameters of lines. These may differ from one trimmer manufacturer to another. In some cases (like here) they are signed, in others they are.
These holes are needed to fix the fishing line when replacing it. After winding the grandmother's fishing line, the ends of the latter are inserted into them. This is necessary so that the line does NOT unwind when installing the reel in the trimmer body. In other words, it makes line changes easier.
There are models without indicating the diameter of the consumables. Then, in order to find out what maximum diameter of the line can be used, it is tried on according to the holes for the line exit from the trimmer spool body (see Figure below).
The reel has two sections for fishing line, separated by a partition. They may not exist. They are needed only to differentiate and facilitate winding of consumables.
First, the required length of the loess is determined. The latter is wound into one of the sections of the coil so that it does not go beyond its limits. In this case, 3 mm was wound, the length turned out to be about 2 meters. Those. for two sections you will need a 4 meter piece - this is for the 1st method. For the second method, you need two pieces of 2 meters each.
Now you need to figure out which way you need to wind it. To do this, many manufacturers of trimmers put special markings on the reels, such as in the figure below.
If no such markings were found, then you need to pay attention to the spool body. There must be an arrow there that indicates the movement of the mowing head. The line is wound in the opposite direction.
Gearbox Trimmer, 26mm, 7 teeth
Gas trimmer-gear, 28mm, 9 teeth, Sturm!
First way
The prepared segment (in this case it is 4 meters) is bent approximately in half - one segment should be 15-20 cm longer, and is inserted into a special slot located on the dividing partition.
The fishing line is wound in a previously determined direction. This is done under tension, the line is carefully distributed. In this case, you need to wind the segment that is longer into the section that is closer to the button.
There are designs that do not provide for dividing the coil into two sections. This does NOT change anything, the line is wound in a similar way. You just need to make sure that the segments do not overlap each other.
The segment that is located at the bottom of the coil should end first, i.e. the one closest to the fixing holes.
This tip is placed in a hole of the corresponding diameter. The line is securely fastened.
The long piece is wound another half turn. There it is similarly fixed. In this case, the segment intersects another section of the coil.
The long piece is wound another half turn.
The fixed ends of the wound fishing line are inserted into the holes in the trimmer spool body.
The fixed ends of the wound fishing line are inserted into the holes of the trimmer spool body
The coil is attached to the body. The ends of the fishing line are pulled up with force so that the fishing line previously fixed in the holes of the spool of fishing line jumps out. This is easily determined by the characteristic sound (click).
The reel with the button is snapped into the trimmer spool body.
The reel with the button is snapped into the trimmer spool body
The line replacement was completed successfully. In this case, you need to install it back on the trimmer and you can start mowing the grass.
It should be repeated that it is not necessary to remove the spool from the trimmer - this was done to illustrate the process of replacing the fishing line. You can disassemble the spool in place, wind it onto the reel and put it back.
The tip can and should be trimmed so that it does not hit the trimmer casing.
Detailed review of STIHL FS 55. Which brush cutter to buy for your home
Series of 4 videos: which brush cutter
buy for home. Let's compare the 4 most popular braids in Ukraine: 1)
STIHL
FS 55 2)
mechanical - to settle and store gasoline for work not in metal containers and for no longer than 1 (one) month, otherwise it will oxidize and lose its properties; chemical - impurities and additives should not be present (they have different rates, degrees and temperatures of combustion). Old gasoline turns yellow or red, and the impurities have a strong smell of bitterness (for example, creosote) or acid (for example, methyl alcohol). The proportion of the fuel mixture is 1:50 (2%) or 20 ml/cm3 of oil per 1 liter of gasoline. For example, pour half a measure of gasoline into a transparent plastic bottle (1 l), then use a medical syringe (20 ml/cm3) to introduce two-stroke oil and mix, add gasoline and mix thoroughly. If the quality of gasoline is questionable or the working conditions are difficult, then the amount of oil can be increased to 22-25 ml/cm3. Shake the mixture before each filling! Store the resulting fuel for no more than two weeks! If the color of the mixture has changed (from sea green to, for example, brown), then it is not recommended to use it!
Threading fishing line into an electric braid
Let's look at how to thread the fishing line into the reel yourself. First you need to remove the coil and its protective casing. Select the fishing line and cut the required amount.
We begin to wind it onto the reel: to do this, we fix one end of the fishing line into the gap, carefully wind the fishing line. The fishing line must be wound so that the protective casing quietly closes, the fishing line can unwind on its own. We insert the second end into the hole in the protective casing. Take the coil and the cover. We pass the end of the fishing line into the hole in the lid and pull the fishing line a little.
We put this design on the trimmer. Turn the coil clockwise until you hear a specific click. We fix it. We connect the braid to the network. The trimmer must be in its original position. Let's turn it on. The extra centimeters of fishing line will be cut off by the trimming blade.
When cutting, the line should not come into contact with hard objects, because they will tear the line. If the line feed in the machine is not automatic, then the driver will have to stop often, remove the reel and wind the line again.
It should be noted that there are line options that are adapted for coarse weeds. It looks like a pigtail, it has its own specific coil.
For a review of Stihl electric scythes, watch the following video.
A trimmer, be it gasoline or electric, is the only correct solution for cutting grass in hard-to-reach places that a wheeled lawn mower cannot handle. Trimmers use metal knives or a special fishing line as a cutting tool, which is threaded into the trimmer reel. But, unfortunately, trimmer heads become unusable over time during use. Some problems can be fixed with your own hands, while others will require a complete replacement of the mowing head.