Main purpose and types of cutters
In agriculture, walk-behind tractors have long occupied a leading position in operation, characterized by fast cultivation of land and the ability to automatically harvest crops.
Each model, regardless of the country of origin, includes additional power units. As a rule, they are quite enough for high-quality work in any area, and there is practically no need to make cutters for a motor cultivator yourself. But there are situations when the capabilities of the purchased unit do not correspond to Russian realities.
A simple example: not all Western manufacturers take into account the soil depth in other countries, specific grain crops, weather conditions and other issues that can complicate the work process and increase the likelihood of rapid breakdown.
In such cases, you can always buy an additional cutter for your specific area or make it yourself. It is worth noting that in many cases, homemade parts work much more efficiently than factory ones! Visually, any cutter looks like this: two parts of the module with a special set of tillage knives are attached to the wheel base, and then adjusted so that one structure does not interfere with the work of the other.
It is worth noting that there is a second type of mounted milling cutter, which operates using a power take-off shaft. Such installations are mounted behind the main structure, and are often found on models such as MTZ, Foreman, Agro and others. Despite the difference in installation, all types of cutters are manufactured according to the same pattern.
Depending on the type of use, additional devices may differ slightly from each other. The main purpose of cutters is to destroy weeds and level the ground surface of the site, but at the same time they can perform other tasks.
Purpose and features
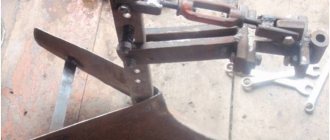
“Crow's feet” are one of the most popular types of cutters, which are designed to ensure high-quality plowing of the land on the site. This element is a small axis on which knives are placed. It is they who create the effect of cutting the earth, plowing it in a similar way. It should be noted that when using a walk-behind tractor with similar cutters in a dacha area, not only the soil can be processed, but also the plants on it. Therefore, many summer residents use this unit to control weeds.
READ How much oil is poured into a walk-behind tractor
The peculiarity of “crow's feet” is that they do not come apart into parts, but are distinguished by a cast construction. During the production process, exclusively carbon steel is used, which ensures the reliability and durability of the unit.
Another advantage of the element is its triangular shape, which guarantees excellent soil mixing. This configuration is extremely relevant, given the strength of solid soil.
Crow's feet are simply irreplaceable when cultivating areas where the soil lies in a large lump.
Most summer residents use walk-behind tractors with similar cutters to cultivate the area where potatoes will be planted. Some believe that such finishing can even protect the future harvest from the Colorado potato beetle.
If you plan to use the attachment not only for cultivating the ground, but also for destroying weeds, then the edges of the knives will need to be sharpened first, since initially they are quite dull.
Do-it-yourself active cutter for a walk-behind tractor
Typically, an active cutter for a walk-behind tractor is sold complete with the walk-behind tractor. But sometimes you need to get the job done using specialized cutters that are not sold anywhere. In this case, you need to make cutters for the walk-behind tractor yourself.
In this case, you can go two ways: make the cutter yourself or order production from a master. The first option is quite labor-intensive. But a little time and money will be spent on manufacturing the cutter, as well as the cost of materials.
The second option has a number of advantages: the master has all the necessary tools and materials, and as a result the cutter will be more practical.
First you need to think about the functionality and design of the cutter. To do this, you should familiarize yourself with the analogues. To achieve maximum functionality and safety, all design details must be taken into account.
If this is not taken into account, then the cutter will not do the necessary work, and all work on its manufacture will be a waste of time. You need to prepare the necessary materials after you have prepared the drawings.
If the cutter design contains figured or pobedite elements, their production is ordered in the workshop. And other elements are bought in the store or those that are available are used.
After all the parts are made, it is necessary to assemble a normally working cutter, which not everyone can do. Assembly must proceed strictly according to the drawings, without any deviations in the design. Otherwise, the cutter will constantly move to the side, which will greatly complicate the work.
After the cutter is assembled, you need to test its operation. If the need arises, we alter the cutter so that it does the required job.
How to work
After the cutters are installed, start the walk-behind tractor. At first speed, right on the cutters, we approach the beginning of the section. If there is only one speed for moving forward, then we do it at the lowest engine speeds. To operate a motor cultivator with a cutter, select the speed as high as possible. We turn on the second speed and, having set the engine speed to maximum, engage the clutch.
Use the coulter to set the desired cultivation depth. First, put it on the second division from the top. The shorter the part of the opener facing the surface, the finer the processing. With its help, we create a load and slow down the forward movement of the equipment. Unable to move forward, the cultivator buries itself deeper with the cutters. The opener is the same anchor. When you have walked the strip from the beginning of the section to the end, then if the section is small, you can turn on the back one and return.
If the area is large, then it is more convenient to move in a circle. If it is possible to turn the steering wheel to the side, it is advisable to turn it. Then the operator will walk on solid ground and not trample the already cultivated soil.
It happens that the soil is heavy and the cultivator is light. Then you need to hang additional weight in the area of the cutters. Select the load in separate “pancakes”, 6-7 kg each.
Cultivation is carried out with a slight overlap of the treated area. We make the second pass so that one of the cutters goes along half of the processed strip. We focus on the depression that the opener leaves behind. Thus, all the soil will be processed twice. This way we will achieve uniform soil treatment throughout the entire area.
When cultivating row spacing, we install protective guide discs on the edges of the assembly. They will not allow the plant roots to be cut and will not allow the unit to deviate from the specified trajectory.
The purpose of a walk-behind tractor is to facilitate soil cultivation, so you need to know how to properly assemble the cutters on it. The most labor-intensive processes when growing garden and vegetable crops are associated with the need to prepare the area for planting. It is necessary to loosen the soil in order to subsequently prepare the beds for planting seedlings or sowing seeds. Because of this, the assembly of the tiller of the walk-behind tractor is carried out immediately after purchasing a mechanical assistant for the garden.
Soil cutters are used for loosening. The designs of active working tools for grinding soil are quite diverse. Some involve not only crushing clumps, they can also select the rhizomes of perennial weeds. Therefore, home-made craftsmen invent and create rotary working bodies for walk-behind tractors that can fight weeds.
Deep tillage
When developing new areas, it is necessary to develop virgin soil. Usually it is abundantly overgrown with turf, perennial grasses and weeds. It is quite difficult to cope with such areas with conventional tools. More often they resort to cultivation using deep processing with formation turnover. With reverse plowing, part of the layer is cut, lifted and turned around its own axis.
Similar work is done in the fall. The rhizomes of nettle, wheatgrass, dandelion and other weeds freeze in November-December, when the air temperature drops below -15...-17 ⁰С (there is no stable snow cover yet). Subsequently, they lose the ability to grow.
In the future, a similar technique is resorted to every autumn. After 2...4 years of autumn fall plowing, the number of weeds on the site is reduced many times over.
Proponents of organic farming disagree with this approach. But the experience of several centuries proves that only such agrotechnical measures can clear the area of weeds. Otherwise, you will have to use chemicals to control weeds.
Deep plowing allows:
- wrap a layer of soil and allow plants to use for nutrition substances that gradually shift to lower horizons during the season. This operation makes it possible to reduce soil salinization using mineral fertilizers, as well as reduce the amount of fertilizer applied;
- aeration of the lower layers of soil contributes to the occurrence of aerobic processes of decay of plant residues. Usually in the lower layers the access to air oxygen is limited. Therefore, conditions are created when the rotting of taproots lasts for several years. Anaerobic processes (without air access) occur with the slow accumulation of humus;
- When the formation is turned over, weed seeds end up in the lower layers of the soil, and they cannot germinate. The roots remaining on the surface freeze. As a result, soil contamination sharply decreases;
- Freezing lumps of earth in winter crumble more easily in spring. A light, loose surface layer is formed in which cultivated plants can receive more abundant nutrition;
- adding organic matter before plowing allows for active rotting of manure or green manure if they were sown after harvesting the main cultivated crops.
How to make a homemade milling cutter #8211 walk-behind tractor
Nothing overcomes resistance as easily as sweep, which is why knives are shaped like a spear. The posts are curved: the cutter works like a vertical plane cutter. The arrow passes through the ground and hardly stirs it, only pushing it back a little. The step can reach up to 15 cm. In this case, the maximum depth is 25 cm.
My walk-behind tractor does not work in layers: it always does it in one pass and on any soil.
One reader complained: “I have loam, not a single walk-behind tractor will take it!” So I would like to help people.
Before work, I always sharpen the arrows, so the cutter even cuts the roots of bushes, making from 20 to 500 rpm. Has three speeds. When plowing land with high grass (up to half a meter), a scraper is placed, so the plants do not wrap around the shaft.
Advice
Working with a walk-behind tractor requires compliance with safety precautions. Do not add fuel to the tank while the engine is running. Make sure there are no large foreign objects on the ground. The walk-behind tractor is also dangerous in areas with a large slope. Chainsaw engine.
On all branded walk-behind tractors the crutch dangles. I have it fixed rigidly, and at its end #8211 there is a rotating plate.
The walk-behind tractor does not have a reverse speed, I don’t need it. When I need to turn something, I press the handles, the cutter gets rid of the earth, and I can turn the walk-behind tractor in any direction, so I can do very fine work, which is especially important in the garden. The crutch cannot go deeper below the plowed layer, so it does not tear the roots.
There is one subtlety in my cutter: the angle of the arrow needs to be guessed very accurately. It shouldn't be too positive or too negative. The arrow should move the ground back a little. And the racks need to be positioned so that only one of them does the main work. My cutter does not hang on the shaft like all branded ones), so you can install a scraper.
How to make a cutter for a walk-behind tractor with your own hands - tractor driver
Choosing cutters for a walk-behind tractor is a responsible process, because this element plays an important role in ensuring the efficiency of the device. In order to choose the right cutters, you need to understand the distinctive features of these products, understand what types and types of cutters exist.
Many novice summer residents think that the most important thing is to purchase a high-quality walk-behind tractor, but they do not pay due attention to the choice of cutters. Such a mistake can be costly when processing the territory, since the correct choice of cutters affects the following points.
- Quality of cultivation. If you purchase and use high-quality cutters, you can even do without a plow.
- Save time. Good cutters allow you to spend a minimum amount of time on certain work on processing a summer cottage.
- The cutters ensure ease of control of the walk-behind tractor. An incorrectly selected part can cause increased stress on the operator during the milling process.
In addition, bad cutters can place increased load on the walk-behind tractor gearbox, which will negatively affect its durability and performance. It is necessary to select such elements based on many factors, including the thickness and type of soil being processed.
Carefully study the features of your walk-behind tractor, as the following are important: wheel stop pin, trailed, PTO or rotary machine, as well as other points.
Such tillers are considered one of the most popular and in demand on the market. These are the varieties that are equipped with factory walk-behind tractors. Depending on their purpose and design, these cutters can be assembled or dismounted.
During the selection process, a person decides for himself which walk-behind tractor he needs, but he will not be able to choose a specific type of cutter. If the equipment was initially equipped with an assembled version, then in the future it will be possible to use exclusively such models.
The design of the cutter may vary depending on the manufacturer and other features. It usually includes a pair of sections that are connected to each other using bolts. When operating such an element, the width of the cultivation is important, which can vary depending on the addition of sections.
A distinctive feature of the factory cutter is that it is offered complete with a walk-behind tractor. For standard tasks it will be quite sufficient. But it is worth considering that tillers from Chinese walk-behind tractors cannot boast of impressive efficiency. If low-quality metal was used during the production process, then problems will arise already during the first processing.
For example, when cultivating virgin land, it will be extremely difficult for the user to control the walk-behind tractor. In addition, this will lead to an increase in the load on the gearbox, which will also negatively affect the durability of the device.
Crow's feet cutters are considered one of the most popular on the market due to their high quality and reliability.
The main disadvantage of such cutters is their non-separable design, which makes it impossible to carry out repairs if they fail.
However, if you choose a high-quality option, it will be able to serve for many years, fully fulfilling its obligations. Among the main advantages of using such cutters are the following.
- The ability to decide for yourself how many plate sections can be placed on a walk-behind tractor. However, it is important to take into account the technical features of the device and the required milling width.
- Robust design that allows the walk-behind tractor to be used for processing hard soils.
- Copes much better with plant residues.
- A unique sleeve that can come in several shapes. Hexagonal and round options are considered optimal. This allows you to choose the appropriate option for any walk-behind tractor, regardless of its type and other indicators.
- Reduces the load on the gearbox, which prevents overheating of the device and has a positive effect on the durability of the equipment.
- Significantly simplifies the process of controlling the walk-behind tractor.
Most experts say that this particular type of cutter is best suited for walk-behind tractors that have an air cooling system.
Such elements are considered very durable and reliable due to the fact that only steel is used in their production process. In addition, such models boast a unique design that makes them resistant to any mechanical damage.
Saber-shaped models are included in the standard kit of most European and American-made walk-behind tractors. The effectiveness of such elements has been tested in areas with any type of soil, which sets them apart from other models.
These cutters are distinguished by their improved quality and high strength, which allows for high-quality soil cultivation.
The peculiarity of saber-shaped knives is that carbon steel is used to manufacture the working parts, which guarantees the reliability of each part even after a year of active use. In addition, the knives are specially treated and hardened using high-frequency currents, making them incredibly durable.
Another popular type of cutter for a walk-behind tractor is “virgin wood”, which is in great demand due to its spiral shape. A distinctive feature of this type is its one-piece design, which allows it to cope even with colossal loads without problems.
The main disadvantage is the slow work and the fact that during tillage the soil is pushed out, which sometimes results in small holes.
As for the advantages, there are a huge number of them, among which are the following:
- unlike other types of tillers for walk-behind tractors, they cope well with virgin soil;
- characterized by impressive cultivation depth;
- allows for high-quality cultivation of the soil;
- It is distinguished by a monolithic design, which is a sign of reliability, strength and durability.
The process of installing a cutter on a walk-behind tractor is quite simple, but before starting work you should carefully study the manufacturer’s instructions and understand the installation features. The standard cutter design includes a rotor axis, a pin equipped with a special lock, several knives and fastening materials.
This equipment must be installed in such a way that the cutter rotates counterclockwise. Rotary cutters are self-sharpening tools, which greatly simplifies the process of using them.
In other words, you will not need to constantly disassemble the structure in order to sharpen the knives.
It should be noted that problems may arise during the installation of the cutter, so experts do not recommend carrying out the installation yourself - it is best to get an assistant in advance.
The installation of a saber cutter deserves special attention. The fact is that it is not a monolithic structure, so first you will have to assemble the product correctly.
The main thing is to set the correct direction of rotation, since without this the device will not perform its tasks.
Assembling such an element with your own hands for a walk-behind tractor is quite easy, because this is a task that can be quickly mastered, but first it is better to study the functions that the unit will have to perform.
Before starting a homemade assembly of a saber-shaped cutter, you need to carefully understand the drawing, and after installation, you must check the unit for functionality.
Usually, it is not possible to accurately configure the equipment the first time, so you have to make some adjustments to its operation.
Thus, cutters represent one of the most important elements for ensuring the efficiency of a walk-behind tractor. They can be purchased at almost any specialty store.
A large selection allows each person to choose the best option depending on the model and other features of their walk-behind tractor.
The process of installing cutters is also quite simple and requires only attention and an assistant.
With the right approach, purchased cutters can last for more than one year without losing their functionality. In addition, you need to carefully study the diagram so that the model can work on a specific walk-behind tractor.
To learn how to make cutters for a walk-behind tractor with your own hands, see the following video.
Advantages and disadvantages
Mills show sufficient efficiency when working on clayey, heavy soil or virgin soil, but they sometimes get clogged in areas with a lot of roots.
The design has a number of advantages, presented by:
- sharp cutting knives;
- good material of manufacture;
- the ability to replace worn-out parts.
Such products show good results when working on virgin lands. The high rotation speed helps them cope with sod-podzolic soil and chernozem soils.
The edges enter the formation at an acute angle, loosen and mix the fertile layers. After using them, there is no need to re-treat the area.
The disadvantages of industrial units are represented by the constant wrapping of the roots and stems of weeds. Due to the one-piece design, cleaning after cultivation is problematic.
Also, individual cutters, especially from Chinese manufacturers, are made from low quality materials. As a result of the work, they bend and break easily.
Pioneering
How to assemble crow's feet
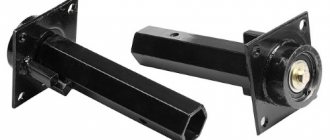
The main element of the soil device is the drive sleeve, the parameters of which must be at least five mm of the wall length, and the optimal indicator is considered to be approximately seven mm. Next, you need to machine the inside so that it fits easily onto the shaft, and make a special hole for the axial pipe, thirty or forty mm deep.
As for the axial pipe itself, it is usually made on the basis of the standard model AE25-32, but other similar parts can also be used. There are two types of finished pipe: collapsible and non-dismountable, it all depends on your expectations.
But if you believe the reviews of farmers, the collapsible option is still considered the most effective, since it is always possible to add or remove knife installations. It is impossible to predict how the walk-behind tractor will behave in a certain area, and for this reason it is better to have a backup modification option just in case.
Having chosen the appropriate type of axial pipe, it is necessary to install a special flange on it for further fastening of the knife units. The total length of such a device will depend on the width of the knives and their distance from each other. The optimal width of triangular knives is approximately 60-80 mm, since larger sizes significantly increase the resistance of the unit to the ground and impair its performance.
By connecting the blade unit and the axial tubes, you get the overall design of a modular element. Actually, this is the final stage of creating “crow’s feet” and you can carry out the first “run-in” of a homemade installation. Also, before starting the cutter manufacturing procedure, you should first make a small drawing to reduce the risk of damage to parts.
Selection rules
The choice of crow's feet attachment must be approached with all responsibility, since this determines whether the model is suitable for cultivating the land at your summer cottage. In the selection process, first of all, you need to pay attention to the size of the nozzle. The element must be selected so that its diameter fully matches the size of the landing shaft. The peculiarity of the latter is that they have three rows of knives. Such “crow’s feet” are perfect for walk-behind tractors from the “Texas” or “Neva” series.
In addition, when purchasing crow's feet cutters, you need to carefully study the outer diameter of the element. This is an extremely important indicator, because it directly affects the depth of plowing.
Of course, the quality of the knives is also an important indicator. If these are Chinese cheap fakes, then after the first treatment they will begin to bend and break. It is best to give preference to models that were produced using carbon steel.
How to properly assemble cutters on a walk-behind tractor?
Assembling the cutter with your own hands should be done as correctly as possible. And here it is especially important to ensure that the active part crashes into the ground during operation. To do this, it is initially recommended to study the drawings and then begin manufacturing the equipment.
To create cutters, the following tools are required:
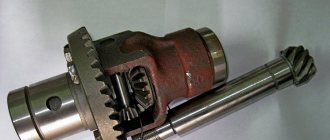
- The rotor axis is of the required length. It can be divided into two parts if you need to assemble a cutter from two blocks.
- Short axis.
- Gearbox with clamps.
- Left and right knives.
- Bolts, washers, nuts.
Assembling the structure does not take more than an hour, but here it is important to install the knives in such a way that they do not interfere with the rotation.
- The long rotor axis is equipped with knives at an angle of 30 degrees.
- It is necessary to combine four knives on one block, securing them to the gearboxes.
- Next, the correctness of the design is checked and all fasteners are tightened.
This design is very reliable and can withstand fairly high loads.
Metal sponge
You can remove carbon deposits from a cast iron frying pan with a simple metal sponge. But only on the condition that the layer of dirt is not very thick and not too old. This method is very labor-intensive and dirty. Try to rub the sides of the pan with short, precise movements so as not to stain the area around you with small black crumbs. Remember that this method does not work for all pans!
Remember that this method does not work for all pans!
There is no easier way to wash off burnt fat than using PMM. All you have to do is load the kitchen utensils into it, press the button and that’s it. But it is worth remembering that the dishwasher is contraindicated for some types of material.
Dishwashing is contraindicated for some types of material.
Household chemicals are an invariable assistant for any housewife, making life much easier. When choosing how to wash burnt fat from a frying pan, it is important to consider the properties of the product. Acid-containing products and powders are not suitable for aluminum, Teflon and ceramics. Anti-grease products do an excellent job, but can have a negative effect on the skin. Such chemicals should only be used with gloves. Various gels successfully combat fresh oil deposits.
Acid-containing products and powders are not suitable for aluminum, Teflon and ceramics. The cleaning result can be enhanced by applying household chemicals to the dishes and placing them in a plastic bag. Leave for a while, then remove the dirt with a sponge.
In the fight against old fat, ordinary baking soda (sodium bicarbonate) dissolved in very hot water will come to the rescue.
Take an enamel basin or steel pan, immerse contaminated items in it, add soda at the rate of 2-3 tablespoons per liter of water and fill with hot water. The higher its temperature, the more intense the process of fat breakdown will occur, so it is best to pour boiling water over the kitchen utensils from a just boiled kettle.
After this, remove the kitchen utensils from the soda solution and wipe them with a sponge or dish brush. The remaining undissolved fat should come off easily and quickly. After this, rinse the cleaned items thoroughly under running warm water.
If the items are too dirty, you can increase the exposure time of the soda solution to one and a half to two hours. During this time, even the most “difficult” fatty stains will come off. But in this case, it is better to put the basin or pan on the stove at minimum heat, keeping the water hot - or bring it to a boil every 10-15 minutes, turning off the stove in between.
We suggest you familiarize yourself with How to remove blood from wallpaper - Everything for the comfort of your home || How to clean blood from wallpaper
Is it necessary to sharpen cutters on a walk-behind tractor - let’s figure it out together
It is quite difficult to give a definite answer to this question due to several factors. Firstly, the recommendations of the cutter manufacturer are of great importance. Some companies that produce high-quality equipment for plowing the soil do not recommend sharpening the cutting elements, as this will lead to a deterioration in the efficiency of the cutters and void the warranty on their service. Other manufacturers, on the contrary, recommend sharpening the cutters before each season of operation of the walk-behind tractor.
The second important factor is the result that sharpening cutters can bring. The only, but very important, advantage that this procedure gives is the ease of cultivation, because it will be much easier for sharpened cutting knives to go deep into the soil and effectively plow it.
The disadvantages of sharpening include the need to dismantle and install equipment on the walk-behind tractor each time.
Another very important drawback is the ability of cutters to crush weed roots deeply hidden in the ground, which will lead to their intensive vegetative reproduction throughout the entire area of the garden.
The third factor is the type of soil being cultivated. If a rototiller on a walk-behind tractor is used primarily for processing hard clay soils and virgin soil, then sharpening the cutting knives will help plow such soil faster and better. If the soil in the garden is soft, then, as a rule, there is no need to sharpen the set of cutters used.
All the tips listed for the manufacture, installation and sharpening of devices are suitable for operating the equipment in tandem with Neva MB-1, MB-2 walk-behind tractors, as well as agricultural machines of the MTZ, Tselina brands and units of other imported and domestic manufacturers.
Milling cutters for walk-behind tractor Link to main publication
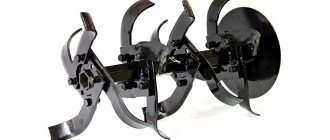
Types of cutters
The device consists of four curved knives - “petals”, attached to a shaft. Most of them are directional: when assembling, the direction of movement must be taken into account. Knives are usually bent in both directions, except for those located at the edges of the shaft. There are models in which all the “petals” are bent only towards the gearbox: this prevents damage to plants during loosening. However, in this case the working width is reduced.
Elements are made from stamped steel - for the lightest devices, and from steel strip, often forged. The last option is the most durable. As a rule, the cutter is a separate part, but there are models in which two rotary cutters are mounted on one shaft.
Installation
Two types of knives are used.
Sharpened - the “petal” enters the ground more easily and does not allow adhesion to the soil. Accordingly, the load on the engine is reduced and fuel consumption is reduced. On the other hand, sharp blades cut the roots of weeds, some of them remain in the ground and germinate again
Sharpened cutters must be used with great care. With a semicircular edge - they are safer, but when loosening they experience more resistance and are more likely to get stuck. This element removes weeds more effectively, since it does not cut, but wraps the root and pulls it out of the soil.
The diameter of the cultivator cutter determines the maximum plowing depth. Relative is set by the opener.
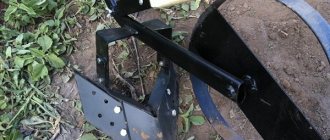
The “petals” are connected in two ways:
- on rivets - the element cannot be disassembled. This difficulty is not so much during storage as during transportation;
- bolted - a collapsible part. The photo shows a sample.
Welding is not used for connections - this reduces the strength of the product.
Assembling a cutter for a walk-behind tractor: tips and instructions
Auto mechanic, specializes in agricultural equipment
Soil cutters can be called the most popular type of attachments for walk-behind tractors used in farms and household plots. They are indispensable for cultivating soil, chopping weeds, mixing and leveling soil, and are actively used on land with heavy and waterlogged soils. Often, working with a walk-behind tractor using cutters is initially envisaged when purchasing the unit.
However, while some devices come with cutters included, others do not, and this has its own advantage. Many experienced users of small agricultural machinery prefer to independently determine which cutters are needed for their farms.
In such cases, cutters for a walk-behind tractor are purchased separately and of the desired type, or they are assembled with your own hands. Often additional cutters are required to the existing ones. The quality of land cultivation depends on the choice of equipment, so it is important to understand its features as best as possible.
Motoblock cutters will help you in cultivating the soil
About the elements
They are needed when cultivating the soil. Therefore, the quality of processing and the complexity of the procedure itself depend on the model: load on the motor, ease of control and labor intensity.
How to assemble cutters?
As a rule, the cutter is included with the walk-behind tractor. But this may not be enough. Sometimes it is necessary to increase the depth or width of processing, so the device can be supplemented with other products. This solution also makes it possible to improve the process of moving the walk-behind tractor forward. In addition, this will increase the service life of the mechanism.
If the soil is clayey, then it is better to use two pairs of cultivators. And even if the soil is light and has already been cultivated previously, additional elements will not become a hindrance.
Changing the depth is possible due to the adjustable coulter. It is a durable element located vertically in the walk-behind tractor coupling. And the final loosening depth is influenced by the diameter of the cultivator cutter.
Advice for housewives
The lengthy process of freeing dishes from greasy deposits can be accelerated and simplified. To do this, after boiling is completed, it is recommended to apply oven cleaner to the frying pan and place it in a plastic bag for half an hour. Then it will be easier to remove the remaining softened fat. The bag must be sealed so that moisture does not evaporate and the product does not dry out. It is better to choose an unscented product.
The digestion procedure can be carried out in several stages: you need to refresh the solution every 10-15 minutes and remove the remaining pieces of soot with a knife or metal spatula. This will reduce the overall process time, but will require more labor.
When you scrape off the black coating, be careful not to damage the outer coating of the cookware. The more damage there is to the enamel, the faster a new layer of burnt fat will grow.
A drill or grinder equipped with a brush attachment will help you get rid of the thick greasy layer. You can get by with a simple scraper, but it is much longer and more difficult. You can speed up the result by periodically heating the pan over the fire.
A drill or grinder equipped with a brush attachment will help you get rid of the thick greasy layer.
When performing mechanical processing, it is necessary to wear safety glasses, a respirator mask and clothing that covers the body as much as possible.
Please note that with this radical method, the top layer of metal is also removed along with the contamination. This means that in the future the dishes will get dirty more quickly.
We suggest you read: Is it possible to wash the filter from a Karcher vacuum cleaner?
You can remove old fat with a paste made from 9% vinegar and soda. To do this, you need to mix these ingredients in equal proportions, apply the finished mixture to the surface and leave for 20 - 30 minutes. The softened fat is easily removed with a scraper or steel wool.
You can remove old fat with a paste made from 9% vinegar and soda.
If carbon deposits on a steel frying pan have formed from the inside, then you need to pour half a glass of salt onto the bottom, pour in water and boil for about 20 minutes. After boiling, let the solution stand for a couple of hours. Then rinse the pan thoroughly.
Another way: pour two tbsp into a frying pan. spoons of salt, pour vinegar (9%), place on the burner. It is important that the bottom is completely covered with liquid. After the solution boils, reduce the heat and add 1/4 spoon of soda. Gradually the liquid will evaporate. The pan must be removed from the heat and rinsed thoroughly.
This inexpensive medicine is used by many to clean cast iron products. A dozen tablets must be crushed into powder and applied to a damp, contaminated surface. After an hour, wash the pan as usual.
Many people use activated carbon to clean cast iron products. Many people use activated carbon to clean cast iron products.
You can also remove fumes with baking soda. You only need one handful. It needs to be dissolved in 3 liters of hot water. Boil the dishes in the resulting solution for half an hour, then wash them.
Making your own cleaning product is easy. Add a drop of ammonia and 10 grams of borax to a glass of warm water. Apply the resulting solution to dirty areas. If these ingredients are not available, then you can prepare a mixture based on citric acid. Dissolve 1 teaspoon of lemon in a liter of water and boil. Let the pan sit in the resulting liquid for an hour. If necessary, repeat these steps.
The resulting solution should be applied to dirty areas. This method is suitable not only for cleaning dishes, but also for removing rust. Place a sheet of foil on the bottom of the oven. The pan must be washed, dried and placed in an oven preheated to 120°C for 40 minutes. After this time, remove the dishes, cool slightly, grease with vegetable oil and place back.
The resulting solution should be applied to dirty areas. This method is suitable not only for cleaning dishes, but also for removing rust. Place a sheet of foil on the bottom of the oven. The pan must be washed, dried and placed in an oven preheated to 120°C for 40 minutes. After this time, remove the dishes, cool slightly, grease with vegetable oil and place back. This method is suitable not only for cleaning dishes, but also for removing rust.
The fire will simply burn out old fat from the surface of the metal. If you don't have a blowtorch, you can place the item in the fire. The very principle of processing with open fire is important - all the burning deposits will simply burn out under the influence of fire. Afterwards, the product must be cooled and washed from soot.
All the burning residue will simply burn out under the influence of fire.
This method is unsafe, so it must be used in an open space, observing safety precautions.
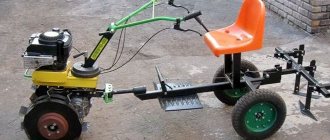
Device
The walk-behind tractor differs from the cultivator in its greater weight and the presence of a power take-off shaft. The cultivator is equipped only with cutters, and any mounted and trailed equipment that meets the characteristics of the equipment can be attached to the walk-behind tractor.
Cultivators are equipped with different engines - 2-, 4-stroke gasoline, diesel and electric, powered by mains power or built-in batteries. They are compact, but inferior in power to motors built into walk-behind tractors.
Before making a cultivator for a walk-behind tractor with your own hands, it is necessary to treat all metal elements with a special anti-corrosion compound to prevent the premature appearance of rust after frequent contact with the ground.
Simple models can be made without drawings. To make and correctly assemble more complex devices, it is necessary to plan the work, calculate the dimensions of the module and parts.
A homemade cultivator made from a pitchfork is a simple way to reprocess (remake) products. To do this, the teeth of the mechanism are bent with a hammer like a corkscrew and placed on the handle. A shovel handle is used as a handle. Electrical tape is used for fastening.
Some craftsmen manage to make a cultivator with their own hands from a bicycle frame with a wheel. A steel rod is welded or bolted between the 2 base blocks. The head is mounted to the crossbar. For this design, it is recommended to take a medium-sized wheel.
In order to correctly assemble a disc cultivator and work correctly with cutters, it is necessary to design diagrams of components and individual parts. Taking into account the deformation of the discs, special adjusting nuts are used. The discs are welded to bushings located on a rotating axis with brackets.
See » Review of the best Motor Sich walk-behind tractors