Many farmers use walk-behind tractors to work in their fields. The adapter for the walk-behind tractor makes it possible to speed up its execution. This unit is used as a trailer that moves on wheels and is attached to a motor cultivator. You can add attachments to the device and mount a chair. Often gardeners make such a unit themselves.
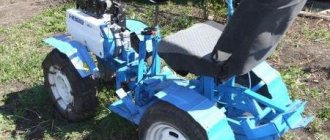
Walk-behind tractor with steering control
With this method, the power unit will be located behind the driver and rigidly attached to the front adapter.
Consequently, the coefficient of adhesion of the driving wheels to the soil will increase. This, in turn, will increase traction force, which will make it possible to work with any attachments. For such experiments, the light Salyut walk-behind tractor, which weighs about 75 kg and has a power of 6.5 liters, is best suited. With. In this case, you will need a steering column with a gearbox. But this is for this case, if you dare to make a walk-behind tractor with front steering. This procedure is much more complex and painstaking than a simple joint, but the result will please you - you will get a walk-behind tractor with a steering wheel and a seat, and all the necessary levers will be at your fingertips.
During production, you will need not only a steering wheel and gearbox, but also steering rods with coulters. You will definitely need gas, clutch and brake pedals located under your feet. They are connected to standard controls with homemade rods or steel cables.
On the right side of the seat there is a lever for raising or lowering attachments, as well as a parking brake handle. Fenders with headlights are placed on the front wheels. And the mini-equipment finally takes on the finished look of a walk-behind tractor with a front adapter.
It should be noted that the price of such a product with a steering wheel starts from 24 thousand rubles. At the same time, the adapter has good technical characteristics that allow you to fully appreciate the advantages of working on your mini equipment.
The walk-behind tractor is a mechanized gardener's assistant, which reduces labor costs and the user's health. If such a device is supplemented with an adapter with steering control, it increases the comfort of control and further reduces physical strain.
In fact, the adapter allows you to turn a walk-behind tractor into something like a mini-tractor. From the material in this article you will learn the device of the adapter, its purpose, types, installation nuances and subtleties of operation.
Design Features
The design of this device is very simple. At its core, the adapter is a trolley that is attached to a walk-behind tractor. It consists of a frame on which the driver's seat or body is mounted. The frame is mounted on a two-wheel chassis. Another indispensable element of this equipment is the drawbar, with which the trolley is attached to the main unit. It pulls the trailer, and this force is transmitted to the wheels of the adapter. You can attach many different devices to this device: a milling cutter, a flat cutter, a harrow, a potato digger and much more.
This ensures the reliability of the device
When making homemade equipment of this kind, it is necessary to pay great attention to the strength of the coupling between the adapter and the walk-behind tractor, since this is the weakest point of the entire unit. The hitch must be made of steel or cast iron. As a rule, it is performed by welding, and special attention should be paid to the weld seams
As a rule, it is performed by welding, and special attention should be paid to the welds. Modern models of this technology also include a control panel conveniently located near the driver’s seat
From this panel you can control the vertical movement of various equipment that is attached to the adapter. You can also change the angular movement of attached devices
Modern models of this technology also include a control panel conveniently located near the driver’s seat. From this panel you can control the vertical movement of various equipment that is attached to the adapter. You can also change the angular movement of attached devices.
For this purpose, the device is equipped with a system of levers or hydraulic units.
In addition to the equipment set that is sold with the adapter, various additional devices can be used to make gardening work easier. Some of them are purchased in the store, others can be made independently if you have the appropriate tools, materials and skills.
Buying a new adapter for a walk-behind tractor is not difficult. There are many different types of this equipment on sale. The more functions this equipment performs and the more convenient it is to use, the higher its price. Even the cheapest adapters have a considerable cost, so many owners of walk-behind tractors decide to make this trailer with their own hands.
In this case, it is necessary to perform a preliminary calculation of the strength and mechanical characteristics of the device.
User manual
The engine and walk-behind tractor manual are the main documents regulating the operation of the machine, the rules for its assembly and startup after assembly. Retain these documents throughout the life of the device. In case of breakdowns during the warranty period, contact the service center to troubleshoot the problem.
First launch and run-in
When starting the Crosser walk-behind tractor, the gear shift knob should be in the neutral position. After the first start, the engine should run idle for several minutes (rpm 1500-2000 per minute). If there is no extraneous noise or knocking, continue working with the unit.
Important! Running in a walk-behind tractor lasts on average 15-20 hours.
It is prohibited to: load the equipment as much as possible while the running-in period is in progress; use heavy mounted implements, plow virgin soil. After running-in, the device can be used with any additional devices.
Maintenance
Diesel fuel: settled for 48 hours. Engine crankcase oil: SAE10W40, 10W60. Lubricating oil: SAE10W30.
Adapter for walk-behind tractor preparation and production of basic elements
Despite the simplicity of the design, making an adapter is a rather complicated procedure. To make a device, you first need to study the drawings. The more accurate diagrams you have at your disposal, the better the result of your work.
Manufacturing will require certain tools and materials.
Be sure to prepare:
- electric drill;
- hammer;
- file;
- welding machine;
- steel sheet, 5 mm thick;
- several square pipes, 1 inch in diameter;
- electric hacksaw;
- square;
- set of bolts and nuts.
Next we move on to manufacturing the main structural elements. You will need:
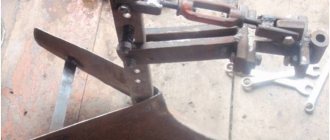
- Make a hitch - it is a welded mechanism, which will later be installed in the base of the adapter frame and attached to it with bolts. The coupling mechanism consists of two pieces of square pipe welded to each other and one piece of water pipe, each no more than 1 inch in diameter and 20 cm long. Insert a rod with a welded tee into the water pipe, which is not completely pressed by the bolt. Be sure to lubricate the rod with grease or grease - this will ensure free rotation of the tee along the horizontal axis when the walk-behind tractor with the adapter moves over bumpy terrain;
- Make a unit that secures the wheels - to do this, take 2 pieces of pipe, 1 inch in diameter and 10 cm long, and weld them perpendicular to each other. After this, insert the horizontal section into the mounting pipe and securely secure it with a bolt. The vertical section of the pipe will serve as a place for attaching the axle and bearing with the wheel.
Having prepared the equipment, materials and made the main elements of the adapter to the walk-behind tractor, you can proceed to assembling the equipment. Be sure to follow the instructions in the drawings, as the slightest mistake will lead to incorrect operation of the entire structure.
Manufacturing a device with a movable joint
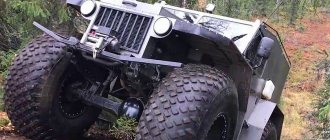
This is the simplest device. The adapter itself will be located behind the walk-behind tractor. It is not difficult to make, but the process requires attention and concentration. The service life of the mechanism depends on the quality of work. This adapter is suitable for heavy walk-behind tractors, for example, “Neva”. It has an engine power of over 7 hp. With. and weight from 105 kg. the adapter without slipping
, but also agricultural implements.
For manufacturing you will need the following materials and tools:
- electric drill with the necessary set of drills;
- DC welding machine and electrodes;
- grinder with a set of cutting and grinding discs;
- hammer, file, square, various hardware;
- sheet metal with a thickness of at least 5 mm;
- several profile pipes measuring 40 x 50 and 50 x 50 mm;
- round water pipe with thick walls with a diameter of 30−45 mm;
- steel rods with a diameter suitable for a round pipe;
- channel 40 x 50 mm;
- two wheels from a Zhiguli or Oka with bearings and hubs;
- driver's seat.
You can choose any adapter size, but based on the needs of the mini-equipment. The frame itself can be made slightly higher or lower than the axis of the walk-behind tractor. For wheels, the optimal suspension is portal, providing decent ground clearance. on the adapter - this complicates the design. The easiest way is to take a seat with built-in elastic elements.
Next, they proceed directly to the manufacture of individual components.
- Hitch. This is a welded mechanism, which is a hinge that operates in two planes. It is then installed into the base of the adapter frame and bolted to it. It consists of two pieces of 40 x 50 pipes welded to each other and a piece of round water pipe. A welded tee is inserted into it. The tee itself consists of a rod and part of the same pipe. This is the most critical unit, so the welds must be perfect.
- Adapter frame. Here you will need a profile pipe and channel. They are welded together, strengthened, and then made into racks for the wheels. Next, the racks are fixed with braces welded to the frame and wheel hubs. Install and secure the wheels.
- Several pieces of pipe are welded to the main frame to install the seat.
- Fix and adjust the seat. It is placed so that when the steering wheel is turned, the operator’s back does not leave the backrest. There is no need to remove the walk-behind tractor controls - this is done when the power plant is located behind the driver.
- Install the finished coupling device.
- Attached to the walk-behind tractor.
READ Adjusting the Plow on a Motoblock With Adapter
A bracket for attachments is made. It is located on the rear cross member of the frame. To do this, add several levers and rods that will change the lifting height of agricultural implements.
Next, the wheel locking mechanism is made. To do this, use a ready-made brake system from any passenger car and fit it to the installed wheel hubs.
Varieties
Adapters with steering can be classified according to the type of wheel arrangement. The steering gear is performed in the format of a separate unit. The steering wheels can be located at the front or rear. As for the position of the steering gear, this depends on the design features and spare parts, because during operation it is impossible to avoid repairs and replacement of worn parts.
Models in which the adapter is located at the front are called front-steering varieties. In such modifications, the engine is a kind of tractor for the entire unit. If the adapter is located at the rear, and the walk-behind tractor has to pull it behind it, such a device is called rear-wheel drive. In other words, if the adapter is located in front of the walk-behind tractor, it is a front-type product, and if at the back, it is a rear-type product.
The choice of one or another option is made by the buyer himself, based on his own preferences.
However, you can take a closer look at the option where the adapter is located closer to the drive axis. In this case, the operator’s weight will create additional load, preventing the walk-behind tractor from jumping out of the ground while the equipment is operating.
Based on the variety, adapters can be classified into body and bodyless. The former involve the transportation of goods, the latter are more suitable for cultivating the soil. Depending on the power of the unit, the adapters are connected to the walk-behind tractor using a long or short drawbar. The first modifications are used on heavy equipment, the second are used on light equipment.
Important Single-bucket excavator EO-2621 Petushok
Making an adapter for a walk-behind tractor with your own hands
The base of the adapter to the walk-behind tractor is made of a rectangular pipe 170 cm long. Another pipe 50 cm long is welded across it, to which the adapter wheel mounting posts should be attached. The height of these racks from the top point of the rack to the axis of the adapter wheel is 30 cm. You can adapt the wheels from a regular garden cart, and bore their inner bushings on a lathe. Bearings of the required size are put on the bushings.
Then braces should be welded to the adapter wheel bushings and to the central pipe. Their length can be different and is determined by the angle that you will need to maintain. This is followed by calculation and welding of the frame for the attachments. The side tubes of this frame are attached to the wheel stands using bolts. The bolts must be of sufficient diameter to withstand various mechanical loads.
Such an adapter for a walk-behind tractor with your own hands moves quite confidently on the ground when working in virgin lands and arable land. You can make a special blade for it for snow removal. In front of the adapter there is a coupling unit, which you can also make yourself or buy ready-made.
The only thing you need to pay attention to is that the reliability of both the adapter coupling and the walk-behind tractor itself must be quite high. On top, to the central pipe, a metal “leg” is welded to accommodate the seat
That's all, actually.
Description of the adapter for the walk-behind tractor
The adapter is a special module for moving on a walk-behind tractor. With its help, you will be able to operate the unit in a sitting position and at the same time cultivate the land. For example, the adapter for the MTZ walk-behind tractor has steering control. It is quite possible to do it yourself. One of the sections of the article below is devoted to how this can be done. In the meantime, let's talk about the purpose of this attachment.
Using an adapter can greatly simplify the use of this home appliance. You will have the opportunity to change attachments for hilling or planting potatoes, a flat cutter, a plow and other devices. The adapter also speeds up absolutely any garden work . In other words, if such a device is used in practice, the speed of the workforce will increase from 5 to 10-11 km/h.
Adapter design features
In fact, the adapter looks like a trolley, significantly increasing the functionality of the walk-behind tractor and making it easier to use.
The adapter design consists of the following parts:
- A durable frame with all structural elements attached to it;
- Footrest, near which the brake pedal is located;
- A manual brake lever, when lowered, the wheels are finally fixed;
- Wheelbase of two wheels of medium size;
- Seats with lift lever.
The hitch, which allows you to attach the adapter to the walk-behind tractor, is located in front or behind the device. The standard type is a single design that includes two main elements. The first is a connecting link, the second is a regulator.
Separate adapters with a universal double hitch, allowing additional attachment of various awnings.
Main varieties
With the help of a homemade adapter, you can greatly facilitate the work with the Neva mechanism, because it acts as a kind of transitional link between the unit and the working elements: a plow, attachments for planting potatoes, etc. Physical stress will have a different effect on the body, because while working you can sit and simply direct the process, and the work itself will go faster, because you will be able to increase the working speed almost 2 times - up to 12 km/h.
The adapter for the Neva walk-behind tractor can have a lifting rod, with the help of which movement around the territory is much easier, as well as a body, which, in addition to performing work in the field, also allows you to transport materials and products (see photo). Most often, such designs have steering control. Also, the adapter with steering wheel for the Neva walk-behind tractor can have a short or long drawbar. Units with short drawbars can only work with light mechanisms, while long drawbars are designed for heavier structures.
The homemade adapter is attached to the Neva walk-behind tractor using a single hitch consisting of two parts, one of which plays the role of an adapter between the device and the lifting mechanism, and the second attaches the equipment to the device. In order to be able to simultaneously use several additional tools, a double hitch can be used instead of a single one, as, for example, in the photo.
Simple design
How to make an adapter for a walk-behind tractor? The simplest version of the mechanism is made by hand as follows:
- a frame is made from a metal pipe more than one and a half meters long;
- at one of its ends, a half-meter long pipe is welded perpendicularly, which will act as a basis for attaching the wheel stands;
- the height of the racks is made equal to 30 centimeters;
- The braces are attached by welding;
- the dimensions of the adapter for the walk-behind tractor can be anything - everything will depend on your own preferences;
- in order to attach auxiliary equipment, a metal beam is welded to the frame;
- side metal pipes are fastened with bolts;
- an adjusting rod is welded to the frame, which should have three inputs 20, 30 and 50 centimeters long;
- a coupling assembly of the structure is created, which can also be purchased at a specialized store;
- if necessary, another adjustment rod 75 centimeters long is made;
- a metal seat support is made by welding;
- A soft or wooden seat is installed on the support.
The video shows how to properly make a simple walk-behind tractor adapter with your own hands. But it can only be created if you have certain skills, equipment and strictly adhere to the presented drawings.
Multifunction device
To make a multifunctional adapter with steering for the Neva walk-behind tractor you will need:
- steel sheets;
- steel corners and pipes;
- sitting;
- 2 wheels;
- welding machine;
- other tools that every owner must have.
Such a device can be used both for work in the field and for transporting materials and products even over long distances. The multifunctional design for the Neva walk-behind tractor can be equipped with a plow, a device for planting potatoes, a harrow and other devices. But in the cold season it can be useful for removing snow from the garden area.
So, in order to create a homemade steering adapter for the Neva walk-behind tractor, you need to:
Make a diagram
In order to avoid distortions of the structure, as well as to protect it from excessive loads, it is necessary to draw up a diagram. You can either create it yourself or use ready-made examples.
Make the main parts
The main parts of the structure, of course, include the frame to which everything else is attached (see drawings). In addition, it is necessary to think over a special mechanism that will ensure free turns of the trailer. The body of the device is usually made of steel sheets, and the height of the sides is about 40 centimeters. The coupling of additional elements and the adapter is carried out using a pin with a ring, which is put on the towbar. The only “disadvantage” of such a clutch is the rapid wear of the elements due to the constant turning of the mechanisms.
Install the seat
The seat is usually attached using bolts, after which the device is considered ready for use.
More detailed information on how to properly make an adapter for a Neva walk-behind tractor with your own hands can be obtained from the presented video, as well as by viewing the drawings.
Rating of the best models for 2022
If you are not sure that you understand how to make an adapter yourself, then it is better to turn to ready-made options. Today the market offers the widest range of products from the best manufacturers. Asking which adapter from which company is better is pointless, since each manufacturer offers a product designed for specific models (although they may also offer universal devices).
There are a large number of varieties of such devices: different load capacity, different power, with a body, without a body, long, short, etc. Different models have different functionality and direction of operation, as well as different diameters of the joint mechanism (unless it is a universal coupling mechanism). The most popular ones are usually suitable for both land cultivation and transportation. They have a body and are more expensive, while the bodyless versions are only suitable for cultivation and are not as expensive.
This review presents only the best and highest quality (according to buyers and popularity) models available in 2021, as well as our recommendations on how to choose a decent unit at the right price.
APM 350 PRO
Another high-quality Russian product produced at the machine-building plant in Gagarin (Smolensk region). The purpose of the device is no different from the two previous models. It is equipped with a mechanism for adjusting the length and height when installing the hitch, which allows it to be equally freely aggregated with any type of motor vehicle - from the lightest to the heaviest.
Thanks to its versatility, the APM 350-PRO is considered a class higher than the devices already listed, although they are in no way inferior to it in terms of functionality. However, this does not affect the cost in any way.
Another important nuance: since the company producing this series is also engaged in the production of Mobil K walk-behind tractors, an attachment was released from the factory especially for them, which greatly simplifies the work with the rotary mower. Most of them have a classic design, completely unsuitable for connecting rotary mowers, while this model, in combination with Mobile K series walk-behind tractors, has a special rod that allows you to lift the mower above the area of cut grass when turning, so you don’t need to remove the mower. Very convenient and practical.
Brake belt
| Length | 160 cm |
| Width | 70 cm |
| Weight | 45 kg |
| Price | RUB 17,500/piece |
APM 350 PROAdvantages:
- has a mechanism for adjusting the length and height of the clutch;
- universal;
- The kit includes an attachment for working with the mower on the MB Mobile K.
Flaws:
- not noticed.
APM 350 with body
Another brainchild of the Gagarin Machine-Building Plant is the APM-350 riding adapter with a body. Many owners of garden equipment do not consider the presence of a built-in trailer vital, because you can always buy it in addition. The average cost of a trailer varies, depending on the total weight of the goods being transported and the width of the trailer itself (usually from 260 to 500 kg). The problem is that any owner quickly gets tired of walking behind the MB, after which he will want to buy a trailer. And this is one of the most common mistakes when choosing adapters.
Since in this article we not only describe existing types, but also recommend which one is better to buy, here is our advice for those who need a walk-behind tractor with a trailer: buy options with a body right away! Although its cost will be slightly higher compared to an ordinary trailer, it will be much more profitable than buying both a trailer and an adapter separately.
APM-350 is an excellent representative of this “combined” type. Its carrying capacity is 350 kilograms. The body dimensions are 800 x 1000 mm. The design includes the following components: frame, floating attachment, operator's seat, band brakes and body.
The manufacturer guarantees compatibility with MB of the following series: AGAT, OKA, NEVA, AVANTGARD and Tselina. Both passive and active equipment can be installed. It can be easily aggregated with walk-behind tractors equipped with a power take-off shaft of the UGRA and MTZ types. However, such devices can only be used with a passive hitch (that is, one that does not have moving units and works only when the walk-behind tractor moves directly across the field: plow, hiller, ripper, potato digger, etc.).
Length160 cm
| Width | 700 cm |
| Brakes | tape |
| Weight | 92 kg |
| Body type | tipper, non-galvanized |
| Price | RUB 23,120/piece |
APM 350 with bodyAdvantages:
- presence of a body;
- installation of active equipment.
Flaws:
- not found
Tselina PM-05
First in the top is Tselina PM-05 - a classic and inexpensive option for those who need a budget “workhorse” with good driving characteristics. It has a fairly simple design: frame, brakes, seat and lift. The operator's seat is adjustable. “Tselina” is equipped with wheels 4.00 x 10 or 19 x 7.00*8, and wheel weights are included.
In reviews of the product, there is mention of a rather weak braking mechanism and a not very high-quality floating hitch system. Active attachments (that is, all those tools that are driven by a rotating mechanism: rotary mower, sweeper, snow blower, etc.) are installed here only on the drawbar, from the front of the walk-behind tractor. Models with this design include units of the following series: MB, Neva, Agat, Tselina, Avangard, Mobile K.
Length165 cm
| Width | 62 cm |
| Brakes | Tape |
| Weight | 50 kg |
| Price | RUB 12,450/piece |
| Working speed | 10 km/h |
| Dimensions | 165 x 75 x 110 cm |
Tselina PM-05Advantages:
- low price;
- seat adjustment;
- good ride quality.
Flaws:
- weak brake mechanism;
- active equipment is installed on the drawbar.
How to assemble an adapter for a walk-behind tractor with your own hands
You can make a simpler or more complex design. Both of these options will be given below.
Assembling a simple version of the adapter for a walk-behind tractor with your own hands
To make it you will need:
- rectangular pipes;
- wheels;
- channel No. 10, 40 cm long;
- coupling unit;
- welding machine;
- bearings;
- mounting bolts;
- sitting
Before starting work, you need to create a drawing. You can use ready-made diagrams or make them yourself.
Important Step-by-step instructions on how to make a homemade crawler tractor
After this, work begins. First, the pipe is cut into sections measuring 1.7 and 0.5 m. The end of the short pipe is welded to the long one, and strictly perpendicular. It will serve as the basis for attaching the wheel stands. Immediately make marks of 30 cm, indicating the height of the racks from the axis.
Wheels that can be used from an old garden cart are then attached to the hubs. Bearings are first attached to the bushings, after which the braces are welded to the central pipe of the bushing by welding.
The frames are made in dimensions of 40x40 cm, but if necessary, these dimensions can be reduced or increased. A channel is attached to the rear end of the frame by welding, and the side pipes are connected to each other with bolts. A lever is also installed on the frame. To increase the adjustment force, install an additional lever 75 cm long.
Quite often, coupling units are purchased in stores. But it should be noted that this element must be of high quality
Therefore, if you plan to make it yourself, then you need to pay special attention to quality
The seat is attached to a metal support, which is welded in advance to the base of the frame, i.e., the central pipe.
Assembling a complicated version of the adapter for a walk-behind tractor with your own hands
To make such an adapter for a walk-behind tractor, you will need:
- steel pipes;
- Sheet steel;
- sitting;
- corners;
- a pair of wheels;
- welding machine.
Such an adapter for a walk-behind tractor will be more functional. The assembled equipment can not only cultivate the land, but also be used for transporting goods. Additionally, a harrow, plows, hillers, etc. are used. And in winter, the walk-behind tractor can be equipped with a scraper for removing snow.
This design consists of the following elements:
- rim;
- sitting;
- wheels;
- coupling devices.
Before starting work, a kinematic diagram is created. This is necessary in order to correctly calculate all loads. You can also use ready-made drawings.
When making the frame, do not forget about installing a fork with a bushing, which are necessary for free rotation of the trailer. Steel sheet is needed for the body. The coupling assembly looks like this: an iron pin measuring 15 cm is inserted into the aperture of a drawbar shaped like the letter “P”. However, it should be noted that this option wears out quickly, since due to the regular rotation of the trailer, the coupling holes very quickly become unusable. In this case, it is necessary to lengthen the U-like chain.
The seat is fastened at a distance of 80 cm from the front end of the frame. This process is carried out using bolts.
Thus, making a homemade adapter for a walk-behind tractor is not so difficult. Therefore, there is no need to buy expensive equipment when you can make it yourself. All elements can be bought in a store or found in a shed at your summer cottage. A properly created design will allow summer residents to significantly ease their hard physical work.
Working on a walk-behind tractor with steering control
Let's say a few words about the control features of a walk-behind tractor with a steering wheel, and why it is recommended to use this option during assembly. It’s not for nothing that this type of conventional and home-made machines is so popular, because it has a lot of advantages:
- the operator will not have to waste his energy walking behind the mini tractor;
- the traction potential of the equipment is realized one hundred percent;
- such a mini tractor is more maneuverable and functional;
- Now, in order to cultivate a plot far from home, you will not have to additionally transport a walk-behind tractor - you can simply drive it, like a regular car or tractor;
- control is more lightweight and convenient than other types;
- Now you don’t need to hold the entire mass of this heavy and bulky device in your hands,
- it becomes possible to quickly assemble and disassemble the unit;
- control parts are not significantly modified during rework;
- good balance in weight along the axes.
We will not mention here the noise of operation and other characteristic features of, in principle, all tractors. Let's just talk about one characteristic drawback - not very reliable stability, which is associated with a movable coupling. However, the advantages are, of course, more impressive.
Crosser walk-behind tractor
The Crosser walk-behind tractor belongs to a Chinese brand; all production facilities are also located in China. This brand is successfully sold in Ukraine, Russia and European countries. The main qualities due to which this equipment has become so popular are powerful engines, an optimal ratio of quality and cost, as well as easy operation that even a novice farmer can master.
Crossers receive praise from their owners, this is due, first of all, to the availability of models for different needs - for different areas and volumes of work, you can choose your own crosser walk-behind tractor model.
Basic equipment of Crosser walk-behind tractors
Please check the contents of your device at the time of purchase. Some heavy duty diesel models have an additional road wheel and driver's seat.
Do-it-yourself hitch to a walk-behind tractor
The U-shaped fastening is the basis of the hitch for the walk-behind tractor, therefore, to make it, a channel of suitable thickness and size is perfect. This mount is located under the steering wheel of the walk-behind tractor.
Important TOP 3 bulldozers John Deere by technical characteristics
When making a hitch mount with your own hands, you need to drill several holes to secure the bracket and mounting pin in them. Therefore, the holes must be of the required diameter. The pin also needs to be made of high-strength steel.
To attach additional accessories to the walk-behind tractor, you will need a bracket. The long end of the bracket should be positioned either down or up to avoid interference with connected equipment. In this case, the end of the bracket should not touch the surface of the soil that we are cultivating.
When making a homemade coupling unit, we used a standard sample. Often, additional devices are used for the walk-behind tractor, with non-standard types of coupling. To connect them to a walk-behind tractor, you need to either purchase a special adapter or make an adapter yourself. As a rule, these are U-shaped brackets.
Arrangement of a multifunctional model
To manufacture a multifunctional device, you need to prepare:
- Steel pipes and angles;
- Sheet steel;
- Two wheels;
- Comfortable seating;
- Welding machine and set of tools.
This adapter is a multifunctional model. It can be used for basic agricultural work and transporting goods over uneven terrain over short distances. The structure can be equipped with agricultural implements such as a plow, harrow, hiller, and potato digger. During the winter months, you can attach a snow scraper to the adapter for clearing snow.
The main elements of the equipment are: frame and coupling devices, as well as wheelset and seats
The process of producing an adapter at home takes place in several stages.
Stage #1 – drawing up a kinematic diagram
To ensure the balance of the structure and prevent additional overloads at the design stage, it is necessary to draw up a kinematic diagram. You can make it yourself or use a ready-made version.
This circuit is designed for the manufacture of an adapter designed to work on the Neva walk-behind tractor.
Stage #2 - production of main parts
When making and assembling a frame, it is important to provide for the arrangement of a fork with a bushing. It is necessary to ensure free rotation of the trailer
The frame of the structure is made of metal pipes and angles
The body of the structure is made of steel sheet. The height of its sides is made no less than 30 cm.
When making stands for the adapter wheels, you can use the diagram below.
The simplest option for manufacturing a coupling assembly is a 15 cm long pin, which is stuck into the hole in the drawbar of a U-shaped walk-behind tractor. The disadvantage of this option is rapid wear: under the influence of a freely rotating trailer, the holes for the hitch quickly break. To reduce wear, it is advisable to lengthen the U-shaped chain.
Stage #3 – seat installation
The seat is secured to the spinal frame of the adapter beam, stepping back 80 cm from the front edge. It is fixed with bolts. The adapter is ready. All that remains is to check the functionality of the multifunctional device.
Making an adapter for a walk-behind tractor with your own hands
At the moment, there are several types of adapters, as a rule, their designs are similar, and are a device attached to the back of the walk-behind tractor with a comfortable seat.
The adapter is made of a square metal profile, 160 to 180 cm long. Across this profile, another one, 50-60 cm in size, is welded, depending on what track you need (wheel stands are attached to it). The height of the racks to the wheel axle from the top to the adapter wheel axle can be from 25 to 40 cm, depending on the design.
Next, braces are welded to the main metal profile and wheel bushings; they also serve as stiffeners. Their length depends on the angle of inclination relative to the entire structure and other parameters. Then, the frame structure to which the attachments will be attached is calculated and welded. The side guides of this design are attached to the wheel stands with bolts.
After this, a control lever with three bends with dimensions of 35, 55, 20 cm is welded to the main frame. To increase the applied force, another lever is attached to the lever, but with dimensions of 80 cm.
The adapter seat is mounted on a support welded to the central metal profile. As you can see, making an adapter for a walk-behind tractor with your own hands is not so difficult.
Purpose of the adapter
Here, I think everything is clear, there is a fairly large amount of work on the ground that is easier, faster and more convenient to do with an adapter. And working with such attachments as a tiller is generally safer.
Design diagram of the adapter for the walk-behind tractor
The adapter for a walk-behind tractor is a kind of towed device made on a frame and having two wheels. Structurally, adapters are divided into several types; in simple terms, they can be simple or more complex. The main types are considered universal, those that are capable of transporting loads and performing soil cultivation, and simple ones, capable of only performing soil cultivation.
For walk-behind tractors of different power, different adapters are used; for a low-power one, an adapter with a short drawbar is installed, for a powerful one, with a long one. Also, universal adapters are equipped with additional functionality, increasing the track, lifting attachments, etc.
https://youtube.com/watch?v=c9649IKGpPI
Attachments
Attachments for the Crosser walk-behind tractor can be purchased at any online store, as well as in specialized equipment stores. Below is an overview of each type of attachment.
Milling cutter
The heavy Crosser walk-behind tractors come equipped with a one-piece cutter, which operates directly from the PTO. The standard parameters of the cutter are 90 cm, knife diameter is 36 cm.
This cutter is connected to equipment such as “Neva”, “Zubr”, “Zirka” and other devices. To work with such equipment, an engine power of at least 5 horses is required.
Arrangement of a multifunctional model
To manufacture a multifunctional device, you need to prepare:
- Steel pipes and angles;
- Sheet steel;
- Two wheels;
- Comfortable seating;
- Welding machine and set of tools.
This adapter is a multifunctional model. It can be used for basic agricultural work and transporting goods over uneven terrain over short distances. The structure can be equipped with agricultural implements such as a plow, harrow, hiller, and potato digger. During the winter months, you can attach a snow scraper to the adapter for clearing snow.
The main elements of the equipment are: frame and coupling devices, as well as wheelset and seats
The process of producing an adapter at home takes place in several stages.
Stage #1 – drawing up a kinematic diagram
To ensure the balance of the structure and prevent additional overloads at the design stage, it is necessary to draw up a kinematic diagram. You can make it yourself or use a ready-made version.
This circuit is designed for the manufacture of an adapter designed to work on the Neva walk-behind tractor.
Stage #2 - production of main parts
When making and assembling a frame, it is important to provide for the arrangement of a fork with a bushing. It is necessary to ensure free rotation of the trailer
The frame of the structure is made of metal pipes and angles
The body of the structure is made of steel sheet. The height of its sides is made no less than 30 cm.
When making stands for the adapter wheels, you can use the diagram below.
The simplest option for manufacturing a coupling assembly is a 15 cm long pin, which is stuck into the hole in the drawbar of a U-shaped walk-behind tractor. The disadvantage of this option is rapid wear: under the influence of a freely rotating trailer, the holes for the hitch quickly break. To reduce wear, it is advisable to lengthen the U-shaped chain.
Adapter for motor blocks
Most often, the adapter has two hitches - one is used to attach additional attachments, and the second makes it possible to attach it to the walk-behind tractor. For example, you can connect the following additional elements to the adapter:
- seeder;
- plow;
- hillers;
- harrow and other equipment.
The wheelset and axle in the adapter are quite durable structures that allow the walk-behind tractor to be used even on the most difficult areas of the earth, as well as for transporting quite heavy loads. It is important to understand that transporting goods on public roads on such a unit is prohibited, for this reason they are used only in rural areas. However, despite a certain structural similarity between all adapters, they are also endowed with some significant differences.
For example, rear steering adapters, all-wheel drive adapters and front units are available for sale.