A trolley for a walk-behind tractor is a towed equipment for universal agricultural motor vehicles for transporting goods on personal plots and land plots. With the help of such a mechanism, garbage, animal feed, building materials, fertilizer, grain, and equipment are transported.
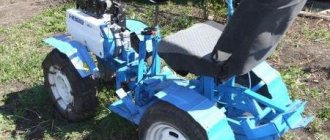
The trailer and adapter for the walk-behind tractor are types of homemade products made by skilled mechanics. The adapter is a longitudinal beam with its own chassis, driver's seat and footrest. This module makes it possible to cultivate the soil in a sitting position, as well as attach 2 equipment at once - in front and behind.
A trolley is a type of adapter with a difference in the design of the chassis.
A purchased cart for a walk-behind tractor is expensive. To save money, craftsmen make it themselves, design design drawings, and select the necessary materials. The process of creating such a useful vehicle does not take much time and is not difficult. Even a beginner with at least a little knowledge of technology can handle it.
A brief overview will help you understand the question of how to make a trolley for a walk-behind tractor yourself with good performance characteristics.
Basic information
Before carrying out work on the manufacture of a trailer, it is necessary to develop a detailed action plan and adhere to it.
The work plan for the manufacture of a trailer for a walk-behind tractor looks like this:
- At the preparatory stage, it is necessary to familiarize yourself with the structure of the mechanism and analyze its functionality depending on the power of the walk-behind tractor.
- Make a design sketch. A trailer diagram drawn up yourself will greatly simplify the work.
- Calculate the dimensions of the cart for the walk-behind tractor.
- Design a drawing of the trolley, which includes the main components, parameters and dimensions of the parts.
- Plan the operating principle of the main and additional mechanisms, think through ways to connect all the components and parts, and their functioning.
- Prepare a list of necessary materials and tools.
- Start the assembly and finishing process.
Depending on the ability to transport cargo, trailers are divided into 3 types:
- A simple 1-axle attachment for walk-behind tractors with a lifting capacity of up to 70 kg. Its design is simple and inexpensive.
- Universal cart with a carrying capacity of up to 110-120 kg. Often used in households.
- Carts for walk-behind tractors with a carrying capacity of over 120 kg. Such mechanisms are designed to move heavy loads, so they have a more complex design, which increases the cost of materials for the frame and cladding. The functionality of this technology is expanding.
Based on these parameters, a material is selected based on strength for the frame and finishing of the mechanism.
Technical features of a single-axle trailed trolley for the AMP adapter
The cart has one axle on which it is mounted. Its design is extremely simple, practical, and reliable:
- The trailer is designed to be used in conjunction with a motorized unit.
- This small vehicle transports cargo weighing no more than 250 kg.
- The body, whose tires are pneumatic, is subject to very little vibration and shaking while driving on uneven surfaces.
The width of the bogie track is 870 mm, and the ground clearance of the body is 180 mm. The dimensions of this modification are:
- length – 150 cm;
- weight – 56 kg;
- width – 72 cm;
- height – 96 cm.
The cart will be sold disassembled, accompanied by instructions for caring for the equipment. Assembling the cart is easy. The procedure takes no more than ten minutes. If problems arise, the solution is popular and is detailed in the operating instructions included with the product. If there is a need to transport the mechanism, it can also be easily disassembled. The kit comes with instructions for caring for the body.
Characteristics of a two-axle ATM trailed to an adapter
The cart for the Neva walk-behind tractor is a device in the form of a frame and two attached axles. The main difference from the single-axle model is that the cart has no bottom. It is not suitable for transporting bulk materials. It does not have a bottom. This situation can be corrected by making a plywood or metal bottom. In addition, if necessary, the length of the sheet can be changed. The advantage of the modification is a load capacity of five hundred kilograms, which is 2 times higher than that of single-axle trailers
. It has the following dimensions:
- adjustable length – 190-250 cm;
- width – 41.5 cm;
- height - 110 cm.
Two-axle cart
Transport moves at speeds reaching twelve kilometers per hour. The ground clearance is 18 cm, and the track is 99 cm. The body has pneumatic tires. It is distinguished by high maneuverability. The body is equipped with sides and a Euro pallet. When purchasing the product, a manual for operating a motorized agricultural machine is included.
Trolley device
Motoblocks and motor-cultivators on trailers consist of the following basic elements:
- frame;
- body;
- hitch or drawbar;
- driver's seat;
- steering gear;
- chassis.
To withstand heavy loads, a homemade cart for a walk-behind tractor is reinforced with special stiffeners.
For a 1-axle trailer, a manual type device is sufficient. A 2-axle dump truck with a large load capacity must be equipped with a hydraulic drive to prevent it from tipping over.
With a load capacity of over 350 kg, for safety, the self-propelled cart is equipped with braking parts. You can make mechanical brakes yourself. If these details are not taken into account, then if overloaded while descending from a hill, the walk-behind tractor trolley will not be able to stop with its own hands and will tip over. To ensure that it remains in the working position after being disconnected from the walk-behind tractor, stops are installed.
Preliminary drawings
It is best to develop drawings yourself, according to the model of your walk-behind tractor and the available materials. To do this, you do not need to have any special education, a rough sketch will be enough. Below is a typical design of a single-axle trailer using which you can easily make a trailer for a walk-behind tractor with your own hands.
Trailer drawing. View from below.
Drawing elements:
- 1 – welded frame (angle 40x40 mm);
- 2 – thrust bearing (strip 150x40 mm, 10 mm);
- 3 – bracket (strip 100x40 mm, 10 mm);
- 4 – axle shaft (steel 45);
- 5 – wheel;
- 6 – drawbar (seamless pipe, cold-rolled, Ø 45x4 mm, L = 1.2 m);
- 7 – cardan head;
- 8 – coupling pin;
- 9 – welded poly (pieces of steel angle);
- 10 – rotary axis of the drawbar (hot-rolled round steel Ø 36 mm or a piece of steel pipe Ø 36×6 mm);
- 11 – nut (M36);
- 12 – washer;
- 13 – welded cross member (a piece of steel angle 40×40 mm);
- 14 – spacer axis (hot-rolled round steel Ø 40 mm);
- 15 – scarf (10 mm, Art. Z);
- 16 – nut (M20);
- 17 – Grover washer;
- 18 – bolt (M20).
Drawing of the trolley coupling assembly.
Drawing elements:
- 1 – pivot bushing;
- 2 – overlay;
- 3 – swivel;
- 4 – swivel bushing;
- 5 – drawbar beam;
- 6 – drawbar.
Materials and tools
To work you need the following tools:
- grinder for cutting parts;
- welding machine;
- welding electrodes;
- jigsaw;
- screwdriver;
- a regular construction square for measuring angles.
When making a trailer structure, you will need the following materials and parts:
- metal profile pipes of square or rectangular section;
- wheels and springs;
- duralumin sheets 2 mm thick;
- steel sheets;
- channel No. 5;
- metal corners;
- metal rod;
- fasteners.
All parts, especially if they are remnants of old metal products, are carefully inspected for damage, cracks, cleaned of rust, and trimmed.
Trailer for walk-behind tractor - let's start manufacturing
Trailer for walk-behind tractor
:
1
— bracket for attachments of the “Electronic” walk-behind tractor,
2
— console,
3
— carrier,
4
— step (20mm board),
5
— driver’s seat (20mm board),
6
— frame,
7
— body (20mm board),
8
— support beam (beam 50×50mm, 3 pcs.),
9
— M8 bolt,
10
— thrust ring (pipe 58×4),
11
— wheel (from an SZD motorized stroller, 2 pcs.). - commonly View
Making a trolley
In order to understand how to make a cart for a walk-behind tractor with your own hands, you need to perform the following algorithm of operations:
- To make a load-bearing welded rigid frame, take 5 pipe blanks and trim the ends with a grinder.
- Press the chipboard sheet with clamps and weld the junction of 3 longitudinal pieces with 2 perpendicular ones so that they create a lattice frame.
- Check the geometry of the structure using a regular construction square. The angles of the connected ribs must be 90°.
- Install spacers between the tacked workpieces in the corners of the bottom and in the center, and tack them by welding.
- Use a welding electrode to tack 4 vertical posts in the corners to the longitudinal pipes of the bottom.
- Check the perpendicularity of the corners, check the dimensions of the sides of the structure with the dimensions on the drawing of the cart for the walk-behind tractor.
- Finally weld all the workpieces to each other, grind the welding seams, clean them of sagging and formations.
- The body can be made of plywood or wooden boards, and the corner joints are secured with steel corners.
- The boards are installed on the frame and attached using bolted connections.
- The craftsman makes stronger sides from steel sheets. The sides can be folding or fixed. Folding sides of the body are considered more rational, because Unloading large volumes of cargo is easier. The sides are also made from metal pipes of square or rectangular cross-section. They are made in the same way as the frame, they are tacked, the geometry is checked for strength and to avoid braces and deviations, they are finally welded, and rigidly attached to the frame. The tailgate is secured with ordinary door hinges and equipped with latches.
- Take a metal rod with a diameter of 30 mm and a length of about 1050 mm to make an axle for the wheels, connect it to the longitudinal hinge and corner supports. The length should be chosen so that the axle does not extend beyond the wheels. Sharpen it to the required diameters of the bearings in the hubs.
- As a running gear, you can take the wheelbase from a scooter, stroller, wheelbarrow or other agricultural machinery. Heavy wheels from a car trailer with hubs are not recommended for installation.
- To make the drawbar, take 2 profile pipes with a diameter of 25x50 mm and a length of about 1.85 m, weld them to the frame beam so that a triangular structure is obtained. For reinforcement, metal gussets 4 mm thick are attached by welding at the corners, and a plate 8 mm thick is attached to the front of the trolley.
- Tipper technology involves the installation of door hinges attached to the bottom of the beam and to the bottom struts.
- The frame of the constructed structure is covered with wooden boards, plastic or metal.
- The driver's seat is installed on a walk-behind tractor with a trolley ready-made or in the form of homemade boxes made from a piece of chipboard and foam rubber covered with dermantine. Such boxes are necessary for covering equipment and materials.
- The parking brake drive of the unit can be used as a brake. Fix the brake pedal, made of a 6 mm thick plate, on the footrest under the seat, weld 2 corners. Install a pedal in the front part, and a plate with 2 holes for fastening brake cables in the rear part, the ends of which are connected to a T-shaped plate with a rod.
In this way, you can make a trolley for a walk-behind tractor with your own hands.
Frame
The frame can be assembled from steel angles and round and rectangular pipes. At first glance, the design is very complex and has a large margin of safety. But it is worth noting that the transport will be used in difficult conditions. Therefore, all questions regarding strength disappear.
Drawing and dimensions of the trolley frame for a walk-behind tractor
1.
Metal corner slope.
2.
Frame for driver's seat
3.
Riser made of pipe
4.
Driver's seat pillars made from angle iron.
5,14.
Pipe front struts
6,15.
Longitudinal spars from the corner
7,8.
Supports for wheel axles.
9,16.
Rear struts made of pipes
10.
Crossbar for reinforcement, made from angle
11.
Longitudinal joint housing
12.
Wheel axle
13,17.
Transverse spars
18.
Headscarves.
However, if the loads are not so large-scale, then simpler design solutions can be chosen (see Dump trailer for walk-behind tractor).
Do-it-yourself trolley for a motorized towing vehicle
A motorized towing vehicle (motorized dog) is a device for transporting goods and traveling through snow and wetlands. The towing vehicle itself has a caterpillar track and is complemented by a sleigh. A trailer in the form of a sleigh is convenient in winter, provided there is a large snow cover, but in summer or in snowless winters, using such a trailer is problematic.
Manufacturers of agricultural equipment offer a wide selection of trailers, adapters and carts, including those for motorized towing vehicles. Some owners of such equipment create a cart with their own hands. Its device is practically no different from a trolley for a walk-behind tractor.
The main difference between a motorized towing vehicle, which dictates the design features of trailers, is the caterpillar track. Such vehicles are ideal for off-road use, so the trailer must meet the same requirements.
Two types of trailers are recommended for motorized dogs: a cargo platform and a skidder. Both options are difficult to implement, so it is better to adapt a ready-made trolley for a walk-behind tractor. The drawings and dimensions for the motorized towing vehicle and the walk-behind tractor will be almost the same, so you can use any.
The main feature of a trailer for this type of equipment is low-pressure wheels. They have a high shock-absorbing effect and are excellent for off-road use. A cart with such wheels can be used at any time of the year. This modification requires the trolley to strengthen the axle, as well as fasten the wheels. All other parts of the cart may remain unchanged.
Rear-mounted design
It is called a trolley because it is placed on a standard tow hitch. Even before starting work, make a drawing with all dimensions, or find a ready-made one, there are many options, there is plenty to choose from. It’s good to understand and, if necessary, make adjustments to accurately fit the product to your equipment. Carry out the work like this:
Cut the pipe or corner, clean the ends to be welded. Place the pieces on a flat surface, check the geometry using a square and measuring the diagonals. Weld the main part of the frame. First, grab, then double-check the position again, and only after that make continuous seams along the entire length of the joints.
Clean off metal deposits with a grinding machine. Weld the hitch to the shank, select the position exactly, and take all dimensions on the walk-behind tractor. It is more convenient to work with an assistant, since it is difficult to position the parts and control their position yourself. Secure the floor and pedals or levers.
All parts must be accurately adjusted, aligned and checked to see if they move normally. Install the seat. First select the correct position, then either weld or bolt the slides. In this case, drill holes in the required places and use fasteners with washers.
Reinforce the floor at the bolt locations with additional stiffeners. Put on the wheels. Here the work depends on the type of attachment to the frame. The easiest way is to make separate modules from a square profile and a hub, which are inserted inside the pipe and secured
Pay attention to the alignment of the hitch at the rear. It would be best if it could be adjusted in height
Make a mounting plate with holes; it will allow you to mount the unit higher or lower; this is the simplest solution.
When assembling a system with a movable joint, the connecting unit must be rigid and rotate only in the horizontal plane. It is easier to buy a ready-made hinge, since it is difficult to accurately adjust this part of the structure at home.
After assembly, check whether the hitch is attached to the walk-behind tractor normally and whether it is convenient to operate. It is better to find all the shortcomings at this stage and eliminate them immediately. Then clean off all pockets of corrosion on the metal, if any, paint the surface in 2-3 layers for reliability.
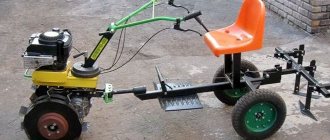
DIY wheelbarrow for walk-behind tractor
A wheelbarrow for a walk-behind tractor is an indispensable assistant in the household. This device allows you to transport cargo (harvest, garbage, building materials, etc.). You can make a cart for a walk-behind tractor with your own hands from auto parts or from individual materials. In both cases, welding and certain design skills will be required. The wheelbarrow assumes the simplest design; any drawing of a trailer for walk-behind tractors will do to create it.
For the Neva MB-2 walk-behind tractor, a mounted wheelbarrow with an H-shaped hitch is suitable. This type of connection is universal and easy to make. The coupling point between the wheelbarrow and the walk-behind tractor is one of the most important components that receives a large load, so the materials for its creation must be durable, and checking for defects (cracks, rust) is mandatory.
A wheelbarrow for a walk-behind tractor consists of a frame, sides and wheels. If you add a seat and a steering column to it, you get an analogue of a mini-tractor. Any of the wheelbarrow options for a walk-behind tractor can be made from available materials; there are many photos and videos on the Internet with the process of assembling devices.
Do you use trailers, adapters and wheelbarrows for walk-behind tractors?
Types of trolleys for the Neva walk-behind tractor
During the operation of Neva walk-behind tractors, four types of trolleys of this trademark emerged . They have certain features:
- AMP single-axle dump truck.
- The chassis trolley is biaxial.
- TPM trailer (modernized).
- Model TPM-M.
Before you buy a trailer for the Neva walk-behind tractor, you need to accurately determine the purpose for which it is being purchased. The main selection parameters are:
- The proportion between the trailer's carrying capacity and the power of the walk-behind tractor, the indicators of which must correspond to each other.
- Motorized units of the Neva line, except for heavy-weight modifications, are endowed with a power of 5.5-7.5 hp.
- For these parameters of motorized units, bodies capable of transporting 250-500 kg are recommended.
- To transport particularly heavy loads, you can use carts carrying up to a thousand kilograms.
A trailer for a walk-behind tractor allows you to use it for transporting goods.
Among the trailers that are made for the adapter, it is better to choose APM:
- This equipment transports cargo weighing up to 250 kg.
- It is equipped with pneumatic tires, thanks to which shaking during driving is not felt.
The ground clearance of 18 cm will not work on difficult roads. Any cart can transport hay, but for heavy loads (bricks, sand, cement) it is better to use the “VRM3”, which is capable of transporting 400 kg. It can easily deliver heavy equipment for field work to your garden plot or dacha. An adapter is not needed for it, since it is attached directly to the gearbox shafts.
Neva brand trolleys have a universal coupling that will allow them to connect to many self-propelled mechanisms of any brand.
Factory sides
The ready-made solution in the form of extending the sides of a passenger car trailer differs for the models for which it is provided, as well as in height, material and sheet thickness. The competitive qualities of this option over homemade products are:
- The quality of the material and design in general.
- Optimality and compliance of sizes.
- Warranty period from the supplier or manufacturer.
- Easy to install and dismantle.
- Attractive view.
- Compliance with installed trailer models.
- No need for long-term work.
Video instructions for installing additional sides on the “Krepysh” trailer
How to increase the sides of a passenger trailer, using what materials, is up to you. The main thing is to accurately assess capabilities, cost, time and quality. The rest depends on the caravan model. However, before starting any modifications, it is important to consult with a professional or look up recommendations from knowledgeable drivers on the Internet.
Photos and descriptions of interesting options
DIYers have already come up with a considerable number of original trailer options. Perhaps one of the following will suit you as a sample.
The small dump truck has small wheels, a simple frame design and no brakes. At the same time, making a tipping trailer is not at all difficult; you just need to provide turning hinges and provide for fixing the body when moving.
A two-axis option is also possible. Such a trolley is suitable for transporting heavy and bulky cargo paired with a powerful walk-behind tractor; in this case, a rotating mechanism for the front axle is required and a braking system will obviously not be superfluous.
It is very smart to use part of the structure from a heavy motorcycle. In this case, a soft suspension with springs and shock absorbers is provided. The wheels of the motorcycle are light in weight and fit well with the load. A luxurious car seat increases the comfort of movement.
Seeing a wide bench, it’s hard to resist saying: “Give us a ride on your tractor, Petrusha.” If two people are going to use the walk-behind tractor, of course, you should provide appropriate seating.
READ How much oil is needed in a walk-behind tractor gearbox
If you have to transport hay, you should provide high sides. To do this, you need nests along the perimeter of the sides.
Just like a mining dump truck, not a trolley for a walk-behind tractor. However, the powerful water-cooled engine allows for the transportation of large amounts of soil.
This unsightly-looking option seemed the most practical. The loading platform is located low, which makes loading easier and increases the trailer's stability when driving. Suspension with springs and shock absorbers plus a car seat promise comfort to the driver of the motor vehicle. In general, if not a Mercedes, then it will definitely be a cool bike.
TRAILER FOR MOTORBLOCK AND MOTOR SCOOTER ANT
Probably, such a car is not even a “Zaporozhets”?! At least he has a trunk in front, but here, where should I put the cargo? The owner will have to sit on a pile of sand...
We decide on the dimensions and prepare homemade drawings
Trolley for walk-behind tractor
- this is a serious matter, so you should start with the drawings. It is clear that each homemaker chooses his own solutions, but the dimensions of existing products will clearly help.
These drawings can be used to build a medium-sized trailer with a rigid suspension. In this case, a body made of boards is assumed.
This drawing will help you make the trailer frame shown above. Typically, a profile pipe with a cross section of 25x25 mm or 20x40 mm is used for these purposes.
This diagram illustrates the parameters of a trailer with a lift. A telescopic stop can be easily made from two pipes of different diameters inserted into each other. There is a protrusion on the frame that secures the front part of the body from lateral movements while driving. The support under the drawbar ensures horizontal fixation of the trailer.
This drawing will help you make a simple structure with a flat loading platform. Light trailer
It can be made from a profile pipe with a cross-section of 20x20 mm or a corner 45x45 mm.
It is convenient to use the trailer suspension from the Ant
"or make the same one yourself. Two independent levers on silent blocks plus shock absorbers with springs will ensure a highly smooth ride.
Another drawing of a trailer with soft suspension. In this case, it is assumed that a torsion bar suspension from a motorized stroller or “Zaporozhets” will be used. Let me note that, regardless of what design you choose, you need to prepare at least a simple sketch of the frame with dimensions. This will help avoid mistakes, material damage and wasted time.
see also
Comments 13
Hello! Happy past! Is the onboard profile proposal still relevant? If yes, send me the price tag in a private message. Second question, (I still haven’t found what topic to ask in) will we make a trailer based on a photo?
what a good article! I really needed the dimensions of the aluminum board. Here’s another drawing of the hinges and fastenings for it, as well as the locking mechanisms...
the price of one side with a height of 400mm and a length of 2600mm as in the first picture-drawing?
Very informative. And I’ve been scratching my head about what to make new sides for a pickup truck out of? From what has been written it follows that I can order the panels I need in height and length for subsequent self-assembly? What about vertical posts, hinges and locks?
You can order everything. The main thing is to decide whether to take everything ready-made (standard) or order according to your own drawings (sketches)
I would like maximum unification with standard products. because The body is planned to be made from scratch, then I would like to design it for ready-made components.
Ready-made components (racks) are available from MZSA for galvanized sides (just the last photo with a trailer) Or take stands for aluminum sides. Hinges and latches can be purchased separately.
Is the canvas for this MSZ in the last photo available for sale? without frame
Only framed and with locks
Very good review. Thank you.
Thank you! Your question prompted the review!)
I’ll tell you honestly, in my projects, the most important thing is the sides of the trailer, from them I lead the entire project. I don’t even look at the axles of the trailer and its tonnage; the side of the trailer is important to me. I attach both the entire body and its trim to the sides of the trailer. I do the entire “technical” department for the sides of the trailer. And when considering the “technical” department, the height is very important and the higher the side height, the more opportunities there are for the final part of the entire trailer structure. The side of the trailer is also important. like the entire trailer design, at least in my versions. The side of the trailer is 100 percent trailer efficiency, no matter how pompous it sounds.
Great binding! You have a serious approach and acumen!
When choosing before purchasing or while using a trailer, drivers think about its functionality and ability to perform certain types of work. And therefore it is natural that today we will discuss the equipment for this trailed vehicle. Namely, the sides for a passenger trailer. What types exist, what are they made of, how to extend the sides of a trailer.
Types of boards
The first question we will raise is the manufacturing materials used to create extension structures. And also their differences. So, in the basic classification there are:
- Aluminum with stainless steel. It is good for extension sides because, according to its technical characteristics, it is durable and does not rust. Although the weak side of this material, which reduces its popularity, is the high price.
Which material is best for a caravan is up to the driver to decide, because they are all good in different situations. The main thing is not to overdo it with savings, so that later it does not become a disappointment.
If we talk about the variety of passenger trailers, it is important to say that homemade ones are popular due to their low cost. Although the weak side of this type of design is the complexity of assembly. However, one way or another, it is first important to determine the model of the trailer you are going to work with. And if you doubt your own abilities or lack the ability to work independently, contact the professionals of companies such as Kurgan Trailer, MZSA. Read this article about what to look for when choosing a trailer for a car trailer.
Popular extension methods
Why did they even come up with extending the sides? It's simple. This is required to increase the capacity of the trailer's cargo platform.
This modification completely justifies itself, since the carrying capacity is designed for a larger amount of cargo than the owner can transport with the current sides. Elementary calculations have shown that when increasing by just 40 centimeters, the internal usable space immediately increases by 70%. And this is the minimum indicator. That is, the possibilities of the car owner and the owner of the trailer will expand significantly. Therefore, it’s worth thinking about whether it’s time for you to start expanding the design of your standard trailer.
Motorcycle dog and caracat
Anyone who has had the chance to ride an imported motorized towing vehicle will probably see in its design a lot of similarities with a conventional walk-behind tractor. Almost the same front traction unit with the engine, a similar method of transmitting torque, similar controls on the steering wheel. The only thing missing is rubber tracks, with the help of which the motorized dog will pull the sled and rider across the snowy field.
When realizing their dream of a motorized towing vehicle, avid fishermen and hunters can go in two ways: buy a ready-made snowmobile attachment or make it yourself.
Today, tracked attachments for almost all types of walk-behind tractors (Neva, Salyut, Agat, Favorit, Cascade, Forza, etc.) are produced on an industrial scale. The price of this unit is quite high (about 30 thousand rubles).
Therefore, anyone who is trying to save money and at the same time is well acquainted with the caterpillar undercarriage structure can make it and ski sleds themselves. To do this, you need to weld a strong frame on which the engine and steering wheel, chassis and driven sprockets, as well as two intermediate shafts with rubber rollers will be placed.
Speaking about what can be made from a walk-behind tractor, it is worth mentioning such an interesting homemade product as a karakat. The strength of this car is in its huge wheels, which are ordinary inner tubes, tightened with strong belts.
Sometimes truck tires are used to make ultra-low pressure tires. They are lightened by carefully cutting out part of the surface with an electric jigsaw, leaving only part of the bead and lug tread pattern.
Homemade rims are installed on the karakat from a walk-behind tractor, modifying and expanding standard car rims. You can also put a very original wheel on a lightweight walk-behind tractor. To do this, two aluminum basins are welded along the contour, the bottom is cut out to fit the size of the hub, and they are equipped with stiffening ribs and side stops for fixing the camera.
Despite its external clumsiness, the carakat based on a walk-behind tractor is surprisingly passable and stable. It not only easily overcomes swampy lowlands, but is also capable of carrying quite a significant load (up to 100 kg).
The seating position in a home-made SUV remains traditional “motoblock”, and not motorcycle-like as in a “quad”. There is no need to make rims for this ATV yourself. You can use standard ones from any passenger car, designed to install wide-profile “mud” tires.
There are no similar posts