Blade for tractor MTZ-82: Choosing the right one
Features of using tractor dumps.
Information on how to make a blade yourself. Tractor dumps are mounted working tools, the use of which can significantly expand the functionality of modern tractors, making them more efficient and versatile. The scope of application of such units is unusually wide, and today we will talk about what a blade on a tractor is, what it comes in and how to make it with your own hands.
Tractor dumps - design and distinctive characteristics
The design of the unit on MTZ tractors consists of the following elements:
- Directly from the dump itself;
- Push type frames;
- Additional frames;
- Mounting systems;
- Hydraulic cylinder;
- Shock absorber groups;
- Spacer beams.
The device is mounted on the front of the tractor, with it attached directly to the frame. The turning mechanism is installed so that it is at an angle not exceeding 300 degrees relative to the tractor axis. Depending on the variation, the front blade can be designed with either hydraulic or mechanical rotation. The unit is raised and lowered using a tractor hydraulic system. As an additional option, the mechanism can be equipped with a rubber pad or a reinforced frame attachment.
Types and their design features
A blade for a mini-tractor is a type of additional attachment that looks like a bucket. Despite the same purpose - to remove snow cover, the shovel comes in several varieties.
Front
This version of the hitch has a hydraulic cylinder in its design, thanks to which the unit is started. Such equipment fulfills the purpose of a bulldozer, as it has a front linkage. The mini-tractor is heavy, so when starting the shovel, some difficulties may arise during transportation. A mini-tractor with a front-type blade is characterized by maneuverability and high-quality hydraulics. Using this unit, you can clear snow, level paths, and level areas. The front blade is mounted in a special place provided by the design of the tractor.
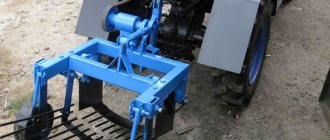
Rear-mounted
The grader type of equipment is defined as rear-mounted. The starting process takes place using the rear linkage. The unit is characterized by the presence of a rotating mechanism and hubs. Rear-mounted equipment can be connected to any brand of mini tractors. Fastening occurs thanks to a three-point fastening system.
Unlike the previous option, this type of hitch does not have a hydraulic cylinder. Snow areas are cleared by reversing the machine. The equipment is made from high-quality materials, so it can perform the most complex tasks. The rear-mounted blade for a mini-tractor is used in agriculture and utilities. With the help of such equipment you can take care of parking areas, areas near schools and others.
The main characteristics of dumps for mini-tractors of various models are as follows:
- weight, which ranges from 65 to 105 kg;
- width – from 1, 2 to 2 meters;
- power unit, which can be no less than 16 horsepower.
Variety of choices – the optimal solution for any type of work
Considering the variety on the market, it is worth noting that a modern tractor blade can be classified as follows:
- Municipal - has a lightweight design and is used for cleaning work on a wide variety of areas and territories with hard surfaces, as well as for the improvement of livestock complexes and grain drains;
- Bulldozer - has a high metal consumption and is used when carrying out planning, construction and road work, as well as cleaning the territory, effectively dealing with bulk and small lump materials;
- Snow plow - equipped in the lower part with a technical plate on a rubberized base that does not spoil the road surface. This type is used for minor planning work or for clearing the area of freshly fallen snow.
Do-it-yourself tractor blade - what you need to know
You can make the device at home. To do this you will need:
- Welder;
- Scissors or metal cutter;
- Set of wrenches.
As for the material, you should stock up in advance on sheets of metal, thick beams, a hydraulic cylinder, swivel joints and metal pipes (about 100 mm in diameter). Well, everything is ready, let's move on to the manufacturing process. We assemble a homemade blade in the following order:
- We form two brackets, connecting them to the transverse beam and securing the resulting structure with bolts;
- We weld steel plates to the brackets, placing them with a hinge joint and stiffening ribs at the bottom;
- We place the connection of a triangular configuration on the hinges and fasten it to the tractor frame;
- We screw a hinge onto the beam with brackets for subsequent installation of a hydraulic cylinder on it;
- We form a half-frame, narrowing it closer to the blade. We install a hinge on each of the beams on the outer side. We attach the blade itself to them;
- We place hydraulic cylinders parallel to the subframe. If a rigid mount is planned, we install two pipes instead, welding them to the half-frame and blade. Additionally, we also weld the central axes. That's it, the work is completed.
Conclusion
A tractor blade is an extremely effective device that is absolutely indispensable when performing a number of jobs in a wide variety of industries. The introduction of such mechanisms makes it possible to increase labor productivity, reducing costs and reducing the time required to complete assigned tasks.
Tractor blade design
Blade design for a tractor.
The blade installed on the MTZ-82 tractor consists of the following components:
- working shovel;
- push-type frame;
- auxiliary frames;
- hanging system;
- hydraulic cylinder;
- spacer beam;
- shock-absorbing system.
The equipment is installed on the front part of the power unit with direct attachment to the frame. The rotating mechanism of the blade is designed in such a way that it is at an angle of no more than 30˚ relative to the tractor axis. Depending on the design, the front shovel can be made with either a hydraulic or mechanical rotating device. Raising and lowering a homemade snow plow is carried out using the MTZ-82 hydraulic system, and as an addition, the shovel can be equipped with a reinforced frame hitch or a rubber pad on the working edge.
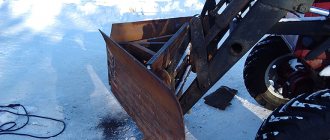
Advantages of using a pusher:
The massive, reinforced structure ensures the reliability of the structure and is designed in such a way that it is not afraid of impact loads (when encountering stumps)
Most of the components and mechanisms of the tractor are blocked by the pusher cloth from sharp branches and twigs.
Preparation and operation of the pusher
The pusher is shipped by the manufacturer fully assembled and complete.
The blade is aggregated with MTZ-82 tractors of all modifications. Attached to the front linkage of the tractor.
You can buy a pusher blade from us without overpayments, because we are a manufacturing company.
Types of blades for the MTZ tractor
Utility blade for MTZ tractor.
Taking a closer look at the attachments on the market, tractor blades can be classified as follows:
- Communal. The equipment has a lightweight design and is mainly used for waste collection in areas and hard-surfaced areas, as well as for the improvement of grain drains and livestock farms.
- Bulldozer. The device installed on the MTZ-82 tractor is used for road, construction and planning work, as well as for cleaning industrial areas.
- Snow removal. The lower working part of the blade is equipped with a rubberized technical plate to prevent damage to the road surface. Such equipment is used for snow removal, as well as for minor site leveling work.
How to use?
People who have become owners of a mini-tractor and a blade should know how to use it correctly. The front and rear type blades are characterized by certain features, as well as operational features. After purchasing a blade, it should be installed on the machine, using specially designed fasteners. After this, it is necessary to set the angle of work. If you need to clean roads, it is worth installing an acute angle. When removing snow cover over a large area, it is necessary to establish a right angle. After all the above activities, you can start removing snow.
Important! A purchased blade, just like a homemade one, requires some knowledge and skills when using it. For the attachment to function properly, it is necessary to use it responsibly, otherwise user injury or damage to the device may occur.
It is worth paying attention to the following safety rules when using a mini-tractor with a blade:
- the use of attachments must be carried out in accordance with its intended purpose;
- During operation, it is necessary to monitor the functioning of the blade;
- If the blade is filled with snow while driving, it must be kept lowered.
Homemade blade for MTZ-82
Do-it-yourself blade for the MTZ-82 tractor.
With a competent approach to creating a snow shovel with your own hands and following all the instructions, homemade equipment has a large number of advantages:
- with independent selection of materials and parts, subsequently such a device can be easily maintained and repaired, and, if necessary, improved;
- the ability to select optimal sizes for the blade;
- using scrap materials and parts, you can make a blade that will cost much less than the factory version;
- A large number of attachments offered on the Internet are manufactured independently, and therefore, with a minimum of tools, drawings and materials, you can make a blade no worse than factory products.
However, this shovel also has some disadvantages:
- if the MTZ-82 tractor or home-made attachments break down, warranty service is not provided and you will have to solve the problem yourself;
- If there is an error in choosing the dimensions for a homemade blade, significant overload of the tractor is possible, which will lead to serious damage to the unit.
Features of a blade for a walk-behind tractor
Snow plows, which are combined with cultivators, walk-behind tractors, ATVs and other small equipment, are indispensable not only in areas with cold and snowy winters (and these occupy most of the territory of Russia), but also as garbage collectors and devices for leveling land. The design of this device includes a working part (the shovel itself), a mechanism for adjusting turns, as well as a unit that secures the blade to the walk-behind tractor.
Many manufacturers of small agricultural equipment offer various models of snow removal equipment in their range. By far the easiest way to own a snow blower is to buy one. However, if you have drawings and an assembly diagram for a walk-behind tractor, you can do it yourself. Various modifications of dumps have been invented, but the design and principle of operation are identical for all of them.
In this video we will look at homemade shovels for a walk-behind tractor:
Required materials and tools
Before you begin selecting materials and creating a blade for the MTZ-82 tractor shown in the photo, you should first draw up a plan and drawings that can easily be found on the Internet. To select the optimal dimensions and weight of the equipment, you should take into account what materials you decide to use, as well as the power and weight of the power unit.
Important! To avoid mistakes, it is best to look at the equipment on the market and simply copy the blade with the optimal parameters.
To make a snow shovel for the MTZ-82 tractor with your own hands, you need a minimum set of tools, namely:
- measuring instruments;
- hand-held electric drill;
- welding machine;
- set of drills;
- bolts;
- steel beams or pipes with a diameter of more than 70 mm;
- shock absorbers;
- set of wrenches;
- hydraulic cylinders;
- metal cutter or scissors;
- Bulgarian;
- steel sheet with a thickness of at least 8 mm;
- rubber strip.
However, in addition to tools, certain skills in working with metal and welding are required.
As for materials, the most basic is sheet metal, which will be used for the frame of the unit and the blade itself. Dimensions should be calculated in accordance with the likely maximum loads, or dimensions can be copied from existing factory models.
To make a half-frame, you will need two thick metal beams, six hinge-type joints and one hydraulic cylinder. You will also need two pieces of metal pipe of the appropriate size and a diameter of about 100 mm, and four more swivel joints. But, if you are planning a homemade rotary blade, then instead of metal pipes you will need two more hydraulic cylinders. This will make it possible to control the rotation of the grader and expand its functionality.
Universal mounted bucket
A homemade KUHN for a mini tractor is one of the types of front loaders. It is indispensable when you need to transport or load large volumes of bulk (and other) materials, such as sand, crushed stone or grain.
The mini tractor itself differs in size from a full-fledged tractor. Using a bucket allows you to turn a simple tractor into a universal vehicle for a wide variety of types of work.
Front loaders have a number of advantages:
- easy maintenance;
- reliability;
- ease of installation and dismantling of equipment;
- serious load capacity for a small-sized tractor;
- ease of control due to enhanced hydraulics.
Making a ladle
You can buy a bucket for a mini tractor at any hardware store, but this is not the cheapest pleasure, so it’s easier to make it yourself. You don't need any special knowledge or materials here. To work, you need to stock up on drawings, a grinder, a welding machine and the material itself.
- First you need to make the fasteners. It is welded to the box and engine, and a metal corner is welded underneath for reinforcement.
- The KUN itself is made from pieces of sheet metal. There is no point in bending the sheet to fit the shape of the ladle. It is much easier to cut rectangles of the required size and weld them together to form a ladle. The durability of the product depends on the quality of the seams. It is better to use pipes with a diameter of 100 mm for racks, and 50 mm for rods.
- The next stage is the installation of the hydraulic booster. For greater mobility, it is recommended to use a pipe with a diameter of 30 mm (it should not be more than 50 mm, otherwise the pipes will not move well inside each other).
- Now the support is welded to the front of the tractor and combined with the racks; gussets are used for reinforcement.
- A cylinder is used to control the rotation of the bucket. It is usually installed to the right of the bucket.
Safety precautions when working with a bucket
Making a bucket for a mini tractor is not very difficult, the main thing is to have knowledge and experience in working with welding, and be able to work with drawings. In order for the attachments to work correctly, you need to approach the work responsibly and do everything strictly according to plan, otherwise the result may not meet expectations, and the mini tractor itself with KUN will pose a danger to the operator.
To ensure safety during operation, you should follow the operating rules:
- KUN can be used only for its intended purpose;
- When working, you should carefully monitor the bucket;
- When driving with a loaded bucket, you need to keep it lowered, that is, near the ground.
Assembly of the structure
To create a grader on the MTZ-82, as shown in the photo, you will need steel about 8 mm thick and metal pipes with a diameter of at least 70 mm. The steel sheet is cut lengthwise closer to the edge, approximately 1/3 from the center. This will give the blade the optimal shape.
As for the width of the shovel, everyone is guided by their own preferences. Although there is one requirement - the blade should not protrude beyond the outer limits of the tractor by more than 400 mm on each side.
In order to install a tractor blade with your own hands, you must follow the following instructions:
- First you need to create two supports that will be connected by a metal cross member. This structure will be secured to the side members by means of a bolted connection. It is also necessary to weld plates with a stiffener and a hinge joint at the bottom to the supports.
- A triangular link is installed at the point where the hinges are attached by means of a welded joint, which is fixed at the bottom of the tractor frame. This will significantly increase the stability of the shovel. A hinge must be welded in front to the transverse beam that connects the supports, which is subsequently connected to the hydraulic cylinder.
- Afterwards, a semi-frame in the shape of a triangle is welded from two beams, and the lifting hydraulic cylinder of the tractor blade is attached to the top of it. One hinge is installed in the middle of both beams on the outer side.
- The grader is installed and fixed on the semi-frame using two hinges. The first hinge should be located at the level of the hydraulic cylinder mounting, and the second should be on a special support located 20 cm higher.
- Now you need to install and secure the hydraulic cylinders, which should preferably be positioned parallel to the subframe, since the maximum load will fall on the lower part of the blade. The blade is divided into two parts with the center on hinges located on the semi-frame. On each half, a mount for hydraulic cylinders is installed 1/3 from the center.
If you do not plan to change the position of the grader, then instead of hydraulic cylinders you can use two pipes, rigidly welded to the shovel and half-frame at the points where the hinges are attached.
Front loader
A homemade loader consists of three main elements:
- ladle;
- hydraulic lifting mechanism;
- bucket mounting and control system.
Important! When making a loader for a mini tractor with your own hands, you need to make sure that the weight of the hitch matches the weight of the tractor itself. Otherwise, when loaded, the loaded bucket may overweight the tractor and cause injury.
First of all, you should make a bucket. This is not the hardest task. It is welded from pieces of metal plates, the thickness of which should not be less than 6 mm. Triangles are welded on the sides to cover the sides of the bucket. Weld special ridges longitudinally to the lower part, which will facilitate the capture of materials.
The second stage of front loader assembly is the hydraulic lift system. To make it you will need 4 levers, a boom and 4 hydraulic lifts. It is better to immediately purchase ready-made lifts. A square pipe with the required cross-section is suitable for the levers, and a U-shaped channel can be used for the boom. On one side it is connected to the bucket, and on the other to the mini tractor.
In addition, various connecting elements will be needed. When assembling, you need to correctly calculate the center of gravity, otherwise, when working with a front loader, the equipment may tip over.
In the figure: 1 - bucket, 2 - levers, 4 - boom, 5 and 6 - hydraulic lifts, 7 - attachment to the tractor, 3 - position of the front wheel (the center of gravity should be here).
When assembling any mounted unit, the most important point is to comply with all proportions; deviation from the plan can lead to bad consequences.
Types of tractor blades
Plows for tractors, including Belarus (MTZ) tractors, are designed to move various materials: soil, garbage, snow masses.
According to their purpose, dumps are divided into utility dumps and bulldozer dumps .
Municipal dumps are intended for municipal work, namely: cleaning areas from snow, garbage and other similar masses. At the base of the blade there is a rubber knife (technical plate). The technical plate protects the blade from impacts when hitting hard objects and uneven surfaces. The technical plate is a consumable material that, in case of damage or wear, is easily replaced, thereby increasing the service life of the blade. The cost of the technical plate itself is small.
According to the method of rotation, municipal dumps are divided into two groups: with mechanical rotation and with hydraulic:
1) Rotation of the mechanical blade must be done manually. That is, to move the blade to the desired position manually and secure it in this position using a locking element, the tractor driver needs to get out and manually turn the blade. 2) The utility blade with hydraulic rotation rotates under the influence of hydraulic oil flow and does not force the driver to leave the tractor cabin. Also, such blades are equipped with springs that compensate for contact with unevenness, when the rubber knife (technical plate) is unable to take the blow and contain it.
Dozer blades are more durable than utility blades and are designed to handle denser materials. At the base of the bulldozer blade there are iron knives made of high-strength carbide metals, which can also be easily replaced in case of wear. The service life of metal knives is much longer than that of rubber knives. According to the method of digging, bulldozer blades are divided into straight (non-rotating) and rigid (RC). Also bulldozer blades have a network with mechanical rotation and hydraulic rotation, similar to a municipal blade.
Features and purpose
A blade for a mini-tractor is a necessary piece of equipment, the use of which is aimed at removing snow and cleaning the area during the cold season. And also with the help of a blade you can transport bulk materials without much effort. By connecting this equipment to the unit, the work can be completed within a few minutes. Procedures without dumps take several hours. A shovel for a mini-tractor can not only be purchased, but also made with your own hands, which helps save money, as well as convenient and comfortable work. You simply cannot do without a blade in the winter season, when it is impossible to leave the yard due to snow cover. In order not to waste time manually cleaning the road, you can use this attachment for the unit.
Snow dumps have the following components:
Thanks to its rigid design, the blade can cope not only with snow of a loose consistency, but also with compacted cover and ice. Models equipped with a mechanical swing do not require a hydraulic line on the loader.
The equipment is protected from collision thanks to an additional rotation axis with a spring block. Thus, when hitting an obstacle, the blade deviates and jumps over it.
Advantages of the MTZ-82 bulldozer
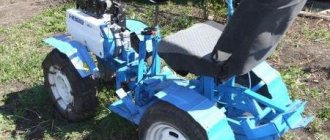
For many private owners and enterprises, MTZ-82 tractors are an indispensable, economical option when carrying out many types of work: municipal, construction, agricultural, etc. This special equipment has been popular for many years due to its operational functionality, versatility, endurance, ease of use and at the same time low cost.
The MTZ-82 model is well suited for installing many types of attachments. Some of them are made independently in order to save money. You can create a homemade blade based on an MTZ tractor if you have professional skills in working with metals and a list of readily available materials and tools.
Types, advantages and disadvantages of homemade dumps
The design of the tractor blade should be selected depending on the planned work. There are several types of dumps for tractors:
- Communal. It has a lightweight form because it is used mainly for cleaning hard-surfaced areas from various debris, as well as for landscaping livestock farms and other facilities.
- Bulldozer. It is used not only for cleaning areas, but also during various construction works - road construction, planning areas where leveling and removal of the top layer of soil is required.
- Snow removal. The design is similar to the communal type, only a technical rubberized plate is installed on the working part of the blade to avoid damage to road surfaces.
Advantages of homemade dumps for the MTZ tractor:
- much cheaper than factory options;
- independent selection of the most suitable materials and parts;
- selection of optimal dimensions of the bulldozer design.
- if the blade size is inappropriate, the bulldozer is overloaded, leading to serious damage;
- lack of warranty service.
Purchased or homemade snow shovel
A snow shovel, designed for mounting on a walk-behind tractor, is a mounted iron blade in the form of a bucket or an arched shovel, and consists of three elements:
- Base;
- Attachment point;
- Shovel rotation angle regulator.
The principle of operation of such a snow blower is to mount it on a tractor - mechanical or automated, in the case described in the article - on a walk-behind tractor.
Shovel with fastening mechanism
The factory equipment of the snow plow includes the following elements:
- A bucket (shovel, blade) attached to the base of the electric motor;
- Handle for height adjustment, often telescopic;
- Electric motor located under the body, with attachments for attachments.
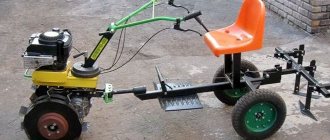
Walk-behind tractor with lug-mounted blade
The nozzles that are equipped with factory models of snow-throwing devices can be made in the form of corded rubber plates, as well as metal knives. Such devices, mounted on the lower wide edge of the blade, efficiently remove snow and level the ground. They can be made and mounted on a homemade snow blower on your own.
The design allows for variations in blade angle rotation:
- 30º to the left;
- 30º to the right;
- no turning (forward only).
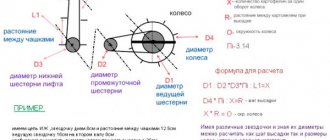
Changing the angle of rotation ensures that the shovel is fixed in this position using an L-shaped fastening, which increases the convenience of clearing snow.
Required materials and tools
The following materials will be required:
- sheet metal 8 mm thick is the main material needed to create the working part (shovel), as well as the frame;
- thick metal beams (2 pcs.), articulated joints (6 pcs.), hydraulic cylinder (1 pc.) - for the half-frame;
- metal pipes Ø 100 mm (2 pcs.), swivel joints (4 pcs.) - for installing a fixed structure;
- To make a rotating blade, you will need two hydraulic cylinders.
Minimum list of tools:
- hand electric drill;
- welding machine;
- measuring instruments;
- set of wrenches;
- drills (set);
- shock absorbers;
- bolts;
- Bulgarian;
- metal cutter;
- rubber strip (for snow removal).
Step-by-step assembly of the structure
Rotary blade assembly sequence:
- To make the main part of the bulldozer, a steel sheet of the required blade size is cut out, and then it is given the optimal shape. The width of the shovel should not exceed the dimensions of the tractor by more than 400 mm on each of the two sides.
- Two supports are created , to which stiffening ribs from plates are welded, and a hinge joint is installed at the bottom. The supports will be connected to the cross beam, and the entire structure will be bolted to the side members. A hinge is welded to the front of the beam for attaching the hydraulic cylinder.
- A triangular semi-frame is made from two beams , on top of which a lifting hydraulic cylinder is installed. On the outer sides of the beams, in the middle of each, one hinge is attached.
- The shovel is connected to the half-frame with two hinges. The first hinge is installed at the level of the hydraulic cylinder, and the second is 200 mm higher on a special support.
- Hydraulic cylinders are installed parallel to the subframe. Attachments for them are made to the blade at a distance of 1/3 from the center on both sides. Rotating the blade provides greater functionality to the bulldozer.
A simpler method, if the bulldozer does not require adjustment of the blade position, is a fixed mount, when instead of hydraulic cylinders, two pipes are welded to the blade on the frame.
Excavator bucket
You can make a mounted excavator on a mini tractor by analogy with a front loader. The fundamental difference is the shape of the bucket, as well as the boom, which will consist of two parts.
To make the boom, you will need two square metal pipes connected to each other in the shape of the letter L. The pipe on which the bucket will be attached must be longer than the pipe attached to the tractor. A hydraulic lift is connected to the protrusion located on top - it will move the boom on which the bucket is attached. The second lift ensures the movement of the boom attached to the mini tractor. The third is responsible for the movement of the bucket itself. It can be made stationary, but for greater efficiency during excavation work you need to be able to control not only the booms, but also the bucket.
The figure shows an approximate size calculation; each specific case uses its own. Thick black lines are hydraulic lifts.
The bucket itself differs from the front loader in size - it must be narrower and stronger, since it will have to blast the ground. For manufacturing, you can use sheet metal with a thickness of 6 mm; it is important to firmly weld the pins to loosen the earth. In general, this unit should be more massive, unlike a loader bucket.