Parking brake GAZ
Useful tips for do-it-yourself car repairs.
Recommendations from car service specialists and experienced car owners.
Useful tips on car repairs for ordinary drivers and professionals. All the necessary information about repairing and maintaining your car is available in e-books
and
regular printed publications
. Electronic manuals are convenient to use on a computer, smartphone or tablet. They will always be at your fingertips.
Parking brake GAZ-3307 (GAZ-53) with D-240 and ZIL gearbox.
Parking brake on a GAZ-3307 conversion, GAZ-53 on a conversion with a D-240 engine and a ZIL gearbox. How I did it.
Hand brake gas 3309
Modernization of the hand brake which has more effect.
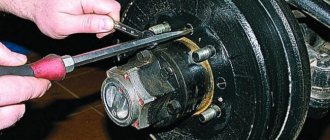
How to change the brake pads on a GAZ 3307/53
Assembling the handbrake pads and adjusting the handbrake
.
Repair of the handbrake GAZ 66, final preparations for the battle Ural versus GAZ 66
https://vk.com/customtruckyoutube Contact email [email protected]
#14. Got a job, first trip. Repair of the parking brake on GAZ-3309.
Parking Brake, Handbrake, Scissor, Electric Handbrake
In this video I’ll tell you about the parking brake, there are three types: handbrake, scissor and electronic handbrake, I’ll tell you...
Volga 31105 Handbrake.
More than a month has passed since installing the rear brake pads, I tightened the parking brake...
Handbrake adjustment
1. Check whether the handbrake lever is released. 2. Place the car on a lift so that...
Gas 24 new pads, but the handbrake does not work?
GAZ 21 Secrets of the handbrake bulkhead. Everything is very clear
In this video I assemble the inside of a handbrake with a sequential description of the actions. Everything is maximum...
Watch the video "GAZ parking brake".
We share our experience of car repair. A large selection of video clips on the topic “GAZ parking brake”.
You will find more detailed information about repairing and maintaining your car in
e-books
and
regular printed publications
.
For those who are accustomed to using regular printed publications, we recommend buying car repair manuals in the online store of the Legion-Avtodata publishing house
Automotive literature stores:
krutilvertel
— Electronic books of printing quality in PDF format
autodata
— Online store of the publishing house Legion-Avtodata
Reviews about GAZ-3309
This page contains a list of the latest (new) reviews from GAZ-3309 owners, as well as the opinions and comments of visitors who are not indifferent to this technology.
I have been working on a GAZ-3309 2004 for 6 years. Mileage – 510 thousand km. There are a lot of problems with the car. If there was an opportunity, I would move to another one or even change my profession.
The brakes are bad, especially in winter (the fluid freezes). Almost every other day you have to install the brake pads and handbrake. It’s the same with the steering - I drive normally only with an empty body in the summer, but in winter it freezes and stops listening.
When you drive, the cabin is still more or less warm, but when you wait for unloading with the engine running, you can freeze. You cannot adjust the engine temperature while driving. The thermostat is completely useless in winter. If you plug the radiator with cardboard, you can boil the engine in mountainous areas.
The gearbox housing is too weak. The gear ratios are chosen quite well.
The engine is snotty. I constantly have to change the rear crankshaft oil seal. Oil and fuel leak from different places. It is very difficult to start at temperatures below -15 degrees.
The truck is rotting terribly. During operation, I changed the fenders twice along with the headlights.
Electrical equipment is generally a problem. I installed new generators three times, and starters twice.
When it rains, water gets into the cabin. In winter, the back wall is covered with “white moss”. You don’t even have to mention sound and heat insulation.
I am engaged in cargo transportation. Two months ago I picked up an onboard GAZ-3309 2011 model. Extended body – 6 m.
Clutch repair
3307 trucks often operate at maximum loads. A fully loaded car cannot drive in one gear when going uphill, and shifting gears in this mode forces the clutch to work quite hard. In addition, the 3307 gearbox is not synchronized and requires double squeezing when changing from one gear to another. Due to the heavy load on the clutch, it often fails and has to be repaired.
Signs of poor clutch are determined by pedal pressure:
- It fails, the gears cannot be engaged;
- Doesn’t squeeze out completely and sticks up;
- The pedal is too “soft”;
- Large free movement, squeezing occurs at the very end.
There are cases when the pedal pressure is normal, but when the gear is engaged, the car does not move.
Clutch diagram for GAZ 3307
The cause of the malfunction can be almost all clutch parts. Often fail:
- “Basket” and clutch disc;
- Release bearing;
- Master and slave cylinder;
- Clutch fork.
A little more detail about each detail:
- Driven clutch disc. The wear of the disc linings can be determined without removing it from the car. You need to remove the clutch housing tray - and then the disc linings can be seen. Linings that are too thin indicate the need to replace the part. Sometimes the disc hub breaks, and then the car does not move when the gear is engaged. Such a malfunction can also be determined on the spot. Two people need to do the check. One squeezes the clutch with the engine not running, the other moves the disc with a screwdriver. The break will be noticeable by the uneven movement of the disk.
- Clutch drive disc (“basket”). The “basket” of a gasoline engine is claw-type (three legs), the height of the legs is adjusted using nuts. Accuracy is very important here - incorrect adjustment affects the movement of the car: when starting off and when changing gears. The car can:
- twitch at the beginning of movement;
- gears on an unadjusted clutch engage with a crunch;
- the clutch can “drive”, but the car will not move.
- Release bearing with bore. The unit consists of two parts - the hub and the bearing itself. The hub has an oiler - the rubbing surface on which the hub moves is lubricated. The bearing itself must have a lithol type lubricant inside. A dry bearing can jam, and in this case the varnishes of the clutch “basket” will instantly wear out.
- Clutch master and slave cylinders. If the master cylinder fails, the pedal becomes soft (“wobbly”) and the clutch periodically disappears. A faulty slave cylinder usually leaks. You can try changing the cuffs inside the cylinders, but if the parts are old enough, it is better to replace them.
- Release bearing fork (clutch fork). The part is very simple, but its malfunction can most often be seen only when the fork is removed. Three characteristic defects of the part:
- the tips in connection with the release bearing hub are worn out;
- the fork bursts in the area of the swivel joint (“soldier”) or in the place where the rod is attached;
- the fork bends.
Pneumatic handbrake for gas 3309
The rear brakes must be adjusted (see subsection “Adjusting the wheel brakes”).
Lower lever 1 (Fig. 70) to the lowest position, and move the gearbox shift lever to the neutral position.
Raise the rear left wheel using a jack.
Remove plug 3 from the shield. While rotating the wheel, use a screwdriver to turn adjusting screw 4 through the slot in the shield until the wheel slows down, then release the adjusting screw until the wheel rotates freely.
Put the plug in place and lower the wheel.
Adjust the right brake mechanism by following steps 2, 3 and 4.
Move lever 1 one tooth of the locking mechanism.
Select the gaps in the parking brake system drive by rotating nuts 13, tighten the nuts and lower the lever /.
With proper adjustment of the drive, lever 1 should move from a force of 55-60 daN (55-60 kgf) by 15-20 teeth, controlled by clicks.
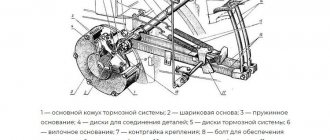
Rice. 70. Parking brake system: 1—lever; 2—front cable; 3—plug; 4—adjusting screw; 5—expanding link; 6—support sleeve; 7—drive lever; 8 and 9—rear cables; 10— equalizer lever; 11—equalizer; 12—bracket; 13—nuts
How to bleed brakes gas 3309 – Special equipment
Hello dear friends! In today's article, we will analyze and get acquainted with the brake system of the Gas 3307 truck. Gas 3307 is equipped with three brake systems: a working main one, acting on all wheels; a spare one is if, say, your rear brakes fail, the front ones remain in working condition, so - like the Gas 3307, the braking system is two-circuit: one circuit for the rear wheels and the second, respectively, for the front wheels.
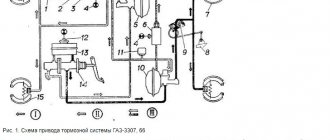
And so, if one circuit fails, the second remains operational, that is, how a spare circuit turns out. And the third system: this is, of course, the parking (hand) brake. On older Gas 3307 models, the parking brake system has a mechanical drive that acts on the drum brake mechanism mounted on the gearbox. ( see Fig. 1. )
Fig.1. Parking brake Gas 3307, old model.
On new Gas 3307 models, they have already begun to install a parking brake that acts on the rear wheels. ( See Fig. 2. ) This design of a parking brake has been used on passenger cars for quite a long time.
But on trucks not so long ago. I’m afraid of course I’ll be wrong, but I’ll say it anyway: they started installing such a parking brake system on Gas 3307 trucks around 2000.
(But if I’m wrong, I apologize, I don’t remember exactly, but it’s not that important).
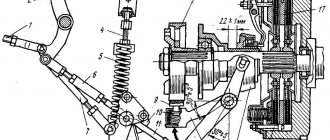
Fig.2. Hand (parking) brake Gas 3307, new model.
1. Lever; 2. Front cable; 3. Plug; 4. Adjustment screw; 5. Expansion link; 6. Support sleeve; 7. Drive lever; 8.9. Rear cables; 10. Equalizer lever; 11. Equalizer; 12. Bracket; 13. Adjusting nut; 14. Lock nut.
It is worth paying special attention to adjusting the parking brake Gas 3307. And it needs to be maintained in working condition. If not adjusted correctly, there may be self-braking or weak braking of the parking brake. There may be different consequences, therefore, it is better to adjust the parking brake in time and correctly.
To adjust the parking brake Gas 3307, you need to do the following. If, when braking with the parking brake system, lever 1 ( see Fig.
2) when a force of 600 N (60 kgf) or more is applied to it, it is fixed on the outermost upper teeth of the sector, then the drive should be adjusted in the following order:
- lower lever 1 to its lowest position and the gearbox lever to neutral;
- completely release the tension of the cables by releasing the adjusting nut 13;
- jack up the rear wheels;
- remove plug 3 in the brake mechanism;
- Using a screwdriver, turning adjusting screw 4 through the slot in the shield, select the gap between the expansion link 5 and the drive lever 7, rotating the wheel forward by hand until it slows down;
- tighten screw 4 until the wheel begins to rotate freely;
- install the plug in the brake mechanism;
- adjust the second wheel in the same sequence;
- move lever 1 by one tooth of the locking mechanism;
- by rotating the adjusting nut 13 of the front cable, tighten the rear cables until one of the wheels begins to brake;
- lower lever 1 to its lowest position and make sure that the rear wheels do not brake;
- lock the adjusting nut 13 with a locknut;
- lower the car onto its wheels.
With a correctly adjusted drive of the parking brake system, the drive lever, when applying a force of 600 N (60 kgf), should move 15-20 teeth of the locking mechanism.
Working brake system of the GAZ-3307 car
The GAZ-3307 vehicle is equipped with a brake drive with a fault signaling system, with separate braking of the axles ( see Fig. 3 ) and having a hydraulic vacuum booster and a vacuum cylinder with a shut-off valve in each circuit.
Fig.3. Diagram of the brake system Gas 3307.
I—vacuum; II—air; III—brake fluid; 1—intake manifold (spider) of the engine; 2—shut-off valve; 3—vacuum cylinder of the front circuit; 4—signalling devices; 5—hydraulic vacuum amplifier of the front circuit; 6—vacuum cylinder of the rear circuit; 7—rear wheel brake mechanism; 8—rear axle housing; 9—pressure regulator; 10—hydrovacuum amplifier of the rear kennel; 11—air filter; 12—sensor for emergency brake fluid level drop; 13—filling tank; 14—main cylinder; 15—front wheel brake mechanism.
Vacuum cylinders provide independent power to each circuit. The vacuum level is monitored by vacuum sensors with red indicators (on the instrument panel) for each circuit. The lighting of one of the indicator lamps indicates insufficient vacuum in the corresponding circuit.
A brake pressure regulator is installed in the hydraulic drive of the brake mechanisms of the rear wheels Gas 3307. Its functions in the event of failure of any of the two circuits are performed by the remaining serviceable circuit (front or rear axle).
At the same time, there is an increase in pedal travel by 90-115 mm. In this case, braking can occur with a gap between the pedal and the cabin floor of 15 mm.
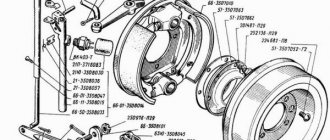
Brake Master Cylinder (Brake Master Cylinder)
Fig.4. Details of GTZ Gas 3307.
I—primary cavity; II—secondary cavity; 1—protective cap; 2—sensor for emergency brake fluid level drop; 3—additional tank; 4—connecting sleeve; 5—tube; 6—tank fitting; 7 and 20—hulls; 8—protective cap; 9—pusher; 10 and 18—pistons; 11—thrust bolt; 12—head sealing ring; 13—cuff; 14—piston head; 15—thrust rod; 16—return spring; 17—primary piston stop; 19—piston head spring; 21—secondary piston stop; 22—valve plate; 23—overpressure valve; 24—fitting.
Brake system GAZ-3309
When performing various repair work, a car enthusiast can be helped by a diagram of the GAZ 3309 diesel brake system, since it has a complex device that can cause difficulties when troubleshooting problems on their own. The brakes of this vehicle allow you to stop the truck quickly and effectively, which improves driving safety.
Diagram of the brake system GAZ-3309 diesel
During the design of such a vehicle, the plant's engineers decided to develop its design almost from scratch, which made it unlike other cars of the automaker. The brake system of the GAZ 3309 deserves special mention, which is radically different from its predecessors.
When studying its structure, it is advisable to identify several categories of basic elements that ensure correct operation. These include:
- worker node;
- parking brake equipment;
- spare system.
All of them are designed to quickly brake the truck or slow down its movement. The pneumatic-hydraulic brakes of this vehicle are reliable, which is especially important for freight vehicles, the braking distance of which is critical when dangerous situations arise on the road.
By working unit we mean the main system, which is constantly used while driving, and the spare one is a reserve in case of failure of the first one.
Brake bleeding technique
Many owners of this car are interested in how to properly bleed the brake system for more efficient operation. This is a pressing problem for many models of domestic trucks, the solution of which requires an integrated approach. You can perform such tuning by following the following instructions:
- Clean the valve mechanisms of the cylinders of each wheel.
- Unscrew the cylinder cover.
- Fill it with the fluid recommended by the manufacturer.
- Bleed the front wheels.
- Remove the brake valve cap, install the hose, and place its other end in a container with brake fluid.
- Unscrew the valve half a turn, then depress the brake pedal several times.
- Screw the valve back and bleed the remaining wheels using a similar method.
When filling brake fluid, it is advisable to remember that its optimal level is 2-3 cm below the maximum recommended level.