Regularly using a brush cutter, its owner may notice an increase in the temperature of the gearbox or the appearance of new uncharacteristic sounds in it that were not heard before. These signs indicate that the mechanism requires lubrication. If you ignore them, after a while new, more significant problems will appear. Thus, without lubrication, gears wear out much faster and soon require replacement. In some cases, the part jams during operation. It is worth understanding that a damaged transmission mechanism can cause damage to other structural parts. It is quite possible to repair the trimmer gearbox and lubricate the part yourself if you know how to carry out such procedures correctly and also have the necessary tools and materials.
Trimmers and chainsaws
A trimmer gearbox (petrol trimmer gearbox, brush cutter gearbox) is a mechanical device located in the lower part of the trimmer (petrol trimmer or brush cutter) and is designed to transmit torque from the engine to the cutting equipment at an angle of 30°, ensuring that the cutting equipment operates in a horizontal plane (parallel to the surface ground), as well as reducing the angular speed and increasing the torque of the output shaft in a ratio of 1:1.40 (for example, if the engine runs at 12 thousand rpm, the knife will rotate at a speed of 8.6 thousand rpm ).
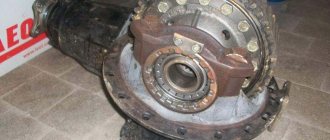
Lower gearbox
Rice. Lower gearbox (bevel) On mowers with a drive to a trimmer with working attachments, an adapter bevel gearbox is provided. Torque transmission occurs through bevel gears. This type of gearbox is produced in two types: serviced and maintenance-free. The name serviceable - the gearbox gets its name from the ability to add lubricant to the working cavity to lubricate the gears. If the gearbox is not maintained, then lubricant is supplied by the manufacturer for the entire service life, and the gearbox itself has a sealed housing. According to the developers of the manufacturer, such measures increase the service life of the gearbox, since contamination does not get inside through leaks in the lubrication hole. The gearbox of a lawn mower is the most loaded part, transmitting force with a change in direction, so proper care and proper lubrication are very important for the unit. What kind of lubricant is needed for the gearbox and repair of the bevel gear with replacement of bearings can be seen in the video below.
Stihl lawn mowers are deservedly popular
Rice. Popular Shtil brushcutter Shtil brushcutters vary in class, engine type and purpose. Designed for caring for small areas to clearing large areas of weeds, shrubs and young trees. In this regard, they are usually divided into classes. The first class includes amateur devices of low power up to 1.2 hp. By design, “Shtil” amateur scythes are produced with a curved rod, which eliminates the lower bevel gearbox from the design, which significantly reduces the cost and maintenance. Brush cutters with a curved bar are designed to work with cutting tools made of fishing line or polymer knives. They are convenient to use in garden plots with small areas.
The second class refers to universal units of average power up to 2.2 hp, intended for field and landscape work. In such designs, a straight rigid shaft is used, which makes it possible to equip this class with steel saw knives for attachments with which you can cut down bushes and small trees. The design provides for a serviceable bevel gearbox. What lubricant to use for the lawnmower gearbox. A special brand name “Shtil” or regular Russian lubricant Litol is used.
Engines from 6.3 to 8 hp are intended for professional use in forestry or gardening. Their name is brush cutters, these are the most powerful brush cutters for working over large areas, cutting down small bushes and trees. The arsenal of working tools includes saw blades for cleaning bushes with a diameter of up to 7 cm. Brush cutters are equipped with an anti-vibration system, which makes working with such a tool more comfortable. What kind of lubricant to lubricate the gearbox of lawn mowers with powerful drive mechanisms? The gearbox of the Shtil lawn mower is lubricated with a special branded or Shtil lubricant or Russian-made Litol 24.
Possible malfunctions of the trimmer gearbox, lawn mower gearbox, and lawn mower gearbox
- Malfunction - the trimmer gearbox gets very hot. The malfunction of the lawn mower gearbox and the lawn mower gearbox is the same as that of the trimmer. The causes of the malfunction are the lack of lubrication in the gearbox, unsuitable lubrication, or the new gearbox not being run in (when the parts have not yet been ground in). Do-it-yourself trimmer repair PrivatBank in Kremenchug.
- malfunction - knocking, play and jamming when rotating the trimmer gearbox shaft, brushcutter gearbox or lawn mower gearbox. The cause of the malfunction is the destruction of one of the bearings in the trimmer gearbox due to lack of lubrication in the gearbox, inappropriate lubrication, harsh operating conditions of the trimmer, damage to the boots on the bearings during their installation. repair - order bearings from the dealer and replace them (there are two or three sealed bearings) - for more details, see below “How to disassemble a trimmer gearbox / lawn mower gearbox / brush cutter gearbox.”
- malfunction - the gearbox wobbles or falls off the trimmer pipe. The cause of the malfunction is mechanical damage to the gearbox housing - for example, if a piece of the housing breaks off due to a strong blow with a knife on heavy metal or stone (or if the gearbox housing is damaged, for example, with a hammer during repairs). repair - replace the gearbox housing. Or, if a small piece breaks off, make a metal clamp to tighten the fracture site. Repairing a lawn mower yourself is similar to repairing a trimmer.
- malfunction - the reducer on the pipe does not clamp. As practice shows, the gearbox does not fly off the pipe at all, but theoretically, it can fly off the pipe along with the rotating knife. The malfunction of a lawn mower is similar to a trimmer. The reason for the trimmer malfunction is wear of the gearbox seat on the pipe (the aluminum of the pipe under the gearbox is worn out). repair - wrap fabric tape around the pipe under the gearbox or replace the pipe.
- malfunction - the trimmer blade has stopped rotating completely (with a characteristic metallic sound) or stops rotating under high loads (with a hard gnawing sound). The cause of the malfunction is wear of the teeth on the bevel gear in the trimmer gearbox. repair - replace the pairs of bevel gears (a pair is replaced) in the gearbox - for more details, see below “How to disassemble the trimmer gearbox / lawn mower gearbox / brush cutter gearbox.”
Is it possible to make a coil for a trimmer with your own hands?
There are a large number of trimmer heads (not automatic) on sale, which are low priced and of good quality. But sometimes situations arise, for example, at the dacha, when the trimmer reel is broken and repair is impossible, the store is far away, and you need to mow. In this case, you can quickly, literally in a few minutes, make a simple trimmer attachment for securing a fishing line from ordinary plywood 10-12 mm thick.
- Take a piece of plywood or PCB and draw a circle on it with a diameter of about 14 cm.
- Cut out the disc using a jigsaw or hacksaw.
- Drill a hole in the center of the disk that matches the diameter of the gearbox shaft. Do not forget to put a washer on it before installing the disk on the shaft.
- You can screw small corners along the edges of the disk or make 1-2 holes on opposite sides. They will serve to thread fishing line into them.
- To secure the fishing line, you can screw several screws into the plywood.
This homemade mowing attachment is secured to the shaft with a nut. It is impossible to tighten or unscrew the nut without fixing the shaft. To replace the cord, it will be enough to loosen the screws, insert a piece of fishing line of the required length and press it again.
Also, the mowing attachment for attaching the fishing line to it can be made from a metal sheet. You can understand how to do this from the following video.
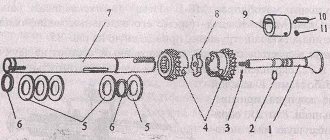
How to disassemble the trimmer gearbox
In order to disassemble the trimmer gearbox, it is necessary.
- Remove the gearbox from the pipe by loosening the two coupling bolts under the gearbox.
- Wash the gearbox with a brush, for example, in gasoline without oil and dry.
- Using round-nose pliers, bring the ends of the retaining ring together and remove it.
- Remove the second retaining ring in the same way.
- Then you need to strongly heat the housing of the trimmer gearbox, brush cutter gearbox or lawn mower gearbox with an industrial (technical) hairdryer at an outlet air temperature of 600°C.
- Then, with strong blows of a wooden block on the upper part of the gearbox housing, knock out the driven shaft with the bearing and gear (first you should try to knock out the bearings without heating). You only need to hit with a wooden block, since a metal hammer, for example, can break the body.
- In the same way, we remove the drive shaft with the bearing and gear (we strongly heat the place where the bearings sit and hit the housing coaxially with the shaft with a wooden block, knocking out the shaft with two bearings and the gear). How to disassemble a trimmer gearbox, a lawn mower gearbox and a brush cutter gearbox. To avoid heating, you can try using a shooter.
The trimmer gearbox is assembled in the reverse order of disassembly (assembly after purchase and replacement of failed spare parts). Assembling the gearbox is much easier than disassembling it - everything is assembled, literally, with your fingers. Sometimes you need to lightly tap something, install circlips and check whether the driven shaft rotates by hand.
If you decide to replace the trimmer gearbox with a non-original one, then in the new gearbox you should pay attention to the diameter of the pipe for which the gearbox is intended (usually 25.4 mm or 26 mm), the diameter of the drive shaft (usually 8 mm), the square size of the drive shaft (usually 5 mm or 9-tooth star) and mounting the protection on the gearbox, as well as on the nut (with a left-hand thread, usually M10x1.25).
How to remove the reel and replace the line
Owners of trimmers, mostly beginners, become confused, bordering on panic, when the need arises to change the cutting tool or line in the reel. Very often, when trying to unscrew the mowing head, users simply render it unusable, not suspecting that it is unscrewing in the opposite direction. To prevent this from happening, if you need to replace the tool, it is recommended that you read the step-by-step instructions below.
- Before threading the line into the spool, turn off the engine of the brush cutter or turn off the power to the electric trimmer to avoid injury that could occur if the cutting tool is accidentally started to rotate.
- Unscrew the attachment attached to the gearbox shaft. To do this, the shaft must be fixed by aligning the holes on the washer and on the axle, and inserting a metal rod or screwdriver into them.
- Unscrew the nozzle. You should know that the thread on the shaft is left-handed. Therefore, you should turn the trimmer coil to the right, that is, clockwise.
- Disassemble the mowing head. Most often, the head cover is secured with clips. To remove it, you will need to push these clips into the body, pressing the edges of the cover. If your trimmer is equipped with a semi-automatic mowing head that has a button on the bottom, then disassembling the attachment must be done carefully, since you can lose the spring, which sometimes flies out when the cover is removed.
- Cut the required amount of fishing line. Typically its length is 5 meters. Use cord of the same diameter as specified in the instructions for the tool. It is not recommended to exceed the maximum diameter of the fishing line, as this will result in increased load on the engine and higher gas consumption.
- Find the middle of the length of cord by folding it in half. You will end up with a loop.
- Special grooves are cut inside the coil (there may be holes). Insert a loop of fishing line into this groove.
- Wind the line onto the reel by turning it counterclockwise. The cord should be threaded as evenly as possible, the turns should lie without overlap and with good tension. When the winding is completed, leave the free ends of the fishing line about 20 cm long and fix them in the grooves located on the sides of the reel.
- Assemble the mowing head. Before finally assembling the nozzle, do not forget to insert the spring and washer (if available). Place the reel in the housing and thread the ends of the cord through the holes or eyes.
- Put on the cover and secure it with the latches.
- Screw the attachment back onto the gearbox shaft, also securing it with a screwdriver. You will need to twist the trimmer coil to the left (counterclockwise).
How to lubricate a trimmer gearbox / brush cutter gearbox / brush cutter gearbox
The trimmer gearbox should be lubricated at least once a year, but it is better to check the lubrication after every 20-25 hours of operation or when gear noise appears in the brush cutter gearbox. How to lubricate the gearbox of a lawn mower. To lubricate, you first need to clear the plug itself and the area around the plug from soil and grass residues so that they do not get inside the gearbox when filling it with lubricant. Then you need to unscrew the plug to lubricate the gearbox (for example, for an ECHO lawn trimmer it is a key set to “17”, for a Husqvarna it is a hexagonal key set to “5”, for a Chinese lawn mower it is a key set to “12”). It is better to use lubricant from the same manufacturer as your trimmer or simply from world-famous brands such as Oleo-Mac, STIHL, Husqvarna, Oregon, LiquiMoly, Litol-24, Azmol 158, etc., as long as it is not a fake ! The tube, if new, is unsealed by removing the cork with your fingers or using the back of the cap to break through the jumper in the nose of the tube. Then we place the trimmer on its left side, and rotating the knife with one hand (so that the gears spread the lubricant and the entire volume is filled), with the other hand we slowly squeeze the lubricant out of the tube through the hole into the gear housing until it is completely filled. Then we twist and clamp the plug of the trimmer gearbox and the plug of the tube with lubricant. If the lubricant is not in a tube (but, for example, in a jar), take a medical syringe without a needle, remove the piston, fill the syringe with lubricant (you can use your finger), and then fill the trimmer gearbox with lubricant from the syringe.
Features of different types of gearboxes
Manufacturers of electric and petrol mowers install various models of gearboxes on their equipment. They usually differ from each other in the shape and dimensions of the seat, which is made in the form of a circle (popular diameters are 24, 25.5 and 26 mm), square or asterisk.
Another difference between gearboxes of Russian, Chinese and European brands is the types of gears. They are conical, worm, spiroid, combined, wave, planetary, cylindrical . Typically, worm gearboxes are used on lawn mowers.
Petrol mower repair: overview of faults and effective methods for solving them. Photo instructions from the pros!
Modern technologies and equipment make it possible to produce the best and optimal technical solutions, which become effective assistants in arranging a summer cottage or personal plot. A green lawn and other plantings can grow quickly; to tidy up the local area and mow lawns, a gas mower is used, which is also called a brush cutter, trimmer, or gas mower.
Traditional scythes are inconvenient and unsafe to use; they require a significant investment of time and effort, which will help save money with gas-powered scythes that combine functionality and practicality in their design. In the photo of lawn mowers you can see various high-tech devices, which are characterized by a set of performance characteristics, including such parameters as increased productivity and long service life.
A convenient and reliable trimmer is a technical device consisting of individual mechanisms, parts and elements that can wear out, become unusable and be damaged during intensive use.
Even with regular technical inspection, maintenance procedures and careful storage, such devices and their individual parts require repair and even replacement; all repair procedures can be carried out independently.
Brief contents of the article:
Characteristics and features of lubricants for angle grinders
When servicing any hand tool with moving parts, a lubricant is used that has the following characteristics and features:
- It should not contain solid particles that could cause damage to the moving parts of the mechanism.
- The temperature at which the oil becomes liquid must be more than 120 degrees.
- The oil should not absorb moisture and should form a durable film that protects parts from corrosion.
- And most importantly, the oil must have such a viscosity that it can stay on the moving parts.
The consistency or viscosity of lubricants is divided according to the NLGI (National Lubricating Oil Institute), and in some cases it is necessary to use an oil of a certain density. The viscosity of the oil is selected depending on the speed of the transmission, the higher it is. The thinner the oil should be. Therefore, depending on the tool, the viscosity is selected:
- Drills, hammer drills, jigsaws where the gearbox has a low speed. NLGI-2 soft oil.
- Lightweight rotary hammers and drills. Class NLGI-1, consistency very soft.
- Angle grinders, circular saws, brush cutters. Class NLGI-0, semi-liquid consistency.
- Heavy hammer drills, jackhammers. Class NLGI-00 is liquid in consistency.
The structure of a lawn mower and common malfunctions
The easiest way is to have your lawn mower repaired by allocating a certain amount of money from the family budget; prompt and high-quality repairs with your own hands are no less simple and convenient if you want to understand the design of the lawn mower and fix all the problems.
Mass and piece production of trimmers is based on the use of generally accepted technology; a typical design diagram consists of certain elements and parts, it is important to know them when carrying out independent repair work:
- top part. The basis of the entire structure, where all the important elements are assembled, such as the starter, carburetor and lawnmower engine;
- middle part. A hollow rod, inside it there is a cable connecting the motor and the gearbox, which drives the cutting line. This part contains fastenings for distributing the weight of the entire structure and a belt for fixing the trimmer on the belt of the person using the trimmer for its intended purpose;
- Bottom part. It houses the gearbox and cutting elements, which are hidden under a practical cover that protects the user. The casing provides an increased level of safety, preventing large fractions of debris, stones and glass from entering a person while working with a lawn mower.
Rod and drive of the working element
Rice. The bar of a brush cutter The bar has two very important functions: the first - it forms a rigid frame of the entire structure, the second - a shaft passes inside the hollow metal bar, which connects the working element with the engine. By the appearance of the rod, you can determine the class of the tool; if the rod is curved, this is convenient for work, but in this case the drive is a flexible shaft, which cannot transmit large torque. If the rod is straight, there is a rigid metal rod inside, it is much more reliable and it can transmit more torque. Therefore, professional tools always have straight shafts.
Determining the causes of the malfunction
If the trimmer engine does not start or stalls immediately after starting, if the gearbox overheats or during operation of the device, extraneous noise is heard and vibration is clearly felt, it is important to carry out a visual inspection and identify the non-working unit.
To optimize preparatory measures before repair, you should carry out simple diagnostics and check step by step:
- presence of fuel in the tank and lubricant in the main components;
- the serviceability of the spark plug and its performance;
- cleanliness of the brush cutter's fuel and air filters;
- clogging of the exhaust channel and breather of the device;
- quality of the fuels and lubricants used.
To determine the functional performance of the ignition of a lawn mower, you should determine whether the spark plug works by testing the appearance of a spark when it comes into contact with the body of the functional device.
The spark plug itself can be replaced with a new one by first drying the spark plug channel; if necessary, the old element is also dried, cleaned with special devices and returned to its place.
How the mechanism works
Almost all tools are organized in the same way, both foreign (Husqvarna, Makita, Shtil, Partner 350) and Chinese chainsaws, as well as domestic ones (Druzhba, Ural). Therefore, finding the reason why the device does not start or stop is not very difficult.
There are four elements where problems may arise:
- The fuel for which the carburetor is responsible;
- Lubrication;
- The air that enters through the air filter;
- A spark, the quality of which depends on the ignition unit.
They all depend on each other and interact with each other. If any element is not working correctly, the saw stops working.
Let's start with the fact that all tools are configured differently. hot and cold. Two commonly used mechanisms are responsible for this process.
Don't forget to look at what the user manual says. It says that when you engage, you need to make sure the emergency stop brake is locked. But starting a saw with a brake is much more difficult, so sometimes it is better not to apply the brake.
As you can see from the manual, there is a fuel tank and engine inside the body, and outside. saw section (bar with chain), handle and starter.
First we need to figure out exactly how the tool is not running. For example, the saw starts, but immediately catches the eye or loses the power of work, the quality cuts.
Carburetor repair
When inspecting the carburetor, you should pay attention to the possible leakage of the fuel used; to identify carburetor problems, the following measures must be taken:
- purging the fuel hose to eliminate possible clogging of the element;
- checking and replacing the gasket located between the engine and carburetor;
- determination of tightness and maintaining constant pressure in the unit.
If necessary, you can disassemble and thoroughly clean the unit yourself, using gasoline; cleaning the nozzle and channels is carried out using compressed air.
Replacement process
Due to the different types of gears, shape and size of the seat, interchangeability of gearboxes is possible in rare cases. Therefore, when purchasing a new part, you should take into account the model of the old unit and the brand of the trimmer. In the event that you still need to use a non-original device, you must choose it taking into account the following nuances:
- rod diameter (usually 24.5 or 26 mm);
- seat shape and diameter (most often 8 mm);
- method of securing protection.
If the listed parameters are the same, the old gearbox can be replaced with a suitable non-original part. And to carry out the replacement, you need to remove the gearbox from the rod and disassemble it. To do this, you will need to loosen the tension bolts located under the structure and remove a pair of corkscrew rings using pliers, and then remove the bearings from the driven and drive shafts using a special puller. To reassemble the mechanism, you need to install the removed parts in reverse order.
First, you should disconnect the spool of fishing line from the gearbox. It screws onto the threaded part of the mechanism gear. It is tightened by hand, and subsequently clamped under the influence of the moment of inertia during operation of the scythe. This means that there is no need to use any tools to unscrew it.
Insert a flat-head screwdriver into the special technological hole and slowly turn the reel until its end fits into the recess of the slots.
With one hand, firmly hold the screwdriver in the selected position, and with the other, unscrew the part in the opposite direction of rotation. There are gearboxes that have a special through hole for disassembly; they are easier to change.
The gearbox is attached to the rod with two bolts. One fixes it in the center, and the second clamps it and does not allow movement during operation.
Loosen the clamp bolt two to three turns. Remove the lower gearbox; it will come off much easier if you constantly turn the body in different directions.
Using the same algorithm, insert the new one into place, aligning the holes in the body and the rod. Insert the appropriate bolt, then screw both hardware onto the gear housing until it stops.
Place the flange to drive the coil onto the shaft splines and tighten it. The flange not only rotates the cutting element, but also protects the gearbox from dirt.
Breakdown of the starter and gearbox
The gearbox transmits torque from the motor shaft to the cutting tool; during operation, its gears must be absolutely clean and always lubricated with a special lubricant.
Carrying out a technical inspection on your own once a season will eliminate the need to repair the gearbox or replace it, with the purchase of an expensive new unit.
A starter is necessary to bring the trimmer into working condition; its diagnosis consists of checking the tension of the cord engaged with the teeth of the starter coil, which are often destroyed during a sudden start.
A non-working starter in a lawn mower cannot be repaired; it must be replaced with a working unit as part of a mandatory technical inspection or a set of repair measures.
The cutting elements require special attention and care; they must always be cleaned of dirt and mown grass after use. Regular inspection and thorough preparation of the device for operation will help you avoid expensive and time-consuming repairs, and always be confident in the functionality of the lawn mower.
Properties of trimmer lubricant
In the production process of trimmer lubricant, special substances are used that meet environmental standards. After use, they are able to decompose in the environment without causing damage. Since the consistency of the composition has a level of increased viscosity, when heated, the lubricant decreases in density. This ensures reliable protection of elements at maximum temperatures.
Another interesting article: Main types of gearbox for walk-behind tractor
The productivity and durability of the trimmer is determined by the level of modern technical maintenance. Carrying out standard maintenance operations for the device includes actions that boil down to lubricating the gearbox and cleaning the air filter.
The filter cleaning process involves:
- removing the casing and removing the element;
- washing the casing with gasoline and drying;
- Cleaning the filter insertion site from dust and oil.
After performing the above steps, you must ensure that the rod does not rotate in the bushing. Next they move on to lubricating the gearbox, for which some gardeners use grease. This will require:
- Unscrew the plug.
- Pour lubricant into the container.
A special lubricant for the gearbox allows you to ensure long-term use of garden equipment. Well-known manufacturers of trimmers, including Champion, Stihl, Makita, Husqvarna, produce their own products for the care of garden equipment, which eliminates possible problems associated with finding and selecting suitable lubricants.
The lubricant must be changed in the gearbox every 50 hours of operation of the unit as a whole. To find out more accurate data for a specific model, you can look at its technical data sheet. Maintenance is necessary for the trimmer shaft, so it should be pre-cleaned and generously lubricated immediately after purchase.
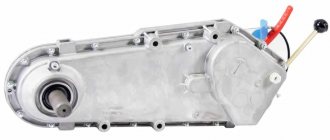
Disassembly and repair of the upper gearbox of a trimmer brushcutter
Published May 24, 2018
Disassembly and repair of the upper gearbox of a brush cutter (trimmer)
Online store of spare parts for garden equipment - https://benzozapchasti.com.ua Rental of garden equipment - https://tehprokat.com.ua
Watch our new videos on the new generation blockchain video service Viuly, an analogue of yuotube https://viuly.io/r/K5852255a74cd13b
If you have questions about repairing the upper gearbox of a brush cutter, ask, I will answer.
Where is the promised link under the video?