How much does it cost to plow a hundred square meters with a walk-behind tractor?
Prices for plowing land in the Moscow region
| Plowing services | Unit change | Price per hundred square meters |
| Plowing virgin soil with a walk-behind tractor | weave | 2500 rub. |
| Plowing virgin soil with a tractor | weave | 5500 rub. |
| Plowing the land to the ground (preparation for planting) – cultivated land | weave | 3500 rub. |
| Plowing the ground to the ground (preparation for planting) – virgin soil | weave | 400 rub. |
Types of plowing. Plow design
In plowing with full rotation of the formation
is intended for maximum destruction of plant cover by embedding it at the bottom of the furrow.
Full rotation of the seam is achieved when using working bodies with helical surfaces, provided that the width of the seam b≥2a
(
a
is the thickness of the seam). This type of plowing is recommended for cultivating virgin lands.
In the depths of the layer
used to create the largest surface area of arable land in order to ensure maximum exposure of the soil to light, heat, and air.
This type of processing is obtained by using screw working surfaces under the condition b<2a
. Formation uplift is used when processing cohesive turf soils. With this type of plowing, voids are formed that disrupt the water-air regime of the soil and the arable land turns out to be ridged and uncultivated turf appears at the joints of layers. To eliminate this drawback, a type of arable land called Uglosnim is used. He cuts off a small triangular soil layer from the field side of the formation and dumps it at the bottom of the furrow.
To cultural plowing
are produced in bodies with cultivated (cylindrical) working surfaces and skimmers during the main cultivation of light old arable soils, which do not form a layer when interacting with screw working surfaces - they crumble into structural aggregates. The skimmer cuts off a tetrahedral soil fragment in the form of a prism from the formation and dumps it to the bottom of the furrow. In this case, the main layer of soil crumbles much more strongly and, therefore, covers plant residues more completely.
The skimmer grip width is 2/3 b
(
b
– working width of the main plow body).
If its working width is increased to b
, then you get
two-tier plowing
, used when cultivating the soil to a greater depth (for example, for cotton, sugar beets, etc.).
When performing rhombic plowing, the soil is cut with two plowshares: from the side of the wall and the bottom of the furrow. The cross section of the formation resembles a rhombus. This type of plowing allows you to get an open wide furrow in which the right wheels of the tractor can roll freely.
Non- mouldboard plowing
- a type of deep loosening, which is performed by plow bodies without dumps. The main objective of no-moldboard plowing is to increase soil moisture permeability in areas of insufficient moisture located on slopes or at risk of wind erosion.
In a plow with a subsoiler
It is used on soddy-podzolic soil with a shallow podzol, which is only loosened with a subsoiler. During such plowing, soil-forming processes begin to take place in the podzolic layer, which in a few years will make it fertile.
On soddy-podzolic soils, plowing with plows with cut-out bodies is also used.
This plowing allows you to crumble the podzolic layer, partially mixing it with the cultivated layer and leaving furrows at the bottom. The soil-forming process that occurs in this case makes it possible to increase the thickness of the cultivated layer of arable land.
T three-tier processing
used on solonetzic soils to wrap and loosen the upper fertile layer, move the solonetzic layer down and replace it with the lower illuvial or carbonate layer.
of plows
. Share plows used for plowing are classified:
by type of traction - horse, tractor, rope traction;
by purpose - general purpose, special;
according to the method of connection with the tractor - mounted, semi-mounted, trailed;
by type of main working bodies (plow bodies) - single-, double-, triple- and multi-body;
according to the nature of the work - plows for smooth and tumble plowing.
of plows.
The most widespread are general purpose plows. The structural elements of the plow are divided into working and auxiliary elements. The main working parts of the plow include the body, skimmer and knife; auxiliary: frame, support wheel and its adjustment mechanism, as well as a hitch. All working and auxiliary parts of the plow are mounted on a frame, which consists of longitudinal bars, a stiffening beam and transverse struts.
Tractor mounted five-furrow plow:
1 – Skimmer; 2 – Housing; 3 – Square; 4 – Hitch for harrow; 5 – Main beam; 6 – Knife mounting bracket; 7 – Disc knife; 8 – Support wheel; 9 – Hitch; 10 – Longitudinal beam; 11 – Cross beam; 12 – Hinge bracket; 13 – Skimmer bracket.
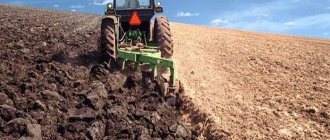
What does deep plowing affect?
For in-depth cultivation of land, several technologies are used: classical (moldboard), non-moldboard, combined. When moldboard tillage, a special moldboard plow is used. Deep digging is used to change the location of genetic soil horizons in the vertical direction.
Thanks to technology, different depths of soil cultivation are practiced. The minimum is considered to be wrapping a layer with a thickness of 20-40 cm. Deep includes wrapping an arable layer with a thickness of at least 40-70 cm. When digging up the soil, the thickness of the arable horizon is taken into account. During the processing process, the above-ground parts of plants are also trimmed and sealed, and mineral and organic fertilizers are added.
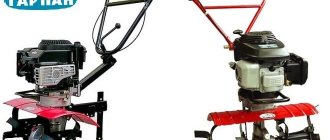
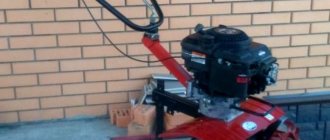
How to operate a motor cultivator correctly
Suppose, in order to avoid the hardest work on your garden plot or in your country house, you bought a motor cultivator. The question immediately arises of how to use it correctly. The first step is to carefully read the instructions that come with it. Some features of engines and other functional components can only be learned from the instructions. This article discusses only the general rules for working with any motor cultivator.
Motor cultivator
Initially, external conservation lubricant is removed from the unit and its devices. Use a rag soaked in gasoline to wipe metal-coated parts and then be sure to wipe them dry. Then the cultivators need to be “run in”.
As with any mechanisms, the moving parts in them must “get used to”, the engine must warm up, and “get used” to the load. Start with light tasks, low speeds, only two cutters, gradually increasing the load. 5-10 hours of a gentle regime may be quite enough.
Then you can resort to increasing the speed (motor speed) and adding the number of cutters.
Preparatory actions
Before starting work you must:
- Prepare the area. Clear it of stones and large branches that can seriously damage the cultivator. Also remove glass, as it can fly out from under the rotating elements; it can seriously injure you.
- Install the attachment required for the selected operation.
- Check the working condition of the cultivator (see below).
First of all, inspect the mounting of all moving parts and set the required handle height. Then use a special dipstick to check the engine oil level. The cultivator will work for a long time and smoothly if you use the fuel and oil recommended in the instructions and change the oil in a timely manner - every 25-50 hours of operation. Don't forget to clean the air filter.
After successful completion of the preparatory process, proceed to the next stage.
Motor cultivator
Handling the cultivator during operation
When operating the cultivator, be sure to keep your limbs away from moving parts of the cultivator. It is better to work in closed shoes: high boots, and even better – boots. Save flip-flops or flip-flops for other purposes, as they increase the risk of injury. It is advisable to wear glasses and gloves when plowing the soil.
After switching on, there is no need to push the cultivator; it is simply pointed in the desired direction. When the unit stops in the ground, rock it slightly from one side to the other, with your little help it will continue to move. To avoid trampling the newly tilled soil, turn the handle and walk next to the plowed strip.
When working with a cultivator on wet soil, large clods are obtained. It is then difficult to loosen the soil, and the soil sticks to the cutters. When the soil is very dry, the depth of cultivation is sharply reduced. In this case, the strip is first passed at a shallow depth, repeating its passage to the required depth. Therefore, it is best to work with moderately moist soil. The low speed of movement of the cultivator at high speeds of the cutter allows for more thorough cultivation of the soil.
When the ground is soft, an anchor attachment is best for loosening the soil. With a cultivator it is more convenient to move in rows or zigzags.
Plowed area with a cultivator
Some tips on how to properly handle the cultivator
- If there are a lot of small pebbles in the area, work at lower speeds.
- The walk-behind tractor will serve for a long time with regular maintenance. Changing the oil, cleaning the unit, sharpening the cutters is the key to the “health” of your cultivator. You can't skimp on oil. When pouring inappropriate oil during operation, a solid sediment is formed, which clogs the unit components. As a result, the cultivator may fail. And then the cost of repairing it will significantly exceed the savings that you managed to achieve on changing the oil. This also applies to gasoline.
- Important : Filling with fuel is only possible when the engine is stopped and cooled down. After refueling, check the fuel tank for leaks.
- All adjustments should also be carried out with the engine turned off.
- If you feel vibration during operation, this is a signal that a problem has begun. It is worth stopping the engine, finding the cause (most likely the parts are loose) and eliminating it.
- Row spacing in the garden is not always ideal. In order not to damage the plants, you can reduce the cultivation strip by removing the external cutters.
- Powerful motor cultivators can move not only forward, but also backward. If it is necessary to change the direction of movement, pause until the cutters stop.
- The cultivator should move smoothly and evenly. If it buries itself in the ground, then it is necessary to adjust the position of the wheels or swap the cutters.
- After using the unit, wipe all metal parts with a cloth. If necessary, rinse the cutters and then wipe them dry. Safety precautions when working with a cultivator
To avoid accidents:
- Do not trust children to operate the cultivator.
- Do not allow people to work who are not familiar with the rules for handling it.
- Make sure that there are no other people or animals near the operating unit.
- Maintain a safe distance from rotating elements.
- Use special strong clothing, shoes and gloves. Laces, ribbons, clothing hems - nothing should dangle when moving.
Plowed area with a cultivator
Optional equipment
Engine Honda GX270
The Salyut has a specific design feature - its engine is shifted forward, which perfectly balances the plow mounted at the rear. Compared to the Neva and Oka, the center of gravity of the Salyut walk-behind tractor is shifted much closer to the surface of the earth, which makes it easier to control the walk-behind tractor, as a result, there is no need for additional balancing, and the load on the hands when moving is greatly reduced.
Lugs
According to reviews from owners and repairmen of walk-behind tractors, it is most comfortable and efficient to work with Japanese engines. Pay attention to the video footage - the walk-behind tractor confidently walks along the furrow, without much effort from its owner. In the video you can see that when the operator releases the steering wheel, the walk-behind tractor with the plow continues to walk exactly along the track and plow at the same pace.
Depending on various tasks, axle extensions and metal wheels with weights are used. The wheels are installed with lugs that have a large supporting area so as not to fall through on loose soil.
Also, the lugs for the walk-behind tractor allow you to adjust the desired distance between the rows.
Weighting weights
The universal hitch mode ensures a stable position of the machine during operation and makes it easier to adjust the plow angles in three planes. There is a variant of wheels with weighting, then the plow goes even deeper into the ground.
Video review of deep plowing with the Salyut-100 walk-behind tractor
Hitches
Plows and hillers are connected to the Salyut walk-behind tractor through the S-13 beam and the S-20 bracket using a universal hitch. It is better to make adjustments through the hitch.
Important! The obligatory coincidence of the longitudinal axis of the regulator and the walk-behind tractor, plus the vertical position of the beam, will help to configure the equipment in the best way.
Universal hitch
To optimally set up a plow without a hitch, it is first advisable to align the minimum parameters for plowing depth and width.
Adjusting the plow without a hitch:
- Align the minimum parameters for plowing depth and width;
- The support triangle must be in a horizontal position;
- Adjust the field board parallel to the movement.
In the future, the plowing depth, depending on the soil, can be adjusted correctly using special holes on the plow stand or by changing the angle of inclination of the body.
Advantages and disadvantages
Any method of cultivating the land has both negative and positive qualities. Advantages of deep plowing of the soil:
- An effective way to kill perennial weeds. Due to the fact that weed seeds fall into the lower layers of the soil, their germination is difficult;
- weeds germinate much later than in the case of surface loosening;
- the soil is protected from infectious pathogens that accumulate in plant residues. Since during deep digging, infectious microorganisms move deep into the ground, infection of plant crops is excluded;
- thanks to the autumn dump digging, most of the colony of wireworms and other pests freezes out during the winter months;
- soil moisture increases;
- organic and mineral additives are evenly distributed in the soil;
- compactions in the soil that contribute to stagnation of water are destroyed.
The disadvantage of the method is the need to use equipment equipped with special devices (multi-leaf springs, disc blades, moldboard plow). You also need to keep in mind the significant costs of fuel and lubricants. With frequent use, the risk of soil erosion increases.
Surface tillage techniques
After plowing alone, the soil will not be well prepared for planting crops. A classic system of good tillage is required. Surface tillage is carried out before plowing by peeling, and then after plowing. The tillage depth is 12-14 cm. The soil tillage methods are as follows:
- disking;
- cultivation;
- shake;
- plowing;
- roll;
- scarification.
All these actions are performed to ensure the loose condition of the soil. When they are carried out, the top layer of soil is leveled and compacted, and weeding is carried out. These methods aim to ensure efficient sowing, planting and harvesting. Each method is selected depending on the climate, soil conditions, crops grown, soil conditions and weed infestation of the field.
Disking
When disking, perennial weeds are distributed as organic fertilizer, and moisture in the soil is retained.
Areas of use:
- Areas overgrown with perennial grasses. Disking is carried out before plowing fields, swamps, and dry peat bogs.
- Sowing alfalfa and perennial forage crops.
- Preparing the soil for sowing.
- Weed control - Cladium grass, wild oats, oats. In the spring, scatter overgrown turf grass to a depth of 5-7 cm. Overgrown cockerel grass is mowed to a depth of 10-12 cm.
https://www.youtube.com/watch?enablejsapi=1&autoplay=0&cc_load_policy=0&iv_load_policy=1&loop=0&modestbranding=0&rel=1&showinfo=1&fs=1&playsinline=0&autohide=2&theme=dark&color=red&controls=2&» class=»__youtube_prefs__» title=» YouTube player» allowfullscreen data-no-lazy=»1″ data-skipgform_ajax_framebjll=»»>.
This video demonstrates the operation of a 7x3 PC platter combine.
Cultivation
The traditional method of mechanical tillage involves plowless tillage of the soil layer. With this method, the wet bottom layer is not carried to the surface and does not erode.
Tillage is carried out using two methods: inter-row and continuous. This cultivation method is aimed at: loosening, crumbling, and easy mixing of the upper layers.
Field cultivation is carried out using T-150K and MTZ-1221 tractors with mounted and trailed implements:
- KPN 3.0 mounted / trailed cultivator; KPN 4.0; KPN 6.0; KPN 8.0;
- 1.5 m. Bomet continuous cultivator
- KPH 2.8m; KPH 3.8m; KPH 8.4m; KPH 12m – mounted / trailed cultivator
- 3.6; 3.8; 4.2; 6.
- etc.
Harrowing
The agrotechnical method of harrowing is most often used in fields where grain crops will be sown and cultivated: spring and winter wheat, barley, oats, rye. It works well in fields where potatoes are grown.
It is performed by class 3 tractors at speeds up to 15 km/h. Trailed equipment includes the following harrows: BZSS-1.0; BZTS-1.0; BZTU-1.0.
Harrowing solves the following problems:
- Destruction of weeds at the white thread stage;
- The struggle for maximum moisture retention in the soil;
- destroying the crust on the top of the soil;
- Increases field productivity.