You can adjust the YaMZ 236 valve yourself using the existing circuit. The procedure must be carried out regularly, since thermal gaps require constant adjustment. If the distance between the components does not meet the established standards, the distribution of gas inside the mechanism is disrupted. This is accompanied by accelerated wear of parts and increased load on valve seals. Increased gaps lead to engine overheating and a decrease in the tightness of the combustion chamber, which accelerates the erasure of the working chamfers of the elements. If you follow the instructions, you need to adjust the valves every 500 hours.
Checking and adjusting the injection advance angle
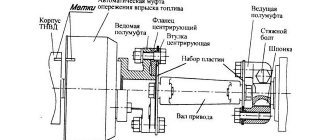
To check and adjust the injection advance angle, it is necessary to align the marks on the crankshaft pulley and the timing gear cover or on the flywheel with the pointer corresponding to the injection advance setting angle by rotating the crankshaft clockwise. The mark on the crankshaft pulley should be opposite the mark corresponding to the installation angle of 20° (Fig. 20).
At the moment of aligning the marks, the mark on the end of the injection advance clutch must align with the alignment indicator mark. If the marks are not aligned, then to adjust, you should unscrew the two nuts securing the coupling half of the fuel pump drive or the bolt securing the coupling half on the axle and by turning the fuel injection advance clutch, align the indicated marks using the oval holes on the flange of the coupling half.
Then, without disturbing the aligned position of the marks, tighten the bolts or nuts of the coupling half flange and check the setting of the injection advance angle by turning the crankshaft one revolution.
If the fuel pump does not have an indicator for the setting injection advance angle, then the injection advance angle should be set using a momentoscope (Fig. 21).
Install the momentoscope on the fitting of the first section of the high-pressure fuel pump and pump fuel into the engine power supply system, to do this, unscrew the handle of the manual booster pump and, moving it up and down, pump the system for 2-3 minutes; After pumping, screw the handle all the way.
Rotate the engine crankshaft clockwise until fuel appears in the glass tube. Pour excess fuel out of the glass tube by shaking it with your finger.
Then turn the crankshaft counterclockwise about 1/8 of a turn. Slowly turn it clockwise until the fuel begins to move in the momentoscope tube.
Check the relative position of the marks on the crankshaft pulley and the timing gear cover or on the flywheel and flywheel housing. If at the moment the fuel begins to move in the pipe, the marks do not align, turn the crankshaft 1/4-1/3 of a turn in the direction of rotation, and unscrew one bolt securing the coupling half (Fig. 22).
Then turn the crankshaft against the direction of rotation by 1/2 turn, slowly turn the crankshaft along the direction of rotation, determine the beginning of fuel movement in the momentoscope.
Unscrew the second bolt securing the coupling half and, holding the injection advance clutch from turning, set the crankshaft to the position corresponding to the injection advance angle.
Then, rotating the crankshaft, align the marks on the crankshaft pulley and the distribution cover and tighten one bolt. Rotate the crankshaft one turn and tighten the second bolt.
Check the injection advance angle setting.
Cold running-in of the engine
Before starting the stand, the crankshaft must be turned manually several times to ensure that the engine is in good condition and that it is installed correctly on the stand, and to check and, if necessary, adjust the thermal clearances in the valve mechanism.
During the break-in process, the oil pressure in the system, the oil supply to the rocker arm bearings and the tightness of the injector seals in the cylinder heads are checked.
A stethoscope can be used to listen for noises and knocks of timing gears, connecting rod and main bearings, piston pins and pistons.
If defects are detected, running-in should be stopped and continued after elimination.
The cold running mode is shown in the table.
At the end of the cold break-in, it is recommended to change the oil in the engine sump and wash the oil filters.
To wash the centrifugal filter rotor, unscrew nut 3 (see Fig. 6) of the filter cap, remove cap 1 and the rotor assembly.
The rotor is disassembled, sediment is removed from the cap 10 and rotor 11, and washed with diesel fuel.
The filter is assembled in the reverse order, checking the condition of the gasket 15, the cleanliness of the nozzle holes 22, the condition of the washer 2 and the position of the mesh 8.
To wash the filter for rough cleaning of the oil, you need to drain the oil from the Filter Housing through the hole closed with plug 2 (see Fig. 7), unscrew the bolt 11 securing the Filter cap, remove the cap 7, the top cover 8 and the filter element 5.
The filter element removed from the engine is placed in a bath with a solvent (gasoline or carbon tetrachloride) for 3 hours.
After 3 hours, the element is washed with a soft hair brush, rinsed in pure gasoline or carbon tetrachloride and blown with compressed air.
During washing, technological replaceable filter elements are installed.
| Engine cold running mode | ||
| Crankshaft rotation speed, min-1 | Duration of engine running-in, min | |
| YaMZ-236, YaMZ-238, YaMZ-2Z8A, YaMZ-238G, YaMZ-238K | YaMZ-238I | |
| 600 | 10 | 10 |
| 800 | 10 | 15 |
| 1000 | 5 | 15 |
| 1500 | 5 | — |
| Total | 40 | 40 |
Ignition installation
Ignition installation is the process of adjusting and controlling fuel injection. You can set the ignition of YaMZ 236 m2 yourself or with the help of service station specialists.
The adjustment must be made as follows:
- find the mark on the coupling near the fuel pump and fix the part with this mark facing up;
- turn the engine to get a value of 20 degrees on the scale;
- loosen the bolted connection fixed on the coupling, turn it to the late ignition position;
- unscrew the tube supplying fuel to cylinder No.1;
- wipe parts and remove dirt;
- Rotate the clutch slowly until fuel is visible in the recess located on the primary cylinder;
- tighten the bolts on the coupling.
Ignition adjustment
To carry out adjustments, there are two special hatches in the flywheel housing design.
The angle values are indicated on the body of the part. In this case, the bottom column expresses the values in numbers, and the side column – in letters. The crankshaft rotates only in a clockwise direction. The view is directed from the side of the fan. Rotation can be done using a wrench hooked onto a bolted connection. The crankcase cover must be removed.
During the process of aligning the marks, the letter “A” printed on the end of the coupling must align with the mark “B” on the lower indicator. If the connection does not occur, then it is necessary to fine-tune the parts.
Gaps
Thermal gaps on all valves are 0.25-0.30 mm. After alignment, the crankshaft should be cranked. Now their size can change to 0.20-0.35 mm. The error lies within the tolerance range. It is not recommended to exceed the values for the following reasons: 1. With increased clearances, the valve lift height decreases. This significantly worsens the degree of filling of the cylinders with the combustible mixture. 2. The small size of the gaps does not provide a sufficient fit to the saddle.
The gaps are set only 1 hour after stopping the engine. Over time, it can reach a value of 0.4 mm. You will need to make another adjustment immediately.
Setting the advance angle
The required advance value is located next to the special mark. The YaMZ 236 fuel injection advance clutch is where this risk is applied. The normal value is 20 or 18 points. The angle of the fuel mass itself is determined by the primary cylinder.
Control is carried out using a conventional pump. So, they work on the power supply system of a car engine, without fail, first opening the valves through which air escapes from the engine. After the air masses have come out without any residue, the plugs are wrapped. Next, you should connect the momentoscope device to the fittings of the special section from the fuel pump. Before carrying out the procedure, it is necessary to remove the injection pump of the Yamz 236 cylinder.
The advance is adjusted as follows:
- the bracket from the working power apparatus is transferred to the working state;
- drain all the fuel from the glass container until the volume of liquid reaches the mark in the middle part of the tube;
- carefully turn the crankshaft.
All movements must be made strictly in the direction of torsion. The current position of the meniscus in the tube must be constantly observed and monitored. Its sharp rise signals the start of fuel start-up by a certain section. The line marked on the pulley should be opposite the line with the number marks. The procedure for setting the angle requires special accuracy up to 1 value.
The operating order of YaMZ 236 cylinders without a turbine
The motor operates in the sequence: 1-4-2-5-3-6. This is significantly different from the internal combustion engine circuit. The work of adjusting the valves begins with the first cylinder. Its compression stroke is set.
The procedure ends with the 6th cylinder. The adjustment is based on equal clearances for the intake and exhaust elements. To get to them, the valve cover is removed.
Expert advice
It is best to make a torque scope yourself so that the device fits perfectly to the engine. You can create a device from several tubes. During operation, it is necessary to monitor the tightness of the tubes and prevent leaks.
Another important point is the process of pumping diesel fuel until the tube appears in sight. Inflating is done by rotating the shaft. A rise in the fuel mass will be noticeable when the shaft is rotated before directly approaching the elements of the first piston. It is important to rotate the shaft smoothly and very slowly.
With slippery fastenings of the YaMZ 236 m2 fuel injection pump, it is important to rotate it so that the injection of the fuel mass corresponds to the injection designation on the flywheel.
History of creation [edit | edit code]
At the end of the 1950s, the Yaroslavl Motor Plant was ordered to develop a more economical four-stroke diesel engine to replace the outdated two-stroke YaAZ-204 and YaAZ-206, as well as as part of the dieselization of transport. As a result, Yaroslavl engines became standard for the MAZ-500, KrAZ-255B, KrAZ-250, KrAZ-257, KrAZ-260, KrAZ-6322, and were also installed on K-700 tractors, armored personnel carriers, construction equipment, power plants, water transport etc. At the beginning of the 1960s, the engine was very modern and had high specific performance.
How can adjustments be made?
Follow the following sequence of actions:
- find the required mark, which is located on the coupling near the fuel pump, fix the part with the mark up;
- turn the engine so that the scale reads 20 degrees;
- loosen the bolt connection that was previously fixed on the clutch, then turn it so that the position corresponds to the late ignition position;
- turn the tube that supplies fuel to cylinder number 1 to the side;
- make sure that all parts are clean, free of dirt;
- begin to rotate the clutch so that traces of fuel become visible in the recess located on the primary cylinder;
- After this, you can tighten the bolts on the coupling.
How to adjust the ignition?
In order to adjust the ignition yourself, there are two special hatches in the flywheel housing. On the body of the part itself you will find two numbers - this is how the angle values are indicated.
Please note: the bottom column consists of numbers, and the side column consists of letters.
The crankshaft should be rotated in a clockwise direction, that is, the view should be directed from the side of the fan. Hook the wrench onto the bolted connection, and then begin to rotate. As a result, the crankcase hatch cover will be removed.
When you rotate the key, pay attention that the letters “A” on the end of the coupling and “B”, which is located on the lower indicator, should align. If such alignment does not occur, try to make more precise adjustments to the parts.
How to set the lead angle?
A special mark that determines the amount of advance is located next to the clutch. The normal value to achieve is 20 or 18 points. To determine the fuel mass angle, use the primary cylinder data.
To control the situation, use a regular pump. With its help, you can work on the power supply system of a car engine, but to do this you need to first open the valves that allow air to pass through. First, you should completely release the air and only then tighten the plugs. The next step is to connect the momentoscope device to the fittings, which are located in a special section from the fuel pump. In order for the procedure to be carried out without any problems, it is necessary to dismantle the cylinder injection pump.
How does advance control occur? The sequence of actions is as follows:
- transfer the bracket, which is located inside the structure of the working power apparatus, to the operating state;
- empty the glass container of fuel to the level when the liquid reaches the mark in the middle part of the tube;
- After this, you can carefully and slowly turn the crankshaft.
Remember that all actions are performed exclusively in the direction of torsion. In this case, it is necessary to monitor the condition of the meniscus in the tube.
If the latter begins to rise sharply, then a certain section is ready to release fuel. To check, note that the line on the pulley must be opposite the line on which the number marks are placed. Setting the angle is a fairly precise operation that requires attention and constant monitoring.