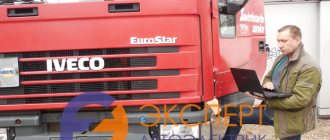
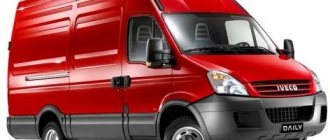
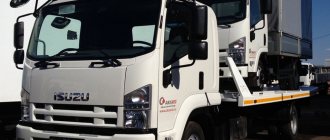
Iveco Eurotech is a family of trucks that is one of the first for the Italian brand Iveco. It combines safety, high performance, comfortable conditions and great power. This series was developed on the principle of modular designs and turned out to be quite successful. Iveco has created over 900 different modifications of vehicles based on Iveco Eurotech, covering various industrial sectors. Production of the truck started in 1992. All versions of Iveco Eurotech now have a comfortable cabin designed for working over long distances.
Video
In the Iveco production program, this series stands apart. The cars became the first models with diesel units of the latest generation (Cursor in the brand’s line-up. Production of advanced Iveco Eurotech started back in 1992. The improved power plants differed from their predecessors in many ways. Among the innovations were a variable geometry turbocharger from the English company Holset, a special a head with four valves per cylinder, a different shaft drive design, aluminum pistons and electronically controlled unit injectors.
Thanks to the improvements, the weight of the engine was significantly reduced, and the number of components was reduced by 15%. Iveco Eurotech, in comparison with the older Iveco 8640, has become 6% more economical and 8% more powerful. In the fall of 1999, the engine line underwent minor changes.
One of the features of the car was the ability to restore keys. The unique shape made it possible to make an additional set in the shortest possible time.
Iveco Eurotech is far from the last model in the line of the Italian manufacturer. Nevertheless, this car remains very popular today. Its inherent qualities (safety, efficiency and high performance) are especially valued by Russian consumers. Compared to new Iveco models, the cost of the truck is more affordable. For the domestic market, this indicator is usually decisive.
Specifications
With a fairly large weight (8000 kg), the Iveco Eurotech is a very maneuverable vehicle. The truck is not afraid of either urban conditions with many cars or narrow roads, since it is compact in size:
- length – 7740 mm;
- width – 2480 mm;
- height – 2800 mm.
The model has rear-wheel drive, so it cannot boast of good cross-country ability. Nevertheless, Iveco Eurotech feels confident outside the city. With a curb weight of 20,000 kg, the car is capable of reaching a speed of 90 km/h.
Antifreeze leak from the engine
I started working on the car and in the process, I began to notice that the antifreeze in the engine was still gradually decreasing. After listening to the expansion tank several more times, I caught the sounds of rare gurgling. From that moment on, I constantly checked the antifreeze level and found that during a week of work, approximately 3 liters decreased.
I was unable to detect external leaks or drips of antifreeze on the engine, and I began to think about what reasons could lead to the disappearance of antifreeze in the engine.
In the end, I came to the conclusion that the leak could be through the compressor, through a bad head gasket, or through a bent (overheated) head. I didn’t even consider the option of draining the antifreeze through the sleeve, because... The Magirus 8210 engine has dry liners. There was nowhere to go and I began to prepare for repairs.
The engine had 2 cylinder heads, each of which covered 3 cylinders. I found out that the front and rear heads are interchangeable and began searching for one to replace.
Previous repair experience suggested that the earlier the search for spare parts begins, the cheaper they ultimately cost. It happened this time too, because little by little I managed to pick up a head for a very reasonable price of 10 thousand rubles.
Device
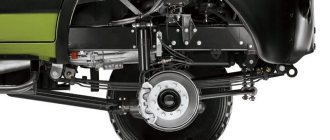
The Iveco Eurotech suspension is available in several modifications, depending on your needs. The car is equipped with pneumatic or mechanical suspension with parabolic and semi-elliptical springs. The first option ensures the safety of goods for which careful handling is important. Iveco Eurotech has disc brakes with pneumatic drive.
The appearance of the car makes a very pleasant impression. A large cabin with massive mirrors, a fuel tank made of stainless steel and occupying almost the entire length of the wheelbase, and beautiful fairings will interest any client. In this case, the tank is located on the right side, like in Russian cars. Closer inspection reveals other interesting features.
Changing gears in the car is very free. Iveco Eurotech is equipped with improved ZF gearboxes, complemented by a pneumatic Servoshift shift mechanism. The transmission travel distance has been significantly reduced. The driver does not need much effort to shift the lever. However, due to improvements, the transmission becomes very sensitive, so it is necessary to monitor hand movements.
At the same time, modifications with less powerful engines are equipped with a 9-speed gearbox. For the rest, 12- and 16-speed gearboxes are available. Optionally, a 6-speed Allison automatic transmission and a 12-speed electronically controlled EuroTronic gearbox, which is a joint product of ZF and Iveco, are offered.
cabin of a car produced in the 90s
You will also be pleased with the insides of the Iveco Eurotech cabin, which fully meets European standards. The seats in the cabin are equipped with air suspension, and the steering wheel has many adjustments. The main instruments are readable quite well, and the steering column switch levers resemble those found in the Volga, so they will be familiar to Russian drivers. Rearview mirrors allow you to fully capture the size of the truck, and glazing provides excellent visibility. The car listens to the steering wheel at high speed, and the level of noise insulation is such that it allows you to talk in the cabin while driving. True, in areas with uneven surfaces the cabin is filled with vibration and roar.
The highlight of Iveco Eurotech is the turbocharging system, which has variable geometry. The car starts rather sluggishly, but soon picks up speed and after 800 rpm the electronics begin to limit the fuel supply. However, the speed is growing very quickly.
The anti-lock braking system of Iveco Eurotech works perfectly. A loaded truck obediently stops even in slippery areas and follows the specified trajectory.
Overall, the Iveco Eurotech tractor is a very reliable vehicle, ready to withstand heavy loads, remaining stable despite the kilometers traveled.
Inspection and testing of block heads
A visual inspection of the cylinder-piston group did not bring any surprises.
The pistons in the liners did not hang out, there were no scuffs and there was practically no wear from the piston rings in the upper part of the liners. Next, I thoroughly cleaned the head gasket and the block itself from carbon deposits and residues. I measured the protrusion of the liners above the cylinder block and paid special attention to the location of the breakdown of the head gasket at the 5th cylinder. To do this, I placed a caliper on the sleeves, and tried to insert a 0.03 mm thick probe under it, and the probe passed everywhere easily. I was unable to detect a sleeve protrusion of less than 0.03 mm (according to the feeler gauge).
To check the flatness of the heads, I took a meter ruler and, pressing its edge against the head, tried to see the gap between it and the plane of the block head. The first removed head caused concern, but I did not see any obvious curvature of its plane.
Here a friend helped me out and suggested that it was best to check the curvature of the head with a simple window glass. It is enough to turn the head over and place the glass on the plane of its contact with the cylinder block.
Next, you need to tap the glass with your finger at the place where the cylinders are jumpered and then on a flat head you can hear a dull knock, and on a curved head a sound similar to a drum.
Checking the flatness of the head using glass
The test result showed that the first removed head needed to be milled. Therefore, I decided to replace it with a purchased head, having first checked the plane on it for curvature.
I also checked the valves and seats in the heads, after which I poured some kerosene into the valves. In general, I examined everything and was satisfied with the inspection.
Homemade key and removing the 2nd head
Having identified the cause of my misfortunes, I decided to find out in advance from my friends how they stretch the block heads.
It turned out that the majority of repairmen tighten the heads by force by eye. Moreover, many told me that there is nothing wrong with this and by the tightening force, I myself will be able to determine the right moment, and therefore I will not be able to tighten it. To be honest, such a consultation did not give me any confidence in the successful completion of the repair.
Colleagues also advised to remove the 2nd head of the block, because... if the gasket on one head is broken, then most likely the engine was overheated, which means you need to at least visually inspect the cylinder liners for scoring and the condition of the piston group. There was a certain logic in their words, and therefore I followed their advice.
I bought two 22 mm sockets for a 20 mm (¾ inch) square, but I didn’t take the knobs for them, because... they seemed weak to me.
To turn the heads, I made a homemade transition from a large bolt with a 36 mm head and grinded the bolt head to 32 mm with a grinder, trying on a wheel wrench on the bolt (withstands a tightening force of the wheel nuts of 80 kgm). The bottom of the bolt was ground to a 20mm square head.
Homemade transition from a wheel wrench to a 20 mm square
With this tool, I easily unscrewed the 2nd head, using as a wrench the rear stabilizer from Sobol with an inch pipe put on it. It became easy to flip the wrench 90 degrees due to the square in the head and 60 degrees along the edges of the wheelbrace.
With such a tool, there is even more space above the engine. In general, the removal of the 2nd cylinder head, although it gave me the opportunity to sweat, did not disfigure the bolts.
Broaching Magirus 8210 block heads
I bought head gaskets at a price of 3,800 rubles. a piece. Now, it's time to install the heads on the block and check the bolts that secure them. I laid out the bolts, but did not find any of them stretched in height. However, I still had to buy 2 used bolts.
It's time to install a new gasket and start installing the heads.
I looked at the instructions for this operation and noted that before tightening the bolts should be dipped in oil and allowed to drain, and the heads should be tightened at a positive temperature of the heads and block. The cylinder head bolts are tightened in 4 stages:
- 15 kgm;
- 15 kgm;
- Rotate 120 degrees;
- Turn another 120 degrees.
Having dealt with the theoretical part, I begged the railway workers for a 90 kgm torque wrench. The key had cyclopean dimensions and a movable arrow, as well as a non-standard 22 mm square.
Torque wrench
I bought an adapter for it from 25 mm to 20 mm and, in order to prevent the key from turning in a 22 mm square, I made an insert from a 25 mm angle.
With such an insert, the square of the 22 mm torque wrench fits tightly into the niche of the 25 mm adapter.
Adapter for torque wrench
Before tightening the bolts, I poured antifreeze into the engine block to the level of the heads and turned on the heater, and after 2 hours the block warmed up to above-zero temperature.
The moment came to tighten the bolts and for this I invited an assistant. I dipped the bolts in oil and let it drain, and then proceeded to arrange them in the block head and pull them through.
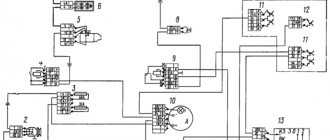
Diagram for pulling bolts of the Magirus 8210 engine block head
First, I tightened the bolts by hand, and then began to tighten them with a torque wrench according to the diagram. I must say that working with the key I had was very inconvenient, because... it was as heavy as a plow and pulling exactly 15 kgm on it turned out to be not an easy task (in practice it turned out to be 15-20 kgm).
I stretched the two heads with smoke breaks twice and it remains to turn the bolts 120 degrees another two times. The work is, of course, cumbersome, but in the process it suddenly dawned on me that I needed to do this all with a meat grinder. Of course, you'll have to twist it, but it's easier than running along the car with a two-meter crank.
The meat grinder has a planetary mechanism that is amplified 60 times and therefore produces 60 revolutions of the handle per 1 revolution of the head. Thus, at 120 degrees of tightening the bolt, you need to make about 20 turns of the meat grinder handle.
I found an old stabilizer from the classics and ground it so that it would fit into the hole in the leg of the meat grinder, and then extended it using a pipe. Next, I drew 3 vertical lines with a felt-tip pen on the head through 2 edges. After that, I started tightening the bolts by 120 degrees.
Tightening the head bolts using a meat grinder
The assistant rested the pipe against the portal of the rear support of the cabin, and according to the diagram, I placed the meat grinder on the bolt, found the vertical line of the felt-tip pen on the head and turned the meat grinder handle from 15 to 20 turns, drawing the next line on the head to the place of the previous line on the head of the block. Thus, I easily pulled out the 2 heads of the block in order.
It was necessary to carry out one final operation to turn the bolts by 120 degrees, but then I remembered that I had initially pulled the bolts with a torque wrench with a force of 15-20 kgm. It turned out that with the “bad” force of the meat grinder, you could simply break the pre-tightened bolts.
Therefore, I had to abandon the use of a meat grinder at the 4th stage, and pull the bolts manually with an assistant and hope that with my hands I could feel the limit and avoid breaking the bolt. During tightening, an assistant controlled the tightening order and the angle of rotation of the head. This is how I pulled the block head bolts.
After the final tightening, I tried to check the tightening force with a torque wrench and it turned out that the force for breaking the bolt was in the region of 70 kgm.